
Search results for "Overtime" in Home Design Ideas

 Rocky Mountain Homes/Rocky Mountain Log Homes
 A sizable eat-in kitchen and butler's pantry give the resident chef plenty of room to work .
Example of a mid-sized mountain style l-shaped light wood floor kitchen pantry design with light wood cabinets, granite countertops, stainless steel appliances and an island
Example of a mid-sized mountain style l-shaped light wood floor kitchen pantry design with light wood cabinets, granite countertops, stainless steel appliances and an island

 Lindsey Markel
This Mid Century Modern home was designed and lived in by the architect in 1966. Since then there was one other owner but not much was updated to the home. When the current homeowners moved in they found many plumbing and electrical issues that accumulated overtime. They decided it was time for the kitchen, which had a hole in the floor from water damage, to be fixed and updated. They wanted a more open concept in the tight, galley, 60's style kitchen. To do so we needed to move the powder room to another location. New cabinets, flooring, counters, and backsplash were selected for the remodel. And after a lot of construction work was done to update the plumbing, electrical, and mechanical their dreams came true. The homeowners taste and style fits perfectly with the architects intentions for the design of the home.
Cabinet Bases: Dura Supreme Bria series, Urbana Vertical door, Textured Foil, Truffle
Granite: Black Uba Tuba
Floor Tile: Flaviker Urban Concrete Smoke 12x24
Backsplash Tile: Clayhaus 3x3 Futura collection Bubble White
Sink: Mirabelle White
Faucet: Mirabelle Vilamonte Stainless
Hardware: Top Knobs, TK503BSN, Brushed Satin Nickel
Photos By: Kate Benjamin Photography LLC
 Lindsey Markel
This Mid Century Modern home was designed and lived in by the architect in 1966. Since then there was one other owner but not much was updated to the home. When the current homeowners moved in they found many plumbing and electrical issues that accumulated overtime. They decided it was time for the kitchen, which had a hole in the floor from water damage, to be fixed and updated. They wanted a more open concept in the tight, galley, 60's style kitchen. To do so we needed to move the powder room to another location. New cabinets, flooring, counters, and backsplash were selected for the remodel. And after a lot of construction work was done to update the plumbing, electrical, and mechanical their dreams came true. The homeowners taste and style fits perfectly with the architects intentions for the design of the home.
Cabinet Walls and Talls: Dura Supreme Bria series, Alpine door, High Pressure Laminate, Frosty White
Granite: Black Uba Tuba
Photos By: Kate Benjamin Photography LLC
Find the right local pro for your project

 Kitchen & Bath Design + Construction
Heated flooring was installed in both this master bath and the hall bath in this major renovation. Note the built in shelving and tilt-down hamper insert. Photos courtesy of KBDC

 Morrison Interiors
Photo by Rod Foster
Kitchen - traditional u-shaped kitchen idea in Orange County with an undermount sink, shaker cabinets, white cabinets, white backsplash and stainless steel appliances
Kitchen - traditional u-shaped kitchen idea in Orange County with an undermount sink, shaker cabinets, white cabinets, white backsplash and stainless steel appliances

 Dianne Davant and Associates
Master Bedroom with Red Bed Frame and custom drapery and bedding.
Bedroom - traditional master light wood floor bedroom idea in Charlotte
Bedroom - traditional master light wood floor bedroom idea in Charlotte
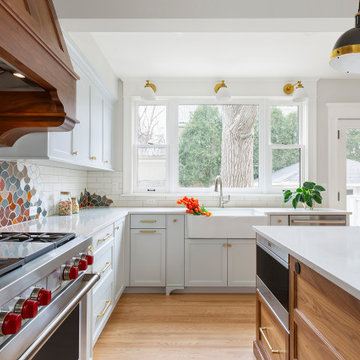
 Kate Roos Design LLC
Example of a large transitional u-shaped light wood floor and beige floor eat-in kitchen design in Minneapolis with a farmhouse sink, recessed-panel cabinets, blue cabinets, quartz countertops, multicolored backsplash, ceramic backsplash, stainless steel appliances, an island and white countertops
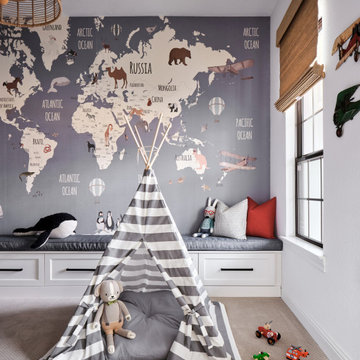
 Haven Design and Construction
Our clients desired a fun and whimsical space for their boys playroom, but wanted it to be gender neutral for possible future children. We started with this fun map of the world wallpaper mural and designed a custom built in storage bench beneath it to easily tuck toys away. A custom bench seat cushion and bright throw pillows make it a cozy spot to curl up with a book. Custom bookshelves hold lots of favorite kids books, while a chalk board wall encourages fun and imagination. A play table and bright red chairs tie into the red bench pillows. Finally, a fun striped play tent completes the space and a woven chandelier adds the finishing touch.

 Highland Builders LLC
Powder room with glam geometric wallpaper complimented with a vessel sink rustic vanity with riveted hardware. Counter top is quartz Viatera - Truffle. Mirror framed wall mirror.
Ryan Hainey


 Custom Floor Installations
About Us at Palos Verdes Peninsula, CA Hardwood Flooring Experts
Got a worn spot on your hardwood floors? Usually, wood flooring problems occurs when the hardwood itself expands and contracts overtime. We can easily fix any broken wood flooring for you as we are sure that you surely do not like that. Our professional floor installers will help you achieve a better flooring needs. We could assist your enhance your home value with this wide variety of flooring options. How do we achieve this? We carry out hardwood floors assistance which are of the highest quality like repair, installation and refinishing.
All set to refinish your hardwood flooring? We can revive your floor’s shine and make it like new. Hardwood floor experts in Palos Verdes Peninsula is totally committed in bringing out the elegance of your home by installing, repairing or refinishing an existing hardwood floor. There are lots of benefits to using a hardwood flooring in your house. Our experts will have your hardwood floors totally prettified and well maintained with the use of best practices in the industry.
Free On-site Consultation for Easy Hardwood Flooring
Our consultation is a beneficial service that we provide at no cost to all of our clients in [CITY]. Our experts always know best for your flooring.
We take pride in our ability to service variety of hardwood floors such as strip, plank or parquet flooring. The type of flooring and the level of gloss you want for your hardwood floors will be highly considered. Do you want durable designed hard wood floors, bamboo floor or even cork materials for your floor? Our company’s on-site review will help make you choose easier. Call us immediately.
Call Us: (310) 955-4039
Visit Us: http://palosverdespeninsulahardwoodfloors.com/customized-floor-installations


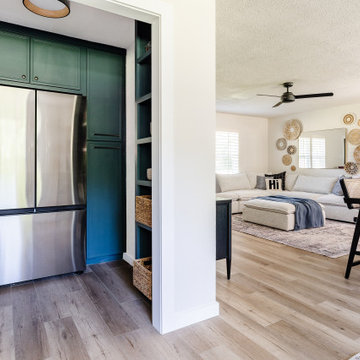

 Lindsey Markel
This Mid Century Modern home was designed and lived in by the architect in 1966. Since then there was one other owner but not much was updated to the home. When the current homeowners moved in they found many plumbing and electrical issues that accumulated overtime. They decided it was time for the kitchen, which had a hole in the floor from water damage, to be fixed and updated. They wanted a more open concept in the tight, galley, 60's style kitchen. To do so we needed to move the powder room to another location. New cabinets, flooring, counters, and backsplash were selected for the remodel. And after a lot of construction work was done to update the plumbing, electrical, and mechanical their dreams came true. The homeowners taste and style fits perfectly with the architects intentions for the design of the home.
Cabinet Bases: Dura Supreme Bria series, Urbana Vertical door, Textured Foil, Truffle
Cabinet Walls and Talls: Dura Supreme Bria series, Alpine door, High Pressure Laminate, Frosty White
Granite: Black Uba Tuba
Floor Tile: Flaviker Urban Concrete Smoke 12x24
Backsplash Tile: Clayhaus 3x3 Futura collection Bubble White
Appliances: Frigidaire and Electrolux
Sink: Mirabelle Stainless
Faucet: Newport Brass Stainless
Hardware: Top Knobs, TK503BSN, Brushed Satin Nickel
Dining Room Light: Allmodern.com
Stools and Chairs: At Home Red Hampton Chair
Table: Iron and Oak Domestics, Jason Hasselhuhn
Photos By: Kate Benjamin Photography LLC
 Lindsey Markel
This Mid Century Modern home was designed and lived in by the architect in 1966. Since then there was one other owner but not much was updated to the home. When the current homeowners moved in they found many plumbing and electrical issues that accumulated overtime. They decided it was time for the kitchen, which had a hole in the floor from water damage, to be fixed and updated. They wanted a more open concept in the tight, galley, 60's style kitchen. To do so we needed to move the powder room to another location. New cabinets, flooring, counters, and backsplash were selected for the remodel. And after a lot of construction work was done to update the plumbing, electrical, and mechanical their dreams came true. The homeowners taste and style fits perfectly with the architects intentions for the design of the home.
Cabinet Bases: Dura Supreme Bria series, Urbana Vertical door, Textured Foil, Truffle
Cabinet Walls and Talls: Dura Supreme Bria series, Alpine door, High Pressure Laminate, Frosty White
Granite: Black Uba Tuba
Floor Tile: Flaviker Urban Concrete Smoke 12x24
Backsplash Tile: Clayhaus 3x3 Futura collection Bubble White
Appliances: Frigidaire and Electrolux
Sink: Mirabelle Stainless
Faucet: Newport Brass Stainless
Hardware: Top Knobs, TK503BSN, Brushed Satin Nickel
Dining Room Light: Allmodern.com
Stools and Chairs: At Home Red Hampton Chair
Table: Iron and Oak Domestics, Jason Hasselhuhn
Photos By: Kate Benjamin Photography LLC
 Lindsey Markel
This Mid Century Modern home was designed and lived in by the architect in 1966. Since then there was one other owner but not much was updated to the home. When the current homeowners moved in they found many plumbing and electrical issues that accumulated overtime. They decided it was time for the kitchen, which had a hole in the floor from water damage, to be fixed and updated. They wanted a more open concept in the tight, galley, 60's style kitchen. To do so we needed to move the powder room to another location. New cabinets, flooring, counters, and backsplash were selected for the remodel. And after a lot of construction work was done to update the plumbing, electrical, and mechanical their dreams came true. The homeowners taste and style fits perfectly with the architects intentions for the design of the home.
Cabinet Bases: Dura Supreme Bria series, Urbana Vertical door, Textured Foil, Truffle
Cabinet Walls and Talls: Dura Supreme Bria series, Alpine door, High Pressure Laminate, Frosty White
Granite: Black Uba Tuba
Floor Tile: Flaviker Urban Concrete Smoke 12x24
Backsplash Tile: Clayhaus 3x3 Futura collection Bubble White
Appliances: Frigidaire and Electrolux
Sink: Mirabelle Stainless
Faucet: Newport Brass Stainless
Hardware: Top Knobs, TK503BSN, Brushed Satin Nickel
Dining Room Light: Allmodern.com
Stools and Chairs: At Home Red Hampton Chair
Table: Iron and Oak Domestics, Jason Hasselhuhn
Photos By: Kate Benjamin Photography LLC
 Tile Doctor Ltd
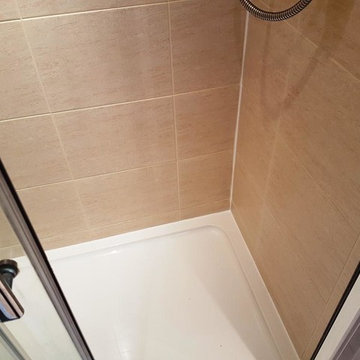
This is a great example of the difference we can make to a Shower Cubicle which suffer from a build up of soap scum, mould and staining from the dyes in shampoos and soaps etc.
This particular cubicle was installed at a property in the city of Edinburgh. The walls were Ceramic tiles which are ideal for shower areas as the glaze makes them completely water proof. However with grout being cementitious it does attract dirt and this shower was no different.
Cleaning Ceramic Tiled Shower Cubicle
The first step was to remove the wire accessory holder and then soak all the tile and grout in a strong solution of Tile Doctor Pro-Clean. I find decanting into a spray bottle works best as it mixes it with air which makes it easier to stick to the wall.
With the Pro-Clean in place it was then hand scrubbed to get the tile and especially the grout clean of all the mould and other stains. The shower walls were rinsed down and the process repeated where necessary.
Grout Colouring Shower Wall Tiles
With the tiles and grout now clean we could see that the grout was still discoloured in some areas where it had been badly stained. One option at this point would be rake out the grout and replace with new however overtime it would only discolour again, so in agreement with the customer we applied a grout colourant in a Limestone colour to better match the tile.
The Grout Colourant would ensure all the grout had a consistent appearance while also adding an impenetrable barrier that will keep its appearance for a long time. It takes a little time to do but is easily applied with a small brush and then you wipe off any excess that gets onto the tile.
The next step was to strip out the mastic silicone sealant strip from around the base of the shower cubicle and replace with new. I used high quality silicone sealant that left nice lines and fresh look, don’t use cheap sealant as it will soon discolour and some have been known to shrink.
Deep cleaning and re-colouring the grout made a huge difference; the shower cubicle has been transformed and now looks like a new installation.
Thomas Wilson
Edinburgh Tile Doctor
 MAADKreatif Studio
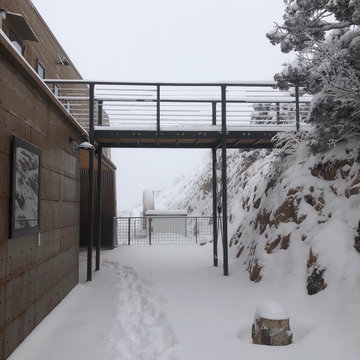
Designed and built by MAADKreatif™ Studio, this home in Northern Colorado is an on-going conversation with the wild, expansive, and awe-inspiring nature just outside its door. Standing at over 6800 feet above sea level on a 40-acre property bordering more than 650,000 acres of forest land and the Rocky Mountain wilderness, Marc Gerritsen, principal architect of MAADKreatif™, had to contend with wind factor exceeding 150 miles per hour, massive snow loads, extreme danger of wild fires, water shortage, dry climate, and intense year round sun exposure in designing the sprawling headquarters.
“Instead of dictating, acquiescing or adapting to Mother Nature, I engage her in a friendly banter”, Marc says with a smile. “We designed and engineered the main building to withstand extreme conditions, but nature had plenty to say in regards to the location, form, orientation, and cladding of the massive structure. “Although we have 40-acres of land to work with, much of it is too steep, exposed, or impenetrable to build on” Marc continues, “the building stands on the only location where we could carve out a large enough area without inflicting too much damage on the land. As it happens, it is also the best location we could hope for. From this location, we have a Southwest orientation that gives the building the optimum amount of sun exposure in the winter, protection from the strong easterly wind, access to water, and a vast, un-interrupted views of the bright city lights, vast plains and the majestic snow-capped mountains”.
The building’s frontage features two sets of 24 feet long panoramic windows to take it all in, and its slightly sloped roofline allows high wind to glide over the building and sends melted snow into a 1800 gallon underground concrete cistern. And, to protect the building from wild fires, the entire structure is cladded in raw steel. Exposure to the sun, wind, rain, and snow has begun to corrode the raw metal and transformed its cold, polished, steely surface into a warm, rusty patina that will continue to darken overtime while the extremely low humidity in the air will stop the rusted steel from withering away.
And so, the friendly banter between man and nature continues.
“Our home embodies the philosophy of Resilient Design + Living,” said Adria Lake, “it is built to last and thrive in any condition, not by force or concessions, but through an on-going conversation and collaboration with nature.”
 Tile Doctor Ltd
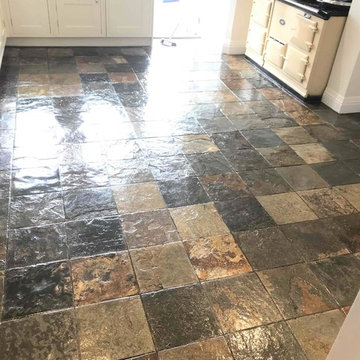
I recently completed the renovation of a Multi-Coloured Slate tiled kitchen floor in Sutton Coldfield. I was actually at the property before Christmas to survey the floor and quote for the work however the owners had planned to have a new kitchen installed in the new year, so we decided it was best for me to wait until after the installation to complete the work.
The slate was in good condition but like any stone floor you do need to maintain the sealer to prevent dirt becoming ingrained in the stone. Sealer do wear off overtime especially in the high foot traffic areas such as Kitchens and within a few years the tiles become dull and difficult to clean effectively.
The kitchen was installed on schedule and I got the call to arrange a visit to deep clean and reseal the floor which would take to two days, one to clean and one to seal.
To begin the restoration, I soaked the slate in a strong dilution of Tile Doctor Pro-Clean and left it to soak in for about ten minutes re-applying extra solution where it dried. Pro-Clean is a powerful tile cleaner that will strip old sealers when applied in concentrated form. I agitated the product using a black pad fitted to a rotary buffing machine. I paid particular attention to the grout which the customer had trouble keeping clean. The rotary pad struggles to reach into the recesses of the grout lines so I also made sure to scrub the solution into the grout with a grout brush.
Once I was satisfied that the Slate and the Grout was clean and clear of old sealers, I gave the whole floor a thorough rinse with water using a wet vacuum to extract the soil and get the floor as dry as possible. The floor was then left to dry off fully overnight.
Returning to the property the next day, I ran some quick damp tests to check for any excess moisture that might have prevented me from sealing the floor. We will always do this as excess moisture can affect the sealer curing.
The customer was very happy with the clean and the floor was dry, so we discussed sealer options to find out their preference for Matt or Satin finish. With the decision made to go with a Satin finish I began the application of the Tile Doctor Seal and Go which enhances the look of the stone with an aesthetically pleasing low-sheen finish, as well as providing on-going protection against ingrained dirt and staining.
A total of four coats of Seal and Go were needed to seal the Slate tiles and as you can see from the photos the sealer really put the life back into the floor.
Trevor Preece
Staffordshire Tile Doctor

8