
Search results for "Periodic performance" in Home Design Ideas
 Kathleen Jennison
An Arts & Crafts Bungalow is one of my favorite styles of homes. We have quite a few of them in our Stockton Mid-Town area. And when C&L called us to help them remodel their 1923 American Bungalow, I was beyond thrilled.
As per usual, when we get a new inquiry, we quickly Google the project location while we are talking to you on the phone. My excitement escalated when I saw the Google Earth Image of the sweet Sage Green bungalow in Mid-Town Stockton. "Yes, we would be interested in working with you," I said trying to keep my cool.
But what made it even better was meeting C&L and touring their home, because they are the nicest young couple, eager to make their home period perfect. Unfortunately, it had been slightly molested by some bad house-flippers, and we needed to bring the bathroom back to it "roots."
We knew we had to banish the hideous brown tile and cheap vanity quickly. But C&L complained about the condensation problems and the constant fight with mold. This immediately told me that improper remodeling had occurred and we needed to remedy that right away.
The Before: Frustrations with a Botched Remodel
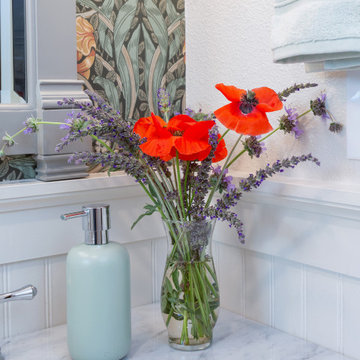
The bathroom needed to be brought back to period appropriate design with all the functionality of a modern bathroom. We thought of things like marble countertop, white mosaic floor tiles, white subway tile, board and batten molding, and of course a fabulous wallpaper.
This small (and only) bathroom on a tight budget required a little bit of design sleuthing to figure out how we could get the proper look and feel. Our goal was to determine where to splurge and where to economize and how to complete the remodel as quickly as possible because C&L would have to move out while construction was going on.
The Process: Hard Work to Remedy Design and Function
During our initial design study, (which included 2 hours in the owners’ home), we noticed framed images of William Morris Arts and Crafts textile patterns and knew this would be our design inspiration. We presented C&L with three options and they quickly selected the Pimpernel Design Concept.
We had originally selected the Black and Olive colors with a black vanity, mirror, and black and white floor tile. C&L liked it but weren’t quite sure about the black, We went back to the drawing board and decided the William & Co Pimpernel Wallpaper in Bayleaf and Manilla color with a softer gray painted vanity and mirror and white floor tile was more to their liking.
After the Design Concept was approved, we went to work securing the building permit, procuring all the elements, and scheduling our trusted tradesmen to perform the work.
We did uncover some shoddy work by the flippers such as live electrical wires hidden behind the wall, plumbing venting cut-off and buried in the walls (hence the constant dampness), the tub barely balancing on two fence boards across the floor joist, and no insulation on the exterior wall.
All of the previous blunders were fixed and the bathroom put back to its previous glory. We could feel the house thanking us for making it pretty again.
The After Reveal: Cohesive Design Decisions
We selected a simple white subway tile for the tub/shower. This is always classic and in keeping with the style of the house.
We selected a pre-fab vanity and mirror, but they look rich with the quartz countertop. There is much more storage in this small vanity than you would think.
The Transformation: A Period Perfect Refresh
We began the remodel just as the pandemic reared and stay-in-place orders went into effect. As C&L were already moved out and living with relatives, we got the go-ahead from city officials to get the work done (after all, how can you shelter in place without a bathroom?).
All our tradesmen were scheduled to work so that only one crew was on the job site at a time. We stayed on the original schedule with only a one week delay.
The end result is the sweetest little bathroom I've ever seen (and I can't wait to start work on C&L's kitchen next).
Thank you for joining me in this project transformation. I hope this inspired you to think about being creative with your design projects, determining what works best in keeping with the architecture of your space, and carefully assessing how you can have the best life in your home.


 Total System Service
As a manager of a building or property, you quickly learn the art of mediation. One minute you may be working with a vendor to keep the building’s operating system running efficient and smooth; the next moment you may be calming a tenant down after finding the change in the system disrupted his office’s workflow. Give and take; it’s the only way to make sure every day runs perfectly.
Overall, you have two goals to strive for in everything you do.
1. Keep the building running properly, upgrading systems as appropriate, and striving to do all you can on a pre-established budget.
2. Keep the building occupants happy, with as little disruption as possible.
While some changes are minor, barely registering on a building occupant’s mind, with HVAC challenges, that’s rarely the case. If a HVAC contractor is replacing an air handler, for instance, and disconnects one and moves to the next unit, it may cause major disruptions to sensitive areas of a building. And if the occupant wasn’t prepared for the disruption, you can have a mighty unhappy customer on your hand.
Anytime you are working on HVAC projects throughout your building, there are strategies you can put into place to keep things running smooth.
Communicate with occupants
Communication is key to any good relationship, and as a property manager, this rule is a great place to start. If you will be working with the HVAC equipment, block out the timeframe for work to be done, and understand the potential consequences of the process. Then communicate this process with every point of contact you have throughout the building. The more detail you can provide, the less surprises you’ll have throughout the process. You can also work with your building’s occupants before the process begins, finding out if there are better timeframes than others.
Establish a realistic schedule
As a property manager, its easy to provide your expectations for the HVAC project at hand, and request that the proposal be written in such a way that work is completed on your timeframe. Unfortunately, many contractors want your business and will agree to anything upfront in order to win the bid, knowing full well the work will take longer than specified. Instead of projecting your timeframes into the proposal process, ask for HVAC project bids to establish realistic schedules of how long the process will take, and what areas of your property will be most effected throughout the schedule. This will help you avoid crises between you and the contractor, and you and your tenants.
Plan for the whole system
If one small piece of your HVAC system is weak, its easy to fix that one small piece. But how will that impact your overall system? Will it cause weak spots in different parts of the building – maybe a corner office will have reduced air flow, and therefore be colder in the winter and warmer in the summer? When retrofitting new pieces with older existing systems, its easy to reduce the efficiency of your entire system. Before agreeing to certain repairs, make sure you understand how it will impact your entire system overall. An easy way of handling this problem is by working with the same HVAC contractor again and again, He will understand your system’s potential, and know when to make repairs, and when to replace.
Have points of contact available for immediate assistance
In many cases, problems arise because connections can’t be made. Can the HVAC contractor get a hold or you or another person that can make decisions at a moments notice if a problem arises? Do you have access to decision makers throughout the building that may be impacted by this change? Many projects have been put on hold simply because a person in authority can’t be found to give the go-ahead to move forward. If you have access to these people during the time of the project, you’ll be able to complete the project in record time.
Test
Finally, if you can test things in stages, or test when the potential for problems is the smallest, you reduce the chances of bigger emergency issues falling into your lap. If you’ll be installing a new terminal unit, can you make the switch on a Saturday morning when the building is largely unoccupied? If you’re replacing a large system, can you replace and test in phases so the entire project isn’t released at once?
Most issues can be avoided with just a little strategy from the beginning. If you’ve never had a HVAC maintenance team to help you stay on track with your building’s heating and cooling, now may be the time to find out how easy a team approach makes the process.
Find the right local pro for your project
 Tom Brzoskwinia
One of the most popular hardwood floor finishing which offers Tom & Peter Flooring is provided by WOCA. If you’ve decided that you want a natural looking wooden floor that is lacquer-free, then the likelihood is that you’ve chosen oil as your way of protecting your wood and making your floor look great at the same time. WOCA for wood flooring comes in various forms and is a great way of making sure that your wood is protected, but at the same time looks natural. A highly popular as well as effective way of treating wood floors, oils effectively penetrate into the wood and in some cases harden into the surface of the floor to stop damage and to maintain the wood in its optimum condition.
WOCA Oil finish hardwood flooring has taken the United States market by in 2014 and shows no signs of slowing down in 2016 and now. Here are some of the most common questions we have regarding this type of finish which we will I’m to answer in today’s my blog:
Is oil finish as durable as traditional factory urethane finishes with aluminum oxide?
When it comes to durability, oil finish flooring tackles the issue with a completely different method. The penetrating oil serves as protection from moisture and wear while allowing the user to feel the wood grains in their bare feet. If compared directly to factory finished aluminum oxide finish, the oil finish flooring will not perform as well to abrasion and impact. However, the beauty of this finish is the fact that it will camouflage any scratches which will inevitably accumulate over time.
Will this finish evaporate over time and will this be harmful for indoor air quality?
Another concern for oil finished floors its effect on indoor air quality. For on-site applications, some varieties suggest several coats which typically require the residents to be out of the home due to mild odors. However, there are factory finished UV-cured or single coat applications which lessen the downtime. Despite the odors produced during the drying process, oil finish floors rank amongst the lowest for VOC (volatile organic compound) emissions. Certain brands even boast true zero VOC. This fact alone makes oil finished floors one of the best options for green building solutions.
“WOCA products are certified by independent laboratories, the German Institute for Biological Building Materials, and are in accordance with DIN–Norm 53–160. WOCA WoodCare Denmark products meet or exceed the most stringent U.S. standards for volatile organic compounds.” –WOCA Oil Finish Manufacture
Does this type of finish require additional maintenance which I am not familiar with?
For weekly cleaning, oiled floors use a special cleaner which contains an oil and soap mixture. After a period of 12-18 months some oil may evaporate causing the wood grains to appear dry. An additional layer of oil can be reapplied to keep the floor looking fresh. Although oil finished floors require more involvement in periodic maintenance in high traffic areas, this maintenance can be done much easier than the equivalent of an onsite sand and refinish.
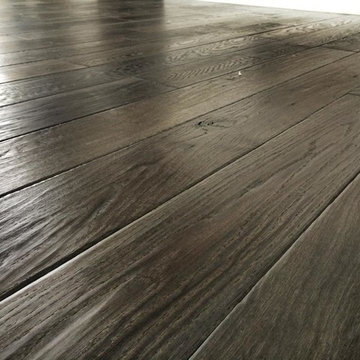
WOCA Master Color Oil contains pigment, which provides a single-step hardwood floor staining process. Laying down the stain and the finish in one step.
This product comes 14 different colors, from Black to Extra White, and you can mix them freely to create various color palettes that will meet the demands of any job.
Below are some pictures of the finished job…
 Tom Brzoskwinia
One of the most popular hardwood floor finishing which offers Tom & Peter Flooring is provided by WOCA. If you’ve decided that you want a natural looking wooden floor that is lacquer-free, then the likelihood is that you’ve chosen oil as your way of protecting your wood and making your floor look great at the same time. WOCA for wood flooring comes in various forms and is a great way of making sure that your wood is protected, but at the same time looks natural. A highly popular as well as effective way of treating wood floors, oils effectively penetrate into the wood and in some cases harden into the surface of the floor to stop damage and to maintain the wood in its optimum condition.
WOCA Oil finish hardwood flooring has taken the United States market by in 2014 and shows no signs of slowing down in 2016 and now. Here are some of the most common questions we have regarding this type of finish which we will I’m to answer in today’s my blog:
Is oil finish as durable as traditional factory urethane finishes with aluminum oxide?
When it comes to durability, oil finish flooring tackles the issue with a completely different method. The penetrating oil serves as protection from moisture and wear while allowing the user to feel the wood grains in their bare feet. If compared directly to factory finished aluminum oxide finish, the oil finish flooring will not perform as well to abrasion and impact. However, the beauty of this finish is the fact that it will camouflage any scratches which will inevitably accumulate over time.
Will this finish evaporate over time and will this be harmful for indoor air quality?
Another concern for oil finished floors its effect on indoor air quality. For on-site applications, some varieties suggest several coats which typically require the residents to be out of the home due to mild odors. However, there are factory finished UV-cured or single coat applications which lessen the downtime. Despite the odors produced during the drying process, oil finish floors rank amongst the lowest for VOC (volatile organic compound) emissions. Certain brands even boast true zero VOC. This fact alone makes oil finished floors one of the best options for green building solutions.
“WOCA products are certified by independent laboratories, the German Institute for Biological Building Materials, and are in accordance with DIN–Norm 53–160. WOCA WoodCare Denmark products meet or exceed the most stringent U.S. standards for volatile organic compounds.” –WOCA Oil Finish Manufacture
Does this type of finish require additional maintenance which I am not familiar with?
For weekly cleaning, oiled floors use a special cleaner which contains an oil and soap mixture. After a period of 12-18 months some oil may evaporate causing the wood grains to appear dry. An additional layer of oil can be reapplied to keep the floor looking fresh. Although oil finished floors require more involvement in periodic maintenance in high traffic areas, this maintenance can be done much easier than the equivalent of an onsite sand and refinish.
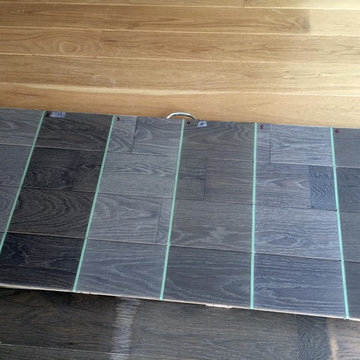
WOCA Master Color Oil contains pigment, which provides a single-step hardwood floor staining process. Laying down the stain and the finish in one step.
This product comes 14 different colors, from Black to Extra White, and you can mix them freely to create various color palettes that will meet the demands of any job.
Below are some pictures of the finished job…
 Crystal Kitchen + Bath
The goal for this 1939 Tudor-style story-and-a-half home was to create a kitchen that offered the conveniences, storage, and performance of a modern workspace while preserving the warmth, craftsmanship, and vintage charm that made the home special. The client, an avid home cook, wanted the room to feel as though it had always belonged to the house, with thoughtful upgrades that respected the original architecture rather than competing with it. Just as important, she needed a more efficient layout with enough storage for small appliances, so everyday cooking would no longer require carrying items up from the lower level.
Several existing conditions shaped the design approach. The kitchen retained original, amber-stained birch woodwork that the client wished to keep, and the compact footprint was interrupted by six doorways and two windows, none of which were to be moved, altered, or replaced. A previous flooring update had left the door casings undercut too short, creating visible gaps where the casing met the floor. The existing vintage 40-inch range also lacked proper ventilation, yet the client wished to accommodate a refrigerator, dishwasher, cooktop, double ovens, built-in microwave, and effective venting above the cooktop into the new kitchen layout.
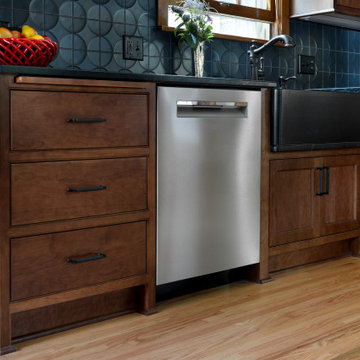
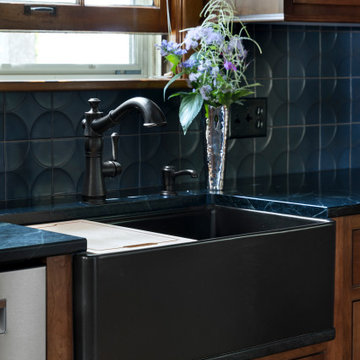
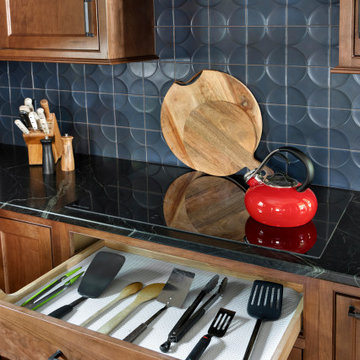
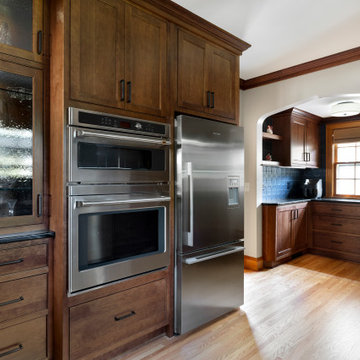
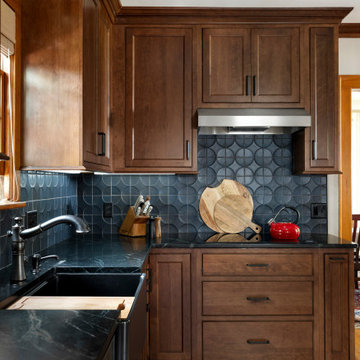
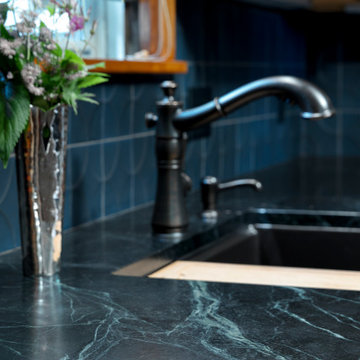
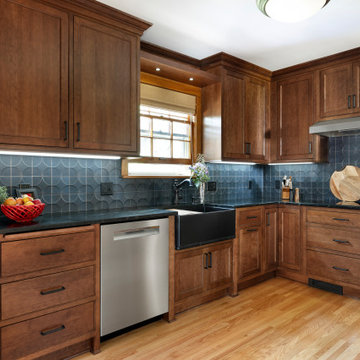
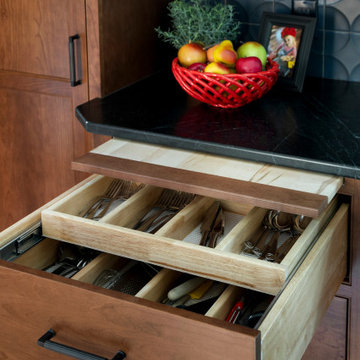
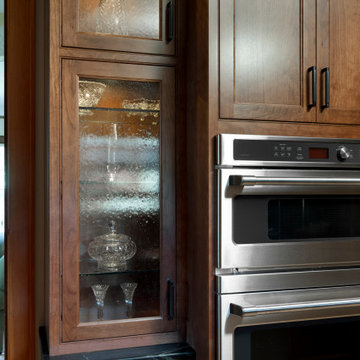
To honor the original millwork, beaded inset-style cherry cabinetry was selected in a soft, hand-rubbed finish that will deepen over time and develop a natural patina. Charcoal-gray soapstone countertops complement the cabinetry while reinforcing the historic character of the home with an organic, timeworn texture. The former breakfast nook was transformed into a butler’s pantry, adding valuable base cabinet storage and expanded work surfaces for frequently used small appliances. Also in the butler’s pantry, a single upper cabinet was paired with open shelves to give an open, airy feeling while adding character and practical storage. A classic single-bowl apron-front workstation sink contributes both period-appropriate character and practical prep and cleanup function.
Because the home’s openings were such a defining feature, the design worked within the existing architecture instead of altering it. Custom plinth blocks were created for each doorway to extend the original casing gracefully down to the new natural red oak flooring, resolving the earlier construction issue while adding a detail that feels authentic to the age of the house. Despite the number of door and window openings, the new layout provides a significantly more functional, built-in kitchen with an improved work triangle for serious cooking.
Appliance placement was carefully planned to deliver the requested performance without overwhelming the small room. Three cooking functions (double ovens & microwave) were consolidated into one location with a GE Café double oven featuring Advantium Technology, while the client’s compact 31-inch refrigerator was reused to preserve space. A sleek 30-inch induction cooktop provides efficient cooking, and a Vent-A-Hood ARS ductless vent hood supplies needed ventilation without requiring a duct run to the exterior.
The finish palette balances richness, texture, and historical sensitivity. A deeply textured navy backsplash tile adds depth and dramatic shadow play against the soapstone, while wallpaper in the back entry echoes the tile’s geometric pattern to visually connect the adjoining spaces. Oil-rubbed bronze cabinet hardware and light fixtures enhance the warmth of the cherry cabinetry and complete the antique-inspired feel.
Lighting was layered to make the compact kitchen brighter, more useful, and more inviting. Vintage-style semi-flush ceiling fixtures establish the overall tone, while dimmable puck lights highlight select areas and undercabinet task lighting keeps work surfaces well illuminated.
The completed kitchen now feels both highly functional and deeply rooted in the home’s history. Rich cherry cabinetry, velvety soapstone, natural red oak flooring, navy tile, bronze accents, and carefully preserved birch trim work together to create a warm, cohesive space that celebrates timeless craftsmanship. By increasing storage, improving workflow, integrating modern appliances, and respecting the Tudor home’s original character, the design achieves the client’s vision: a kitchen that feels personal, practical, historically appropriate, and as though it has always been there.
 Newschool Builders LLC
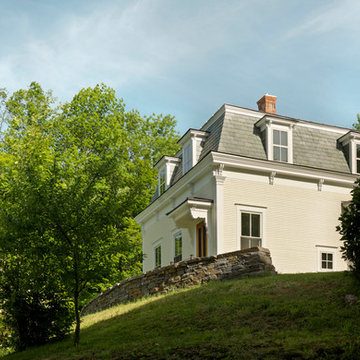
This was one of those special projects in which we were able to build not only a incredibly insulated and efficient home, but were also able to incorporate a bunch of custom woodworking, metal work, stone work and historical details into the project. We adhered to “Efficiency Vermont’s’ rigorous High Performance Home standards in the construction of this project. In addition, this was a Duplex and as a result required extra attention to special code requirements surrounding multi-family construction. We also tried to recreate the exterior details to match with the historical period of early Vermont.
 Crystal Kitchen + Bath
The goal for this 1939 Tudor-style story-and-a-half home was to create a kitchen that offered the conveniences, storage, and performance of a modern workspace while preserving the warmth, craftsmanship, and vintage charm that made the home special. The client, an avid home cook, wanted the room to feel as though it had always belonged to the house, with thoughtful upgrades that respected the original architecture rather than competing with it. Just as important, she needed a more efficient layout with enough storage for small appliances, so everyday cooking would no longer require carrying items up from the lower level.
Several existing conditions shaped the design approach. The kitchen retained original, amber-stained birch woodwork that the client wished to keep, and the compact footprint was interrupted by six doorways and two windows, none of which were to be moved, altered, or replaced. A previous flooring update had left the door casings undercut too short, creating visible gaps where the casing met the floor. The existing vintage 40-inch range also lacked proper ventilation, yet the client wished to accommodate a refrigerator, dishwasher, cooktop, double ovens, built-in microwave, and effective venting above the cooktop into the new kitchen layout.
To honor the original millwork, beaded inset-style cherry cabinetry was selected in a soft, hand-rubbed finish that will deepen over time and develop a natural patina. Charcoal-gray soapstone countertops complement the cabinetry while reinforcing the historic character of the home with an organic, timeworn texture. The former breakfast nook was transformed into a butler’s pantry, adding valuable base cabinet storage and expanded work surfaces for frequently used small appliances. Also in the butler’s pantry, a single upper cabinet was paired with open shelves to give an open, airy feeling while adding character and practical storage. A classic single-bowl apron-front workstation sink contributes both period-appropriate character and practical prep and cleanup function.
Because the home’s openings were such a defining feature, the design worked within the existing architecture instead of altering it. Custom plinth blocks were created for each doorway to extend the original casing gracefully down to the new natural red oak flooring, resolving the earlier construction issue while adding a detail that feels authentic to the age of the house. Despite the number of door and window openings, the new layout provides a significantly more functional, built-in kitchen with an improved work triangle for serious cooking.
Appliance placement was carefully planned to deliver the requested performance without overwhelming the small room. Three cooking functions (double ovens & microwave) were consolidated into one location with a GE Café double oven featuring Advantium Technology, while the client’s compact 31-inch refrigerator was reused to preserve space. A sleek 30-inch induction cooktop provides efficient cooking, and a Vent-A-Hood ARS ductless vent hood supplies needed ventilation without requiring a duct run to the exterior.
The finish palette balances richness, texture, and historical sensitivity. A deeply textured navy backsplash tile adds depth and dramatic shadow play against the soapstone, while wallpaper in the back entry echoes the tile’s geometric pattern to visually connect the adjoining spaces. Oil-rubbed bronze cabinet hardware and light fixtures enhance the warmth of the cherry cabinetry and complete the antique-inspired feel.
Lighting was layered to make the compact kitchen brighter, more useful, and more inviting. Vintage-style semi-flush ceiling fixtures establish the overall tone, while dimmable puck lights highlight select areas and undercabinet task lighting keeps work surfaces well illuminated.
The completed kitchen now feels both highly functional and deeply rooted in the home’s history. Rich cherry cabinetry, velvety soapstone, natural red oak flooring, navy tile, bronze accents, and carefully preserved birch trim work together to create a warm, cohesive space that celebrates timeless craftsmanship. By increasing storage, improving workflow, integrating modern appliances, and respecting the Tudor home’s original character, the design achieves the client’s vision: a kitchen that feels personal, practical, historically appropriate, and as though it has always been there.
 Crystal Kitchen + Bath
The goal for this 1939 Tudor-style story-and-a-half home was to create a kitchen that offered the conveniences, storage, and performance of a modern workspace while preserving the warmth, craftsmanship, and vintage charm that made the home special. The client, an avid home cook, wanted the room to feel as though it had always belonged to the house, with thoughtful upgrades that respected the original architecture rather than competing with it. Just as important, she needed a more efficient layout with enough storage for small appliances, so everyday cooking would no longer require carrying items up from the lower level.
Several existing conditions shaped the design approach. The kitchen retained original, amber-stained birch woodwork that the client wished to keep, and the compact footprint was interrupted by six doorways and two windows, none of which were to be moved, altered, or replaced. A previous flooring update had left the door casings undercut too short, creating visible gaps where the casing met the floor. The existing vintage 40-inch range also lacked proper ventilation, yet the client wished to accommodate a refrigerator, dishwasher, cooktop, double ovens, built-in microwave, and effective venting above the cooktop into the new kitchen layout.
To honor the original millwork, beaded inset-style cherry cabinetry was selected in a soft, hand-rubbed finish that will deepen over time and develop a natural patina. Charcoal-gray soapstone countertops complement the cabinetry while reinforcing the historic character of the home with an organic, timeworn texture. The former breakfast nook was transformed into a butler’s pantry, adding valuable base cabinet storage and expanded work surfaces for frequently used small appliances. Also in the butler’s pantry, a single upper cabinet was paired with open shelves to give an open, airy feeling while adding character and practical storage. A classic single-bowl apron-front workstation sink contributes both period-appropriate character and practical prep and cleanup function.
Because the home’s openings were such a defining feature, the design worked within the existing architecture instead of altering it. Custom plinth blocks were created for each doorway to extend the original casing gracefully down to the new natural red oak flooring, resolving the earlier construction issue while adding a detail that feels authentic to the age of the house. Despite the number of door and window openings, the new layout provides a significantly more functional, built-in kitchen with an improved work triangle for serious cooking.
Appliance placement was carefully planned to deliver the requested performance without overwhelming the small room. Three cooking functions (double ovens & microwave) were consolidated into one location with a GE Café double oven featuring Advantium Technology, while the client’s compact 31-inch refrigerator was reused to preserve space. A sleek 30-inch induction cooktop provides efficient cooking, and a Vent-A-Hood ARS ductless vent hood supplies needed ventilation without requiring a duct run to the exterior.
The finish palette balances richness, texture, and historical sensitivity. A deeply textured navy backsplash tile adds depth and dramatic shadow play against the soapstone, while wallpaper in the back entry echoes the tile’s geometric pattern to visually connect the adjoining spaces. Oil-rubbed bronze cabinet hardware and light fixtures enhance the warmth of the cherry cabinetry and complete the antique-inspired feel.
Lighting was layered to make the compact kitchen brighter, more useful, and more inviting. Vintage-style semi-flush ceiling fixtures establish the overall tone, while dimmable puck lights highlight select areas and undercabinet task lighting keeps work surfaces well illuminated.
The completed kitchen now feels both highly functional and deeply rooted in the home’s history. Rich cherry cabinetry, velvety soapstone, natural red oak flooring, navy tile, bronze accents, and carefully preserved birch trim work together to create a warm, cohesive space that celebrates timeless craftsmanship. By increasing storage, improving workflow, integrating modern appliances, and respecting the Tudor home’s original character, the design achieves the client’s vision: a kitchen that feels personal, practical, historically appropriate, and as though it has always been there.
 Crystal Kitchen + Bath
The goal for this 1939 Tudor-style story-and-a-half home was to create a kitchen that offered the conveniences, storage, and performance of a modern workspace while preserving the warmth, craftsmanship, and vintage charm that made the home special. The client, an avid home cook, wanted the room to feel as though it had always belonged to the house, with thoughtful upgrades that respected the original architecture rather than competing with it. Just as important, she needed a more efficient layout with enough storage for small appliances, so everyday cooking would no longer require carrying items up from the lower level.
Several existing conditions shaped the design approach. The kitchen retained original, amber-stained birch woodwork that the client wished to keep, and the compact footprint was interrupted by six doorways and two windows, none of which were to be moved, altered, or replaced. A previous flooring update had left the door casings undercut too short, creating visible gaps where the casing met the floor. The existing vintage 40-inch range also lacked proper ventilation, yet the client wished to accommodate a refrigerator, dishwasher, cooktop, double ovens, built-in microwave, and effective venting above the cooktop into the new kitchen layout.
To honor the original millwork, beaded inset-style cherry cabinetry was selected in a soft, hand-rubbed finish that will deepen over time and develop a natural patina. Charcoal-gray soapstone countertops complement the cabinetry while reinforcing the historic character of the home with an organic, timeworn texture. The former breakfast nook was transformed into a butler’s pantry, adding valuable base cabinet storage and expanded work surfaces for frequently used small appliances. Also in the butler’s pantry, a single upper cabinet was paired with open shelves to give an open, airy feeling while adding character and practical storage. A classic single-bowl apron-front workstation sink contributes both period-appropriate character and practical prep and cleanup function.
Because the home’s openings were such a defining feature, the design worked within the existing architecture instead of altering it. Custom plinth blocks were created for each doorway to extend the original casing gracefully down to the new natural red oak flooring, resolving the earlier construction issue while adding a detail that feels authentic to the age of the house. Despite the number of door and window openings, the new layout provides a significantly more functional, built-in kitchen with an improved work triangle for serious cooking.
Appliance placement was carefully planned to deliver the requested performance without overwhelming the small room. Three cooking functions (double ovens & microwave) were consolidated into one location with a GE Café double oven featuring Advantium Technology, while the client’s compact 31-inch refrigerator was reused to preserve space. A sleek 30-inch induction cooktop provides efficient cooking, and a Vent-A-Hood ARS ductless vent hood supplies needed ventilation without requiring a duct run to the exterior.
The finish palette balances richness, texture, and historical sensitivity. A deeply textured navy backsplash tile adds depth and dramatic shadow play against the soapstone, while wallpaper in the back entry echoes the tile’s geometric pattern to visually connect the adjoining spaces. Oil-rubbed bronze cabinet hardware and light fixtures enhance the warmth of the cherry cabinetry and complete the antique-inspired feel.
Lighting was layered to make the compact kitchen brighter, more useful, and more inviting. Vintage-style semi-flush ceiling fixtures establish the overall tone, while dimmable puck lights highlight select areas and undercabinet task lighting keeps work surfaces well illuminated.
The completed kitchen now feels both highly functional and deeply rooted in the home’s history. Rich cherry cabinetry, velvety soapstone, natural red oak flooring, navy tile, bronze accents, and carefully preserved birch trim work together to create a warm, cohesive space that celebrates timeless craftsmanship. By increasing storage, improving workflow, integrating modern appliances, and respecting the Tudor home’s original character, the design achieves the client’s vision: a kitchen that feels personal, practical, historically appropriate, and as though it has always been there.
 Crystal Kitchen + Bath
The goal for this 1939 Tudor-style story-and-a-half home was to create a kitchen that offered the conveniences, storage, and performance of a modern workspace while preserving the warmth, craftsmanship, and vintage charm that made the home special. The client, an avid home cook, wanted the room to feel as though it had always belonged to the house, with thoughtful upgrades that respected the original architecture rather than competing with it. Just as important, she needed a more efficient layout with enough storage for small appliances, so everyday cooking would no longer require carrying items up from the lower level.
Several existing conditions shaped the design approach. The kitchen retained original, amber-stained birch woodwork that the client wished to keep, and the compact footprint was interrupted by six doorways and two windows, none of which were to be moved, altered, or replaced. A previous flooring update had left the door casings undercut too short, creating visible gaps where the casing met the floor. The existing vintage 40-inch range also lacked proper ventilation, yet the client wished to accommodate a refrigerator, dishwasher, cooktop, double ovens, built-in microwave, and effective venting above the cooktop into the new kitchen layout.
To honor the original millwork, beaded inset-style cherry cabinetry was selected in a soft, hand-rubbed finish that will deepen over time and develop a natural patina. Charcoal-gray soapstone countertops complement the cabinetry while reinforcing the historic character of the home with an organic, timeworn texture. The former breakfast nook was transformed into a butler’s pantry, adding valuable base cabinet storage and expanded work surfaces for frequently used small appliances. Also in the butler’s pantry, a single upper cabinet was paired with open shelves to give an open, airy feeling while adding character and practical storage. A classic single-bowl apron-front workstation sink contributes both period-appropriate character and practical prep and cleanup function.
Because the home’s openings were such a defining feature, the design worked within the existing architecture instead of altering it. Custom plinth blocks were created for each doorway to extend the original casing gracefully down to the new natural red oak flooring, resolving the earlier construction issue while adding a detail that feels authentic to the age of the house. Despite the number of door and window openings, the new layout provides a significantly more functional, built-in kitchen with an improved work triangle for serious cooking.
Appliance placement was carefully planned to deliver the requested performance without overwhelming the small room. Three cooking functions (double ovens & microwave) were consolidated into one location with a GE Café double oven featuring Advantium Technology, while the client’s compact 31-inch refrigerator was reused to preserve space. A sleek 30-inch induction cooktop provides efficient cooking, and a Vent-A-Hood ARS ductless vent hood supplies needed ventilation without requiring a duct run to the exterior.
The finish palette balances richness, texture, and historical sensitivity. A deeply textured navy backsplash tile adds depth and dramatic shadow play against the soapstone, while wallpaper in the back entry echoes the tile’s geometric pattern to visually connect the adjoining spaces. Oil-rubbed bronze cabinet hardware and light fixtures enhance the warmth of the cherry cabinetry and complete the antique-inspired feel.
Lighting was layered to make the compact kitchen brighter, more useful, and more inviting. Vintage-style semi-flush ceiling fixtures establish the overall tone, while dimmable puck lights highlight select areas and undercabinet task lighting keeps work surfaces well illuminated.
The completed kitchen now feels both highly functional and deeply rooted in the home’s history. Rich cherry cabinetry, velvety soapstone, natural red oak flooring, navy tile, bronze accents, and carefully preserved birch trim work together to create a warm, cohesive space that celebrates timeless craftsmanship. By increasing storage, improving workflow, integrating modern appliances, and respecting the Tudor home’s original character, the design achieves the client’s vision: a kitchen that feels personal, practical, historically appropriate, and as though it has always been there.
 Crystal Kitchen + Bath
The goal for this 1939 Tudor-style story-and-a-half home was to create a kitchen that offered the conveniences, storage, and performance of a modern workspace while preserving the warmth, craftsmanship, and vintage charm that made the home special. The client, an avid home cook, wanted the room to feel as though it had always belonged to the house, with thoughtful upgrades that respected the original architecture rather than competing with it. Just as important, she needed a more efficient layout with enough storage for small appliances, so everyday cooking would no longer require carrying items up from the lower level.
Several existing conditions shaped the design approach. The kitchen retained original, amber-stained birch woodwork that the client wished to keep, and the compact footprint was interrupted by six doorways and two windows, none of which were to be moved, altered, or replaced. A previous flooring update had left the door casings undercut too short, creating visible gaps where the casing met the floor. The existing vintage 40-inch range also lacked proper ventilation, yet the client wished to accommodate a refrigerator, dishwasher, cooktop, double ovens, built-in microwave, and effective venting above the cooktop into the new kitchen layout.
To honor the original millwork, beaded inset-style cherry cabinetry was selected in a soft, hand-rubbed finish that will deepen over time and develop a natural patina. Charcoal-gray soapstone countertops complement the cabinetry while reinforcing the historic character of the home with an organic, timeworn texture. The former breakfast nook was transformed into a butler’s pantry, adding valuable base cabinet storage and expanded work surfaces for frequently used small appliances. Also in the butler’s pantry, a single upper cabinet was paired with open shelves to give an open, airy feeling while adding character and practical storage. A classic single-bowl apron-front workstation sink contributes both period-appropriate character and practical prep and cleanup function.
Because the home’s openings were such a defining feature, the design worked within the existing architecture instead of altering it. Custom plinth blocks were created for each doorway to extend the original casing gracefully down to the new natural red oak flooring, resolving the earlier construction issue while adding a detail that feels authentic to the age of the house. Despite the number of door and window openings, the new layout provides a significantly more functional, built-in kitchen with an improved work triangle for serious cooking.
Appliance placement was carefully planned to deliver the requested performance without overwhelming the small room. Three cooking functions (double ovens & microwave) were consolidated into one location with a GE Café double oven featuring Advantium Technology, while the client’s compact 31-inch refrigerator was reused to preserve space. A sleek 30-inch induction cooktop provides efficient cooking, and a Vent-A-Hood ARS ductless vent hood supplies needed ventilation without requiring a duct run to the exterior.
The finish palette balances richness, texture, and historical sensitivity. A deeply textured navy backsplash tile adds depth and dramatic shadow play against the soapstone, while wallpaper in the back entry echoes the tile’s geometric pattern to visually connect the adjoining spaces. Oil-rubbed bronze cabinet hardware and light fixtures enhance the warmth of the cherry cabinetry and complete the antique-inspired feel.
Lighting was layered to make the compact kitchen brighter, more useful, and more inviting. Vintage-style semi-flush ceiling fixtures establish the overall tone, while dimmable puck lights highlight select areas and undercabinet task lighting keeps work surfaces well illuminated.
The completed kitchen now feels both highly functional and deeply rooted in the home’s history. Rich cherry cabinetry, velvety soapstone, natural red oak flooring, navy tile, bronze accents, and carefully preserved birch trim work together to create a warm, cohesive space that celebrates timeless craftsmanship. By increasing storage, improving workflow, integrating modern appliances, and respecting the Tudor home’s original character, the design achieves the client’s vision: a kitchen that feels personal, practical, historically appropriate, and as though it has always been there.
 Crystal Kitchen + Bath
The goal for this 1939 Tudor-style story-and-a-half home was to create a kitchen that offered the conveniences, storage, and performance of a modern workspace while preserving the warmth, craftsmanship, and vintage charm that made the home special. The client, an avid home cook, wanted the room to feel as though it had always belonged to the house, with thoughtful upgrades that respected the original architecture rather than competing with it. Just as important, she needed a more efficient layout with enough storage for small appliances, so everyday cooking would no longer require carrying items up from the lower level.
Several existing conditions shaped the design approach. The kitchen retained original, amber-stained birch woodwork that the client wished to keep, and the compact footprint was interrupted by six doorways and two windows, none of which were to be moved, altered, or replaced. A previous flooring update had left the door casings undercut too short, creating visible gaps where the casing met the floor. The existing vintage 40-inch range also lacked proper ventilation, yet the client wished to accommodate a refrigerator, dishwasher, cooktop, double ovens, built-in microwave, and effective venting above the cooktop into the new kitchen layout.
To honor the original millwork, beaded inset-style cherry cabinetry was selected in a soft, hand-rubbed finish that will deepen over time and develop a natural patina. Charcoal-gray soapstone countertops complement the cabinetry while reinforcing the historic character of the home with an organic, timeworn texture. The former breakfast nook was transformed into a butler’s pantry, adding valuable base cabinet storage and expanded work surfaces for frequently used small appliances. Also in the butler’s pantry, a single upper cabinet was paired with open shelves to give an open, airy feeling while adding character and practical storage. A classic single-bowl apron-front workstation sink contributes both period-appropriate character and practical prep and cleanup function.
Because the home’s openings were such a defining feature, the design worked within the existing architecture instead of altering it. Custom plinth blocks were created for each doorway to extend the original casing gracefully down to the new natural red oak flooring, resolving the earlier construction issue while adding a detail that feels authentic to the age of the house. Despite the number of door and window openings, the new layout provides a significantly more functional, built-in kitchen with an improved work triangle for serious cooking.
Appliance placement was carefully planned to deliver the requested performance without overwhelming the small room. Three cooking functions (double ovens & microwave) were consolidated into one location with a GE Café double oven featuring Advantium Technology, while the client’s compact 31-inch refrigerator was reused to preserve space. A sleek 30-inch induction cooktop provides efficient cooking, and a Vent-A-Hood ARS ductless vent hood supplies needed ventilation without requiring a duct run to the exterior.
The finish palette balances richness, texture, and historical sensitivity. A deeply textured navy backsplash tile adds depth and dramatic shadow play against the soapstone, while wallpaper in the back entry echoes the tile’s geometric pattern to visually connect the adjoining spaces. Oil-rubbed bronze cabinet hardware and light fixtures enhance the warmth of the cherry cabinetry and complete the antique-inspired feel.
Lighting was layered to make the compact kitchen brighter, more useful, and more inviting. Vintage-style semi-flush ceiling fixtures establish the overall tone, while dimmable puck lights highlight select areas and undercabinet task lighting keeps work surfaces well illuminated.
The completed kitchen now feels both highly functional and deeply rooted in the home’s history. Rich cherry cabinetry, velvety soapstone, natural red oak flooring, navy tile, bronze accents, and carefully preserved birch trim work together to create a warm, cohesive space that celebrates timeless craftsmanship. By increasing storage, improving workflow, integrating modern appliances, and respecting the Tudor home’s original character, the design achieves the client’s vision: a kitchen that feels personal, practical, historically appropriate, and as though it has always been there.
 Crystal Kitchen + Bath
The goal for this 1939 Tudor-style story-and-a-half home was to create a kitchen that offered the conveniences, storage, and performance of a modern workspace while preserving the warmth, craftsmanship, and vintage charm that made the home special. The client, an avid home cook, wanted the room to feel as though it had always belonged to the house, with thoughtful upgrades that respected the original architecture rather than competing with it. Just as important, she needed a more efficient layout with enough storage for small appliances, so everyday cooking would no longer require carrying items up from the lower level.
Several existing conditions shaped the design approach. The kitchen retained original, amber-stained birch woodwork that the client wished to keep, and the compact footprint was interrupted by six doorways and two windows, none of which were to be moved, altered, or replaced. A previous flooring update had left the door casings undercut too short, creating visible gaps where the casing met the floor. The existing vintage 40-inch range also lacked proper ventilation, yet the client wished to accommodate a refrigerator, dishwasher, cooktop, double ovens, built-in microwave, and effective venting above the cooktop into the new kitchen layout.
To honor the original millwork, beaded inset-style cherry cabinetry was selected in a soft, hand-rubbed finish that will deepen over time and develop a natural patina. Charcoal-gray soapstone countertops complement the cabinetry while reinforcing the historic character of the home with an organic, timeworn texture. The former breakfast nook was transformed into a butler’s pantry, adding valuable base cabinet storage and expanded work surfaces for frequently used small appliances. Also in the butler’s pantry, a single upper cabinet was paired with open shelves to give an open, airy feeling while adding character and practical storage. A classic single-bowl apron-front workstation sink contributes both period-appropriate character and practical prep and cleanup function.
Because the home’s openings were such a defining feature, the design worked within the existing architecture instead of altering it. Custom plinth blocks were created for each doorway to extend the original casing gracefully down to the new natural red oak flooring, resolving the earlier construction issue while adding a detail that feels authentic to the age of the house. Despite the number of door and window openings, the new layout provides a significantly more functional, built-in kitchen with an improved work triangle for serious cooking.
Appliance placement was carefully planned to deliver the requested performance without overwhelming the small room. Three cooking functions (double ovens & microwave) were consolidated into one location with a GE Café double oven featuring Advantium Technology, while the client’s compact 31-inch refrigerator was reused to preserve space. A sleek 30-inch induction cooktop provides efficient cooking, and a Vent-A-Hood ARS ductless vent hood supplies needed ventilation without requiring a duct run to the exterior.
The finish palette balances richness, texture, and historical sensitivity. A deeply textured navy backsplash tile adds depth and dramatic shadow play against the soapstone, while wallpaper in the back entry echoes the tile’s geometric pattern to visually connect the adjoining spaces. Oil-rubbed bronze cabinet hardware and light fixtures enhance the warmth of the cherry cabinetry and complete the antique-inspired feel.
Lighting was layered to make the compact kitchen brighter, more useful, and more inviting. Vintage-style semi-flush ceiling fixtures establish the overall tone, while dimmable puck lights highlight select areas and undercabinet task lighting keeps work surfaces well illuminated.
The completed kitchen now feels both highly functional and deeply rooted in the home’s history. Rich cherry cabinetry, velvety soapstone, natural red oak flooring, navy tile, bronze accents, and carefully preserved birch trim work together to create a warm, cohesive space that celebrates timeless craftsmanship. By increasing storage, improving workflow, integrating modern appliances, and respecting the Tudor home’s original character, the design achieves the client’s vision: a kitchen that feels personal, practical, historically appropriate, and as though it has always been there.
 Crystal Kitchen + Bath
The goal for this 1939 Tudor-style story-and-a-half home was to create a kitchen that offered the conveniences, storage, and performance of a modern workspace while preserving the warmth, craftsmanship, and vintage charm that made the home special. The client, an avid home cook, wanted the room to feel as though it had always belonged to the house, with thoughtful upgrades that respected the original architecture rather than competing with it. Just as important, she needed a more efficient layout with enough storage for small appliances, so everyday cooking would no longer require carrying items up from the lower level.
Several existing conditions shaped the design approach. The kitchen retained original, amber-stained birch woodwork that the client wished to keep, and the compact footprint was interrupted by six doorways and two windows, none of which were to be moved, altered, or replaced. A previous flooring update had left the door casings undercut too short, creating visible gaps where the casing met the floor. The existing vintage 40-inch range also lacked proper ventilation, yet the client wished to accommodate a refrigerator, dishwasher, cooktop, double ovens, built-in microwave, and effective venting above the cooktop into the new kitchen layout.
To honor the original millwork, beaded inset-style cherry cabinetry was selected in a soft, hand-rubbed finish that will deepen over time and develop a natural patina. Charcoal-gray soapstone countertops complement the cabinetry while reinforcing the historic character of the home with an organic, timeworn texture. The former breakfast nook was transformed into a butler’s pantry, adding valuable base cabinet storage and expanded work surfaces for frequently used small appliances. Also in the butler’s pantry, a single upper cabinet was paired with open shelves to give an open, airy feeling while adding character and practical storage. A classic single-bowl apron-front workstation sink contributes both period-appropriate character and practical prep and cleanup function.
Because the home’s openings were such a defining feature, the design worked within the existing architecture instead of altering it. Custom plinth blocks were created for each doorway to extend the original casing gracefully down to the new natural red oak flooring, resolving the earlier construction issue while adding a detail that feels authentic to the age of the house. Despite the number of door and window openings, the new layout provides a significantly more functional, built-in kitchen with an improved work triangle for serious cooking.
Appliance placement was carefully planned to deliver the requested performance without overwhelming the small room. Three cooking functions (double ovens & microwave) were consolidated into one location with a GE Café double oven featuring Advantium Technology, while the client’s compact 31-inch refrigerator was reused to preserve space. A sleek 30-inch induction cooktop provides efficient cooking, and a Vent-A-Hood ARS ductless vent hood supplies needed ventilation without requiring a duct run to the exterior.
The finish palette balances richness, texture, and historical sensitivity. A deeply textured navy backsplash tile adds depth and dramatic shadow play against the soapstone, while wallpaper in the back entry echoes the tile’s geometric pattern to visually connect the adjoining spaces. Oil-rubbed bronze cabinet hardware and light fixtures enhance the warmth of the cherry cabinetry and complete the antique-inspired feel.
Lighting was layered to make the compact kitchen brighter, more useful, and more inviting. Vintage-style semi-flush ceiling fixtures establish the overall tone, while dimmable puck lights highlight select areas and undercabinet task lighting keeps work surfaces well illuminated.
The completed kitchen now feels both highly functional and deeply rooted in the home’s history. Rich cherry cabinetry, velvety soapstone, natural red oak flooring, navy tile, bronze accents, and carefully preserved birch trim work together to create a warm, cohesive space that celebrates timeless craftsmanship. By increasing storage, improving workflow, integrating modern appliances, and respecting the Tudor home’s original character, the design achieves the client’s vision: a kitchen that feels personal, practical, historically appropriate, and as though it has always been there.
 Guangzhou Longlass New Material Co., Ltd
Laminated glass is a safety glass that uses one or more layers of PVB film (polyvinyl butyral) or SGP between two or more pieces of glass. It is made under a special process and is combined into a whole through high temperature and high pressure within a certain period of time.
Longlass Laminated Glass Advantages:
1. We have high class dust-free constant temperature and humidity laminating production line.
2. We are the approved processor by SentryGlass
3. Our products meet the requirements of BS EN12600:2002 Class 1 (C) 1 ,and ANSI Z97.1-2015 Class A ,type 4.
An impact perfbimance test for materials in accordance with BS EN12600:2002 has been performed on the four given samples. The performance classification of the all test samples is Classification 1 (C) 1.
Performance Test
Sample:5mm tempered glass + 1.14 PVB + 5mm tempered glass
Impact Test: In accordance with Clause 5.1 of ANSI Z97.1-2015 Type 4
Thermal Test: In accordance with Clause 5.3 of ANSI Z97.1-2015
The distinguish between PVB & SGP:
1.The shear modulus of SGP is 50 times of that of PVB.
2.The Tear strength of SGP is 5 times of that of PVB.
3.The bearing capacity of SGP is 2 times of that of PVB.
4. The bending of SGP is only 1/4 of that of PVB.
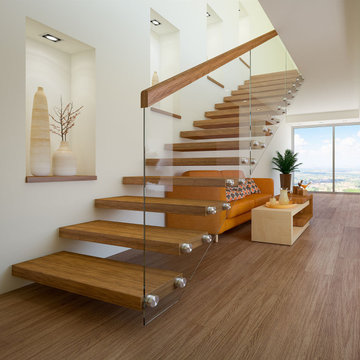
In a word, SGP has better performance than PVB, and it's widely applied in glass path, glass ceiling, glass floor, Stair Treads,etc.
Longlass Laminated Glass Features
Energy saving
When sunlight directly shines on a piece of colorless laminated glass, the PVB interlayer film can absorb most of the heat and only radiate a part of the heat back indoors, making the indoor and outdoor heat difficult to conduct, reducing heat energy consumption, thereby maintaining indoor temperature and saving air conditioning Energy consumption.
Security
it can withstand the penetration of accidental impact. Once the glass is damaged, its fragments will still stick together with the intermediate film, which can avoid personal or property damage caused by the glass falling, and the whole piece of glass remains intact and can continue to withstand impact, wind and rain
Sound insulation
The interlayer film has the function of blocking sound waves, so that the laminated glass can effectively control the transmission of sound and play a good sound insulation effect.
Noise reduction
In the process of sound wave transmission, the glass on both sides of the film is reflected back and forth, and is attenuated and absorbed by the soft film. Generally, the noise can be reduced by 30-40 dB. The thicker the film, the better the noise reduction effect.
Decorative effect
The laminated glass can be sandwiched with various patterns, which can achieve the decorative effect, and there are also decorative effects such as ice glass.
UV resistance
The interlayer film has the function of filtering ultraviolet rays; the special PVB film can make laminated glass weaken the transmission of sunlight, effectively block ultraviolet rays, reduce the fading of indoor fabrics. The color PVB interlayer film has different light transmittance, and can control the ultraviolet and heat gain as needed. It will not block the penetration of visible light .
 China Marmoglass Co.,Limited
Home > Products
Crystallized Glass,Crystallized stone 6
Crystallized Glass,Crystallized stone,Crystallized glass panel
Marmoglass,Nanoglass,Marmoglass Composite Collectively referred to as Crystallized Glass
Crystallized Glass Application:
1). Interior & external wall cladding
2). Flooring Tile, Stair, Column cladding
3). Basin, Countertop, Table, Bar
4). bath, Kitchen, any tops, round pillar and furniture decoration etc .
Crystal white is a kind of artificial stone . It is made of glass ,which should be burned in the oven for two days under the more than 1000C temperature . It is much different from natural stone from all sides.
1. Natural and soft texture,
2. Varied colors such white, beige, carrara white
3. Good weather resisting property and durability
4. Zero percent of water absorption , not be polluted easily
5. Green environmental building material
6. High-intensity, light weight
7. Bending formation, economical, time saving
8. scratch resistant ,withstand high-heat .
More details about it :
1. There are more than 10 colors of crystallized glass panel products available: Pure white, yellow, silver yellow, silver grey, grey in white, grey spot white, USA grey spot white, yellow in white….
2. Panel thickness: 10-30MM
3. Normal specifications (mm):
1800*3000*18 1200*2400*18 600*600*18 1200*1200*18
1600*2400*18 1800*3000*30 800*800*18 1000*1000*18
Thin tiles:
305*305*12mm, 450*450*12mm
457*457*12mm, 400*400*12mm
600*600*12mm 1200*2400*12mm
4. Material: crystal quartz sand
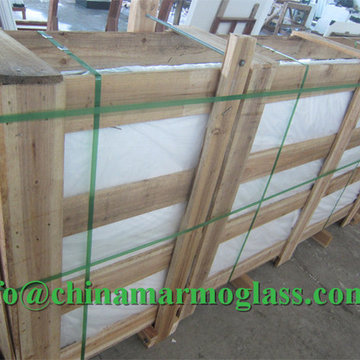
5. Packaging: Fumigated wooden crates, Bundles,foam
6. Brand name: China Marmoglass / Nanoglass
7. Place of origin: Xiamen, Fujian ,China
8. Model NO.: GS001, SN002, NANO2009, NNAO2011
9. Supply ability: 20000M2/MONTH, 30TON/DAY
10. Delivery time: generally within 10 days, after the order confirmed and the deposit received
11. Arc panel specifications (mm):
Thickness: 18-30mm
Diameter : 30cm-120cm
1.What is crystallized glass stone(Marmoglass SN002 )?
The micro crystal stone is an innovative product designed as a substitute for the rare natural white marble. It is superior to the natural white marble in terms of characteristics, where the micro crystal stone possesses extreme density making it anti-breakage, giving it zero water absorption qualities, and making it resistant to acidic and alkaline substances. at the pace that mankind is consuming the natural resources in today’s world, the micro crystal stone is the ultimate solution, the superior alternative for the external and internal applications. It is certainly a revolutionary product and the finest construction material of the 21st century.
2.Why choose crystallized glass stone(Marmoglass SN002)?
The micro-crystal stone, also known as the micro-crystal glass, Marmoglass, is a new type of high-level decoration material. It is derived from natural inorganic material through a high temperature process, and it possesses excellent characteristics including the followings:
1. High Performance
The micro-crystal stone has even texture and high density, which makes it crush resistant, anti-bending and high resistant resulting its performance being higher than natural stone. It can be used for long period with minimal damage.
2. Acid-proof alkalinity and anti-corrosion
Not only does the micro-crystal stone posses special micro-crystal characteristics, it also has special glass features such as a fine texture, shiny surface and light reflection effect.
3. Fine Texture
We have the flexibility to manufacture any colors as per customer requirements while also making up the defect of color differences, which exists in natural stone. While the product is widely used for interior and interior decoration of star-level hotels, subways, local landmark buildings, airports, and office building etc, it is more suitable for high-level home decoration.
4. Pollution-resistance and easy maintenance
The micro-crystal is a kind of inorganic crystalline material with stable chemical characteristics. Its acid proof alkalinity and anti-corrosion nature are superior to nature stone, specifically its anti-weather characteristics whereby it is unaffected by the wind or sunlight.
5.A wide application range
The water absorption rare of micro-crystal is quite low, close to zero. Several types of dirty pulps and dyed solution have difficulty in penetrating it. Any dirt on the surface is easily cleaned and it is convenient to mankind.
6. Heat-bend reformation
With the heating method, the micro-crystal can be made into various arched profiles and arched slabs. the process is simple and it allows us to save time, cost, material and resources.
7. No radioactive elements
In the process of manufacturing the micro-crystal stone, we have integrated the elimination of all the harmful radioactive elements that are found in natural stone from its components. It is therefore the safest and most environmentally friendly building material in our modern world.
Crystallized glass can be processed into slab, tile, countertop, column and vanity top, wash basin and etc. It is applicable for flooring, interior and exterior wall cladding, stairs and table. Contributed to the character of no color difference, so it is widely used for top grade hotel, business building shopping mall and such great construction.
Physical Parameter
Density
2.70 g/cm
Water Absorption
0.01%
Compressive Strength
126 Mpa
Radioactive
Class A (Suitable for indoor and outdoor)
Size
Slabs
2400/2600/2800/3000 x 1800/1600/1400/1500mm
Cut-to-size Tiles
30 / 40 / 50 / 60 / 80 / 100cm X 30 /40/50 /60/80 /100cm
12"x12", 24"X12", 24"x24" or customized size
Thickness
1.2cm,1.8cm (3/4'), 2.0cm, 2.5cm, 3.0cm,
Finishing
Polished, honed
Usage
Flooring, Walls, Stairs / Steps, Counter tops, Vanity, Paving / Curbstone, Pillar, Column, Border, Skirting, Window Sills
Quality Control
Thickness Tolerance
+- 1mm;
Polishing Grade
above 100 degree
Crack / Spot
EU / US Standard: zero
QC Standard
AQL2.5/4.0 ITS
Certificate
CE, ISO, GB/T19001-2008
Advantage
1. Own factory with stable supply;
2. Factory direct with good price and prompt delivery;
3. Good Management System for good quality;
4. Value-added service.
large glass white artificial stone of Packing
Inner Packing
Cover with foam and plastic film, corner paper board protection
Individual Carton
Individual carton packing with trademark is available upon request
Outer Packing
Plastic tapes in 6 sides, further strengthened with iron sheet in the corner
Shipping Mark
OEM
Port of Loading
Xiamen Port of China
Delivery Lead Time
Normally 10-15 days for one 20’ GP, faster delivery is available upon confirmation
Trade Term
FOB, CFR, CIF, etc.
Loading Info.
Thickness
Qty per pallet
Pallets per 20ft container
QTY per 20ft container
Square Meter per 20ft container
Weight per 20ft container
Big slab size
3000*1200mm
12mm
25pcs
7
175pcs
600-900 m2
21000kgs
3000*1400mm
15mm
20pcs
7
175pcs
500-700 m2
21000kgs
3000*1600mm
20mm
15pcs
7
105pcs
350-500 m2
21000kgs
3200*1600mm
30mm
10pcs
7
70pcs
250-358 m2
21000kgs
Installation Recommendations
Wall Cladding
1.Wall should be leveled and cleaned,
2.Fix the panel on the wall with wire and expansion screw tightly,
3.Fill the space between the panel and the wall with cement mortar of ratio 1:3,
4.Clean the extra mortar and dirt on the surface.
Floor Installation
1.Mark out the baseline of gound level,
2.Mix the mortar with ratio of 1 cement to 4 sand to have semi-day mortar,
3.Lay the mixed mortar in level with a layer of 3-4cm thickness,place the tile over the mortar and adjust the height properly to be leveled,
4.Remove the tile after level adjustment.Put a thin layer of cement powder on the mortar and add water on it to become wet,
5.Put the tile on top and gently knock with rubber hammer until it sealed with the mortar properly. Make sure the tile is leveled and has the same space between each other. Those tiles which are not leveled with others should be removed and repeat the leveling procedure in step 4.Genetally,the space between two tiles should be 2mm for water evaporation and normal expansion.
Daily maintenance of Micro Crystal Stone
1.The laying area of micro crystal stone can only be opened for use or stacking any item on top after at least 24 hours of filling the gap,
2.The ground must be covered with plywood or carpet for protection in case of doing other decoration work after the installation of micro crystal stone floor,
3.In areas like exit and entrance, the surface of micro crystal stone floor should be covered by carpet or plywood to protect it from the damage of abrasion of sand or other hard material.
4.Do not use general floor wax on micro crystal stone,General floor wax is an oil-based wax which is easily stuck to dust.
5.Please use rubber wheels for shopping cart and trolley on micro crystal stone floor, for the hard wheel may scratch and damage the surface,
6.Regular care and maintenance is the key for long lasting of micro crystal stone’s high glossy and reflection.
Important Notice
1.Make sure the ground of laying area is dry and clean before laying mortar. The ratio 1:3(volume ratio) must be strictly followed and no extra water added during the installation progress
2.In the choice of using white cement as the filling material, the strength and quality of the cement must be checked properly.
3.It is not recommended to store micro crystal stone outdoor for long time. It should be covered with rock wool in winter and moved into indoor 2 hours in advance before installation. It also needs to be covered with waterproof cloth when installing during the rainy days outdoor,
4.When using micro crystal stone as ground floor,2mm wild gap must be left between the joints for the benefit of the water vaporization and physical expansion. In the case of large-scale installation, it is recommended to leave an 8mm expansion joint,
5.It is recommended that the area of micro crystal stone to remain-not used-for at least 24 hours and kept 2-3 days before passing or storing items on top.
Marmoglass Polished Edge, Shining !
China Marmoglass SN002 Slabs Packing and Ready for ship
We not only make Slabs, we also can make:
- Project Tiles
- Countertop
- Tabletop
- Vanitytop
- Column
Tags: Marmoglass, Crystallized glass panel, nano crystallized glass panel, pore marmoglass, pore crystallized glass panel, Artificial Stone, Hole-Free Micro Crystal Stone, Pure white stone, Crystallized glass tile, Crystal glass tile, pure white artificial white marble, Marmo Glass, Glass Marble, White Marble, Marmoglass, nano marmoglass, no pore marmoglass, non-pore crystallized glass panel, glass marble, white marble, crystal white marble, white stone, white marble tile, Micro-crystal stone, Crystallized glass, Crystallized White Stone, Crystallized White Stone, Micro-crystallized composite tile, Hole-Free Micro Crystal Stone, Micro-crystallized composite tile, White Marble Tiles, pure white marble
China Marmoglass SN002 Strong Packing Crates
China Marmoglass SN002 and Nanoglass NANO3 Container Loading
Welcome to our product page of China Marmoglass, in which you can find detailed information of Marmoglass. China Marmoglass Co.,Limited offer Crystallized White Marmoglass is good in quality and competitive in price. China Marmoglass Co.,Limited is the manufacturer and supplier of Marmoglass,White Crystallized Glass Panel,Nanoglass. Crystallized Glass Stone,Crystallized Glass Panel,Crystallized Glass Stone Tile,Crystallized Glass Stone Countertop,Marmoglass also known as Nanoglass and White Crystallized Glass,Marmoglass, Crystallized Glasss is the popular materials for interior and exterior applications, including kitchen countertops, bathroom vanities, commercial foyer wall claddings, etc. China Marmoglass Co.,Limited is the Manufacturer and export Crystallized Glass and Crystallized Glass products. Crystallized Glass can be used Interior & external wall cladding, Flooring Tile, Stair, Column cladding, Basin, Countertop, Table, Bar, bath, Kitchen, any tops, round pillar and furniture decoration etc. Super White Nanoglass Slab, You Can Buy Various High Quality Super White Nanoglass Slab Products from Super White Nanoglass Slab Suppliers and Super White Nanoglass Slab Manufacturers at Chinamarmoglass.com
 China Marmoglass Co.,Limited
Home > Products
Crystallized Glass,Crystallized stone 6
Crystallized Glass,Crystallized stone,Crystallized glass panel
Marmoglass,Nanoglass,Marmoglass Composite Collectively referred to as Crystallized Glass
Crystallized Glass Application:
1). Interior & external wall cladding
2). Flooring Tile, Stair, Column cladding
3). Basin, Countertop, Table, Bar
4). bath, Kitchen, any tops, round pillar and furniture decoration etc .
Crystal white is a kind of artificial stone . It is made of glass ,which should be burned in the oven for two days under the more than 1000C temperature . It is much different from natural stone from all sides.
1. Natural and soft texture,
2. Varied colors such white, beige, carrara white
3. Good weather resisting property and durability
4. Zero percent of water absorption , not be polluted easily
5. Green environmental building material
6. High-intensity, light weight
7. Bending formation, economical, time saving
8. scratch resistant ,withstand high-heat .
More details about it :
1. There are more than 10 colors of crystallized glass panel products available: Pure white, yellow, silver yellow, silver grey, grey in white, grey spot white, USA grey spot white, yellow in white….
2. Panel thickness: 10-30MM
3. Normal specifications (mm):
1800*3000*18 1200*2400*18 600*600*18 1200*1200*18
1600*2400*18 1800*3000*30 800*800*18 1000*1000*18
Thin tiles:
305*305*12mm, 450*450*12mm
457*457*12mm, 400*400*12mm
600*600*12mm 1200*2400*12mm
4. Material: crystal quartz sand
5. Packaging: Fumigated wooden crates, Bundles,foam
6. Brand name: China Marmoglass / Nanoglass
7. Place of origin: Xiamen, Fujian ,China
8. Model NO.: GS001, SN002, NANO2009, NNAO2011
9. Supply ability: 20000M2/MONTH, 30TON/DAY
10. Delivery time: generally within 10 days, after the order confirmed and the deposit received
11. Arc panel specifications (mm):
Thickness: 18-30mm
Diameter : 30cm-120cm
1.What is crystallized glass stone(Marmoglass SN002 )?
The micro crystal stone is an innovative product designed as a substitute for the rare natural white marble. It is superior to the natural white marble in terms of characteristics, where the micro crystal stone possesses extreme density making it anti-breakage, giving it zero water absorption qualities, and making it resistant to acidic and alkaline substances. at the pace that mankind is consuming the natural resources in today’s world, the micro crystal stone is the ultimate solution, the superior alternative for the external and internal applications. It is certainly a revolutionary product and the finest construction material of the 21st century.
2.Why choose crystallized glass stone(Marmoglass SN002)?
The micro-crystal stone, also known as the micro-crystal glass, Marmoglass, is a new type of high-level decoration material. It is derived from natural inorganic material through a high temperature process, and it possesses excellent characteristics including the followings:
1. High Performance
The micro-crystal stone has even texture and high density, which makes it crush resistant, anti-bending and high resistant resulting its performance being higher than natural stone. It can be used for long period with minimal damage.
2. Acid-proof alkalinity and anti-corrosion
Not only does the micro-crystal stone posses special micro-crystal characteristics, it also has special glass features such as a fine texture, shiny surface and light reflection effect.
3. Fine Texture
We have the flexibility to manufacture any colors as per customer requirements while also making up the defect of color differences, which exists in natural stone. While the product is widely used for interior and interior decoration of star-level hotels, subways, local landmark buildings, airports, and office building etc, it is more suitable for high-level home decoration.
4. Pollution-resistance and easy maintenance
The micro-crystal is a kind of inorganic crystalline material with stable chemical characteristics. Its acid proof alkalinity and anti-corrosion nature are superior to nature stone, specifically its anti-weather characteristics whereby it is unaffected by the wind or sunlight.
5.A wide application range
The water absorption rare of micro-crystal is quite low, close to zero. Several types of dirty pulps and dyed solution have difficulty in penetrating it. Any dirt on the surface is easily cleaned and it is convenient to mankind.
6. Heat-bend reformation
With the heating method, the micro-crystal can be made into various arched profiles and arched slabs. the process is simple and it allows us to save time, cost, material and resources.
7. No radioactive elements
In the process of manufacturing the micro-crystal stone, we have integrated the elimination of all the harmful radioactive elements that are found in natural stone from its components. It is therefore the safest and most environmentally friendly building material in our modern world.
Crystallized glass can be processed into slab, tile, countertop, column and vanity top, wash basin and etc. It is applicable for flooring, interior and exterior wall cladding, stairs and table. Contributed to the character of no color difference, so it is widely used for top grade hotel, business building shopping mall and such great construction.
Physical Parameter
Density
2.70 g/cm
Water Absorption
0.01%
Compressive Strength
126 Mpa
Radioactive
Class A (Suitable for indoor and outdoor)
Size
Slabs
2400/2600/2800/3000 x 1800/1600/1400/1500mm
Cut-to-size Tiles
30 / 40 / 50 / 60 / 80 / 100cm X 30 /40/50 /60/80 /100cm
12"x12", 24"X12", 24"x24" or customized size
Thickness
1.2cm,1.8cm (3/4'), 2.0cm, 2.5cm, 3.0cm,
Finishing
Polished, honed
Usage
Flooring, Walls, Stairs / Steps, Counter tops, Vanity, Paving / Curbstone, Pillar, Column, Border, Skirting, Window Sills
Quality Control
Thickness Tolerance
+- 1mm;
Polishing Grade
above 100 degree
Crack / Spot
EU / US Standard: zero
QC Standard
AQL2.5/4.0 ITS
Certificate
CE, ISO, GB/T19001-2008
Advantage
1. Own factory with stable supply;
2. Factory direct with good price and prompt delivery;
3. Good Management System for good quality;
4. Value-added service.
large glass white artificial stone of Packing
Inner Packing
Cover with foam and plastic film, corner paper board protection
Individual Carton
Individual carton packing with trademark is available upon request
Outer Packing
Plastic tapes in 6 sides, further strengthened with iron sheet in the corner
Shipping Mark
OEM
Port of Loading
Xiamen Port of China
Delivery Lead Time
Normally 10-15 days for one 20’ GP, faster delivery is available upon confirmation
Trade Term
FOB, CFR, CIF, etc.
Loading Info.
Thickness
Qty per pallet
Pallets per 20ft container
QTY per 20ft container
Square Meter per 20ft container
Weight per 20ft container
Big slab size
3000*1200mm
12mm
25pcs
7
175pcs
600-900 m2
21000kgs
3000*1400mm
15mm
20pcs
7
175pcs
500-700 m2
21000kgs
3000*1600mm
20mm
15pcs
7
105pcs
350-500 m2
21000kgs
3200*1600mm
30mm
10pcs
7
70pcs
250-358 m2
21000kgs
Installation Recommendations
Wall Cladding
1.Wall should be leveled and cleaned,
2.Fix the panel on the wall with wire and expansion screw tightly,
3.Fill the space between the panel and the wall with cement mortar of ratio 1:3,
4.Clean the extra mortar and dirt on the surface.
Floor Installation
1.Mark out the baseline of gound level,
2.Mix the mortar with ratio of 1 cement to 4 sand to have semi-day mortar,
3.Lay the mixed mortar in level with a layer of 3-4cm thickness,place the tile over the mortar and adjust the height properly to be leveled,
4.Remove the tile after level adjustment.Put a thin layer of cement powder on the mortar and add water on it to become wet,
5.Put the tile on top and gently knock with rubber hammer until it sealed with the mortar properly. Make sure the tile is leveled and has the same space between each other. Those tiles which are not leveled with others should be removed and repeat the leveling procedure in step 4.Genetally,the space between two tiles should be 2mm for water evaporation and normal expansion.
Daily maintenance of Micro Crystal Stone
1.The laying area of micro crystal stone can only be opened for use or stacking any item on top after at least 24 hours of filling the gap,
2.The ground must be covered with plywood or carpet for protection in case of doing other decoration work after the installation of micro crystal stone floor,
3.In areas like exit and entrance, the surface of micro crystal stone floor should be covered by carpet or plywood to protect it from the damage of abrasion of sand or other hard material.
4.Do not use general floor wax on micro crystal stone,General floor wax is an oil-based wax which is easily stuck to dust.
5.Please use rubber wheels for shopping cart and trolley on micro crystal stone floor, for the hard wheel may scratch and damage the surface,
6.Regular care and maintenance is the key for long lasting of micro crystal stone’s high glossy and reflection.
Important Notice
1.Make sure the ground of laying area is dry and clean before laying mortar. The ratio 1:3(volume ratio) must be strictly followed and no extra water added during the installation progress
2.In the choice of using white cement as the filling material, the strength and quality of the cement must be checked properly.
3.It is not recommended to store micro crystal stone outdoor for long time. It should be covered with rock wool in winter and moved into indoor 2 hours in advance before installation. It also needs to be covered with waterproof cloth when installing during the rainy days outdoor,
4.When using micro crystal stone as ground floor,2mm wild gap must be left between the joints for the benefit of the water vaporization and physical expansion. In the case of large-scale installation, it is recommended to leave an 8mm expansion joint,
5.It is recommended that the area of micro crystal stone to remain-not used-for at least 24 hours and kept 2-3 days before passing or storing items on top.
Marmoglass Polished Edge, Shining !
China Marmoglass SN002 Slabs Packing and Ready for ship
We not only make Slabs, we also can make:
- Project Tiles
- Countertop
- Tabletop
- Vanitytop
- Column
Tags: Marmoglass, Crystallized glass panel, nano crystallized glass panel, pore marmoglass, pore crystallized glass panel, Artificial Stone, Hole-Free Micro Crystal Stone, Pure white stone, Crystallized glass tile, Crystal glass tile, pure white artificial white marble, Marmo Glass, Glass Marble, White Marble, Marmoglass, nano marmoglass, no pore marmoglass, non-pore crystallized glass panel, glass marble, white marble, crystal white marble, white stone, white marble tile, Micro-crystal stone, Crystallized glass, Crystallized White Stone, Crystallized White Stone, Micro-crystallized composite tile, Hole-Free Micro Crystal Stone, Micro-crystallized composite tile, White Marble Tiles, pure white marble
China Marmoglass SN002 Strong Packing Crates
China Marmoglass SN002 and Nanoglass NANO3 Container Loading
Welcome to our product page of China Marmoglass, in which you can find detailed information of Marmoglass. China Marmoglass Co.,Limited offer Crystallized White Marmoglass is good in quality and competitive in price. China Marmoglass Co.,Limited is the manufacturer and supplier of Marmoglass,White Crystallized Glass Panel,Nanoglass. Crystallized Glass Stone,Crystallized Glass Panel,Crystallized Glass Stone Tile,Crystallized Glass Stone Countertop,Marmoglass also known as Nanoglass and White Crystallized Glass,Marmoglass, Crystallized Glasss is the popular materials for interior and exterior applications, including kitchen countertops, bathroom vanities, commercial foyer wall claddings, etc. China Marmoglass Co.,Limited is the Manufacturer and export Crystallized Glass and Crystallized Glass products. Crystallized Glass can be used Interior & external wall cladding, Flooring Tile, Stair, Column cladding, Basin, Countertop, Table, Bar, bath, Kitchen, any tops, round pillar and furniture decoration etc. Super White Nanoglass Slab, You Can Buy Various High Quality Super White Nanoglass Slab Products from Super White Nanoglass Slab Suppliers and Super White Nanoglass Slab Manufacturers at Chinamarmoglass.com
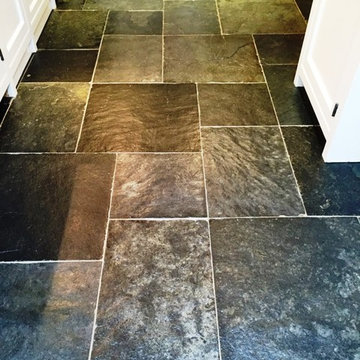
 Tile Doctor Ltd
These photographs below are of a Slate Tiled Kitchen floor taken at a customer’s house in Henley-on-Thames which, as its name suggests, sits alongside the River Thames in Oxfordshire. My client’s Slate kitchen floor had recently been cleaned with unsuitable cleaning products which I suspect impacted the sealer leaving it looking dull. Sealers really to improve the look of a stone floor so unsurprisingly once the sealer had been damaged my client had been unable to find a cleaning product that could have any kind of positive effect on the tiles.
It’s fairly well known that many supermarket quality cleaners are only really designed for use on Ceramic or Porcelain tiled floors as they contain acids which strip away at sealers and acid sensitive stone floors, leaving the stone beneath vulnerable. So your select a cleaning product for your floor always read the small print on the back of the label and make sure you avoid anything that mentions not for use on acid sensitive stone; belter still Tile Doctor have a number of products for cleaning tiled floors including Neutral Cleaner and Stone Soap.
To clean the floor and remove any remaining sealer I first made a strong dilution of Tile Doctor Pro Clean which is a strong alkaline cleaner and then spread this over the floor, leaving it to dwell. This allows the cleaner to seep into the slate and get underneath, breakdown sealers and start to lift out ingrained dirt.
Following a dwelling period of roughly ten minutes, I agitated the floor periodically with a rotary machine fitted with a black scrubbing pad and scrubbed along the grout lines with a stiff grout brush. I then used a wet vacuum to extract the resultant slurry away and then followed up by rinsing the floor with clean water, and once again vacuumed up the residue.
Any stubborn areas were retreated until I was happy with the floor and then I left the floor to dry off completely overnight, in preparation for sealing the following day.
Upon my return to the house the following day, I ran some damp tests on different parts of the floor to check for any excess moisture which could potentially damage the performance of the sealer. Once I was satisfied that the floor was completely dry, I proceeded to seal the tiles using Tile Doctor Seal & Go. This will provide a robust surface seal for the future, along with an aesthetically pleasing low-sheen finish.
This sealer works particularly well on Slate tiles and, being a water-based sealant, additionally Seal & Go does not emit an unpleasant smell as it dries. Slate is quite a porous stone so I applied six coats of seal to provide long-lasting protection.
Barry Woodward
Oxfordshire Tile Doctor
8