
Search results for "Poor soil" in Home Design Ideas

 Forest Landscaping
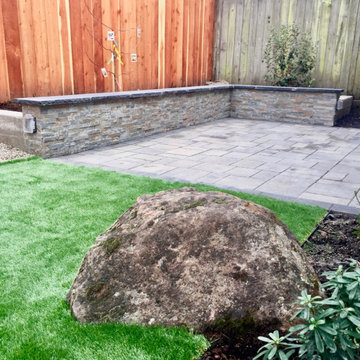
This client contacted us with a two fold purpose. The first was that his yard was constantly wet no matter how much or how little he irrigated, which kept him and his pets from enjoying the yard. The second was to give him and his wife a patio that fit the space well. We designed a retaining wall that diverted water away from his property that was draining off several neighbor's lots onto his. Along with excavating and removing some poor soils, this succeeded in drying out what had previously been a saturated and largely unusable backyard. We also designed a spacious, curved layout that compliments the rolling nearby terrain. We also sealed the hardscape elements to give it a lustrous, wet look without making it slippery!

 Sweet Smiling Landscape Design
This beautiful property is located in the hills above of Montecito with 360 degree of views onto the Channel Islands and the surrounding mountains. Inspired by the Japanese landscape design principal of the borrowed landscape the gardens on this property serves as a kind of picture frame from which to view the natural beauty of its surroundings.
This 15-year-old costume-built home was crafted with all the style and workmanship ship found in Villa or Château in the Mediterranean. Unfortunately, the garden design was not as well thought out as the house was. Most of this property receives baking sun, drying winds and is in an extremely high fire danger area. Do to these factors many of the plants on the property were unsuitable for their location. The original planting scheme was also lifeless and colorless. Poor landscape maintenance had left many of the plants on the property sick and dying.
We came in to revive this landscape, breathing new life into it.
Creating a drought tolerant and fire wise landscape was of utmost importance to these clients. Staying true to the more formal landscape styles found in Southern Europe we also want to create an opportunity to design seamlessly blend with its natural surroundings. We did that by incorporating a lot of California native plants. This vast property also contains an avocado orchard and a vineyard. By adding California native plants the property is inviting in native birds and insects that help keep pollinate the orchard and vineyard and keep pest problems at bay. Because these clients enjoy harvesting from their land we added elements of edible landscaping to this project. We filled pottery and planter beds with fruit trees, culinary and medicinal herbs as well as flowers that can be used in cut flower arrangements. Lastly, we went through carefully pruning diseased plants, treating pest problems an improving the soil. Now the landscape is not only more beautiful it is more protected against fire, is more water wise and integrate into its surrounds with a wholistic approach.
 Forest Landscaping
This client contacted us with a two fold purpose. The first was that his yard was constantly wet no matter how much or how little he irrigated, which kept him and his pets from enjoying the yard. The second was to give him and his wife a patio that fit the space well. We designed a retaining wall that diverted water away from his property that was draining off several neighbor's lots onto his. Along with excavating and removing some poor soils, this succeeded in drying out what had previously been a saturated and largely unusable backyard. We also designed a spacious, curved layout that compliments the rolling nearby terrain. We also sealed the hardscape elements to give it a lustrous, wet look without making it slippery!
Find the right local pro for your project
 Superior Basement Solutions
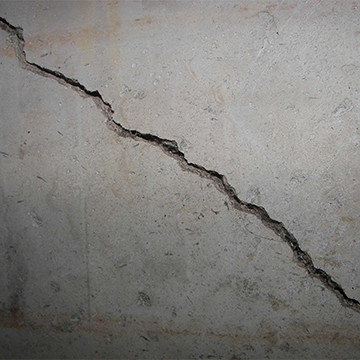
Foundation Wall Cracks
Foundation wall cracks are the most common source of seepage in residential basements across CT and RI. Some of the common causes of these cracks are structure settling, concrete shrinkage or poor site conditions related to soil type and compaction, drainage or concrete strength. Most wall cracks are small in nature and typically pose no structural risk. Some horizontal cracks may reveal a more serious issue and may require crack repair from a structural engineer. Locating the cause of the problem and understanding the cracking pattern is the key to a successful repair.
Our crack repair specialists are trained in many repair procedures.
 Lincoln Lighthill Architect
What does a roof deck look like when every part of the roof, even areas deemed uninhabitable and structurally weak, is utilized and optimized?
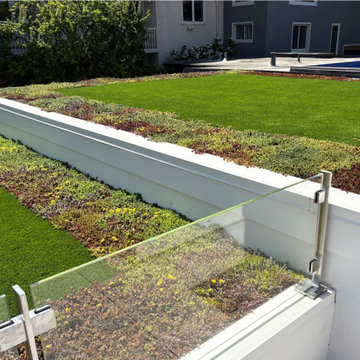
This large midcentury home on the edge of Presidio National Park in San Francisco had an incredible location and views. But the original roof deck suffered from poor design detailing that had rendered it a leaking, deteriorating mess. Even worse, the previous owner had covered three roof areas surrounding the deck with river stones, structurally overloading the building and endangering its occupants.
We removed the river stones and everything else down to the framing. An expertly detailed drainage and waterproofing system underlies everything above. The deck and access stairs are surfaced with durable and refined porcelain pavers. The guardrail is made from custom stainless steel supports with clear, low-iron, laminated glass spanning between for an unobstructed view. Heated seats make watching the chilly fog roll in through the gate comfy.
Planting and greenery surround the deck. The type varies depending on structural conditions- a deep planter sits on top of a structural wall, sedums in shallow soil occupy the strong edges of the surrounding rooftops, and faux grass turf fills out the middle in areas that can’t support the weight of wet soil.
 Tile Doctor Ltd
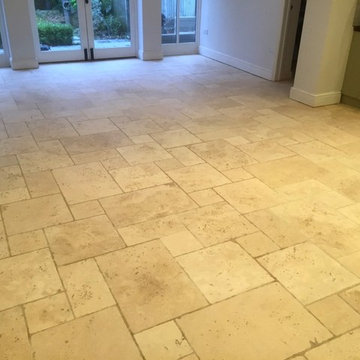
Recently I visited a client in the town of Maidenhead, Berkshire who needed assistance restoring a very dirty pitted Limestone tiled floor which had suffered over the years due to poor maintenance choices. The pressures of a busy family life had, understandably, prevented my client from undertaking regular cleaning and the products and methods used for cleaning were by and large unsuitable for this type of natural stone. In addition, the pits in the tiles had been filled with grout; however, they were not flush to the tile and therefore a large amount of soil had collected in the pockets. The result was a Limestone tiled floor in considerably poor condition that was increasingly difficult to keep clean.
My client had tried and tried to get the floor clean, using methods such as scrubbing with toothbrushes, steam cleaners, and mopping – but they weren’t getting anywhere! I explained to my client that steaming is, in fact, one of the worst cleaning systems to use on natural stone floors. Steam not only damages sealers, it also thins out greasy soils. Some of these soils are absorbed onto the domestic microfiber pads, however a lot of the soil becomes thinner allowing it to penetrate deeper into the pours of the stone and grout. This in itself starts the vicious circle to rapidly soiled and dirty tiles and grout. This happens because the grease soils magnetise dirt!
My first task in the cleaning process was to mix a strong solution of Tile Doctor Pro-Clean, which is a high alkaline cleaner. This solution was applied liberally across the entire Limestone tiled floor and grout. It was allowed to dwell for 30-40 minutes, giving it time to seep into the stone to get underneath and lift the ingrained dirt to the surface. During this time, I scrubbed the grout lines using a specialist stiff grout brush. The Limestone tiles were then scrubbed with heavy mechanical rotary agitation machine.
I then gave the floor a thorough rinse using the latest in cleaning and capture technology, which involves firing hot water at high pressure in a spinning motion across the floor, in effect blasting away the ingrained soils from the grout and pitting in the limestone. The high pressure is delivered from a system mounted inside my van which also contains waste tanks to capture the extracted soiled water.
After being allowed to dry thoroughly for 24 hours, I returned to seal the floor with Tile Doctor Colour Grow which would have brought out the deep colours in the stone, however after discussing the options with the client it became clear that they wanted to keep the floor looking as light as possible so Tile Doctor Ultra Seal was applied. Ultra Seal is a natural look impregnating sealer that soaks into the pores of the stone and protects it from within.
The floor now looks fantastic and the sealer should ensure it remains looking that way for some time to come and before leaving I made sure to provide my client with some professional maintenance advice.
Tim Colenutt
Berkshire Tile Doctor
 Lincoln Lighthill Architect
What does a roof deck look like when every part of the roof, even areas deemed uninhabitable and structurally weak, is utilized and optimized?
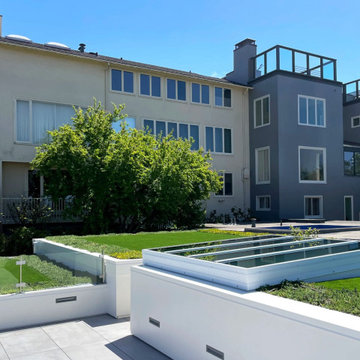
This large midcentury home on the edge of Presidio National Park in San Francisco had an incredible location and views. But the original roof deck suffered from poor design detailing that had rendered it a leaking, deteriorating mess. Even worse, the previous owner had covered three roof areas surrounding the deck with river stones, structurally overloading the building and endangering its occupants.
We removed the river stones and everything else down to the framing. An expertly detailed drainage and waterproofing system underlies everything above. The deck and access stairs are surfaced with durable and refined porcelain pavers. The guardrail is made from custom stainless steel supports with clear, low-iron, laminated glass spanning between for an unobstructed view. Heated seats make watching the chilly fog roll in through the gate comfy.
Planting and greenery surround the deck. The type varies depending on structural conditions- a deep planter sits on top of a structural wall, sedums in shallow soil occupy the strong edges of the surrounding rooftops, and faux grass turf fills out the middle in areas that can’t support the weight of wet soil.
 Art Garden Design
This Berkeley property had overgrown vines, concaving fences, rotted deck, dead lawn, broken concrete, and poor drainage. After removing about 30 yards of soil from this lot, we were able to begin leveling and sculpting the landscape. We installed new concrete pathways, synthetic lawn, custom swing and arbor, Thermory wood decking with metal railings, paver patio with masonry stone wall seating, and stone mosaic water feature with stainless steel wire to match. Many elements tied together nicely in this modern Berkeley backyard.

 soilsalive
Common Dandelion. Dandelions are perennials that thrive in areas of full sun and consistent moisture, however they can still crop up in areas of drier shade. They produce a huge taproot that can reach up to 15-feet deep! Pulling the top of the plant off, or cutting it down with a weedeater won't kill the plant; it can generate new top growth from the roots below the soil. Seeds from the bright yellow flowers spread far and wide and can quickly overwhelm a weak lawn with poor soil. https://soilsalive.com/resources/identification-guide/common-dandelion
 Lincoln Lighthill Architect
What does a roof deck look like when every part of the roof, even areas deemed uninhabitable and structurally weak, is utilized and optimized?
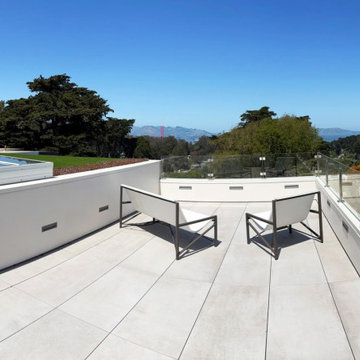
This large midcentury home on the edge of Presidio National Park in San Francisco had an incredible location and views. But the original roof deck suffered from poor design detailing that had rendered it a leaking, deteriorating mess. Even worse, the previous owner had covered three roof areas surrounding the deck with river stones, structurally overloading the building and endangering its occupants.
We removed the river stones and everything else down to the framing. An expertly detailed drainage and waterproofing system underlies everything above. The deck and access stairs are surfaced with durable and refined porcelain pavers. The guardrail is made from custom stainless steel supports with clear, low-iron, laminated glass spanning between for an unobstructed view. Heated seats make watching the chilly fog roll in through the gate comfy.
Planting and greenery surround the deck. The type varies depending on structural conditions- a deep planter sits on top of a structural wall, sedums in shallow soil occupy the strong edges of the surrounding rooftops, and faux grass turf fills out the middle in areas that can’t support the weight of wet soil.
 Lincoln Lighthill Architect
What does a roof deck look like when every part of the roof, even areas deemed uninhabitable and structurally weak, is utilized and optimized?
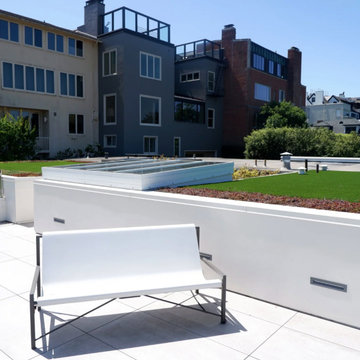
This large midcentury home on the edge of Presidio National Park in San Francisco had an incredible location and views. But the original roof deck suffered from poor design detailing that had rendered it a leaking, deteriorating mess. Even worse, the previous owner had covered three roof areas surrounding the deck with river stones, structurally overloading the building and endangering its occupants.
We removed the river stones and everything else down to the framing. An expertly detailed drainage and waterproofing system underlies everything above. The deck and access stairs are surfaced with durable and refined porcelain pavers. The guardrail is made from custom stainless steel supports with clear, low-iron, laminated glass spanning between for an unobstructed view. Heated seats make watching the chilly fog roll in through the gate comfy.
Planting and greenery surround the deck. The type varies depending on structural conditions- a deep planter sits on top of a structural wall, sedums in shallow soil occupy the strong edges of the surrounding rooftops, and faux grass turf fills out the middle in areas that can’t support the weight of wet soil.
 Elzo Landscape
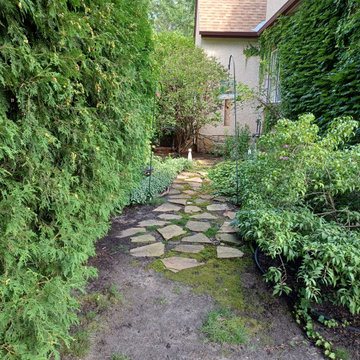
Before renovation: an informal stepping stone path with compacted soil and inconsistent grading contributed to poor drainage and unclear circulation. The space required regrading, defined edging, and structured planting to improve both performance and visual order.
 Elzo Landscape
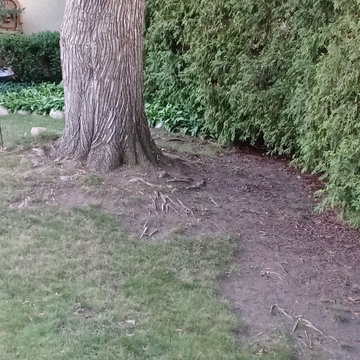
Before renovation: compacted soil, exposed tree roots, and poorly defined planting areas contributed to drainage issues and uneven turf conditions. The yard required regrading and underground drainage correction to restore function and structure.
 Tile Doctor Ltd
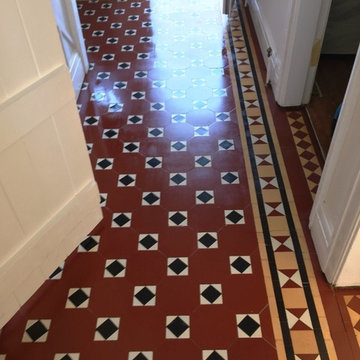
This Victorian tiled hallway was one of the most beautiful Victorian floors I have ever had the pleasure to work on. With the wide range of patterns and colours they are available in, it seems no two Victorian tiled floors are exactly the same, and this uniqueness is part of what makes them so appealing to property owners.
Unfortunately, this floor had been poorly maintained over the years, even suffering from a few loose and missing tiles. There was a thick coating of dust and dirt soiling its appearance, and the property owner was understandably keen to remedy the situation. Having realised that everyday household cleaners are not likely to achieve great results, she asked me to carry out a full professional restoration, including making some repairs where necessary. I was pleasantly surprised to find out that this property was situated in the town of Wyken, which is a few miles outside of Coventry city centre and in fact just down the road from where I live myself!
Before making a start on the cleaning process, it was first necessary to re-fix the small number of loose tiles and replace a single missing tile by the radiator. Fortunately, I’ve been working on these types of floors for some time and have built up a good collection of replacement Victorian tiles so I was able to find one that matched in nicely with the rest of the floor without too much problem.
To clean the tiles, I began by applying a layer of Tile Doctor Oxy-Gel directly into the floor with a small brush. This product is very similar to the popular Tile Doctor Pro Clean: both are strong alkaline cleaners, strippers and degreasers, with the main difference being that Oxy-Clean comes in a gel form, making it easier to control and therefore ideal for precise cleaning, or for application to vertical surfaces. Like Pro Clean and being an alkaline base it is suitable for use on all types of natural stone and tile. The Oxy-Gel was left to soak into the tiles for around ten minutes before being scrubbed in and then rinsed off carefully with water, I then used a wet vacuum to extract the now soiled cleaning solution off the floor.
The next step was to acid wash the floor using Tile Doctor Acid Gel; this served to break down alkaline mineral deposits inherent in the grout along with some excess grout that had been left on the untidily left on tile from installation. It is recommended not to use this product on acid-sensitive soon such as Marble and Limestone as it can cause irreparable etching but its fine on Victorian tiles as long as you don’t leave it on too long.
Finally, the floor was given a rinse with clean water to remove any trace of chemicals from the cleaning and to neutralise the area in preparation for sealing.
I left the floor for 48 hours to dry before returning to the property to seal the tiles. This allowed plenty of time for the floor to dry completely, which is important as any excess moisture can damage the ability of the sealer to protect against dirt and stains.
My choice of sealer for this floor was Tile Doctor High Shine; three coats in total were applied, providing – as the product name suggests – the high shine finish that the customer had requested. The sealer will provide durable surface protection going forward preventing dirt from becoming ingrained into the pores of the tile and ensuring it remains easy to clean and keeping its appearance for some time to come.
As a big fan of Victorian tiles, it was a great pleasure to restore this floor, and my customer was certainly pleased too. It’s amazing how far a little professional maintenance can go to improving the appearance of these fantastic types of floor.
Mick Gayton
Warwickshire Tile Doctor
 Tile Doctor Ltd
Shower and bathroom mould and soap scum growth are probably the most common, annoying and frustrating tile-related problems. Wet and high humidity areas with poor ventilation provide the perfect breeding ground for mould and stains. Soap residue and body oils also create a food source for soap scum, mould to grow.
My customer in Dane Bank had the exact problem with dirty and mouldy grout lines in her shower cubicle. She had tried scrubbing the grout lines herself with a toothbrush and standard supermarket cleaners but never got the result she wanted.
Fortunately she was lucky to find Tile Doctor from the internet and I was asked to pop over and take a look to see what could be done. I was confident we could make a big difference so I went through the options with her and give her price for the job. She was happy with the price and we agreed a date for me to return and complete the work.
For grout lines cleaning I used Tile Doctor Grout Colorant Pre-Treat Cleaner, which successfully removes dirt, soil, soap scum and hard water deposits from grout joints. The product was sprayed on to the grout and left to dwell and seep into the pores for approximately five minutes to break down the soap scum and dirt before being scrubbed in using a stiff grout brush. The cleaning was successful but there were still few mouldy spots left. On these spots I used Tile Doctor Mould Away Spray that is meant for quick removal of mould from grout and silicone. One again product got sprayed on grout lines and left to dwell for five minutes and then scrubbed with stiff grout brush and then rinsed with clean water. After I had finished cleaning I express dried the tile and grout using high power heat gun.
With the area nice and dry, I had to choose the matching colour for the existing grout. There are ten colours to choose from the Tile Doctor range of Grout Colourant and on this occasion we chose Limestone as the best colour to match the tile.
The colourant is easily applied directly to the grout and in this case I applied two coats. The product is epoxy based and completely seals and rejuvenates the appearance of the grout, which not only drastically improves appearance it also makes it much easier to clean in the future. After applying the re-colourant I buffed all grout colorant excess off the tiles and the shower cubicle was ready.
My customer was very satisfied with the work and left the following comment on the Tile Doctor Feedback system
“Really, really happy with the service Tony provided and the recommendations he suggested. The work was carried out in a highly professional manner, to a high standard. I have already recommended him to friends. Thank you”
Tony Olmet
Greater Manchester Tile Doctor
 Tile Doctor Ltd
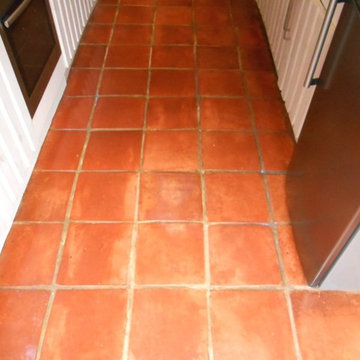
Not too long ago, I visited a house in the town of Fulwood in Preston, Lancashire. My client had a Terracotta tiled floor which had been neglected for many years and in their attempt to improve it had unfortunately been given some very poor advice by tile retailers, all of whom sold him different products, and each of which was unsuitable. Using these different products in succession had resulted in the depreciation of the floor’s texture and smoothness, in turn making the clay difficult to clean and maintain.
As per my usual process I ran a small test clean to demonstrate what could be done to improve the floor and I was commissioned to restore the floor back to its former glory.
I started by mixing a strong cleaning solution consisting of one part Tile Doctor Pro-Clean to three parts water. The solution was applied to the floor and left it to dwell for a short period. The high alkaline cleaner seeps into the pores of the tile getting underneath and lifting out the ingrained dirt and breaking down the old sealers. Then, I agitated the floor using a scrubbing pad fitted to a rotary floor machine before using a wet vacuum to suck up the resulting soiled solution.
There were a few paint marks dotted across the floor, but these were not noticeable until after I had given the Terracotta a deep clean. To remove the paint marks I used Tile Doctor Remove & Go, which is specially formulated to break down paint stains, adhesives and coatings. This product was used in combination with a steamer which, when applied directly to the tiles, helped to lift the paint out. Following this, I rinsed the entire floor a couple of times to remove any trace of cleaning product, and vacuumed up the excess moisture.
It’s always best to let the floor dry completely prior to sealing as applying sealer to a damp floor will affect the sealer. I left the house to allow this to take place overnight returning the next day. To get the best out of the Terracotta I sealed the floor using one coat of Tile Doctor Colour Grow, which is an impregnating sealer that soaks into the pores of the tile and acts as both as a bonding sealer enhancing the natural colours and darkening the clay (as requested by my client).
After the coat of Colour Grow had dried, I applied a further seven coats of Tile Doctor Seal & Go, which achieves a nice, low sheen Satin finish. Before leaving my happy client to enjoy his newly restored Terracotta floor, I made sure to provide some professional cleaning and long-term maintenance advice.
Russell Taylor
Lancashire Tile Doctor
 Tile Doctor Ltd
This Tumbled Travertine tiled floor at a beautiful house in Horley had been poorly maintained through the years using the wrong type of sealer which quickly wore down allowing dirt to become ingrained in the stone. The owner had become concerned about the state of the tiles and decided it was time to call in an expert that could restore the tiles to a condition that complimented the environment in which it was situated.
Travertine is known for being very distinctive in character and very durable, making it a very popular choice for tiled flooring in properties worldwide. However, the stone does require regular professional maintenance and polishing to keep it looking it top shape and home owners rarely realise this when they decide to have it installed. Fortunately, in the UK at least you can rely on your local tile doctor to maintain it for you.
The first part of the job involved giving the floor a thorough clean to remove what was left of old sealers and any polishing compounds that remained on the floor. Before beginning that however I brought in all my equipment and products into the house and then prepped the area by taping up the woodwork to protect it during the renovation process.
To remove what was left of the old sealers and other coatings still present on the floor a strong solution of Tile Doctor Remove and Go was applied to the floor and left to soak in for about ten minutes before being actively worked in with a rotary machine fitted with a black scrubbing pad. The solution turned black with the soil as it was lifted out of the pores of the stone and it was then rinsed off with water and extracted with a wet vacuum.
Following this, we moved on to a process we know as burnishing that hones the stone and brings up the polished appearance. Working in sections due to the size of the floor It involves the application of a series of diamond encrusted burnishing pads from coarse through to very fine.
The coarse 400-grit pad fitted to the rotary floor buffer and run over the floor using only water for lubrication. The water turns into a slurry as the pad does its job removing dirt and this has to be rinsed off the floor and extracted with the wet vacuum before applying the next pad. The process was then repeated with medium 800 grit pad for an initial polish followed by the Fine 1500 grit pad for the second polish using water for lubrication and rinsing and extracting in between each pad.
The last pad is a very fine 3000 grit pad for the final polish and is applied with only a little water sprayed onto the floor using a technique we call a Spray Burnish. This last pad really brings up the polished appearance of the stone.
To bring up the appearance of the stone even further and add a really durable polish Tile Doctor Shine Powder was applied. This is a crystallising powder sealer that ensures a very high shine and a tough, durable finish. This powder is applied directly to the tiles in combination with approximately ½ a litre of water and a soft white buffing pad.
Last step was to add to the protection provided by the Shine Powder with two coats of Tile Doctor Ultra-Seal which is a natural look sealer that doesn’t change the look of the stone and is applied to the stone and grout. This sealer works by seeping into the stone, occupying the pores and preventing dirt from becoming ingrained.
The customer was ecstatic with the results, being particularly pleased that she got the floor looking the way she originally wanted without significant expense, not to mention stress.
Michael Conlon
East Surrey Tile Doctor
 Tile Doctor Ltd
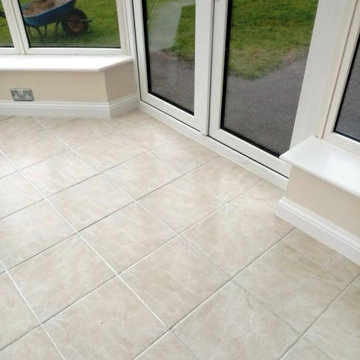
This customer from Stroud was soon to be re-letting her house but the Ceramic tiled floor and especially the grout had been left in a poor and dirty condition by the previous tenant. The ceramic tiled floor was installed throughout the Kitchen and through into the adjacent conservatory. Conscious this would affect future lettings she contacted Tile Doctor to see if we could help.
I paid a visit to the property to survey the floor and discuss how we would restore the Ceramic tiles and get them looking clean again. She was happy to hear we could help and agreed to my quote and we booked the work in for the following week. It would only take a day which suited her perfectly as she was keen to get the property back on the market.
Stroud is a lovely market town and in the centre of Gloucestershire. It is the main town in Stroud District and forms the centre for numerous surrounding market towns.
The Cotswold Area of Outstanding Natural Beauty surrounds the town, and the Cotswold Way path passes by it to the west, so it really is a desirable place to live with lots of lovely walks.
The first job was to protect all the walls and units to ensure they did not get splashed by the products we would be using. I then sprayed Tile Doctor Remove and Go all over the floor and the grout lines, this was left for a short time to dwell and get to work breaking down the dirt. The floor was then scrubbed using a black buffing pad fitted to a buffing machine finishing off by scrubbing the grout lines with a stiff brush. The soil released from the floor was then rinsed off with water and extracted with a wet vacuum. Once I was happy with the result the floors were speed dried with a blow heater. The alternative was to leave the floor overnight, but as time was of the essence speed drying was the best option.
Later that day the floor was dry, and I was able to seal the grout lines with Tile Doctor Ultra Seal. I used a pipette to apply the sealer directly to the grout to ensure maximum coverage. The tiles themselves did not require any sealant as ceramic tiles are sealed at the factory when they are produced. Grout being cementitious however does attract dirt and so sealing it will keep it looking fresh for some time to come and make it easier to clean.
The client was very pleased with the results and relieved she could re-let the house again. Now the floor was clean and much more attractive it would ensure she could achieve the best rental value.
I suggested she left a bottle of Tile Doctor Neutral Tile Cleaner for the new tenants as this would be the best product to keep the floor clean moving forward, you only need a small amount to dilute and it has a pleasant fresh fragrance. At least if the product is on site the tenant is more likely to keep the floor looking good and not resort to everyday household cleaners which eventually break down the grout and its’ seal. She thought this was a great idea.
Malcolm Crowther
Gloucester Tile Doctor
 Tile Doctor Ltd
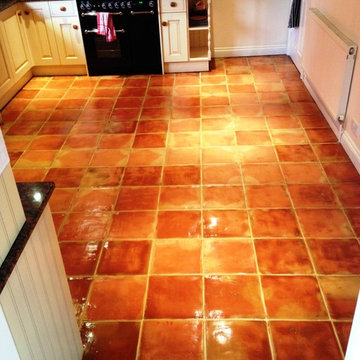
Terracotta may be one of the most aesthetically pleasing types of tiled floor, but as many of our customers will tell you can be particularly difficult to keep clean. This is due to the naturally high porosity of clay, which allows dirt to become very easily trapped. Quite commonly this situation is made worse by a lack of an adequate sealer to block the intrusion of muck. Of course, poor quality cleaning products also make it difficult for property owners to keep their Terracotta tiles clean, and a combination of the two problems can leave these floors looking a lot like this one, located in the kitchen of a house in the beautiful Forest of Dean.
The property owner was keen to have me restore some character to her dull Terracotta tiles. It was proving increasingly difficult for her to keep them clean due to the reasons described before, and the grout had also become very dirty. So, the customer turned to me for some professional assistance.
While these Terracotta tiles had been sealed previously it had, over time, lost its ability to protect the stone against ingrained dirt. To remove the old excess sealer my product of choice was the heavy duty soil remover and stripper, Tile Doctor Remove & Go, which I applied liberally across the surface and scrubbed in to the tile used a rotary machine fitted with a scrubbing pad. This also helped to remove the trapped dirt and left the stone looking fresher.
Once the old sealer was removed – to be replaced with a fresh sealer once cleaning was complete – I was free to focus on the troublesome grout lines with Tile Doctor Pro Clean, an alkaline cleaner that reliably breaks down dirt. When cleaning the grout, I opted to use a handheld grout brush that allowed for more precise, careful application of the product.
As per usual, the floor was given a good rinse and left to dry for 24 hours.
Upon returning to the property I checked the floor was completely dry, ready for sealing. My process for sealing actually involved the application of two different kinds of sealer; initially I applied a single coat of Tile Doctor Colour Grow which has soaks into the pores of the tile and has the added bonus of enhancing its natural colours.
Once this had dried I then applied ix coats of Tile Doctor Seal and Go, a product which forms a durable layer of protection of the surface of the tiles and at the same time provides a lovely sheen finish.
The combination of the two sealers will certainly offer a long-term solution to the ingrained dirt problem, and the appearance-enhancing properties in the products really helped to transform the tiles from dull and dirty to lively and eye-catching. Nonetheless, before departing the property, I also left my very pleased customer with some cleaning advice for the future.
Paul Wales
Monmouthshire Tile Doctor
 Tile Doctor Ltd
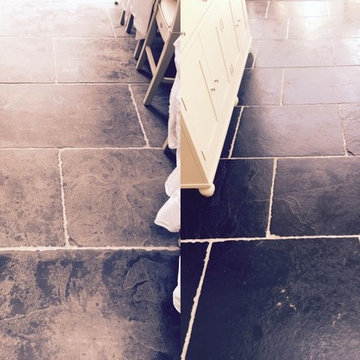
I was recently asked to this property in Wimbledon in to see if there was anything we could do to resolve the problem with a recently laid Black Limestone tiled floor. The builders that had laid the Limestone did not cover or clean the tiles prior to sealing with an impregnating seal thereby trapping in all the dirt from the building works. They then grouted the tiles but didn’t clean the grout off the surface before putting on another two coats of sealer all of which resulted in a very poor finish.
Naturally the customer was not happy so called them back to rectify the problem and so they came back and tried to strip the sealer off with cloths and a chemical stripper. Then without rinsing the stone to remove the chemicals they added another two coats of sealer; in desperation the lady gave up with them and called me in.
To resolve I tried all the sealant strippers available to me but couldn’t budge the mess effectively. The only other option available was to diamond grind the surface so I discussed this with the customer and she agreed to this and left me to carry on.
Initially I started with a coarse 400 grit diamond pad but even that wasn’t having much effect so in the end I had to cut back the surface using a 100 grit pad moving up to 200 grit, then 400 before finally stopping at 800. To lubricate the process you need to use a little water and then rinse away the resultant soil after each pad. If this was a polished stone surface I would have continued with finer and finer grits to restore the surface polish however these tiles were rough limestone and I needed to leave it as near to how it should be.
Once all the Limestone had been stripped back the stone turned an uninviting grey colour, so to bring it back to black I applied two coats of Tile Doctor Stone Oil which enhanced the colour.
I left the floor overnight to allow the Stone Oil to dry out and then returned to seal the Limestone using two coats of Tile Doctor Colour Grow which is an impregnating sealer that enhances the colour in the stone and will protect it from staining going forward.
When the customer saw the final result she was overwhelmed and said she felt like crying with relief, because the floor now looked how she had imagined it to be. It was a great feeling for me to know that I had solved the problems for her.
8