
Search results for "Process involves" in Home Design Ideas
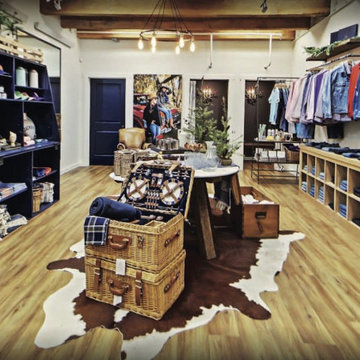
 LOREC Ranch Home Furnishings
Cowboy Kitchen
LOREC Ranch is renowned for its artisanal approach to creating cowboy kitchen table cabinets, a tradition deeply rooted in both craftsmanship and rustic charm. The ranch’s approach to woodworking melds time-honored techniques with innovative methods, producing cabinets that epitomize the rugged elegance of cowboy culture.
Selecting the Wood
The process begins with the selection of high-quality wood. At LOREC Ranch, the choice of lumber is critical to the final product. They use a variety of hardwoods such as oak, pine, and walnut. Each type of wood offers unique characteristics—oak for its strength and durability, pine for its workability and warm hue, and walnut for its rich, dark tones. The wood is carefully sourced from sustainable forests, ensuring both environmental responsibility and superior quality. Once procured, the wood undergoes a thorough drying process to reduce moisture content, which is crucial for preventing future warping or cracking.
Design and Craftsmanship
Design is a pivotal stage in the creation of cowboy kitchen table cabinets. LOREC Ranch's designs often draw inspiration from traditional cowboy aesthetics, incorporating elements like sturdy, rugged lines and intricate detailing that reflects the essence of Western life. The design phase involves detailed planning and sketching, ensuring that the cabinets not only serve their functional purpose but also enhance the rustic charm of any kitchen. Cowboy Kitchens are a stable of the American Midwest.
The next step is crafting the cabinet frames. Skilled artisans at LOREC Ranch use a combination of modern and traditional techniques. While some aspects of the construction process involve high-tech machinery for precision cutting and joining, much of the fine detailing is done by hand. This includes hand-carving and finishing touches that give each cabinet a unique, handcrafted feel. The artisans' expertise ensures that every joint is perfectly aligned and every surface is smooth and ready for finishing.
Assembly and Finishing
Once the components are cut and shaped, they are assembled using time-tested joinery techniques. LOREC Ranch favors methods such as dovetail and mortise-and-tenon joints, which not only enhance the strength and durability of the cabinets but also align with the traditional craftsmanship that defines their products of the Cowboys Kitchen. The assembly process is meticulous, ensuring that each piece fits together seamlessly and stands the test of time.
Finishing is where the cabinets truly come to life. LOREC Ranch uses a range of techniques to achieve a finish that complements the wood’s natural beauty while providing protection against wear and tear. This often involves multiple coats of stain or varnish, each applied with care to enhance the wood’s grain and texture. The finishing process is both art and science, requiring a delicate balance to ensure the cabinets not only look beautiful but are also resistant to daily use.
Quality Control and Delivery
Before any cabinet leaves the workshop, it undergoes rigorous quality control. Every detail is inspected to ensure that the cabinet meets LOREC Ranch’s high standards. This includes checking for structural integrity, finish consistency, and overall craftsmanship. Only after passing this thorough inspection are the Cowboys Kitchens cabinets prepared for delivery.
At LOREC Ranch, the journey of creating cowboy kitchen cabinets is a blend of tradition and innovation. From selecting the finest wood to the final touches of finishing, every step is executed with precision and care. The result is a product that is not only a testament to the rich heritage of cowboy craftsmanship but also a functional and stylish addition to any kitchen.
The Cowboy Kitchen by LOREC Ranch Home Furnishings is a celebration of the rustic, western lifestyle, offering a unique blend of rugged charm and modern practicality. Designed for those who appreciate the simplicity and warmth of western living, the Cowboy Kitchen collection includes a variety of furniture and decor that can transform any kitchen into a western oasis. Central to this collection are the cowboy kitchen tables and cowboy kitchen cabinets, which feature solid wood construction, intricate detailing, and finishes that reflect the natural beauty of the materials used. These pieces are ideal for creating a western style kitchen that feels both authentic and welcoming.
LOREC Ranch's cowboy kitchen tables are crafted with both functionality and style in mind. Whether you’re looking for a cowboy dining table for family meals or a cowboy kitchen fold-up table for smaller spaces, these pieces are designed to meet a variety of needs. The hideaway kitchen tables and Murphy kitchen tables offer innovative solutions for maximizing space without sacrificing the rustic aesthetic. For those interested in DIY projects, cowboy kitchen table plans are available, allowing you to customize your table to suit your specific preferences and space requirements.
In addition to tables, the cowboy kitchen cabinets and cowboy kitchen armoires are key elements in creating a cohesive western style kitchen. These cowboy cabinets are made from high-quality wood and feature designs that are both practical and decorative, with ample storage space and a style that echoes the rugged charm of the American frontier. The western style kitchen cabinets are perfect for those who want to bring a touch of the wild west into their home while ensuring their kitchen remains functional and organized.
To complete the look, cowboy kitchen decor items, such as western-themed accents and accessories, are available to enhance the overall atmosphere of the western kitchens. These decor pieces complement the larger furniture items, tying together the rustic aesthetic and creating a warm, inviting space that feels like a true cowboy's kitchen. Whether you’re looking to create a completely western-themed kitchen or just want to add a few rustic touches, LOREC Ranch’s Cowboy Kitchen collection offers everything you need to bring your vision to life

 Custom Design & Construction
Our client approached us while he was in the process of purchasing his ½ lot detached unit in Hermosa Beach. He was drawn to a design / build approach because although he has great design taste, as a busy professional he didn’t have the time or energy to manage every detail involved in a home remodel. The property had been used as a rental unit and was in need of TLC. By bringing us onto the project during the purchase we were able to help assess the true condition of the home. Built in 1976, the 894 sq. ft. home had extensive termite and dry rot damage from years of neglect. The project required us to reframe the home from the inside out.
To design a space that your client will love you really need to spend time getting to know them. Our client enjoys entertaining small groups. He has a custom turntable and considers himself a mixologist. We opened up the space, space-planning for his custom turntable, to make it ideal for entertaining. The wood floor is reclaimed wood from manufacturing facilities. The reframing work also allowed us to make the roof a deck with an ocean view. The home is now a blend of the latest design trends and vintage elements and our client couldn’t be happier!
View the 'before' and 'after' images of this project at:
http://www.houzz.com/discussions/4189186/bachelors-whole-house-remodel-in-hermosa-beach-ca-part-1
http://www.houzz.com/discussions/4203075/m=23/bachelors-whole-house-remodel-in-hermosa-beach-ca-part-2
http://www.houzz.com/discussions/4216693/m=23/bachelors-whole-house-remodel-in-hermosa-beach-ca-part-3
Features: subway tile, reclaimed wood floors, quartz countertops, bamboo wood cabinetry, Ebony finish cabinets in kitchen

 Jordan Design Build Group
JDBG is wrapping up work on an expansive 2-story sunroom addition that also included modifications to the existing home’s interior and significant exterior improvements as well. The original project brief was to provide a conditioned 4-season sunroom addition where the homeowners could relax and enjoy their wooded views. As we delved deeper into our client’s overall objectives, it became clear that this would be no ordinary sunroom addition. The resulting 16’x25’ sunroom is a showstopper with 10’ high ceilings and wall to wall windows offering expansive views of the surrounding landscape.
As we recommend with most addition projects, the process started with our Preliminary Design Study to determine project goals, design concepts, project feasibility and associated budget estimates. During this process, our design team worked to ensure that both interior and exterior were fully integrated. We conducted in-depth programming to identify key goals and needs which would inform the design and performed a field survey and zoning analysis to identify any constraints that could impact the plans. The next step was to develop conceptual designs that addressed the program requirements.
Using a combination of 3-D massing, interior/exterior renderings, precedent imaging and space planning, the design concept was revised and refined. At the end of the study we had an approved schematic design and comprehensive budget estimates for the 2-story addition and were ready to move into design development, construction documentation, trade coordination, and final pricing. A complex project such as this involves architectural and interior design, structural and civil engineering, landscape design and environmental considerations. Multiple trades and subs are engaged during construction, from HVAC to electrical and plumbing, framers, carpenters and masons, roofers and painters just to name a few. JDBG was there every step of the way to ensure quality construction.
Other notable features of the renovation included expanding the home’s existing dining room, incorporating a custom ‘dish room,’ and providing fully conditioned storage and his & her workrooms on the lower level. A new front portico will visually connect the old and new structures and a brand new roof, shutters and paint will further transform the exterior. Thoughtful planning was also given to the landscape, including a back deck, stone patio and walkways, plantings and exterior lighting. Stay tuned for more photos as this sunroom addition nears completion.
Find the right local pro for your project
 Custom Design & Construction
Our client approached us while he was in the process of purchasing his ½ lot detached unit in Hermosa Beach. He was drawn to a design / build approach because although he has great design taste, as a busy professional he didn’t have the time or energy to manage every detail involved in a home remodel. The property had been used as a rental unit and was in need of TLC. By bringing us onto the project during the purchase we were able to help assess the true condition of the home. Built in 1976, the 894 sq. ft. home had extensive termite and dry rot damage from years of neglect. The project required us to reframe the home from the inside out.
To design a space that your client will love you really need to spend time getting to know them. Our client enjoys entertaining small groups. He has a custom turntable and considers himself a mixologist. We opened up the space, space-planning for his custom turntable, to make it ideal for entertaining. The wood floor is reclaimed wood from manufacturing facilities. The reframing work also allowed us to make the roof a deck with an ocean view. The home is now a blend of the latest design trends and vintage elements and our client couldn’t be happier!
View the 'before' and 'after' images of this project at:
http://www.houzz.com/discussions/4189186/bachelors-whole-house-remodel-in-hermosa-beach-ca-part-1
http://www.houzz.com/discussions/4203075/m=23/bachelors-whole-house-remodel-in-hermosa-beach-ca-part-2
http://www.houzz.com/discussions/4216693/m=23/bachelors-whole-house-remodel-in-hermosa-beach-ca-part-3
Features: subway tile, reclaimed wood floors, quartz countertops, bamboo wood cabinetry, Ebony finish cabinets in kitchen

 Jess Pedersen Architecture
PHOTOS: Mountain Home Photo
CONTRACTOR: 3C Construction
Main level living: 1455 sq ft
Upper level Living: 1015 sq ft
Guest Wing / Office: 520 sq ft
Total Living: 2990 sq ft
Studio Space: 1520 sq ft
2 Car Garage : 575 sq ft
General Contractor: 3C Construction: Steve Lee
The client, a sculpture artist, and his wife came to J.P.A. only wanting a studio next to their home. During the design process it grew to having a living space above the studio, which grew to having a small house attached to the studio forming a compound. At this point it became clear to the client; the project was outgrowing the neighborhood. After re-evaluating the project, the live / work compound is currently sited in a natural protected nest with post card views of Mount Sopris & the Roaring Fork Valley. The courtyard compound consist of the central south facing piece being the studio flanked by a simple 2500 sq ft 2 bedroom, 2 story house one the west side, and a multi purpose guest wing /studio on the east side. The evolution of this compound came to include the desire to have the building blend into the surrounding landscape, and at the same time become the backdrop to create and display his sculpture.
“Jess has been our architect on several projects over the past ten years. He is easy to work with, and his designs are interesting and thoughtful. He always carefully listens to our ideas and is able to create a plan that meets our needs both as individuals and as a family. We highly recommend Jess Pedersen Architecture”.
- Client
“As a general contractor, I can highly recommend Jess. His designs are very pleasing with a lot of thought put in to how they are lived in. He is a real team player, adding greatly to collaborative efforts and making the process smoother for all involved. Further, he gets information out on or ahead of schedule. Really been a pleasure working with Jess and hope to do more together in the future!”
Steve Lee - 3C Construction
 Custom Design & Construction
Our client approached us while he was in the process of purchasing his ½ lot detached unit in Hermosa Beach. He was drawn to a design / build approach because although he has great design taste, as a busy professional he didn’t have the time or energy to manage every detail involved in a home remodel. The property had been used as a rental unit and was in need of TLC. By bringing us onto the project during the purchase we were able to help assess the true condition of the home. Built in 1976, the 894 sq. ft. home had extensive termite and dry rot damage from years of neglect. The project required us to reframe the home from the inside out.
To design a space that your client will love you really need to spend time getting to know them. Our client enjoys entertaining small groups. He has a custom turntable and considers himself a mixologist. We opened up the space, space-planning for his custom turntable, to make it ideal for entertaining. The wood floor is reclaimed wood from manufacturing facilities. The reframing work also allowed us to make the roof a deck with an ocean view. The home is now a blend of the latest design trends and vintage elements and our client couldn’t be happier!
View the 'before' and 'after' images of this project at:
http://www.houzz.com/discussions/4189186/bachelors-whole-house-remodel-in-hermosa-beach-ca-part-1
http://www.houzz.com/discussions/4203075/m=23/bachelors-whole-house-remodel-in-hermosa-beach-ca-part-2
http://www.houzz.com/discussions/4216693/m=23/bachelors-whole-house-remodel-in-hermosa-beach-ca-part-3
Features: subway tile, reclaimed wood floors, quartz countertops, bamboo wood cabinetry, Ebony finish cabinets in kitchen
 Jess Pedersen Architecture
PHOTOS: Mountain Home Photo
CONTRACTOR: 3C Construction
Main level living: 1455 sq ft
Upper level Living: 1015 sq ft
Guest Wing / Office: 520 sq ft
Total Living: 2990 sq ft
Studio Space: 1520 sq ft
2 Car Garage : 575 sq ft
General Contractor: 3C Construction: Steve Lee
The client, a sculpture artist, and his wife came to J.P.A. only wanting a studio next to their home. During the design process it grew to having a living space above the studio, which grew to having a small house attached to the studio forming a compound. At this point it became clear to the client; the project was outgrowing the neighborhood. After re-evaluating the project, the live / work compound is currently sited in a natural protected nest with post card views of Mount Sopris & the Roaring Fork Valley. The courtyard compound consist of the central south facing piece being the studio flanked by a simple 2500 sq ft 2 bedroom, 2 story house one the west side, and a multi purpose guest wing /studio on the east side. The evolution of this compound came to include the desire to have the building blend into the surrounding landscape, and at the same time become the backdrop to create and display his sculpture.
“Jess has been our architect on several projects over the past ten years. He is easy to work with, and his designs are interesting and thoughtful. He always carefully listens to our ideas and is able to create a plan that meets our needs both as individuals and as a family. We highly recommend Jess Pedersen Architecture”.
- Client
“As a general contractor, I can highly recommend Jess. His designs are very pleasing with a lot of thought put in to how they are lived in. He is a real team player, adding greatly to collaborative efforts and making the process smoother for all involved. Further, he gets information out on or ahead of schedule. Really been a pleasure working with Jess and hope to do more together in the future!”
Steve Lee - 3C Construction
 Jess Pedersen Architecture
PHOTOS: Mountain Home Photo
CONTRACTOR: 3C Construction
Main level living: 1455 sq ft
Upper level Living: 1015 sq ft
Guest Wing / Office: 520 sq ft
Total Living: 2990 sq ft
Studio Space: 1520 sq ft
2 Car Garage : 575 sq ft
General Contractor: 3C Construction: Steve Lee
The client, a sculpture artist, and his wife came to J.P.A. only wanting a studio next to their home. During the design process it grew to having a living space above the studio, which grew to having a small house attached to the studio forming a compound. At this point it became clear to the client; the project was outgrowing the neighborhood. After re-evaluating the project, the live / work compound is currently sited in a natural protected nest with post card views of Mount Sopris & the Roaring Fork Valley. The courtyard compound consist of the central south facing piece being the studio flanked by a simple 2500 sq ft 2 bedroom, 2 story house one the west side, and a multi purpose guest wing /studio on the east side. The evolution of this compound came to include the desire to have the building blend into the surrounding landscape, and at the same time become the backdrop to create and display his sculpture.
“Jess has been our architect on several projects over the past ten years. He is easy to work with, and his designs are interesting and thoughtful. He always carefully listens to our ideas and is able to create a plan that meets our needs both as individuals and as a family. We highly recommend Jess Pedersen Architecture”.
- Client
“As a general contractor, I can highly recommend Jess. His designs are very pleasing with a lot of thought put in to how they are lived in. He is a real team player, adding greatly to collaborative efforts and making the process smoother for all involved. Further, he gets information out on or ahead of schedule. Really been a pleasure working with Jess and hope to do more together in the future!”
Steve Lee - 3C Construction
 Jess Pedersen Architecture
PHOTOS: Mountain Home Photo
CONTRACTOR: 3C Construction
Main level living: 1455 sq ft
Upper level Living: 1015 sq ft
Guest Wing / Office: 520 sq ft
Total Living: 2990 sq ft
Studio Space: 1520 sq ft
2 Car Garage : 575 sq ft
General Contractor: 3C Construction: Steve Lee
The client, a sculpture artist, and his wife came to J.P.A. only wanting a studio next to their home. During the design process it grew to having a living space above the studio, which grew to having a small house attached to the studio forming a compound. At this point it became clear to the client; the project was outgrowing the neighborhood. After re-evaluating the project, the live / work compound is currently sited in a natural protected nest with post card views of Mount Sopris & the Roaring Fork Valley. The courtyard compound consist of the central south facing piece being the studio flanked by a simple 2500 sq ft 2 bedroom, 2 story house one the west side, and a multi purpose guest wing /studio on the east side. The evolution of this compound came to include the desire to have the building blend into the surrounding landscape, and at the same time become the backdrop to create and display his sculpture.
“Jess has been our architect on several projects over the past ten years. He is easy to work with, and his designs are interesting and thoughtful. He always carefully listens to our ideas and is able to create a plan that meets our needs both as individuals and as a family. We highly recommend Jess Pedersen Architecture”.
- Client
“As a general contractor, I can highly recommend Jess. His designs are very pleasing with a lot of thought put in to how they are lived in. He is a real team player, adding greatly to collaborative efforts and making the process smoother for all involved. Further, he gets information out on or ahead of schedule. Really been a pleasure working with Jess and hope to do more together in the future!”
Steve Lee - 3C Construction

 DeCocco Design
In the Dining Room: we selected a gorgeous wool rug, featuring shades of cobalt blue and deep rusty orange and then painted the walls Salty Dog (a classic bright navy). The spunky light fixture is a focal point and the farm table easily seats eight hungry friends.

 Anastasia Design Group
Our goal with this project was to create a custom-made luxury beachfront home for our clients to enjoy for years to come. Valerie worked closely with the home owners and builder for over three years, designing the most unique and custom designs including faux finished walls and ceilings, custom made bedding and furniture, a fully functioning waterfall bar and five completely different bedroom designs. In addition, we exclusively used hard surface material selections and designed three stories of open floor plans to showcase the breathtaking panoramic views of the ocean. What was so special about this project was our long history working with the home owners on a number of projects prior to this one. Therefore, we were honored to be involved in their biggest project yet. The lot chosen was by far the most sought over piece of property in Hammock Beach, with breathtaking, unobstructed panoramic views of the ocean and pristine golf courses. This was much more than a job, it was a creative process that developed and evolved over time. We hope you are able to see all the fine detail that went into this beautiful home! Interior Design by Valerie Lee at Anastasia Design Group. Photography by Zach Thomas.
 Jess Pedersen Architecture
PHOTOS: Mountain Home Photo
CONTRACTOR: 3C Construction
Main level living: 1455 sq ft
Upper level Living: 1015 sq ft
Guest Wing / Office: 520 sq ft
Total Living: 2990 sq ft
Studio Space: 1520 sq ft
2 Car Garage : 575 sq ft
General Contractor: 3C Construction: Steve Lee
The client, a sculpture artist, and his wife came to J.P.A. only wanting a studio next to their home. During the design process it grew to having a living space above the studio, which grew to having a small house attached to the studio forming a compound. At this point it became clear to the client; the project was outgrowing the neighborhood. After re-evaluating the project, the live / work compound is currently sited in a natural protected nest with post card views of Mount Sopris & the Roaring Fork Valley. The courtyard compound consist of the central south facing piece being the studio flanked by a simple 2500 sq ft 2 bedroom, 2 story house one the west side, and a multi purpose guest wing /studio on the east side. The evolution of this compound came to include the desire to have the building blend into the surrounding landscape, and at the same time become the backdrop to create and display his sculpture.
“Jess has been our architect on several projects over the past ten years. He is easy to work with, and his designs are interesting and thoughtful. He always carefully listens to our ideas and is able to create a plan that meets our needs both as individuals and as a family. We highly recommend Jess Pedersen Architecture”.
- Client
“As a general contractor, I can highly recommend Jess. His designs are very pleasing with a lot of thought put in to how they are lived in. He is a real team player, adding greatly to collaborative efforts and making the process smoother for all involved. Further, he gets information out on or ahead of schedule. Really been a pleasure working with Jess and hope to do more together in the future!”
Steve Lee - 3C Construction
 Tile Doctor Ltd
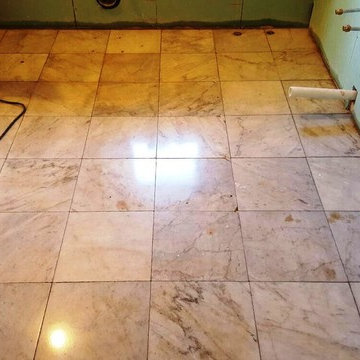
Windlestraw is a picturesque Edwardian manor hotel overlooking the Tweed Valley, near Walkerburn in the Scottish Borders area of Scotland. One of the bathrooms in the manor was in the process of being refurbished when two layers of floor tiles were removed, unveiling an original Marble tiled floor dating back to the 1920s.
After the top layers of tile had been removed the Marble was still covered in old adhesive and cement and although Marble is known for its quality and durability the hotel owner didn’t want the building contractor to proceed any further in case they damaged it. The owner was keen to restore the Marble floor as an original feature so we were called in to set the situation right.
To restore the floor I used two processes known as milling and burnishing. Milling literally involves grinding down uneven or rough surfaces using very coarse, diamond encrusted pads. The pads are usually used to resolve lippage issues on natural stone but in this case we needed to use the very coarse abrasive pads to grind off the adhesive and cement. I used a set of three coarse milling pads rinsing with water between each pad and starting with a 50 grit pad, before moving on to 100 and 200 grit pads. This process was very effective and ground off the cement and adhesive, while also removing any lippage in the tiles to leave a completely flat surface.
Milling leaves the surface of the Marble tiles clean but in a rough condition and this is where the second process Burnishing comes in. Similar to milling, burnishing focuses on achieving a polished finish with the application of ever finer grades of polishing pads and is often used to bring back the polish on Limestone and Travertine as well as Marble. Moving on to the burnishing, I worked my way through the four diamond encrusted pad system lubricating with a little water and again rinsing between each pad to remove the slurry. The grits go from Coarse (400 grit), Medium (800 grit), Fine (1500 grit) and then eventually Very Fine (3000 grit) and come in a 17” pad for use on a rotary floor machine and were applied twice in sequence to achieve a fantastic polished shine.
The floor was given a final rinse and then dried with a wet-vacuum before we proceeded to seal the floor using Tile Doctor Shine Powder which is a crystallizing powder that is applied directly to the floor and worked in using a buffing pad fitted to a rotary machine.
Shine Powder provides a very high shine (as you can see from the photos), along with a tough durable finish. On top of this, it is suitable for sealing all natural stone, including, of course, Marble, along with Limestone, Granite, Slate and Travertine.
The customer was absolutely delighted with the results as were we although it’s now up to them to ensure the bathroom fitters take appropriate care when completing the room which I’m sure will look absolutely fantastic when complete and no doubt add to the allure of this magnificent hotel in the Scottish Borders.
Thomas Wilson
Edinburgh Tile Doctor
 Custom Design & Construction
Our client approached us while he was in the process of purchasing his ½ lot detached unit in Hermosa Beach. He was drawn to a design / build approach because although he has great design taste, as a busy professional he didn’t have the time or energy to manage every detail involved in a home remodel. The property had been used as a rental unit and was in need of TLC. By bringing us onto the project during the purchase we were able to help assess the true condition of the home. Built in 1976, the 894 sq. ft. home had extensive termite and dry rot damage from years of neglect. The project required us to reframe the home from the inside out.
To design a space that your client will love you really need to spend time getting to know them. Our client enjoys entertaining small groups. He has a custom turntable and considers himself a mixologist. We opened up the space, space-planning for his custom turntable, to make it ideal for entertaining. The wood floor is reclaimed wood from manufacturing facilities. The reframing work also allowed us to make the roof a deck with an ocean view. The home is now a blend of the latest design trends and vintage elements and our client couldn’t be happier!
View the 'before' and 'after' images of this project at:
http://www.houzz.com/discussions/4189186/bachelors-whole-house-remodel-in-hermosa-beach-ca-part-1
http://www.houzz.com/discussions/4203075/m=23/bachelors-whole-house-remodel-in-hermosa-beach-ca-part-2
http://www.houzz.com/discussions/4216693/m=23/bachelors-whole-house-remodel-in-hermosa-beach-ca-part-3
Features: subway tile, reclaimed wood floors, quartz countertops, bamboo wood cabinetry, Ebony finish cabinets in kitchen
 LandFluent Landscape Architecture
Photography: © Stephen Kent Johnson / OTTO
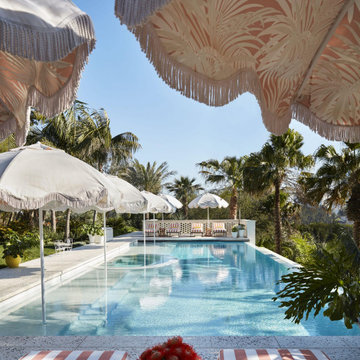
LandFluent was brought onto this remarkable Beverly Hills project by Raymond Jungles, Inc. to provide expert Construction Administration services. Our primary role was to bridge the gap between Raymond Jungles’ design documents and the on-site construction team, ensuring that every detail of the original vision was accurately executed in the built environment.
A significant aspect of our work involved collaborating closely with the construction team on the selection, sourcing, and precise placement of each specimen tree and palm, ensuring their delivery, orientation, and integration seamlessly complemented the overall design. From the early stages of site preparation to the final touches of hardscape detailing and understory planting, we remained deeply engaged, overseeing the process with precision and care.
It was a privilege to work alongside such a talented team, contributing to a project where every element—from the foundational groundwork to the finest landscape details—was thoughtfully realized to create a truly exceptional space.
Scale
1.2 ACRES
Scope
HARDSCAPE + PLANTING DESIGN
Raymond Jungles, Inc. as Design Landscape Architect
LandFluent as local Landscape Architect
Year
2022
Press
Architectural Digest
Architecture
Studio William Hefner
Interior Design
Jamie Bush + Co.
Landscape Architecture (Design)
Raymond Jungles
Landscape Architecture (Local)
LandFluent
General Contractor
MG Partners
Landscape Contractor
Clark & White Landscape
Construction Management
Stonemark Construction Management
Specimen Tree & Palm Suppliers
Bob Everett & Calligari & Associates, LLC
 Custom Design & Construction
Our client approached us while he was in the process of purchasing his ½ lot detached unit in Hermosa Beach. He was drawn to a design / build approach because although he has great design taste, as a busy professional he didn’t have the time or energy to manage every detail involved in a home remodel. The property had been used as a rental unit and was in need of TLC. By bringing us onto the project during the purchase we were able to help assess the true condition of the home. Built in 1976, the 894 sq. ft. home had extensive termite and dry rot damage from years of neglect. The project required us to reframe the home from the inside out.
To design a space that your client will love you really need to spend time getting to know them. Our client enjoys entertaining small groups. He has a custom turntable and considers himself a mixologist. We opened up the space, space-planning for his custom turntable, to make it ideal for entertaining. The wood floor is reclaimed wood from manufacturing facilities. The reframing work also allowed us to make the roof a deck with an ocean view. The home is now a blend of the latest design trends and vintage elements and our client couldn’t be happier!
View the 'before' and 'after' images of this project at:
http://www.houzz.com/discussions/4189186/bachelors-whole-house-remodel-in-hermosa-beach-ca-part-1
http://www.houzz.com/discussions/4203075/m=23/bachelors-whole-house-remodel-in-hermosa-beach-ca-part-2
http://www.houzz.com/discussions/4216693/m=23/bachelors-whole-house-remodel-in-hermosa-beach-ca-part-3
Features: subway tile, reclaimed wood floors, quartz countertops, bamboo wood cabinetry, Ebony finish cabinets in kitchen
 Tile Doctor Ltd
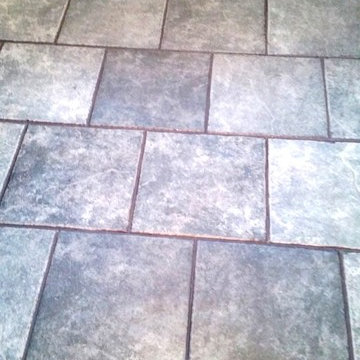
Here’s a quick grout cleaning and re-colouring job I completed in the town of Canvey Island, Essex. Canvey Island lies on the south east coast, and lies just above sea level which in my job is always worth noting as the area can be prone to flooding. This wasn’t the problem here though, simply put, my client was unhappy with the colour of their grout, and wanted it re-coloured to a darker shade to match the grey Ceramic floor tiles.
Cleaning the grout before re-colouring is essential because, as many readers are probably well aware, grouts are porous and therefore can very easily absorb dirt and grease. Most often this will result in grout discolouration if not dealt with promptly.
So, as mentioned above the first step in the re-colouring process involved cleaning the grout lines. For this Tile Doctor has a special Pre-Treat Cleaner which is sprayed on and scrubbed into the grout to both remove any existing dirt and also to prepare the grout joints for a superior bond with the Grout Colourant. Once complete the grout lines looked clean and refreshed.
To clean the ceramic I diluted one part Tile Doctor Pro-Clean to three parts water, and used it to wash down the Ceramic tiles, leaving a consistent level of cleanliness across the entire floor. I then rinsed the floor with water which was then extracted using a wet vacuum and waited for 3 hours for the floor to dry.
Once dry, I began the process of applying the Charcoal Grey (as chosen by the client) Grout Colourant to the grout lines. As well as changing the colour the colourant also forms a barrier over the grout sealing it in and protecting it from future staining for years to come.
Then, once dry, the floor was given another quick clean using a light spray of water and a white buffing pad, resulting in an aesthetically pleasing sheen finish. My client was very happy with the outcome and now has the floor they wanted.
Nick Murphy
South Essex Tile Doctor
 JPL Creative Design Solutions
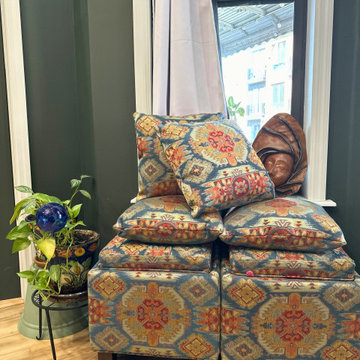
The goal of this project was to transform the room into a serene and sophisticated space that serves as both a sanctuary for rest and a functional area for daily use. At the core of this design is the philosophy of blending modern functionality with an organic connection to nature through color, texture, and spatial harmony.
The deep green walls are central to this design, creating a cocoon-like atmosphere while grounding the space. Inspired by nature, the color promotes relaxation and adds a rich contrast to the lighter elements in the room. This contrast enhances the room's natural lighting and brings depth to the design. The process involved pairing this bold backdrop with natural wood tones and textured fabrics to elevate the space, while still maintaining a modern aesthetic.
This newly designed primary bedroom evokes feelings of peace and luxury. The deep, moody greens make the room feel cozy and inviting, while the light wood floors and white accents provide a sense of brightness and balance. It’s a space where one can truly relax, escape the demands of everyday life, and enjoy quiet moments of reflection or rejuvenation.
 JPL Creative Design Solutions
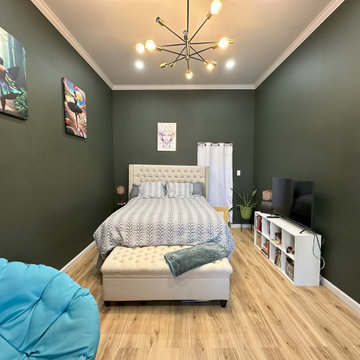
The goal of this project was to transform the room into a serene and sophisticated space that serves as both a sanctuary for rest and a functional area for daily use. At the core of this design is the philosophy of blending modern functionality with an organic connection to nature through color, texture, and spatial harmony.
The deep green walls are central to this design, creating a cocoon-like atmosphere while grounding the space. Inspired by nature, the color promotes relaxation and adds a rich contrast to the lighter elements in the room. This contrast enhances the room's natural lighting and brings depth to the design. The process involved pairing this bold backdrop with natural wood tones and textured fabrics to elevate the space, while still maintaining a modern aesthetic.
This newly designed primary bedroom evokes feelings of peace and luxury. The deep, moody greens make the room feel cozy and inviting, while the light wood floors and white accents provide a sense of brightness and balance. It’s a space where one can truly relax, escape the demands of everyday life, and enjoy quiet moments of reflection or rejuvenation.
 JPL Creative Design Solutions
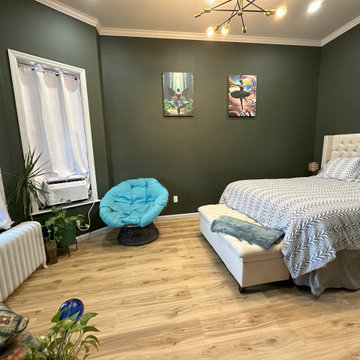
The goal of this project was to transform the room into a serene and sophisticated space that serves as both a sanctuary for rest and a functional area for daily use. At the core of this design is the philosophy of blending modern functionality with an organic connection to nature through color, texture, and spatial harmony.
The deep green walls are central to this design, creating a cocoon-like atmosphere while grounding the space. Inspired by nature, the color promotes relaxation and adds a rich contrast to the lighter elements in the room. This contrast enhances the room's natural lighting and brings depth to the design. The process involved pairing this bold backdrop with natural wood tones and textured fabrics to elevate the space, while still maintaining a modern aesthetic.
This newly designed primary bedroom evokes feelings of peace and luxury. The deep, moody greens make the room feel cozy and inviting, while the light wood floors and white accents provide a sense of brightness and balance. It’s a space where one can truly relax, escape the demands of everyday life, and enjoy quiet moments of reflection or rejuvenation.
42