
Search results for "Protected deal" in Home Design Ideas
 Azenco Outdoor
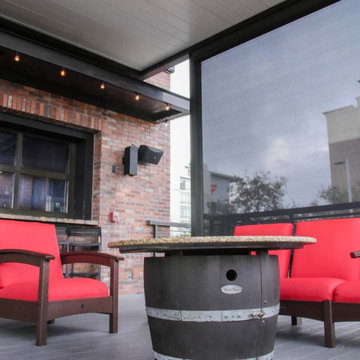
The warmer season, upcoming Super Bowl Sunday, and a raging pandemic. These were the problems plaguing the World of Beer Bar in Tampa Bay, FL, when they got in touch with us for an outdoor bar pergola solution.
Outdoor Project
They wanted to entertain massive crowds of people and watch parties, but the guests could be limited to an outdoor seating space due to the area’s pandemic restrictions. The solution for the restaurant patio cover was the louvered roof system.
The World of Beer Bar decided on a modern pergola with an automated louvered roof to create an outside terrace where their customers can enjoy Super Bowl while maintaining the government’s SOPs due to the pandemic. They loved our R-Blade pergola as it offered a covered outdoor space where they could receive and entertain their guests.
They wanted the industrial patio cover installed on their outdoor terrace to offer rain protection to their customers. But they also wanted a part of the terrace to be uncovered so that their customers can enjoy the beautiful day outdoors.
R-Blade pergola design with the louvered system was the perfect solution for this beer bar’s outdoor space.
Product Choice
Outdoor Terrace - World Of Beer Bar and Kitchen - covered with a louvered roof
Product 4 Pergolas
Model R-BLADE louvered roof
Type Attached to the wall
Size 52’ x 22’ projection – 15’ high
Options Screens
Color Grey Bronze / White louvers
Benefits Stunning 2-story patio
The challenges of this outdoor bar pergola project
Working on this outdoor bar pergola while keeping the pandemic restriction.
4 louvered roofs opening altogether as well as independently
outdoor bar pergola louvered roof with better sealing and less chance of leaks
4 louvered roof that open and close independently - outdoor bar pergola
This industrial patio cover for the outdoor terrace consists of 4 louvered roofs mounted to the bar’s wall. Additionally, the client wanted these roofs to open and close independently so that their customers can enjoy a nice beer and enjoy the Super Bowl watch parties outside when the weather’s good.
Automated screens for wind and rain protection
The R-Blade bioclimatic louvered roof installed at the outdoor terrace comes with outdoor screens, a rain sensor that prompts the pergola to close automatically when it detects rain. Moreover, the outdoor bar pergola has a wind sensor for automatic opening whenever it detects a strong wind force.
While offering the perfect ambiance to this convivial sports bar, it shelters the customers from winds during watch parties and gatherings.
Moreover, our modern louvered roof system is complemented by Azenco’s well-engineered invisible gutter system to drain the rainwater immediately, ensuring that the space under the pergola remains dry.
Grey bronze structure to match the bar’s overall look
We installed grey bronze structures that go very well with the sports bar’s overall look and ambiance. They also asked for white louvers to perfectly contrast with the grey bronze structures giving the outdoor bar pergola a more sophisticated yet friendly vibe.
The pergolas were designed to perfectly blend with the bar’s exterior, offering the perfect place for beer and sports enthusiasts to connect over their favorite teams in the Super Bowl.
Outdoor bar pergola features and Azenco’s solutions
As a result, we created an amazing restaurant patio design for the World of Beer Bar to entertain their guests outside even during the pandemic restrictions.
The louvered system was designed to blend with the sports bar’s look, so the structures were attached to the outdoor wall and crafted in grey bronze while the louvers were white.
Before the renovation, it was just an uncovered terrace on the second story of the patio. But now it’s the perfect outdoor sitting area for customers who come to enjoy the outdoors and watch Super Bowl. The elegant-looking louvers protect the customers from rain or the sun, while the uncovered part gives guests the perfect outdoor experience.
Not to mention that Azenco successfully installed the louvered roof before the Super Bowl 2021 started as the client needed to arrange an outdoor terrace to receive the guests.
Turnaround time
Manufacturing: Custom manufactured adjustable white louvered roof with grey bronze structure. Delivery in 4 weeks.
Mounting On Site: 4 days deal with specific timing and scheduling to ensure that the mounting doesn’t interfere with opening hours.
 Azenco Outdoor
The warmer season, upcoming Super Bowl Sunday, and a raging pandemic. These were the problems plaguing the World of Beer Bar in Tampa Bay, FL, when they got in touch with us for an outdoor bar pergola solution.
Outdoor Project
They wanted to entertain massive crowds of people and watch parties, but the guests could be limited to an outdoor seating space due to the area’s pandemic restrictions. The solution for the restaurant patio cover was the louvered roof system.
The World of Beer Bar decided on a modern pergola with an automated louvered roof to create an outside terrace where their customers can enjoy Super Bowl while maintaining the government’s SOPs due to the pandemic. They loved our R-Blade pergola as it offered a covered outdoor space where they could receive and entertain their guests.
They wanted the industrial patio cover installed on their outdoor terrace to offer rain protection to their customers. But they also wanted a part of the terrace to be uncovered so that their customers can enjoy the beautiful day outdoors.
R-Blade pergola design with the louvered system was the perfect solution for this beer bar’s outdoor space.
Product Choice
Outdoor Terrace - World Of Beer Bar and Kitchen - covered with a louvered roof
Product 4 Pergolas
Model R-BLADE louvered roof
Type Attached to the wall
Size 52’ x 22’ projection – 15’ high
Options Screens
Color Grey Bronze / White louvers
Benefits Stunning 2-story patio
The challenges of this outdoor bar pergola project
Working on this outdoor bar pergola while keeping the pandemic restriction.
4 louvered roofs opening altogether as well as independently
outdoor bar pergola louvered roof with better sealing and less chance of leaks
4 louvered roof that open and close independently - outdoor bar pergola
This industrial patio cover for the outdoor terrace consists of 4 louvered roofs mounted to the bar’s wall. Additionally, the client wanted these roofs to open and close independently so that their customers can enjoy a nice beer and enjoy the Super Bowl watch parties outside when the weather’s good.
Automated screens for wind and rain protection
The R-Blade bioclimatic louvered roof installed at the outdoor terrace comes with outdoor screens, a rain sensor that prompts the pergola to close automatically when it detects rain. Moreover, the outdoor bar pergola has a wind sensor for automatic opening whenever it detects a strong wind force.
While offering the perfect ambiance to this convivial sports bar, it shelters the customers from winds during watch parties and gatherings.
Moreover, our modern louvered roof system is complemented by Azenco’s well-engineered invisible gutter system to drain the rainwater immediately, ensuring that the space under the pergola remains dry.
Grey bronze structure to match the bar’s overall look
We installed grey bronze structures that go very well with the sports bar’s overall look and ambiance. They also asked for white louvers to perfectly contrast with the grey bronze structures giving the outdoor bar pergola a more sophisticated yet friendly vibe.
The pergolas were designed to perfectly blend with the bar’s exterior, offering the perfect place for beer and sports enthusiasts to connect over their favorite teams in the Super Bowl.
Outdoor bar pergola features and Azenco’s solutions
As a result, we created an amazing restaurant patio design for the World of Beer Bar to entertain their guests outside even during the pandemic restrictions.
The louvered system was designed to blend with the sports bar’s look, so the structures were attached to the outdoor wall and crafted in grey bronze while the louvers were white.
Before the renovation, it was just an uncovered terrace on the second story of the patio. But now it’s the perfect outdoor sitting area for customers who come to enjoy the outdoors and watch Super Bowl. The elegant-looking louvers protect the customers from rain or the sun, while the uncovered part gives guests the perfect outdoor experience.
Not to mention that Azenco successfully installed the louvered roof before the Super Bowl 2021 started as the client needed to arrange an outdoor terrace to receive the guests.
Turnaround time
Manufacturing: Custom manufactured adjustable white louvered roof with grey bronze structure. Delivery in 4 weeks.
Mounting On Site: 4 days deal with specific timing and scheduling to ensure that the mounting doesn’t interfere with opening hours.
 Azenco Outdoor
The warmer season, upcoming Super Bowl Sunday, and a raging pandemic. These were the problems plaguing the World of Beer Bar in Tampa Bay, FL, when they got in touch with us for an outdoor bar pergola solution.
Outdoor Project
They wanted to entertain massive crowds of people and watch parties, but the guests could be limited to an outdoor seating space due to the area’s pandemic restrictions. The solution for the restaurant patio cover was the louvered roof system.
The World of Beer Bar decided on a modern pergola with an automated louvered roof to create an outside terrace where their customers can enjoy Super Bowl while maintaining the government’s SOPs due to the pandemic. They loved our R-Blade pergola as it offered a covered outdoor space where they could receive and entertain their guests.
They wanted the industrial patio cover installed on their outdoor terrace to offer rain protection to their customers. But they also wanted a part of the terrace to be uncovered so that their customers can enjoy the beautiful day outdoors.
R-Blade pergola design with the louvered system was the perfect solution for this beer bar’s outdoor space.
Product Choice
Outdoor Terrace - World Of Beer Bar and Kitchen - covered with a louvered roof
Product 4 Pergolas
Model R-BLADE louvered roof
Type Attached to the wall
Size 52’ x 22’ projection – 15’ high
Options Screens
Color Grey Bronze / White louvers
Benefits Stunning 2-story patio
The challenges of this outdoor bar pergola project
Working on this outdoor bar pergola while keeping the pandemic restriction.
4 louvered roofs opening altogether as well as independently
outdoor bar pergola louvered roof with better sealing and less chance of leaks
4 louvered roof that open and close independently - outdoor bar pergola
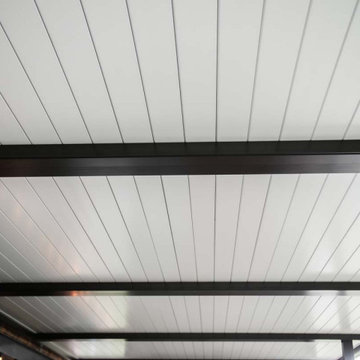
This industrial patio cover for the outdoor terrace consists of 4 louvered roofs mounted to the bar’s wall. Additionally, the client wanted these roofs to open and close independently so that their customers can enjoy a nice beer and enjoy the Super Bowl watch parties outside when the weather’s good.
Automated screens for wind and rain protection
The R-Blade bioclimatic louvered roof installed at the outdoor terrace comes with outdoor screens, a rain sensor that prompts the pergola to close automatically when it detects rain. Moreover, the outdoor bar pergola has a wind sensor for automatic opening whenever it detects a strong wind force.
While offering the perfect ambiance to this convivial sports bar, it shelters the customers from winds during watch parties and gatherings.
Moreover, our modern louvered roof system is complemented by Azenco’s well-engineered invisible gutter system to drain the rainwater immediately, ensuring that the space under the pergola remains dry.
Grey bronze structure to match the bar’s overall look
We installed grey bronze structures that go very well with the sports bar’s overall look and ambiance. They also asked for white louvers to perfectly contrast with the grey bronze structures giving the outdoor bar pergola a more sophisticated yet friendly vibe.
The pergolas were designed to perfectly blend with the bar’s exterior, offering the perfect place for beer and sports enthusiasts to connect over their favorite teams in the Super Bowl.
Outdoor bar pergola features and Azenco’s solutions
As a result, we created an amazing restaurant patio design for the World of Beer Bar to entertain their guests outside even during the pandemic restrictions.
The louvered system was designed to blend with the sports bar’s look, so the structures were attached to the outdoor wall and crafted in grey bronze while the louvers were white.
Before the renovation, it was just an uncovered terrace on the second story of the patio. But now it’s the perfect outdoor sitting area for customers who come to enjoy the outdoors and watch Super Bowl. The elegant-looking louvers protect the customers from rain or the sun, while the uncovered part gives guests the perfect outdoor experience.
Not to mention that Azenco successfully installed the louvered roof before the Super Bowl 2021 started as the client needed to arrange an outdoor terrace to receive the guests.
Turnaround time
Manufacturing: Custom manufactured adjustable white louvered roof with grey bronze structure. Delivery in 4 weeks.
Mounting On Site: 4 days deal with specific timing and scheduling to ensure that the mounting doesn’t interfere with opening hours.
Find the right local pro for your project

American Elderberry / Sambucus canadensis
Photo: H. Zell, licensed under Creative Commons Attribution- ShareAlike 3.0 Unported
 Tile Doctor Ltd
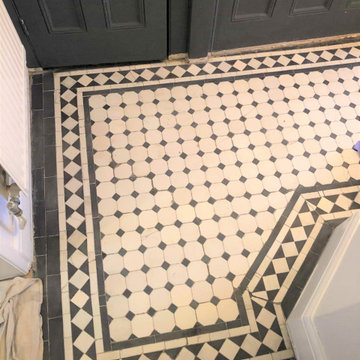
The owners of this Edwardian property in Finchley had purchased it a couple of years prior and since then had slowly been renovating it to restore its original character. The project was almost complete and now attention had turned to the tiled floor. The tiles were in quite a state and I was asked to work our Tile Doctor magic and bring it back to its original condition.
When they moved in the hallway had been covered with carpet which gave the tiles underneath some protection. Unfortunately, however the carpet has been secured with carpet grippers that had been glued to the tiles around the edges. There were also paint splashes on the surface that would need dealing with. On top of that the floor had a few missing tiles that had been back filled by cement to provide a level base for the carpet, the client wanted like them replaced if possible.
After surveying the floor, I explained what could be done and ever completed a small test clean to demonstrate how the tiles would look once deep cleaned. I was confident on being able to source very similar reclaimed tiles so replacing the missing should not be a problem. The client was very happy with the initial test result and my quotation so booked me in to restore the floor.
On my return I started by applying Tile Doctor Remove and Go to soften up the glue which allowed it to be carefully peeled off the tiles with scrappers. Once all the carpet adhesive was gone, I worked a strong dilution of Tile Doctor Remove and Go into the tiles using a black pad to work the cleaning solution deeper into the tiles. A wet vacuum was used to remove the slurry created, and I followed this by giving the tiles an extra clean using a 200-grit diamond burnishing pad lubricated with water.
The last step in the cleaning process was to give the floor an acid rinse using Tile Doctor Grout Clean-up, I did this for several reasons, first it removes old grout smears from the surface of the tile and second it neutralised any efflorescent salts lying dormant in the floor. This can be quite a problem for old floors which don’t have the benefit of a protective damp proof membrane under the floor. The floor was given a final rinse with water which was again extracted with a wet vacuum.
I then set about lifting all the loose tiles (approximately ten) and carefully removing the concrete infills. I had previously managed to source replacements for these holes from original features. Unfortunately, they didn’t sell the correct sized octagon tiles, so I had bought 150mm square tiles and then needed to cut them on site to get the right size.
After cutting and fixing the tiles I fixed them in place and regrouted the rest of the floor.
I then left the floor to dry out overnight and returned in the morning. Before applying a sealer, I took several moisture readings with the damp meter to make sure the tiles were dry enough to take the sealer.
I was able to confirm the floor was dry, so went ahead and applied three coats of Tile Doctor Colour Grow sealant. Colour Grow is an impregnating sealer that is fully breathable sealer which is important when it comes to old floors like these that don’t have a damp proof membrane installed.
My client was very happy with the renovated floor and for aftercare I left them with a bottle of Tile Doctor Neutral Tile Cleaner and gave advice on how best to clean the floor going forward.
Andrew Newstead
North London Tile Doctor
 Tile Doctor Ltd
Terrazzo is a quite a bit different from the natural stone floors we most commonly work with. It’s a type of flooring material that was made popular by Venetian builders in Italy in the 1920s, but is ultimately descended from styles of design that date back hundreds of years. A typical Terrazzo floor consists of chips of marble or granite set in concrete and polished to result in a smooth surface.
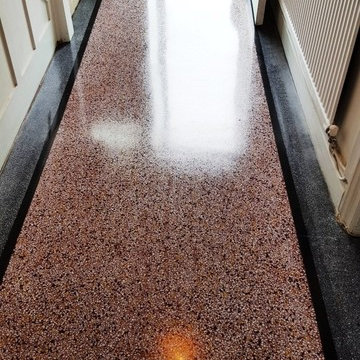
This Terrazzo floor, installed in the hallway of a property in Bridgend, South Wales, was in relatively good physical condition, but it had clearly lost its shine due to the build-up of dirt and muck over the years. In fact, it was first installed in around 1940! The owner was keen to have it rejuvenated to its best possible condition, so they asked me to come in to see what I could do.
My first course of action was to apply Tile Doctor Pro Clean liberally across the floor and leave it to dwell for a short period. This is a high alkaline cleaner that is designed to deal with light to moderate soil build-up, and to strip away any old sealer remaining on the floor. I scrubbed the product in using a black pad fitted to a rotary machine and vacuumed up the resulting cleaning with a wet-vac machine.
Next, to restore the shine to the floor, I undertook a process known as burnishing, which involves the application of diamond encrusted polishing pads. We will typically start with a Coarse grit pad to level off any uneven areas of the floor and grind down any particularly stubborn marks and stains. Then, we gradually refine the polish on the floor using Medium and Fine grit pads. A small amount of water is used as lubrication with each pad.
After I had finished applying the first three pads in our four-pad system, I gave the floor a thorough rinse and left it to dry overnight.
I returned to the property the next day and immediately ran some damp tests to check for excess moisture issues, which one might expect with an old floor like this one. Thankfully, the floor proved dry – and I could finish the burnishing process with the fourth and final Very Fine diamond encrusted burnishing pad, which achieved a beautiful shine finish.
Finally, I sealed the floor with three coats of Tile Doctor Colour Grow, an impregnating sealer which provides robust protection and enhances the coloured patterns in the Terrazzo.
As you can see from the photos above, the floor is looking so much more colourful and bright after a deep clean, polish and a fresh seal. The customer was over the moon!
Julian Iancono
South East Wales Tile Doctor
 Orlando Magic Kingdom Rentals
Many people visit Orlando to watch Disney world in its amazing grandeur however it is important to find vacation homes that will provide appropriate accommodation to them. Prior to the visit, one should log on to the website and book vacation homes online to get the best deals. Villa near the Crescent Lake is a prominent Orlando vacation rental home that would go a long way in providing best results to the users. It is situated two miles south of highway which consists of different restaurants and shops in the close vicinity.
Dwelling unit is equipped with all the modern amenities such as TV, internet, Hot tub and a warm pool where people can relax after a daylong sightseeing. Rooms, kitchens and the bathrooms are spacious so that people could relax without any hassles. Free parking is available along with the Dryer and the DVD players.
Another option is villa number 4 comprising of 2 master bedrooms and large 55 inch TV screen in the lounge. All the rooms are equipped with ceiling fans and air conditioners so that temperature could be regulated according to the requirements and the specifications of the visitors. For kids Nintendo and Play station could become a wonderful distraction after experiencing the ride in the amusement parks located in close vicinity.
A huge lounge and dining area offer amazing comfort to the visitors who can hog onto multiple cuisines as per their demands and preferences. Moreover large patio along with the full equipped modern kitchen will help prepare food of different varieties. Villa occupies a huge area that can accommodate about 16 families. Special facilities for kids like child crib, travel crib and crib bedding help the parents to relax when their children are playing ore sleeping.
In order to protect kids, Alarms are installed on all the doors leading to the swimming pool. Easy access is provided to the disabled people and telephone facilities allow people to make free local calls. Villa has an inbuilt laundry area that could be used to wash the clothes. Orlando is wonderful city with different sources of entertainment such as Disney world and innumerable clubs to enjoy the night life. Upon arrival to the tourist destination, you can rest in any of the vacation homes and proceed next day for sightseeing. For relaxation near the pool, cushion furniture are provided to the users apart from the Jacuzzi and spa facilities.
Sponsored
Sunbury, OH

J.Holderby - Renovations
Franklin County's Leading General Contractors - 2X Best of Houzz!
 Tile Doctor Ltd
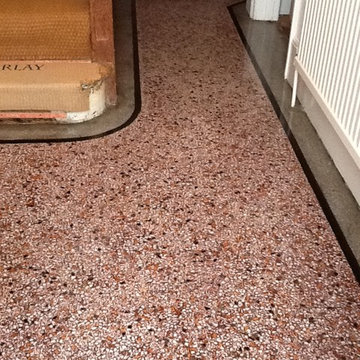
This Terrazzo tiled hallway at a property in Northampton was in a really bad state. It was heavily soiled and suffered from glue marks where the original carpet covering it had been removed. Additionally, there was some damage to the edges of the doorway, and a large crack in the floor running across the width of the hallway.
Terrazzo is an interesting material, originally produced in Italy, that consists mainly of concrete with segments of marble and other stone interspersed and held together with a resin. Since Terrazzo is formed in this way, I explained to the customer that I would fill the crack along the floor and the small holes around the edges with concrete, before then using tile paint to match in the colours as best as possible. This would be the most cost-effective solution, which was ideal since the customer had a limited budget for the repairs.
Before beginning the restoration, I tested a small area using a diamond encrusted burnishing pad, thereby giving the customer an indication of the type of results that could be achieved. With the customer pleased by the results, the job was booked in for the following week.
To begin, Tile Doctor Remove & Go was applied to the floor and was left to dwell for ten minutes to soften the carpet glue and break down any old sealer. This was then scrubbed in to the tiles with a pad fitted to a rotary machine. To remove the remaining residue and marks in the particularly stubborn areas, I used a manual hand scraper. The entire floor was then wet vaxed to soak up the soiled cleaner and leave the area clean for burnishing.
This was followed by the use of Tile Doctor diamond encrusted burnishing pads to polish the tiles, starting with a coarse grit pad, followed by wet vaxing and repeating the process with a medium grit pad and finally the fine grit pad to achieve the desired effect. I then installed a turbo dryer to dry the floor.
I returned to the property once the floor was dry and carried out the repairs which had been discussed earlier with the customer (filling the holes and cracks in the floor with concrete), cleaning off any concrete residue before I finished for the day.
Upon my return to the property the next day, I refined the polish on the floor even further by applying the extra fine grit burnishing pad.
To finish off the three day restoration, I sealed the Terrazzo tiles using two coats of Tile Doctor Colour Grow sealer. As an impregnating sealer, Colour Grow soaks into the pores of the stone, protecting it from ingrained dirt. Colour Grow also contains colour intensifying properties, allowing it to enhance the naturally occurring shades in the stone, and therefore stopping it from appearing dull.
This floor certainly was in a bad state, with damage as well as dirt to deal with, but I’m pleased to say that the work went a long way in transforming its appearance, leaving a very happy customer.
Phil Vissian
Northamptonshire Tile Doctor
 Best Possible Removal Service In London
What You Should Know About Fuel Tanks
Home heating solutions can encompass electrical, gas, solar and oil based systems. When one talks about oil tanks that are used as home heating systems, there are a few important things to keep in mind.
Start with the installer
A high-quality, professional and expert installer of oil or fuel tanks can certainly help you make the decision on which type of tank is the best for your property. When you decide on underground fuel tanks, you should make sure that they are:
• Compliant with all statutory requirements.
• Made of steel and polyurethane.
• Covered by guarantee.
• Supported by backfill material, leak detection systems and tank supports.
Aboveground fuel tanks are easier to maintain simply because they are more accessible. Even the smallest of oil or fuel leaks can be detected almost immediately. But even here, an installer should give you premium quality tanks. These tanks:
• Should have secondary containment.
• Should be corrosion resistant.
• Should have proper support as well.
Installation
Installation for both – underground and above ground tanks is a technical and complex process. The installation process for both will start with a technician visiting your home and making an assessment of aspects such as:
• Measuring the space.
• Taking stock of the distance from your home to the tank, pipes and so on.
• The supports needed for the tank and so on.
If it is an above ground tank, then it may also need bollards to protect it from vehicles. An underground tank will need containment sumps and drop tubes and so on.
The combination of components will be decided by the installer and you can certainly ask for a complete breakup of the same and get the costs for the same as well.
Remediation
Repair and remediation of above and underground tanks is a critical task. In fact, many problems associated with underground fuel storage tanks can be eliminated if the home owner invests time and resources into periodic analysis and examination of the same.
A fuel tank that has been installed above the ground will be easier to access but repair and remediation of both types of tanks will entail:
• Soil sampling.
• Extent of oil contamination.
• Assessment of leaks and the extent and number of the same.
• Drawing up a plan for dealing with all problem areas.
Removal
Every fuel tank has a shelf life. At some point of time or the other, the fuel tank will need to be removed. When it comes to above ground installations, the removal company will need to assess the type of fuel and the knowhow on emptying the tank completely.
The tank will also need to be cleaned completely before being loaded on to a vehicle that can take it away to a recycling unit or disposal unit. Underground tanks can be removed or closed or treated as abandoned depending on the condition of the tank and official licenses. For instance, a tank can be treated as closure in place if the removal of the same is going to compromise the safety of structures above the ground.
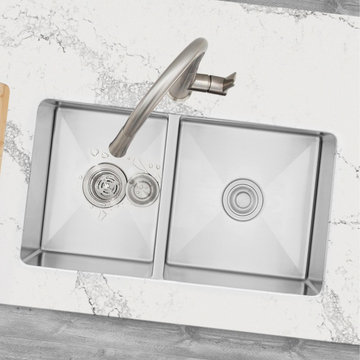
 Stylish
Do you want to upgrade your kitchen? Replace your current sink with this Canadian STYLISH stainless steel kitchen sink. This luxurious 33” x 18” double undermount kitchen sink is made of surgical grade SUS 304 16G stainless steel, this sleek and luxurious kitchen sink with a brushed satin finish will look amazing in your kitchen! Even after years of constant use, the patina finish of the kitchen sink will never oxidize. The X-pattern drain grooves in this undermount kitchen sink’s basin allow for optimal drainage. the undermount sink will drain and dry quickly and effortlessly. Also, the 10mm radius sink corners are smooth and easy to clean, so that your skin will always be shiny and free of bacteria and unpleasant smells. The STYLISH stainless steel sink is here to make your life easier. Keep your cabinets intact. Water condensation in kitchen sinks often causes your cabinets to get ruined. This won’t be a problem if you install the STYLISH undermount sink in your kitchen. The stone guard coating of our stainless steel sinks prevents condensation and makes the sink quiet. Our kitchen sinks are Canadian designed and meet the highest plumbing standards for North America, so you can trust us when we say that this is the best sink on the market.
This functional STYLISH sink will not make loud noises when the water is on. Thanks to the 2mm and 3mm extra thick pads, this is a very quiet sink. STYLISH has equipped the undermount kitchen sink with a soundproofing system, so that you will be able to wash dishes and your hands without having to deal with loud, annoying noises. Another great feature of this sink is that the double bowls are 60/40 and extra deep. One of the bowls is extra-large for even bigger pots. The extra deep basins of this double undermount kitchen sink can fit large pots and pans easily. The 10-inch depth is also great because it can hide the dirty dishes under the countertop line until you have the time to wash them. This undermount kitchen sink comes with two luxury stainless steel basket strainers. These are also extra deep, so that they can catch more food scraps than regular strainers. Also included are two stainless steel bottom grids, perfect to protect the bottom of your stainless steel kitchen sink, one cutting template and mounting brackets. This double undermount kitchen sink was designed with the busy parent and young professional in mind. The modern and linear style will integrate perfectly in any kitchen space.
 Tile Doctor Ltd
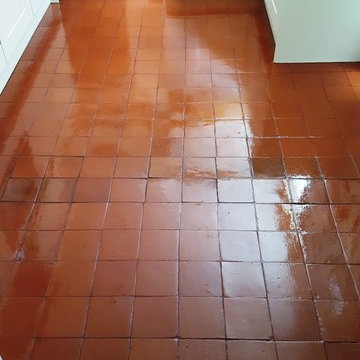
If you’re a first time buyer in the process of renovating or redecorating your new property, you may well discover some fantastic tiled floors hidden under your carpets. Certainly in my experience this happens quite often, so it came as no surprise when I got a call from a couple who had pulled up the carpet in the kitchen of their new house in Chester to find Quarry tiles, along with some fantastic Victorian tiles in the hallway.
While the Quarry tiles were in relatively good condition – having been shielded by carpet for many years – the couple were still understandably keen to get them back to looking their very best. I was more than happy to help them do just that.
Before beginning the restoration, I removed the kick boards from the kitchen cupboards so as not to damage them. I then applied a solution of our versatile, high alkaline cleaner, Tile Doctor Pro Clean, and let it soak into the tiles for a short period before scrubbing it in using a rotary machine fitted with a black scrubbing pad. Pro Clean is suitable for use on most natural stone tiles, including Quarry, Victorian and Slate, doing the trick to break down medium to heavy soil buildup.
The floor was then rinsed off with clean water, and the resulting slurry was promptly removed using a wet vac. I then left the floor dry out overnight.
I returned to the property the next morning, and started out by taking a couple of damp meter readings to make sure the floor was dry enough to seal. This is an essential task before sealing any tiled floor as even the smallest amount of excess moisture can cloud the sealer and damage its performance.
To seal the floor, I firstly applied one coat of Tile Doctor Colour Grow, which really brought out the natural reddish shades in the Quarry. As an impregnating sealer, Colour Colour fills the pores in the stone and prevents dirt from becoming ingrained. I followed the application of Colour Grow by applying three coats of Tile Doctor Seal and Go Extra. As a topical sealer, Seal and Go Extra forms an additional stain resistant seal on the surface of the tiles to protect against dirt and stains. It also gave the tiles a quality sheen finish as requested by the customer.
The customers were very happy with their newly restored Quarry tiled floor. They left the following feedback:
“We were both thrilled to bits with how nice the Quarry tiled kitchen floor looked, after being cleaned and sealed. Alastair was a pleasure to deal with and we would highly recommend him to anyone considering having their floor done.”
Alastair Robb
West Cheshire Tile Doctor
 Tile Doctor Ltd
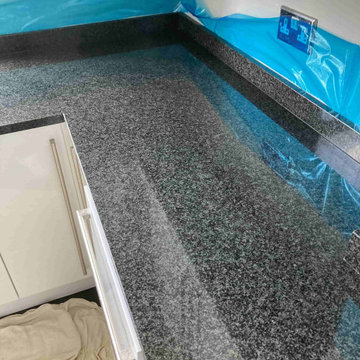
Although expensive Granite makes the most beautiful and practical stone worktop you can install in your kitchen. It gives real wow factor to a room and this kitchen in Folkestone was no different. Normally granite needs little maintenance however Folkestone has very hard water (often referred to as limescale) containing high levels of calcium and over time the calcium in the water gets deposited on nearby surfaces. According to the Affinity Water website the water in Folkestone contains 287.5 mg of calcium per litre which is classed as hard.
The owner of the property contacted us explaining that due to this problem the build-up of calcium deposits had overtaken her sink and countertop to a degree that she couldn`t deal with it through normal cleaning and a restoration was required. There are several household products on the market that can remove limescale however you need to be very careful when using these on natural stone as they use acids to break down the calcium and this can etch stone making the problem worse (always read the label). I went and had a look at the problem and gave her a quote for resolving the problem, which she was happy to accept.
Before starting the renovation, I protected the floor with dust sheets and the walls with a blue film that is easy to remove. Then to tackle the limescale I carefully went over each part of the Granite counter using a set of six-inch Tile Doctor Burnishing pads applying them in sequence from coarse to extra fine. To give extra cleaning power the coarser pads were applied with Tile Doctor Oxy-Gel which is an alkaline cleaning gel. The pads were fitted to a hand buffer and the soil generated by the abrasive pads was rinsed off between pads with water. For the finer detail such as the groves in the granite draining board, I used diamond encrusted handheld burnishing blocks of various grits. With the combination of diamond tooling and lots of elbow grease the job took around five hours to complete and the granite now has the polished look it deserves.
The granite worksurface does not require an actual sealer to be applied. However, maintenance is the key to keeping the stone in great condition so for aftercare I left the owner with a bottle of Tile Doctor Stone Patina Spray. This product is designed for cleaning stone worktops and contains a special ingredient that maintains the lustre. This should ensure the Limescale becomes manageable and can be cleaned more easily.
I made a striking difference to the appearance of the Granite Worktop and the owner was over the moon with the result.
Michael Conlon
South Kent Tile Doctor
 Pro-Roofing
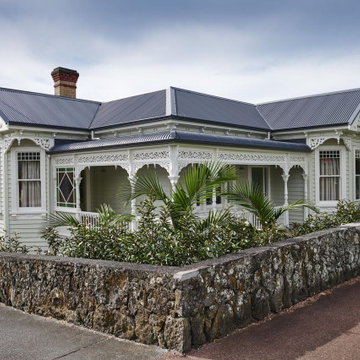
The standard duration of a roof is roughly many years. If the roof is under few years old yet you are having problems, it will probably be able to get repaired instead of being forced to put up a brand-new roof. Even so, if your roof exceeds this age it usually is recommended to put in a new roof. To complete both fixes and new installs, a roofing contractor should be employed. A roofing contractor will be able to perfectly put in or service roofing components to make certain a good quality end product.
Before employing a residential roofing Auckland contractor it's always a good idea to get recommendations from family or friends. No matter whether you have recommendations, acquire several bids prior to figuring out the roofing company to hire. A bid ought to be thorough and encompass the work to be conducted, expense, and time-frame to finish. Make certain clean up is included in the offered cost. If you would like save money, offer to complete the cleanup yourself.
Ask the roofer for how long they've been in business. Roofing contractors with numerous years experience are preferred. Additionally, make certain they have a physical address. Many roofing rip-offs are carried out by folks operating out of a truck without any legitimate business licenses or permanent street address. Obtain recommendations and verify them. Roofers should be properly insured. Request verification of insurance coverage to be certain you are shielded from any damage to your house.
The residential roofing Auckland repairs and new roofs may require particular building permits. Make sure the enterprise you deal with knows community building regulations and that they acquire the right licenses or permits. Many cities also need to have inspections during particular stages of construction and a final inspection when the work is complete. Examine your community building codes to be sure the roofer is adhering to all codes. You may be liable if this does not occur.
Before starting the task get a contract. This would include every detail of the project, period of time to finish, and cost. It needs to clearly define payment procedures and warranties. Furthermore, make certain the contract declares they are liable for clean up. Roof elements can be very messy and you should not need to clean up and dispose of waste yourself. However remember you can save a little money if you choose to take on the cleanup process yourself. Don't be rushed into choosing a residential roofing Auckland contractor. Take time to talk to prospective roofers and check out expertise and recommendations. Roof maintenance can be costly and a new roof is really a major investment. Protect your house through doing a bit of analysis. Hire the roofing contractor that has the best mix of expertise and expense and with which you feel most confident.
For More Info:- https://www.proroofing.co.nz/
https://classifiedsfree.nz/new-zealand-classifieds/www_9_208_710990/central-auckland-roofing
https://www.okidoki.co.nz/item/commercial-roofing-in-auckland/8598537/
https://www.directorytogoto.com/new-zealand/auckland/professional-services/pro-roofing
Sponsored
Sunbury, OH
J.Holderby - Renovations
Franklin County's Leading General Contractors - 2X Best of Houzz!

 SERVPRO of Blackwood NJ and Gloucester Township NJ
Cleaning Mold with Bleach is Hazardous, Don't use bleach, Mold,
Using chlorine bleach to kill mold is probably one of the worst things you can do.
As a matter of fact, the Occupational Safety and Health Administration (OSHA), stopped recommending the use of bleach for dealing with mold issues. And, the Environmental Protection Agency (EPA) updated their guide as well, removing the suggestion to use bleach to kill mold.
The problem is, it’s true that bleach can kill some mold in some places, some of the time. But, bleach only works to remove mold on hard, impermeable surfaces like bathtub and shower surrounds or tiles. However, on porous surfaces like drywall or hardwood floors, it won’t work to kill mold or keep it from coming back.
Mold spreads its roots deep into porous surfaces.
Simply spraying a bleach solution on the surface won’t kill mold spores at their roots.
Here are some reasons Why you should NOT to Use Bleach to Kill Mold:
1) Bleach is Caustic, with High VOC's and can cause Burns to your Eyes, Nose and Throat and Skin. Your Pets paws, can get burned, and Pets lick their paws.
2) Bleach encourages toxic mold growth on porous surfaces because it provides excess moisture.
3) Bleach is extremely corrosive, and corrodes Metal Fastners, such as Screws and Nails, Water Pipes, Waste and Drain Pipes.
4) Bleach only removes the color from mold.
5) Chlorine bleach is extremely harmful to surfaces.
SERVPRO of Blackwood NJ Gloucester Township NJ, is a Veteran Owned and Operated Small Business, or Veteran Owned Business, (V.O.S.B.), and understands that fires, Mold, floods, Covid 19, or other disasters can strike suddenly and they can cause disruption to your life and home or business.
SERVPRO of Blackwood NJ Gloucester Township NJ, is Completely registered with:
1) The System for Award Management (SAM) for the U.S. Government.
2) The Commercial and Government Entity (CAGE) Code, with the Federal Government.
***CAGE Code 8QK50 and DUNS 023257359
***Government Contractor
We look forward to partnering with Industrial Hygienists, Environmental Consultants, and other business opportunities, to bid on Federal, State, County, City, Industrial, Manufacturing, Commercial, and Residential Projects, throughout the entire United States of America.
YES WE ARE OPEN!!
Jon A. Barrett
Marketing Manager
SERVPRO of Blackwood/Gloucester Twp
Phone: (856) 227-7800
Email: sp.jonb@gmail.com
Website: https://www.SERVPROblackwoodgloucestertownship.com/company-profile
Emergency Services 24/7/365
Federal, State, Industrial, Commercial and Residential Restoration Services
CAGE Code: 8QK50 DUNS# 023257359
*****VETERAN OWNED AND OPERATED
Google MyBusiness:
https://goo.gl/maps/v5wzUXhQ3pDntdbTA
 Tile Doctor Ltd
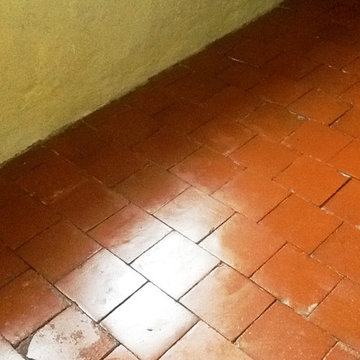
Here’s an interesting work I recently completed on a red Quarry tiled floor at a house in the town of Abington, Northampton. In post-war Britain (more specifically in the 1940s and 1950s), many new homes were built with Quarry tiled hallways and kitchens, so quite a popular feature back then. These floors are typically quite hard wearing and therefore ideal for such high traffic areas; additionally they don’t need a great deal of maintenance but their appearance will degrade over time.
In this particular house, the Quarry tiled floor had been covered with linoleum for many years, causing significant patches of visible black mould. The floor also had a loose tile (which I promptly reset to mitigate the potential tripping hazard) and splashes of paint due to a lack of precaution while the house was being renovated. Needless to say, the floor needed a lot of work.
Before beginning the cleaning I made sure to vacuum up all of the loose debris from the floor. I then applied Tile Doctor Remove & Go to the tiles, left it to dwell for a short period, and then agitated the area with a black stripping pad, adding water to aid the process. This helped to break down any old and ineffectual sealer, along with the paint splashes marking the tiles, leaving a much cleaner and more refined appearance.
I followed this up with Tile Doctor Grout Clean-Up to eliminate the odd speck of cement and grout haze dating back to when the floor was first installed; Gout Clean-up has an acid base so it’s not advised to leave it on the tiles for too long, consequently as soon as I was happy it had done the job I rinsed it off with water and give the floor a thorough wash down.
I used a wet-vacuum machine to extract as much water as possible and gave the floor a once over with steam cleaner which improves the evaporation of any remaining moisture by heating up the tiles.
After completing the cleaning process, I left the house to allow time for the floor to dry completely. Upon my return, I conducted a damp test which showed the floor needed to dry further before sealing so I left an industrial fan in place for a couple of hours to help speed things up.
Once I was satisfied that the floor was dry enough to take the sealant, I sealed the floor using Tile Doctor Colour Grow which is an interesting product that will not only provide durable stain protection but also improves the natural colours of the tile.
While the floor required a lot of time and work to restore, I think you will agree the results were certainly worth waiting for.
Phil Vissian
Northamptonshire Tile Doctor
 Tile Doctor Ltd
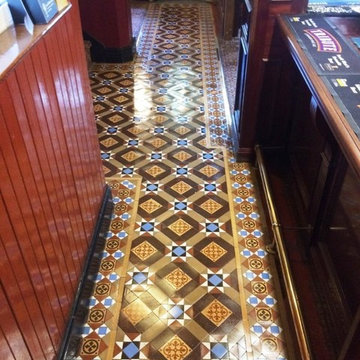
Here’s a really interesting commercial job for you, which I recently completed in the town of Hinckley, Leicestershire. I was asked to take a look at a Victorian Geometric and Encaustic tiled floor in the historic Queen’s Head pub.
This floor is over a century old and although in good condition for its age had suffered significant wear over the years, along with some cracked tiles and slight inherent moisture issues. What the pub landlord requested was a restorative clean to alleviate the aesthetically damaging effect of the wear, and to enhance the natural colours of the stone. I was also asked to seal the floor following the clean to achieve a semi-gloss finish.
The first step in the cleaning process was to mix a strong solution of one part Tile Doctor Pro-Clean to four parts clean water. Pro-Clean is a high alkaline cleaner which also contains stripping properties, allowing it to break down old sealer and tackle heavy soil build-up. The solution was applied to the floor and left to dwell for 15 minutes, giving it times to seep into the stone, get underneath the dirt and lift it to the surface.
I addressed several paint spots and areas suffering from glue contamination by using Tile Doctor Remove & Go, which is specially formulated to break down paint and adhesives on unpolished natural stone floors, amongst others. The entire floor was then scrubbed using a special floor cleaning pad, and the resulting slurry was vacuumed away using a wet-vac machine.
The final issue to deal with was the inherent efflorescence staining. This was treated using Tile Doctor Grout Clean-Up, an acid-based product which removes not just efflorescence but also grout haze, mineral deposits, and rust stains. The solution here was one part Grout Clean-Up diluted with four parts water.
After completing the clean, I thoroughly rinsed the floor with clean water to remove any trace of cleaning product and dried the floor as much as possible with a wet vacuum, then before leaving for the day i installed a couple of air movers to assist with drying overnight.
Upon my return the following day, I checked the floor for any excess moisture before sealing it with our topical, semi-gloss finish sealer, known as Seal & Go Extra which due to its formula is ideal for external or old internal floors where there is unlikely to be damp from membrane.
This unique product provides excellent protection, and allows the tiles to breath where floors are suffering from inherent moisture issues. It is suitable for both internal and external use, on Victorian floor tiles, Sandstone, Flagstones, Terracotta, and rough Slate.
As you can see from the photo, I was able to fulfil my client’s request to a high standard, bringing the pub’s old yet characterful Victorian tiled floor back to life again.
Kay Sylvester
Leicestershire Tile Doctor

 Lori Clarke Interior Design Inc.
Get Cozy in this Renovated 1870’s Home with Modern Classic Charm
The Challenge: Replacing and rebuilding an entire floor to coincide with the style and charm of the historic home
For a lot of people, nothing can compare to the charm and warmth of a unique heritage property. As an interior designer, it is remarkable to walk into a home that was built in Fredericton during the 1870s. To be surrounded with such architectural details is a designer’s dream, so you stop and pause and realize the character, charm and warmth should never be comprised, it must be protected. I had every intention of doing so, I wanted to bring the space under renovation back to a luster and original beauty by providing a modern yet classic appeal.
The first thing I noticed was the wasted space that we could capitalize on. The bay window was the perfect backdrop for a custom window bench and the current heritage bookshelves required symmetry, so a decision to build an adjoining custom piece was designed. The floors required complete replacement and the entrance tile was outdated and did not align with the hardwood floor.
With a heritage home renovation comes special challenges that don’t normally present themselves in a newer home renovation. Unfortunately, the original floor had to be replaced, it could not be salvaged. We chose a warm hickory hardwood that aligned perfectly with the warmth and comfort of the home. The entrance tile…took some convincing. In the end the home owners agreed to my recommendation of Casa Roma tile.
The real challenge came when the floor had to be replaced, there were so many issues from rotten wood to uneven floor joists. The contractor and his team were meticulous, ensuring the new floor was safe, balanced and aligned to perfection with the adjoining floor. The entrance floor was removed and a seamless transition from tile to hardwood was perfected. The result – true perfection, like the hardwood and the tile had been married together for years.
The adjoining custom piece was designed to house the electronics in the room but with a great deal of detail to ensure it appeared to have always been there. The real challenge was matching the stain to the existing bookcases, there was no stain on the market that matched. A call to Fredericton’s Stain Doctor and the perfect stain was custom created.
I utilized the colour undertones in the home owners art collection to create the colour palate. I wanted to ensure the furniture and furnishings were worthy of this magnificent home. I developed a soft, warm palate of greys, blues and lavender using different textures yet providing a cozy, modern and classic appeal.
I can’t imagine anyone not wanting to curl up in either of these rooms with a good book, a glass of wine, get lost and let the world go by
Bang On Photography
 Tile Doctor Ltd
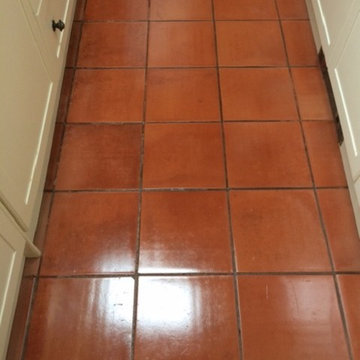
Terracotta is an interesting type of stone manufactured using a variety of techniques dependant on the country of origin which leads to a number of differences such as Spanish Terracotta being less porous than its Mexican counterpart: the former is semi-hand made and finished in a factory kiln, while the latter is completely handmade. Spanish Terracotta is therefore a lot less than porous and ultimately, of a higher quality.
But despite the Spanish Terracotta being less porous, and therefore being less prone to ingrained dirt, it still, like any other stone, needs regular maintenance to keep it looking smart. In the tiling trade, we quite often refer to this as a good old fashioned ‘Clean and Seal’ and this is exactly what was requested by this property owner in Halifax, for their Spanish Terracotta tiled floors in the kitchen and adjacent hallway.
I cleaned both sets of Terracotta tiles using the same process, which involved the application of our reliable alkaline cleaner known as Tile a Doctor Pro Clean, diluted with five parts of warm water. Once the solution had been left to dwell for a short period, it was scrubbed into the tiles to remove all dust, dirt, and general muck. This created a slurry of cleaning residue, which I promptly soaked up using a wet vac. A wet vac machine is an essential tool when it comes to cleaning porous tiles since, unlike a traditional mop and bucket, it sucks the excess trapped dirt out of the clay and thus provides a superior clean.
Following this, I applied a small amount of our heavy duty remover, known as Tile Doctor Remove & Go, to deal with some of the more stubborn stains and paint splashes, before rinsing with clean water and wet vaxing in a similar fashion to before.
Once the clean had been completed I left the tiles to dry completely. This can take 12 to 24 hours depending on numerous factors including whether a Damp proof Membrane and underfloor heating has been installed which can really help reduce drying times. Letting the tiles dry completely before sealing is paramount as moisture can cloud the sealer and affect its performance.
Upon my return to the property I ran some quick damp tests, which revealed the tiles were ready to be sealed. I then applied several coats of Tile Doctor Seal and Go, our topical sealer which provides a satin finish and accentuates colour. A new coat of this product is recommended every six months on Terracotta to ensure the continuous protection of the tiles’ soft clay particles.
My customer was extremely pleased with her refreshed Terracotta tiles. It goes to show what a big difference a bit of regular maintenance can make. I advised the customer that an everyday cleaner called Tile Doctor pH Neutral cleaner can also be used regularly to keep the tiles looking great without damaging the sealer.
Nigel Stoker
North West Yorkshire Tile Doctor
 Lori Clarke Interior Design Inc.
Get Cozy in this Renovated 1870’s Home with Modern Classic Charm
The Challenge: Replacing and rebuilding an entire floor to coincide with the style and charm of the historic home
For a lot of people, nothing can compare to the charm and warmth of a unique heritage property. As an interior designer, it is remarkable to walk into a home that was built in Fredericton during the 1870s. To be surrounded with such architectural details is a designer’s dream, so you stop and pause and realize the character, charm and warmth should never be comprised, it must be protected. I had every intention of doing so, I wanted to bring the space under renovation back to a luster and original beauty by providing a modern yet classic appeal.
The first thing I noticed was the wasted space that we could capitalize on. The bay window was the perfect backdrop for a custom window bench and the current heritage bookshelves required symmetry, so a decision to build an adjoining custom piece was designed. The floors required complete replacement and the entrance tile was outdated and did not align with the hardwood floor.
With a heritage home renovation comes special challenges that don’t normally present themselves in a newer home renovation. Unfortunately, the original floor had to be replaced, it could not be salvaged. We chose a warm hickory hardwood that aligned perfectly with the warmth and comfort of the home. The entrance tile…took some convincing. In the end the home owners agreed to my recommendation of Casa Roma tile.
The real challenge came when the floor had to be replaced, there were so many issues from rotten wood to uneven floor joists. The contractor and his team were meticulous, ensuring the new floor was safe, balanced and aligned to perfection with the adjoining floor. The entrance floor was removed and a seamless transition from tile to hardwood was perfected. The result – true perfection, like the hardwood and the tile had been married together for years.
The adjoining custom piece was designed to house the electronics in the room but with a great deal of detail to ensure it appeared to have always been there. The real challenge was matching the stain to the existing bookcases, there was no stain on the market that matched. A call to Fredericton’s Stain Doctor and the perfect stain was custom created.
I utilized the colour undertones in the home owners art collection to create the colour palate. I wanted to ensure the furniture and furnishings were worthy of this magnificent home. I developed a soft, warm palate of greys, blues and lavender using different textures yet providing a cozy, modern and classic appeal.
I can’t imagine anyone not wanting to curl up in either of these rooms with a good book, a glass of wine, get lost and let the world go by
Bang On Photography
 SUPERIOR CHIMNEY SERVICES CORPORATION
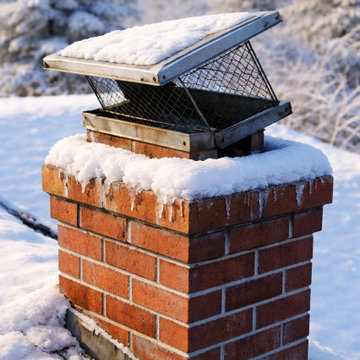
Is it crazy to think about chimney repairs in the winter? It’s cold and snowy outside and the rooftops are solid white, coated with a layer of ice. A homeowner called us with a concern about her home. She reported that a small stream of water was coming down the chimney and into the firebox. To keep the water from flooding the firebox, the homeowner placed a Tupperware container to collect the water. Not a good look. Can chimney repairs in the winter be done by a certified chimney technician?
Chimney Repairs in the Winter
Chimney repairs can be completed in the winter, although it depends on what type of chimney repair is needed. Let’s take a quick look at the different chimney repairs in our cold winter months.
Chimney Cap: If your chimney cap comes loose, or if the winter winds knocked it out of place or blew it off completely, our certified chimney technician can go up on the roof and take care of the chimney cap for you with a chimney cap replacement. Our technicians follow the guidelines for safety, especially in the winter months when roofing systems are the slipperiest.
Flashing: Flashing is the connector from the roofing system to the chimney. It is the barrier that protects water from finding its way into your home. However, if the flashing becomes loose or comes away from the roof and chimney, it is open season for the rain to come directly into your home and create chaos.
Chimney Crown: The chimney crown is the slab of cement that sits on top of the chimney and right below the chimney cap. Hairline cracks can form in the chimney crown allowing water, melted snow, to enter. Even the smallest hairline crack can cause the melted snow to find the weak spot on the chimney crown and make its way into your home.
Remember, hairline cracks can and will grow in width and length with the freeze thaw cycles. When the melted snow freezes at night, it expands inside of the crack. If the temperatures cooperate in the daytime, it melts the snow. But remember, it doesn’t necessarily dry out inside of the crack. It can remain moist and freeze again at night.
Chimney Tuckpointing: Tuckpointing the chimney can be done in the winter, but it certainly isn’t an easy process as we’re dealing with wet mortar. Cracks can create an entry point for melted snow to enter, further deteriorating the mortar.
Although it is not optimal to perform chimney repairs in the winter, Superior Chimney takes precautions to ensure a safe and effective repair. Now the homeowner can get rid of the streaming water in the firebox and enjoy the rest of the winter with a warm and dry fireplace.
Be sure to contact us today if you have a water leak in your fireplace. If you would like to have your chimney inspected and checked for water leaks coming this spring, contact us today to schedule it up in March. This way, you’ll be all set and not compete with others in the Spring.
9