
Search results for "Protected replacement" in Home Design Ideas

 Alair Homes Plano
This house was built in 1994 and our clients have been there since day one. They wanted a complete refresh in their kitchen and living areas and a few other changes here and there; now that the kids were all off to college! They wanted to replace some things, redesign some things and just repaint others. They didn’t like the heavy textured walls, so those were sanded down, re-textured and painted throughout all of the remodeled areas.
The kitchen change was the most dramatic by painting the original cabinets a beautiful bluish-gray color; which is Benjamin Moore Gentleman’s Gray. The ends and cook side of the island are painted SW Reflection but on the front is a gorgeous Merola “Arte’ white accent tile. Two Island Pendant Lights ‘Aideen 8-light Geometric Pendant’ in a bronze gold finish hung above the island. White Carrara Quartz countertops were installed below the Viviano Marmo Dolomite Arabesque Honed Marble Mosaic tile backsplash. Our clients wanted to be able to watch TV from the kitchen as well as from the family room but since the door to the powder bath was on the wall of breakfast area (no to mention opening up into the room), it took up good wall space. Our designers rearranged the powder bath, moving the door into the laundry room and closing off the laundry room with a pocket door, so they can now hang their TV/artwork on the wall facing the kitchen, as well as another one in the family room!
We squared off the arch in the doorway between the kitchen and bar/pantry area, giving them a more updated look. The bar was also painted the same blue as the kitchen but a cool Moondrop Water Jet Cut Glass Mosaic tile was installed on the backsplash, which added a beautiful accent! All kitchen cabinet hardware is ‘Amerock’ in a champagne finish.
In the family room, we redesigned the cabinets to the right of the fireplace to match the other side. The homeowners had invested in two new TV’s that would hang on the wall and display artwork when not in use, so the TV cabinet wasn’t needed. The cabinets were painted a crisp white which made all of their decor really stand out. The fireplace in the family room was originally red brick with a hearth for seating. The brick was removed and the hearth was lowered to the floor and replaced with E-Stone White 12x24” tile and the fireplace surround is tiled with Heirloom Pewter 6x6” tile.
The formal living room used to be closed off on one side of the fireplace, which was a desk area in the kitchen. The homeowners felt that it was an eye sore and it was unnecessary, so we removed that wall, opening up both sides of the fireplace into the formal living room. Pietra Tiles Aria Crystals Beach Sand tiles were installed on the kitchen side of the fireplace and the hearth was leveled with the floor and tiled with E-Stone White 12x24” tile.
The laundry room was redesigned, adding the powder bath door but also creating more storage space. Waypoint flat front maple cabinets in painted linen were installed above the appliances, with Top Knobs “Hopewell” polished chrome pulls. Elements Carrara Quartz countertops were installed above the appliances, creating that added space. 3x6” white ceramic subway tile was used as the backsplash, creating a clean and crisp laundry room! The same tile on the hearths of both fireplaces (E-Stone White 12x24”) was installed on the floor.
The powder bath was painted and 12x36” Ash Fiber Ceramic tile was installed vertically on the wall behind the sink. All hardware was updated with the Signature Hardware “Ultra”Collection and Shades of Light “Sleekly Modern” new vanity lights were installed.
All new wood flooring was installed throughout all of the remodeled rooms making all of the rooms seamlessly flow into each other. The homeowners love their updated home!
Design/Remodel by Hatfield Builders & Remodelers | Photography by Versatile Imaging

 Thrive Outdoor, Inc.
Hardscaping is the implementation of garden architecture combining plants, walls, walkways, and even water. This landscaping technique utilizes non-plant based elements as an integral part of the overall design and construction of your landscape, providing more than ornamental grasses, trees, shrubs and flowers to your outdoor space.
Retaining Walls That Tame the Landscape and Protect Your Investment
More than functional, our retaining walls are works of art. Made of modular concrete or natural stone, they are both classic and contemporary in style. We’ll work hard to complement the style of your home’s existing structures and outdoor surfaces while ensuring a design that is integral to preventing erosion, providing easy transitions to steep grades and protecting your investment in plantings.
Sustainable and Beautiful Patios, Entryways and Driveways
Turf Tamer, Inc. is known for unique, custom stonework and specialty brick paving that varies from subtle to dramatic. We use a variety of materials, including concrete permeable pavers, bricks, concrete, and flagstone, some of which carry up to a lifetime warranty. Our designers and crew can create an incredible, low-maintenance outdoor surface that increases the beauty, function and value of your home.
Sustainable Decks for Value, Beauty and Enjoyment
If it’s a deck you want, we’ll design it to be uniquely yours. And, we’ll build it from cedar, redwood or even longer lasting composition materials. Whatever it takes, we’ll make those transitions from inside to outside living beautiful, low-maintenance and perfect for your next dinner party or family get together.

 Interlocking Concrete Pavement Institute
2018 HNA Awards Honorable Mention - Concrete Paver - Permeable
Contractor: Sequoia Stonescapes
Producer: Williamette Graystone
Designer: Drake's 7 Dees Landscaping
Eco-Panorama Demi pavers, in a tri-color blend, perfectly complement this home’s exterior. Contrasting color paver bands artfully define the driveway and courtyard. The use of the same pavers in the walkway and courtyard created design continuity and flow. Paver color and texture enhance and seamlessly integrate with an adjacent natural stone retaining wall.
Expert workmanship is showcased via smooth pavement elevation transitions and precise paver trim cuts. This quality Eco-Panorama Demi paver install ensured the homeowner’s stormwater drainage issues were addressed in a manner that enhanced the beauty of their home.
The existing storm drain inlets were retained and work in conjunction with installed Eco-Panorama Demi permeable pavers. The pavers also achieve visual harmonization with the adjacent natural stone wall, which was a project requirement.
This home is positioned at the lower end of a 200ft long drive that drops sixteen feet in elevation from the street entrance. Impervious concrete was replaced with PICP to manage 80,700 gallons of rainwater the pavement receives annually. The PICP improvement eliminated concerns over flooding in the home and garage. The 3500 SF pavement includes a courtyard and vehicle turnaround.
Despite thirty-seven inches of annual rainfall, these homeowners will rest assured their property is protected from rainwater runoff. Keystone Hardscapes’ Eco-Panorama permeable pavers provide improved stormwater management and elevated property value. Stormwater controls critical to the project were achieved and aesthetic beauty was significantly enhanced.
Find the right local pro for your project


 Tile Doctor Ltd
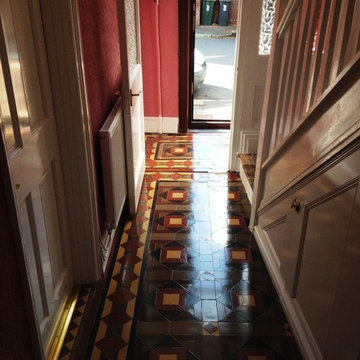
This Victorian tiled hallway at a house in the Forest of Dean had a very interesting pattern, consisting of an array of different colours, including shades of red, yellow and blue. Unfortunately, as you can see from the first photograph below, the tiles had lost all life, with the colours largely masked by months’ – or maybe even years’ – worth of ingrained dirt and muck. The floor as a whole was also suffering from a number of loose tiles that needed to be reset before it could be cleaned.
The property owner was keen to employ some professional assistance to restore the appearance of the floor and prevent it from getting in an even wrote state, and so contacted Tile Doctor who have a lot of experience working with Victorian tiled floors.
As mentioned, the loose tiles had to be repaired before the cleaning process could be started. I removed the tiles and extracted excess grout and old adhesive from the exposed concrete substrate using a vacuum, before putting the original tiles back into place and fixing them back into position carefully using fresh adhesive and matching grout.
Once happy the replaced tiles had set, I started the process of cleaning the entire area of hallway tiles using a combination of Tile Doctor Remove and Go to strip away the old sealer and Tile Doctor NanoTech HBU (formerly Ultra Clean) remover to get the tiles as clean as possible. The latter product contains nano-sized cleaning particles (hence the name) to reach difficult areas of trapped dirt, making it more effective than your run-of-the-mill tile cleaner. These two products were scrubbed into the tiles using a rotary machine fitted with a black scrubbing pad. The floor was then rinsed with water and the soiled residue was extracted with a wet vacuum.
I then paid particular attention to the grout, applying our alkaline-based multi-purpose cleaner Tile Doctor Pro-Clean to the grout lines, before scrubbing them with a narrow grout brush. This quickly had the grout looking clean again: I’d even go as far as to say that it matched it seamlessly with the fresh grout that had just been laid.
With the tile and grout as clean as it was possible to get it, I gave the whole floor a final rinse to neutralise the excess chemicals. I extracted as much water as possible with a wet vacuum and left the floor to dry overnight.
My first task upon returning to the property the next day was to check for any dampness. If you neglect to remove all excess moisture from the surface of the tiles before sealing it is more than likely going to cloud the sealer, rendering it less effective I’m protecting the stone against ingrained dirt and stains.
Once satisfied that the floor was completely dry, I proceeded to seal the tiles using multiple costs of Tile Doctor Seal and Go. Seal and Go is what we would classify as a topical sealer, meaning it rests on the surface of the tiles to act as a durable layer of protection against all kinds of muck. While providing surface protection, Seal and Go also adds a nice subtle sheen to the tiles, as per the customer’s request.
The customer was quite amazed at how quickly the appearance of the tiles had been restored. It was fantastic to see the colours we both knew were hidden in the tiles come to life once again. Another satisfied customer for sure!
Paul Wales
Monmouthshire Tile Doctor
 Gayler Design Build
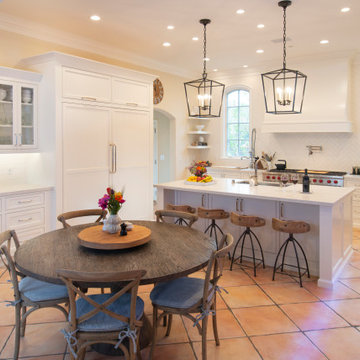
New cabinetry had to be measured with extreme care to cover the original cabinet footprint. Since the existing kitchen tile flooring would be difficult to find, Gayler also took special care during construction to protect the tile. The dated cabinetry in the kitchen and butler’s pantry was replaced with all new semi-custom inset maple cabinets painted in a Swiss Coffee finish.
A full overlay, custom-built kitchen hood, also in painted maple, anchors the kitchen’s large size and is complimented by a full ceiling-height backsplash in a herringbone pattern. Since the tile was custom-made, it had variations. Gayler Design Build took meticulous care to select and lay the tile to preserve the beautiful pattern.
The kitchen counters, the island, and the butler's pantry are finished in a marble-inspired Sereno Bianco Quartz.
To the delight of our client, they selected all new high-end appliances. Their appliance package included a SubZero 36” Integrated column refrigerator and freezer, a Wolf 60” dual fuel, 6 burner with a double griddle, a Thermador oven and microwave, a Thermador warming drawer, a Cove 24” dishwasher, a SubZero 15” Ice Maker and a SubZero 24” undercounter wine refrigerator.
Finally, pendant lighting, open and glass shelving, and dual sinks make a dramatic statement to this fantastic kitchen and butler's pantry transformation.
 Zabitat, Door Glass Replacement
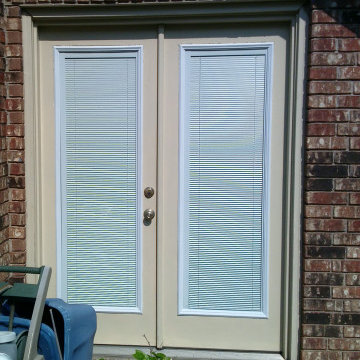
Because they’re protected between glass, Enclosed blinds retain their ‘like new’ look over time and with repeated use. They stay clean and free of damage from kids, pets, and anything else that might come into contact with your doorglass. No dusting, no tangled or dangling cords, and no crimped or dented blinds. The thermally sealed doorglass can be used in doors to meet ENERGY STAR criteria, giving you energy savings and long-term value, too. They reduce heat loss in the winter and solar heat gain in the summer. Our offering includes energy-saving Low-E glass options and impact-resistant, triple-glazed doorglass that safeguards against high winds, offers sound suppression, and reduces heat transmission. With our Light-Touch Blinds, a single-touch control lets you choose the perfect light or privacy level. The ergonomically considered design places the fingertip control within easy reach to tilt, raise, and lower blinds the entire length of the doorglass—with only the slightest movement required. Privacy channels on each side of the doorglass eliminate light gaps when the blinds are closed—no streetlight shadows or sunlight glare. Easy to clean, no dusting required. Light and Privacy Control.

 Tile Doctor Ltd
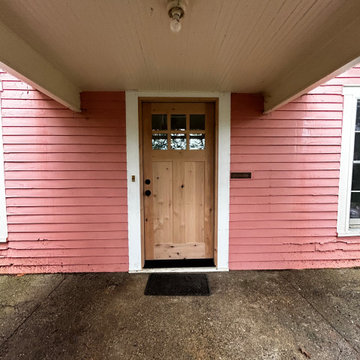
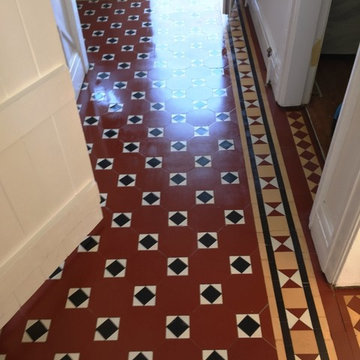
This Victorian tiled hallway was one of the most beautiful Victorian floors I have ever had the pleasure to work on. With the wide range of patterns and colours they are available in, it seems no two Victorian tiled floors are exactly the same, and this uniqueness is part of what makes them so appealing to property owners.
Unfortunately, this floor had been poorly maintained over the years, even suffering from a few loose and missing tiles. There was a thick coating of dust and dirt soiling its appearance, and the property owner was understandably keen to remedy the situation. Having realised that everyday household cleaners are not likely to achieve great results, she asked me to carry out a full professional restoration, including making some repairs where necessary. I was pleasantly surprised to find out that this property was situated in the town of Wyken, which is a few miles outside of Coventry city centre and in fact just down the road from where I live myself!
Before making a start on the cleaning process, it was first necessary to re-fix the small number of loose tiles and replace a single missing tile by the radiator. Fortunately, I’ve been working on these types of floors for some time and have built up a good collection of replacement Victorian tiles so I was able to find one that matched in nicely with the rest of the floor without too much problem.
To clean the tiles, I began by applying a layer of Tile Doctor Oxy-Gel directly into the floor with a small brush. This product is very similar to the popular Tile Doctor Pro Clean: both are strong alkaline cleaners, strippers and degreasers, with the main difference being that Oxy-Clean comes in a gel form, making it easier to control and therefore ideal for precise cleaning, or for application to vertical surfaces. Like Pro Clean and being an alkaline base it is suitable for use on all types of natural stone and tile. The Oxy-Gel was left to soak into the tiles for around ten minutes before being scrubbed in and then rinsed off carefully with water, I then used a wet vacuum to extract the now soiled cleaning solution off the floor.
The next step was to acid wash the floor using Tile Doctor Acid Gel; this served to break down alkaline mineral deposits inherent in the grout along with some excess grout that had been left on the untidily left on tile from installation. It is recommended not to use this product on acid-sensitive soon such as Marble and Limestone as it can cause irreparable etching but its fine on Victorian tiles as long as you don’t leave it on too long.
Finally, the floor was given a rinse with clean water to remove any trace of chemicals from the cleaning and to neutralise the area in preparation for sealing.
I left the floor for 48 hours to dry before returning to the property to seal the tiles. This allowed plenty of time for the floor to dry completely, which is important as any excess moisture can damage the ability of the sealer to protect against dirt and stains.
My choice of sealer for this floor was Tile Doctor High Shine; three coats in total were applied, providing – as the product name suggests – the high shine finish that the customer had requested. The sealer will provide durable surface protection going forward preventing dirt from becoming ingrained into the pores of the tile and ensuring it remains easy to clean and keeping its appearance for some time to come.
As a big fan of Victorian tiles, it was a great pleasure to restore this floor, and my customer was certainly pleased too. It’s amazing how far a little professional maintenance can go to improving the appearance of these fantastic types of floor.
Mick Gayton
Warwickshire Tile Doctor
 Murphy Bros. Design | Build | Remodel
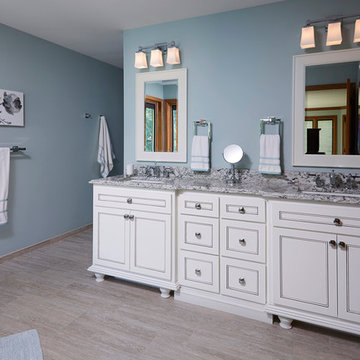
When these homeowners bought the executive property years ago they didn't really notice that all the bathroom countertops were several inches lower than today's standard height. Add that irritating anomaly to badly outdated bathrooms in terms of colors, materials and functionality, well, you've got the perfect remodeling storm—all three baths at once needed to be remodeled. This presented some challenges as well as some opportunities.
Cost and time efficiencies can be gained by doing all the bathrooms at once, assuming the homeowners have a latrine out back, leave the property until the work is done, or have a fourth bathroom—which was the case with this ambitious project. The homeowners were able to continue to utilize their Master Bedroom throughout the project, as the prep for the work area included a temporary plastic wall barrier and floor coverings, creating a protected hallway to the workspace and keeping dust minimized in adjacent areas.
In the end we updated the main floor powder room with new custom vanity, sink and mirror, replaced all the materials in the guest bathroom, including the tub, opened up the feel and functionality without changing the foot print, and completely gutted the master bath, moving the vanity wall forward to allow for a much larger walk-in shower.
Design/Build Consultant—Cherie Poissant
Photography—Alyssa Lee

 Anna O Design
The homeowners of this Marblehead residence wished to remodel their master bathroom, which had been redone only a few years prior. The previous renovation, however, was not a pleasant experience and they were hesitant to dive-in again. After an initial conversation, the homeowners agreed to meet with me to discuss the project.
listened to their vision for the room, paid close attention to their concerns, and desire to create a tranquil environment, that would be functional and practical for their everyday lifestyle.
In my first walk-through of the existing bathroom, several major issues became apparent. First, the vanity, a wooden table with two vessel sinks, did not allow access to the medicine cabinets due to its depth. Second, an oversized window installed in the shower did not provide privacy and had visible signs of rot. Third, the wallpaper by the shower was peeling and contained mold due to moisture. Finally, the hardwood flooring selected was impractical for a master bathroom.
My suggestion was to incorporate timeless and classic materials that would provide longevity and create an elegant environment. I designed a standard depth custom vanity which contained plenty of storage. We chose lovely white and blue quartzite counter tops, white porcelain tile that mimic the look of Thasos marble, along with blue accents, polished chrome fixtures and coastal inspired lighting. Next, we replaced, relocated, and changed the window style and shape. We then fabricated a window frame out of the quartzite for protection which proved to give the shower a lovely focal point. Lastly, to keep with the coastal theme of the room, we installed shiplap for the walls.
The homeowners now look forward to starting and ending their day in their bright and relaxing master bath. It has become a sanctuary to escape the hustle and bustle of everyday life.
 Tile Doctor Ltd
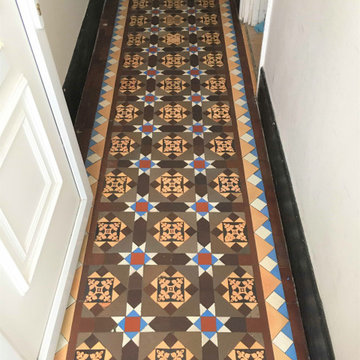
This client owned a property in Haringey, North London, which had a classic Victorian tiled floor laid in the hallway. Unfortunately, the floor was in a bad state, the tiles were dull and dirty and there was a missing section by the bottom of the stairs that had been back filled with cement. Fortunately for him however his neighbour decided to remove their front path which was made with matching tiles and so he was able acquire replacements from him. He then contacted us to see if we could use those tiles to fill in the missing ones and revive the whole floor with a clean and seal at the same time.
Before quoting for the restoration work, I paid a visit to the property to survey the floor. I can give quotes from photographs, but much prefer to visit and conduct a test clean, and in this case, I was able to check the spare tiles he had acquired. From that I emailed a quote which the client was happy with, so we arranged a date to return and do the work.
This was a large job, so I teamed up with Jackson Davis the Central London Tile Doctor and whilst Jackson started on cleaning the floor, I took the reclaimed tiles outside and carefully grinded off the excess cement and adhesive from them and cleaned them by hand. We managed to do this by about 3pm. Jackson and I work on a lot of jobs together so it made sense to work as a bubble from the beginning of Covid so we could continue to work together, with two of us on the job it also means we can get the job done quicker.
Cleaning the floor involved applying a 200-grit diamond burnishing pad to the tile lubricated with a strong dilution of Tile Doctor Remove and Go, the slurry was then rinsed off the floor with more water and then extracted with an industrial vacuum. The process was repeated on stubborn areas until we were satisfied the tiles were really clean.
We then moved onto carefully removing the cement from the floor at the bottom of the stairs and cleaning up the base. Once done the newly renovated replacement tiles were laid in place using a rapid setting adhesive which meant they could be grouted later that day before heading home. The floor was then left overnight to dry off.
We then returned the following day and took some moisture readings with the damp meter. The readings were within the expected range, so we were good to go ahead and apply the sealer. If the floor is not dry the seal will not cure properly, and this can lead to a patchy finish.
Three coats of Tile Doctor Colour Grow were applied to seal the tiles. This is a colour intensifying impregnating sealer that works from with and will gives the Victorian tiles durable protection, ideal for a high traffic area such as the hallway. In addition, Colour Grow is a fully breathable sealer so it will allow for moisture to rise through the tile and evaporate, this is critical for floors of this age that will not have the benefit of a damp proof membrane installed under the floor.
The hallway is now looking transformed by the work we did, we certainly thought so, but more importantly our client was very happy with the result and now has the floor he hoped for.
Andrew Newstead
North London Tile Doctor

 Globe Electric
The original Globe Electric Designer Series Power Hub with 4 USB Ports and 4 outlets was specifically designed to eliminate the unsightly traditional power bar and replace it with one you’ll want to show off! A circular design is ideal for shared workspaces and allows you the freedom of plugging in your laptop, monitors and lamps in one easy space. Equipped with four 3.1 amp combined USB ports you can charge three phones, two phones and one tablet, or two tablets simultaneously while you work. A handy space saver right angle plug allows your furniture to sit flush to the wall - creating more space without bent wires. A 6-foot fabric covered cord gives you the added convenience of increased range from power outlets while the four grounded outlets are perfect to use at home or in the office. Surge protected to 900 joules, you can rest assured that your small electronics are safe while plugged in. Equipped with LED surge and ground indicator lights, you'll always know that your power hub is working properly. Recommended for indoor use. Patent pending.
 Zabitat, Door Glass Replacement
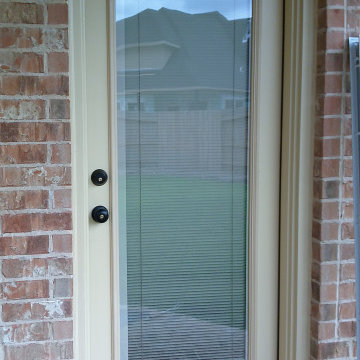
Because they’re protected between glass, Enclosed blinds retain their ‘like new’ look over time and with repeated use. They stay clean and free of damage from kids, pets, and anything else that might come into contact with your doorglass. No dusting, no tangled or dangling cords, and no crimped or dented blinds. The thermally sealed doorglass can be used in doors to meet ENERGY STAR criteria, giving you energy savings and long-term value, too. They reduce heat loss in the winter and solar heat gain in the summer. Our offering includes energy-saving Low-E glass options and impact-resistant, triple-glazed doorglass that safeguards against high winds, offers sound suppression, and reduces heat transmission. With our Light-Touch Blinds, a single-touch control lets you choose the perfect light or privacy level. The ergonomically considered design places the fingertip control within easy reach to tilt, raise, and lower blinds the entire length of the doorglass—with only the slightest movement required. Privacy channels on each side of the doorglass eliminate light gaps when the blinds are closed—no streetlight shadows or sunlight glare. Easy to clean, no dusting required. Light and Privacy Control.
Sponsored
Sunbury, OH

J.Holderby - Renovations
Franklin County's Leading General Contractors - 2X Best of Houzz!
 SUPERIOR CHIMNEY SERVICES CORPORATION
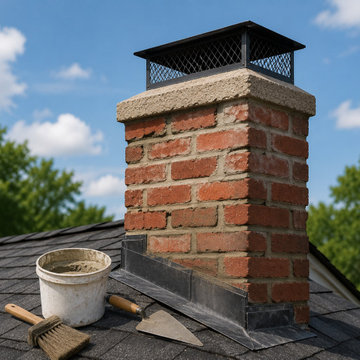
A friend noticed a damp, musty smell coming from her living room fireplace the week after a February thaw. When she called a masonry technician from Superior Chimney, to take a look, and found that water had been working its way behind the bricks for years. What started as a small crack now meant her chimney needed structural repairs before she could safely use it again.
Chimney repairs are any work done to restore the structural and weatherproof condition of a chimney. This can include mortar joint repair, brick replacement, crown repair, flue repair, and cap or flashing replacement. Most Chicagoland homeowners discover the need for chimney repairs often times after winter, when the freeze and thaw cycles have already done its damage. Uncovering the symptoms early is the best way to keep chimney repairs down. Let’s discuss how that can be done.
Why Chicagoland Weather Is Especially Hard on Chimneys
Chicagoland has some of the most polarized weather. One day it’s a blizzard and the next week hot, humid and 100 degrees. That swing in weather conditions and temperatures are the real reasons why chimney repairs are needed.
When moisture from humid and rainy days’ soak into brick and mortar and then freezes, it expands. As it begins to thaw, the materials contract. Repeat that cycle dozens of times in a single Illinois winter and even solid masonry in the chimney starts to crack, spall, and separate from the joints holding it together. This is called the freeze thaw cycle. We’ve talked about it many times over the years, and it continues to be the single biggest reason homes need chimney repairs more often than homes in milder climates.
The Chimney Safety Institute of America (CSIA), the leading nonprofit certifying body for chimney professionals in the United States, notes that water intrusion is one of the most damaging and most preventable problems. If the problem is left to mature, it affects more than the appearance. It compromises the structure itself.
What Do Chimney Repairs Involve?
Not every chimney problem requires the same fix. Chimney repairs generally fall into a few categories. Understanding the difference, helps homeowners have a more informed conversation with the expert technician.
Mortar joint repair or tuckpointing. This involves removing deteriorated mortar between bricks and replacing it with fresh mortar, matched to the original color and texture as closely as possible.
Brick replacement. When individual bricks have spalled, meaning the face has cracked or popped off from trapped moisture, those bricks are removed and replaced.
Crown and cap repair. The crown is the concrete slab at the very top of the chimney. Cracks both big and small let water directly into the chimney flue. Chimney crown repair is often one of the most urgent forms of chimney repairs.
Flashing repair. Flashing is the barrier where the chimney meets the roofline. Loose, damaged or poorly installed flashing is a common source for water leaks. The roof gets the blame as it is the largest piece that covers the house. However, it certainly can be the overlooked chimney.
Flue and liner repair. Cracked flue tiles or damaged liners affect how safely a chimney vents smoke and combustion gases.
When to Know a Chimney Needs Repair
Most chimney damage shows up as small, easy to dismiss way. Let’s take a look at the following list. Be sure to print this out and keep it handy so if/when something happens, you know what to look for.
• Water stains near the fireplace or on the ceiling
• A brownish stain on the wall around your fireplace, or a stain on the ceiling near an exterior chimney. This means water is getting in somewhere it should not.
• Crumbling or missing mortar
• If you can see gaps between bricks, or mortar that flakes off when you touch it
• A leaning or visibly shifting chimney
• A chimney that appears to pull away from the house, even slightly, could indicate a structural issue
• White staining on the brick (efflorescence)
• Chalky white residue left behind as water evaporates out of the masonry. It is a visible sign that moisture is moving through brick
• Rusted damper or firebox components
• Metal parts inside a fireplace that are rusting are a strong indicator that moisture is present
• Debris in the fireplace
• Small chunks of brick, mortar, or tile landing in the firebox
What are the Various Types of Chimney Repair?
This is a compiled list of chimney repairs so you can be aware of what to look for. If you have any questions, contact us directly at 877-244-6349.
Homeowners who schedule chimney repairs at the first sign of trouble typically spend far less than those who wait until water damage reaches the interior of the home. This is a great reason to contact Superior Chimney at 877-244-6349.
Why an Annual Inspection Matters More Than People Think
The CSIA and the National Fire Protection Association both recommend that chimneys, fireplaces, and vents be inspected at least once a year, whether or not the fireplace gets used. This recommendation exists because damage does not take a break just because a chimney sits without any use.
According to data stated by the CSIA, chimney related fires still contribute to tens of thousands of residential fires across the United States each year, and a large share of those incidents can be traced back to deferred maintenance. An annual chimney inspection is what catches the small mortar crack or the hairline crown crack before it turns into a repair bill.
Hiring the Right Company for Chimney Repairs
Not every company who offers chimney repair work has the certified training to diagnose a problem correctly. CSIA certification is the most widely recognized credential in the industry, and it requires technicians to study chimney physics, venting systems, and fire codes. After the studies, the new technician needs to pass an exam and agree to a professional code of ethics.
When you call, be sure to ask:
Are your technicians CSIA certified, and can I verify that certification?
Will you show me photos or video of the damage before starting work?
Does the estimate distinguish between cosmetic repair and structural repair?
At Superior Chimney, we welcome these and other of your questions.
How Chimney Repairs Affect Insurance and Resale
A chimney in poor condition can complicate a home sale or an insurance claim. Home inspectors routinely report on visible mortar loss, leaning chimneys, or missing chimney caps. Some insurers will request proof of repair before renewing a policy on an older home. Addressing chimney repairs proactively protects more than curb appeal. It protects the sale timeline and the claims history associated to the property.
Frequently Asked Questions
How often should a Chicago area chimney be inspected? At least once a year, per CSIA and NFPA guidance, regardless of how often the fireplace is used.
Can chimney repairs be done in winter? Some interior repairs can happen in cold weather, but most masonry repair requires temperatures consistently above freezing. Spring and fall are the most common repair times in the Chicago area.
Is tuckpointing the same thing as chimney repair? Tuckpointing is one type of chimney repair, focused on replacing deteriorated mortar joints.
Does homeowners insurance cover chimney repairs? It depends. Sudden damage from a storm may be covered, while gradual deterioration from lack of maintenance typically is not.
So Finally…
Taking care of your home includes a chimney. Just because you don’t see it every day, doesn’t mean things aren’t happening. Be sure to get a chimney inspection done once per year by a certified and credible company such as Superior Chimney to take care of the issues. Contact us today by calling 877-244-6349.
 MIDWEST CONSTRUCTION & SUPPLY INC
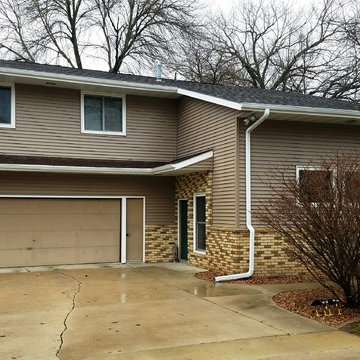
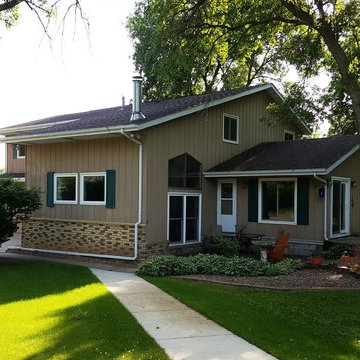
Paul Despenas: EcoSmart Custom Built 2-Lite Sliding windows, picture units and patio door were installed before the siding crew came to do their part.
EcoSmart windows feature Smart Core insulated master and sash frames:
EcoSmart windows come standard with our patented insulation in all primary frame and sash cavities. This is high density insulation provides a NFRC determined R-Value of 7.25 per inch of thickness.
SmartCore insulation provides almost two times the insulating proprieties of typical fiberglass insulation, making EcoSmart windows more energy efficient and your home more comfortable.
Performance Glass Options are the heart and soul of any good window. You’ll find a great selection of options to deliver the energy savings your home deserves.
Fusion-Welded Frames:
The frame and sash on EcoSmart windows are 100% fusion welded for superior sealing against water or air infiltration and no expansion and contraction.
Added strength provided by our I-Beam & Rigid Core Fiberglass Reinforcement.
All EcoSmart windows are custom built to fit into your home.
American Classic Insulated siding features:
Lifetime Non-Fade Protection
Progressive Foam Fullback Insulation is laminated to the back of the siding to add rigid backing to the siding panel to give straight wall lines
Four Times the energy savings value than conventional siding underlayments
High permebiliyty lets your walls breath to minimize the opportunity for mold growth
Deters termites and carpenter ants
The list goes on and on……….American Classic Insulated Vinyl siding and EcoSmart Windows = ENERGY SAVINGS FOR THE LIFETIME OF THE HOME
 Interlocking Concrete Pavement Institute
2018 HNA Awards Honorable Mention - Concrete Paver - Permeable
Contractor: Sequoia Stonescapes
Producer: Williamette Graystone
Designer: Drake's 7 Dees Landscaping
Eco-Panorama Demi pavers, in a tri-color blend, perfectly complement this home’s exterior. Contrasting color paver bands artfully define the driveway and courtyard. The use of the same pavers in the walkway and courtyard created design continuity and flow. Paver color and texture enhance and seamlessly integrate with an adjacent natural stone retaining wall.
Expert workmanship is showcased via smooth pavement elevation transitions and precise paver trim cuts. This quality Eco-Panorama Demi paver install ensured the homeowner’s stormwater drainage issues were addressed in a manner that enhanced the beauty of their home.
The existing storm drain inlets were retained and work in conjunction with installed Eco-Panorama Demi permeable pavers. The pavers also achieve visual harmonization with the adjacent natural stone wall, which was a project requirement.
This home is positioned at the lower end of a 200ft long drive that drops sixteen feet in elevation from the street entrance. Impervious concrete was replaced with PICP to manage 80,700 gallons of rainwater the pavement receives annually. The PICP improvement eliminated concerns over flooding in the home and garage. The 3500 SF pavement includes a courtyard and vehicle turnaround.
Despite thirty-seven inches of annual rainfall, these homeowners will rest assured their property is protected from rainwater runoff. Keystone Hardscapes’ Eco-Panorama permeable pavers provide improved stormwater management and elevated property value. Stormwater controls critical to the project were achieved and aesthetic beauty was significantly enhanced.
 Tile Doctor Ltd
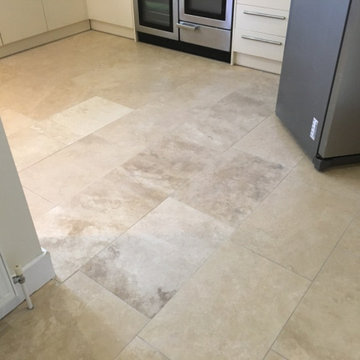
This client from Cobham contacted me in despair, she was quite concerned about her Travertine tiled floor which was cracking. She had the Kitchen and Dining room tiled with Travertine six years ago and recently several cracks had begun to appear in a long line crossing five tiles.
Several holes had also begun to appear and across the threshold to the kitchen from the dining area a serious lip had formed where a tile had risen above its neighbour causing a trip hazard.
After removing a tile from an unobtrusive area, I began to see where the issues lay. The tiler had dabbed the adhesive. This mean that instead of spreading the adhesive equally across the tile and floor they had splurged four lumps in each corner then set the tile down. This is poor working practice that will sooner or later become apparent. It means the areas were no adhesive was applied are eventually compromised resulting in cracking. This could take years or weeks to surface.
After some discussion we decided that I would remove and replace six tiles in total. The client was happy for me to go ahead and agreed a cost for the works to be done.
Returning the following week, firstly I had to remove the grout. This was done with a handheld Fein tool fitted with an oscillating blade. I thought this would be good experience from my son during the holidays, so I took him along and whilst I was working on the grout, he was able to gather the dust in a vacuum cleaner.
Next, I started to remove the cracked tiles with a chisel, starting from the cracks where the tiles would be weakest. This was noisy and messy work which required ear defenders and safety goggles. The process took several hours with the help of my son on general assistance duties. Once the tiles were removed this just left the remaining adhesive attached to the floor to get removed. This was the hardest part of the job, a lot of hammer and chisel work with as much dust gathered as possible to try and contain the mess. I had warned the customer that a considerable amount of mess would be produced and request that she should remove as much items as possible and to tape up her cupboards. Finally, I filled several holes in the sub floor so I would have a flat surface to lay the new tiles on. I left it there for the night to solidify.
Returning the next day, I began laying the replacement tiles down. Colour matching replacement tiles is a difficult task as Travertine is a natural product and colours vary greatly so these were a pretty good match.
Once the adhesive had set, I grouted in the newly laid tiles and once that was dry set about applying a sealer. For this I used two coats of Tile Doctor Ultra Seal which is an impregnating sealer that doesn’t alter the colour of the stone. This would ensure they were nicely protected and hopefully the client will not experience any further issues.
She was very happy with the result and was pleased the floor no long looked unsightly or posed a tripping hazard.
Rupert Mcleod
West Surrey Tile Doctor
Sponsored
Plain City, OH

Kuhns Contracting, Inc.
Central Ohio's Trusted Home Remodeler Specializing in Kitchens & Baths
 Interlocking Concrete Pavement Institute
2018 HNA Awards Honorable Mention - Concrete Paver - Permeable
Contractor: Sequoia Stonescapes
Producer: Williamette Graystone
Designer: Drake's 7 Dees Landscaping
Eco-Panorama Demi pavers, in a tri-color blend, perfectly complement this home’s exterior. Contrasting color paver bands artfully define the driveway and courtyard. The use of the same pavers in the walkway and courtyard created design continuity and flow. Paver color and texture enhance and seamlessly integrate with an adjacent natural stone retaining wall.
Expert workmanship is showcased via smooth pavement elevation transitions and precise paver trim cuts. This quality Eco-Panorama Demi paver install ensured the homeowner’s stormwater drainage issues were addressed in a manner that enhanced the beauty of their home.
The existing storm drain inlets were retained and work in conjunction with installed Eco-Panorama Demi permeable pavers. The pavers also achieve visual harmonization with the adjacent natural stone wall, which was a project requirement.
This home is positioned at the lower end of a 200ft long drive that drops sixteen feet in elevation from the street entrance. Impervious concrete was replaced with PICP to manage 80,700 gallons of rainwater the pavement receives annually. The PICP improvement eliminated concerns over flooding in the home and garage. The 3500 SF pavement includes a courtyard and vehicle turnaround.
Despite thirty-seven inches of annual rainfall, these homeowners will rest assured their property is protected from rainwater runoff. Keystone Hardscapes’ Eco-Panorama permeable pavers provide improved stormwater management and elevated property value. Stormwater controls critical to the project were achieved and aesthetic beauty was significantly enhanced.
 MIDWEST CONSTRUCTION & SUPPLY INC
Paul Despenas: EcoSmart Custom Built 2-Lite Sliding windows, picture units and patio door were installed before the siding crew came to do their part.
EcoSmart windows feature Smart Core insulated master and sash frames:
EcoSmart windows come standard with our patented insulation in all primary frame and sash cavities. This is high density insulation provides a NFRC determined R-Value of 7.25 per inch of thickness.
SmartCore insulation provides almost two times the insulating proprieties of typical fiberglass insulation, making EcoSmart windows more energy efficient and your home more comfortable.
Performance Glass Options are the heart and soul of any good window. You’ll find a great selection of options to deliver the energy savings your home deserves.
Fusion-Welded Frames:
The frame and sash on EcoSmart windows are 100% fusion welded for superior sealing against water or air infiltration and no expansion and contraction.
Added strength provided by our I-Beam & Rigid Core Fiberglass Reinforcement.
All EcoSmart windows are custom built to fit into your home.
American Classic Insulated siding features:
Lifetime Non-Fade Protection
Progressive Foam Fullback Insulation is laminated to the back of the siding to add rigid backing to the siding panel to give straight wall lines
Four Times the energy savings value than conventional siding underlayments
High permebiliyty lets your walls breath to minimize the opportunity for mold growth
Deters termites and carpenter ants
The list goes on and on……….American Classic Insulated Vinyl siding and EcoSmart Windows = ENERGY SAVINGS FOR THE LIFETIME OF THE HOME
 MIDWEST CONSTRUCTION & SUPPLY INC
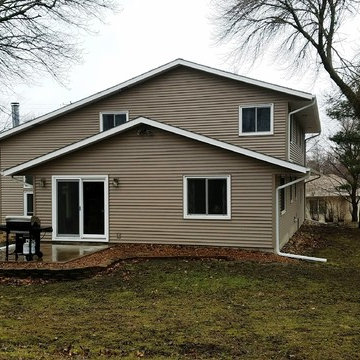
Paul Despenas: EcoSmart Custom Built 2-Lite Sliding windows, picture units and patio door were installed before the siding crew came to do their part.
EcoSmart windows feature Smart Core insulated master and sash frames:
EcoSmart windows come standard with our patented insulation in all primary frame and sash cavities. This is high density insulation provides a NFRC determined R-Value of 7.25 per inch of thickness.
SmartCore insulation provides almost two times the insulating proprieties of typical fiberglass insulation, making EcoSmart windows more energy efficient and your home more comfortable.
Performance Glass Options are the heart and soul of any good window. You’ll find a great selection of options to deliver the energy savings your home deserves.
Fusion-Welded Frames:
The frame and sash on EcoSmart windows are 100% fusion welded for superior sealing against water or air infiltration and no expansion and contraction.
Added strength provided by our I-Beam & Rigid Core Fiberglass Reinforcement.
All EcoSmart windows are custom built to fit into your home.
American Classic Insulated siding features:
Lifetime Non-Fade Protection
Progressive Foam Fullback Insulation is laminated to the back of the siding to add rigid backing to the siding panel to give straight wall lines
Four Times the energy savings value than conventional siding underlayments
High permebiliyty lets your walls breath to minimize the opportunity for mold growth
Deters termites and carpenter ants
The list goes on and on……….American Classic Insulated Vinyl siding and EcoSmart Windows = ENERGY SAVINGS FOR THE LIFETIME OF THE HOME
86