
Search results for "Protective measures" in Home Design Ideas

 Claude Clemaron Luxury Bespoke Furniture
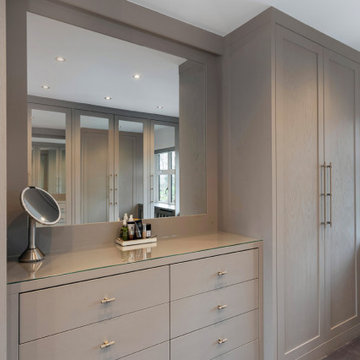
Claude Clémaron had the pleasure of creating this large bespoke fitted dressing room for our clients’ residence in Esher, Surrey. The made to measure floor to ceiling wardrobes and integrated drawers are built to the highest quality with every detail tailored to the couple’s exact specification. Mirrors are a key aspect of this dedicated ‘his and hers’ dressing room, and they also enhance the natural light, add glamour, and create an illusion of space. Handcrafted in oak with a lacquer finish, the built in furniture has a classic elegance that will always be in style.
Classical elegance, real oak quality
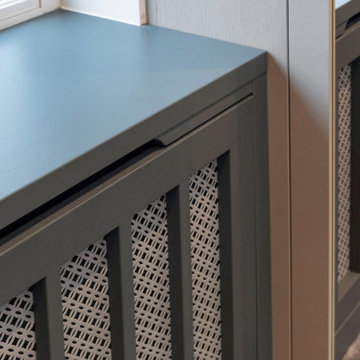
All the cabinetry is made of solid oak wood and real oak veneer, both inside and out, and flawlessly spraypainted in Farrow and Ball’s Worsted. This lovely neutral mid grey has an understated richness with cold tones and makes perfect neutral background shade for a stylish his and hers dressing room. Ultra-slim, long, premium metal bar handles elevate the look even further. The vanity unit with an illuminated oak-framed mirror and drawers features a clear safety glass top to protect the counter from cosmetic and perfume spills. And an unsightly radiator had a bespoke cabinet cover created to blend seamlessly with the windowsill.
Illuminated interiors with tailored storage
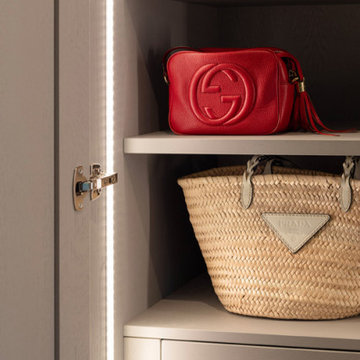
Behind the mirrored soft-close doors, the matching grey cabinet interiors are fully customised with a range of storage features. These include internal felt and velvet-lined drawers for jewellery, watches, and belts. Concealed, vertical automatic LED lighting in all the closets. Double height hanging rails and cleverly crafted pull-out trays with low fronts for easy viewing and access. High-level open shelves with useful dividers for less frequently used items. Every millimetre of space has been immaculately crafted to accommodate every item in our clients’ collections from coats to cufflinks.
 Claude Clemaron Luxury Bespoke Furniture
Claude Clémaron had the pleasure of creating this large bespoke fitted dressing room for our clients’ residence in Esher, Surrey. The made to measure floor to ceiling wardrobes and integrated drawers are built to the highest quality with every detail tailored to the couple’s exact specification. Mirrors are a key aspect of this dedicated ‘his and hers’ dressing room, and they also enhance the natural light, add glamour, and create an illusion of space. Handcrafted in oak with a lacquer finish, the built in furniture has a classic elegance that will always be in style.
Classical elegance, real oak quality
All the cabinetry is made of solid oak wood and real oak veneer, both inside and out, and flawlessly spraypainted in Farrow and Ball’s Worsted. This lovely neutral mid grey has an understated richness with cold tones and makes perfect neutral background shade for a stylish his and hers dressing room. Ultra-slim, long, premium metal bar handles elevate the look even further. The vanity unit with an illuminated oak-framed mirror and drawers features a clear safety glass top to protect the counter from cosmetic and perfume spills. And an unsightly radiator had a bespoke cabinet cover created to blend seamlessly with the windowsill.
Illuminated interiors with tailored storage
Behind the mirrored soft-close doors, the matching grey cabinet interiors are fully customised with a range of storage features. These include internal felt and velvet-lined drawers for jewellery, watches, and belts. Concealed, vertical automatic LED lighting in all the closets. Double height hanging rails and cleverly crafted pull-out trays with low fronts for easy viewing and access. High-level open shelves with useful dividers for less frequently used items. Every millimetre of space has been immaculately crafted to accommodate every item in our clients’ collections from coats to cufflinks.
 Claude Clemaron Luxury Bespoke Furniture
Claude Clémaron had the pleasure of creating this large bespoke fitted dressing room for our clients’ residence in Esher, Surrey. The made to measure floor to ceiling wardrobes and integrated drawers are built to the highest quality with every detail tailored to the couple’s exact specification. Mirrors are a key aspect of this dedicated ‘his and hers’ dressing room, and they also enhance the natural light, add glamour, and create an illusion of space. Handcrafted in oak with a lacquer finish, the built in furniture has a classic elegance that will always be in style.
Classical elegance, real oak quality
All the cabinetry is made of solid oak wood and real oak veneer, both inside and out, and flawlessly spraypainted in Farrow and Ball’s Worsted. This lovely neutral mid grey has an understated richness with cold tones and makes perfect neutral background shade for a stylish his and hers dressing room. Ultra-slim, long, premium metal bar handles elevate the look even further. The vanity unit with an illuminated oak-framed mirror and drawers features a clear safety glass top to protect the counter from cosmetic and perfume spills. And an unsightly radiator had a bespoke cabinet cover created to blend seamlessly with the windowsill.
Illuminated interiors with tailored storage
Behind the mirrored soft-close doors, the matching grey cabinet interiors are fully customised with a range of storage features. These include internal felt and velvet-lined drawers for jewellery, watches, and belts. Concealed, vertical automatic LED lighting in all the closets. Double height hanging rails and cleverly crafted pull-out trays with low fronts for easy viewing and access. High-level open shelves with useful dividers for less frequently used items. Every millimetre of space has been immaculately crafted to accommodate every item in our clients’ collections from coats to cufflinks.
Find the right local pro for your project
 Claude Clemaron Luxury Bespoke Furniture
Claude Clémaron had the pleasure of creating this large bespoke fitted dressing room for our clients’ residence in Esher, Surrey. The made to measure floor to ceiling wardrobes and integrated drawers are built to the highest quality with every detail tailored to the couple’s exact specification. Mirrors are a key aspect of this dedicated ‘his and hers’ dressing room, and they also enhance the natural light, add glamour, and create an illusion of space. Handcrafted in oak with a lacquer finish, the built in furniture has a classic elegance that will always be in style.
Classical elegance, real oak quality
All the cabinetry is made of solid oak wood and real oak veneer, both inside and out, and flawlessly spraypainted in Farrow and Ball’s Worsted. This lovely neutral mid grey has an understated richness with cold tones and makes perfect neutral background shade for a stylish his and hers dressing room. Ultra-slim, long, premium metal bar handles elevate the look even further. The vanity unit with an illuminated oak-framed mirror and drawers features a clear safety glass top to protect the counter from cosmetic and perfume spills. And an unsightly radiator had a bespoke cabinet cover created to blend seamlessly with the windowsill.
Illuminated interiors with tailored storage
Behind the mirrored soft-close doors, the matching grey cabinet interiors are fully customised with a range of storage features. These include internal felt and velvet-lined drawers for jewellery, watches, and belts. Concealed, vertical automatic LED lighting in all the closets. Double height hanging rails and cleverly crafted pull-out trays with low fronts for easy viewing and access. High-level open shelves with useful dividers for less frequently used items. Every millimetre of space has been immaculately crafted to accommodate every item in our clients’ collections from coats to cufflinks.
 Tile Doctor Ltd
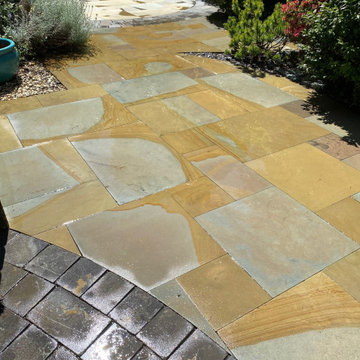
This Indian Sandstone Patio in Bolton-Le-Sands near Lancaster had not been cleaned successfully for several years. Although the owner had power washed it on occasion, that won’t rid you of Black Spot, Mould, Lichen etc and this will build-up over the years. It does clean the stone up to a certain standard but at some point, it will need further treatment.
My client had now reached this point and decided to give Tile Doctor a call to have it renovated. We discussed the Patio which ran around the house and calculated that it measured approximately 60m2. With the measurements and a summary of the issues I was able to work out a quote which they were happy to accept.
To improve the appearance of the stone I started by giving it a power wash to remove the general grime and dirt. I used a top of the range Karcher Pressure Washer for this which can apply up to 20 bars of pressure. The machine also comes with a spinner attachment results in a much more even clean than simply using the spray head.
The patio was left to dry for thirty minutes before applying neat Tile Doctor Patio & Brick Driveway Cleaner. Please note this is a very powerful product meant for professional use so if you’re using it always wear gloves and protective glasses. You leave it on the stone for ten minutes or longer before working it in. The directions on the back of the bottle say recommend leaving it for two to four hours, but its general advice. Personally, I find it is best to test the timing on a small inconspicuous area first, leave it on for say ten minutes then add a bit of water, scrub the surface and if the Black Spot disappears then that is all the time you need. If the stain is stubborn, increase the time. The two to four hour recommendation is really for difficult Black Spots that have become ingrained into the stone and then the product needs longer to digest the stain before it can work.
Once that was done, I used the power washer on low pressure to wash the products off the stone and into the sewerage drain, a wet vacuum comes in handy for this. Don’t dispose of it into the grass or planting areas as the strong chemicals in the product could upset them. Many properties have a soak away to capture rainwater from gutters, so you need to make sure it’s the sewage drain you are using.
As you can see on the pictures, this product really does work and got rid of the Black Spot completely. To maintain the patio a regular jet wash was recommended, the household versions are ideal for keeping it clean and tidy.
Due to the size of the Sandstone patio the whole process took around six hours to complete. Once done though the patio looked transformed and was all ready for a barbeque and some guests. Hopefully, it will stop raining long enough for this to happen.
Russell Taylor
Lancashire Tile Doctor
 Claude Clemaron Luxury Bespoke Furniture
Claude Clémaron had the pleasure of creating this large bespoke fitted dressing room for our clients’ residence in Esher, Surrey. The made to measure floor to ceiling wardrobes and integrated drawers are built to the highest quality with every detail tailored to the couple’s exact specification. Mirrors are a key aspect of this dedicated ‘his and hers’ dressing room, and they also enhance the natural light, add glamour, and create an illusion of space. Handcrafted in oak with a lacquer finish, the built in furniture has a classic elegance that will always be in style.
Classical elegance, real oak quality
All the cabinetry is made of solid oak wood and real oak veneer, both inside and out, and flawlessly spraypainted in Farrow and Ball’s Worsted. This lovely neutral mid grey has an understated richness with cold tones and makes perfect neutral background shade for a stylish his and hers dressing room. Ultra-slim, long, premium metal bar handles elevate the look even further. The vanity unit with an illuminated oak-framed mirror and drawers features a clear safety glass top to protect the counter from cosmetic and perfume spills. And an unsightly radiator had a bespoke cabinet cover created to blend seamlessly with the windowsill.
Illuminated interiors with tailored storage
Behind the mirrored soft-close doors, the matching grey cabinet interiors are fully customised with a range of storage features. These include internal felt and velvet-lined drawers for jewellery, watches, and belts. Concealed, vertical automatic LED lighting in all the closets. Double height hanging rails and cleverly crafted pull-out trays with low fronts for easy viewing and access. High-level open shelves with useful dividers for less frequently used items. Every millimetre of space has been immaculately crafted to accommodate every item in our clients’ collections from coats to cufflinks.

 Manhattan Home Design
Arco Floor Lamp : The Arco Floor Lamp by Manhattan Home Design
The arco Floor lamp in style of Achille Castiglioni is a timeless masterpiece. A beautiful authentic Carrara Marble stone that creates an elegant and sophisticated focal point for your room. The dramatic stainless steel finished Arco creates an incredible and luxurious environment. The head is embellished and protected by a dome-like shape, adding to the artistry. The arco floor lamp is the most eminent specimen in arco lamps and easily commands attention. A product of innovation, it was designed by Italy’s architect Achille Castiglioni and his brothers in the 1960s and is considered a modern lighting fixture today.
The arco floor lamp was introduced to the world in 1962. It was designed by Achille and Pier Giacomo Castiglioni, Italian designers who are also brothers. The arco Lamp is a floor lamp that has a long, curved arm that stretches out at around eight feet from a marble base. The Manhattan Home Design Castiglioni arco Floor Lamp is a must-have accessory and an icon of modern design. The Manhattan Home Design Castiglioni's replica is true to the original design down to every last feature. The arco Lamp’s base is made of Carrera marble that it is sturdy enough to hold up a spun aluminum reflector by way of an arched stainless steel lacquered modifiable stem. This outstanding floor lamp goes well with lounge chair replica because it will bring out the sophistication and class in any room you put it in.
The original flos arco Floor Lamp sells for around $3,000.00. This high quality arco floor lamp replica by Manhattan Home Design arco Lamp reproduction is manufactured to the exact specifications and materials as the original arco Lamp Castiglioni and for a Limited Time at a sale price of only $449.
Features:
Iconic arco design, Castiglioni style(1962)True to original: Hand cut and polished 170lb Sculptured Italian Carrara Marble baseTrue to original: 2 Circumference hole bored completely though the marble base.True to original: 45 degree 1 angles honed into all 8 corners, 4 on top, 4 on bottom of marble.True to original: Marble base is channel cut housing the stainless steel finished stem on the back sideMaximum arch height of lamp is 92" - 95"Maximum span of lamp from marble base to reflector is 78.6"Dimension of marble base 21.2" h x 9.4"Electric cord with floor dimmer button for easy operation126 individual holes in aluminum heat diffuser to allow light at the top of the hoodPivoting stainless steel brushed hood measures 11.5" at its widest pointSoft white reflective hood interior for efficient light reflection
Sponsored
Sunbury, OH

J.Holderby - Renovations
Franklin County's Leading General Contractors - 2X Best of Houzz!
 Windy City Painters
PREPARATION AND PLANNING
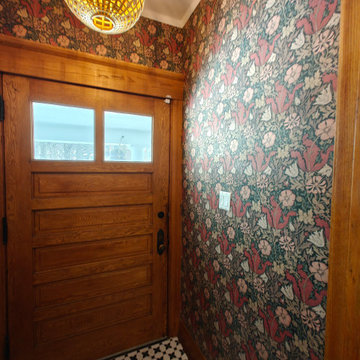
First, we assessed existing wall conditions and repaired minor imperfections. Next, surfaces were thoroughly cleaned and primed for maximum adhesion. Then, precise measurements ensured perfect pattern alignment throughout the space.
INSTALLATION PROCESS
Subsequently, we carefully cut each strip accounting for pattern matching. Moreover, professional installation techniques eliminated bubbles and ensured seamless seams. Finally, detailed finishing work created flawless edges and corners.
CHICAGO-SPECIFIC CHALLENGES
Furthermore, older Chicago buildings present unique challenges including settling walls, vintage plaster surfaces, and lead paint considerations. Therefore, proper preparation becomes crucial for long-lasting results that withstand seasonal temperature fluctuations.
RESULTS AND QUALITY
Consequently, the finished installation showcases perfect pattern alignment and professional craftsmanship. The wallpaper enhances the entry hall's architectural character while providing durability for high-traffic use.
PROFESSION AL TIPS
Homeowners should always hire experienced installers for complex patterns. Additionally, investing in quality primer saves money long-term by ensuring proper adhesion and easier future removal.
See more work and request free estimate at windypainters.com.
Q: How long does wallpaper installation take? / A: Most entry halls require one to two days depending on pattern complexity, surface preparation needs, and room size for professional wallpaper installation.
Q: Can you install over existing wallpaper? / A: We recommend removing old wallpaper first for best adhesion, though some situations allow installation over existing wallpaper after proper preparation and assessment.
Q: What wallpaper works best in Chicago? / A: Vinyl and fabric-backed wallpapers handle Chicago's climate changes best, providing durability against humidity fluctuations and temperature variations throughout seasons.
Q: Do you guarantee installation work? / A: Yes, Windy City Painters provides comprehensive warranties covering wallpaper installation craftsmanship and adhesion for specified warranty periods on all projects.
Q: How do you handle pattern matching? / A: We carefully measure walls, calculate pattern repeats, and plan installation sequence to ensure perfect wallpaper installation pattern alignment throughout the space.
Q: Can wallpaper work in vintage buildings? / A: Absolutely, we specialize in wallpaper installation for older Chicago homes, understanding unique challenges like settling walls and vintage plaster surfaces.
Q: What preparation is required? / A: Proper wallpaper installation requires surface assessment, repairs, thorough cleaning, appropriate priming, and climate control for optimal adhesion and lasting results.
Q: Do you remove old wallpaper? / A: Yes, we provide professional wallpaper removal services using safe techniques that protect underlying wall surfaces during the wallpaper installation preparation process.
Q: How much does installation cost? / A: Wallpaper installation costs vary based on room size, pattern complexity, surface preparation needs, and wallpaper selection - contact for detailed estimates.
Q: What tools do professionals use? / A: Professional wallpaper installation requires specialized smoothing tools, precision cutting equipment, quality brushes, and professional-grade adhesives for optimal results and longevity.
 Tile Doctor Ltd
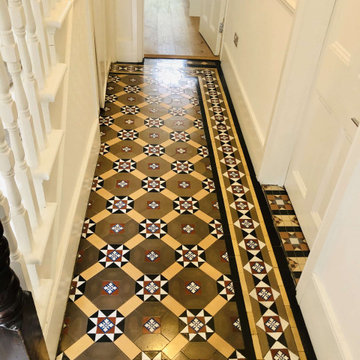
This customer had just moved into a property in Chesham around eighteen months ago. During that time, they had completely renovated the property and in the process had pulled up the hallway carpet to discover a lovely Victorian tiled floor which appeared to be in good condition but very dirty. Period features like these can add a lot of value to a house these days and so they decided to investigate having it professionally cleaned and contacted me for a quote.
Although I can give some indication of price over the phone you never know exactly what to expect so my preference is to visit the property a conduct a test clean. It’s a little trickier to do this now due to COVID-19 but using a combination of PPE, maximum ventilation and social distancing measures I was able to work on the floor. The tiles were in good order with no replacements needed so my focus would be removing carpet adhesive and ingrained dirt. The test went well, and I followed up with a quotation which was accepted, and a date arranged to do the work.
I had worked out previously that the quickest was to deep clean the floor and remove the glue and any old seal was to apply Tile Doctor Remove and Go which as its name suggests is a coatings removed designed for Tiled floors. My method was to spray strong a dilution of Remove and Go onto the Victorian tiles and leave it to soak in for fifteen minutes. Then it was scrubbed in with a black scrubbing pad fitted to a rotary machine. The soil was rinsed off using a minimal of water and extracted with a wet vacuum.
Once the floor had dried, I inspected the tiles and could see more work would be needed to get the white tiles really sparkling. For this I went over the floor using a 200-grit resurfacing pad using water to lubricate the process, I also used handheld burnishing blocks of different grits to do the edges. With this extra effort and another rinse with water to remove the soil the floor looked great, and so I left for the day so it could dry out ready for sealing.
I came back the next day and started by taking moisture readings with a damp meter to ensure the tiles were dry and ready for sealing. This is important as you don’t want to apply sealer to a damp tile and old floors can suffer from damp issues due to the lack of a damp proof membrane.
All was well with the floor, so I was able to move straight onto sealing which started with the application of a single coat of Tile Doctor Colour Grow. This is an impregnating sealer that soaks into the pores of the tile enhancing colour and adding protection. Once this had dried, I followed up with another seven coats of Tile Doctor Seal and Go which adds further protection and leaves a nice subtle sheen to the tiles. This product works really well on old Victorian Tiles like these and being water based it doesn’t leave a smell as it dries.
Andrew Newstead
South Buckinghamshire Tile Doctor


 Gayler Design Build
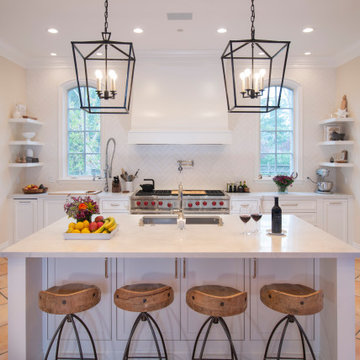
Gayler’s design team and construction crew worked closely with the aquarium experts. Several meetings were held to discuss and review every aspect of the 250-gallon saltwater fish tank. Among those details it was determined that the cabinet needed to be built with a steel frame in order to support the weight of the 3,000-pound tank. A chase cooling system was also installed below the tank in order to keep the water at a required, cooler temperature.
New cabinetry had to be measured with extreme care to cover the original cabinet footprint. Since the existing kitchen tile flooring would be difficult to find, Gayler also took special care during construction to protect the tile. The dated cabinetry in the kitchen and butler’s pantry was replaced with all new semi-custom inset maple cabinets painted in a Swiss Coffee finish.
A full overlay, custom-built kitchen hood, also in painted maple, anchors the kitchen’s large size and is complimented by a full ceiling-height backsplash in a herringbone pattern. Since the tile was custom-made, it had variations. Gayler Design Build took meticulous care to select and lay the tile to preserve the beautiful pattern.
The kitchen counters, the island, and the butler's pantry are finished in a marble-inspired Sereno Bianco Quartz.
To the delight of our client, they selected all new high-end appliances. Their appliance package included a SubZero 36” Integrated column refrigerator and freezer, a Wolf 60” dual fuel, 6 burner with a double griddle, a Thermador oven and microwave, a Thermador warming drawer, a Cove 24” dishwasher, a SubZero 15” Ice Maker and a SubZero 24” undercounter wine refrigerator.
Finally, pendant lighting, open and glass shelving, and dual sinks make a dramatic statement to this fantastic kitchen and butler's pantry transformation.

 Best Redwood
Customer review: The pergola was well built to my measurements. Craftsmanship is excellent. I went with 4x4 posts to match the deck. Some hardware may have to be trimmed when assembled. A shade cloth was added for additional protection. While the wood looks great the first year, it will darken after a Northwest winter.
Experience the natural beauty of Best Redwood Super Deck Pergola. Create the perfect spot for lounging, dining, and relaxation in your outdoor patio. Make this Redwood Deck Pergola your own!
100% solid redwood.
Features plenty long term benefits, such as reliability, strength, and resistance to decay, rot, and weather elements.
Post sizes are built at 6 in. x 6 in. and rafters at 2 in. x 6 in.
Custom combinations that are smaller than 10ft. x 10ft. Post sizes will be built at 4 in. x 4 in. and rafters at 2 in. x 4 in.
Standard height of pergola is 8ft. (If you are looking for a higher roof, contact us for a custom request).
Standard separation between rafters is 18" approximately. (looking for more shade? contact us and we can accomodate your needs).
Assembly instructions and hardware are included.
Anchors are not included, but can be requested and sold separately.
Your choice of premium sealant applied.
Your choice of end rafter design.
Includes 4 bottom of posts trim boxes.
Excellent craftsmanship and quality.
Home Delivery.
With over 50 different combinations in sizes and styles, your can customize your Best Redwood Pergola the way you want. If you are looking for a special design, please contact us. Choose from:
Deck Pergolas.
Attached Pergolas.
Arched Pergolas.
Lattice Pergolas.
Custom Pergolas.
There are 4 different designs of end rafters, or customize your own design, just send us a brief design, and we can develop and improve what you have in mind.
Posts can be 6"x 6" or 4"x 4" of solid redwood.
Rafters can be 2"x 6" or 2"x 4".
Separation between rafters can be from 12" to 24".
Height can be 8ft to 12ft.
Length of pergola is measured from rafter to rafter. Therefore a 12ft x 12ft pergola would be 10ft x 10ft from post to post.
Custom Design Services
Arched Redwood Pergola
So, if you are looking for a Custom Pergola, or to fine tune our Super Deck Redwood Pergola to fit your needs, we can offer custom made services as well. Just send us a brief design of what you require and we can develop together a new design! See here an example of an Arched Redwood Pergola measuring 20ft long and 16ft Wide, 12ft Tall with arched rafters and lattice cover!
Your Best Redwood Furniture will last a lifetime! But we'll guarantee your product for at least 5 years all-round weather conditions with normal maintenance every year or so.
California redwood is one of nature’s most maintenance-free building materials. It has a natural resistance to decay and insects. Redwood’s natural stability means it shrinks, warps, and splits less than most other woods. In addition, no other wood takes and holds finishes better than redwood.
If you want to apply your choice of premium stain sealant or if you enjoy the natural color of redwood lumber, then clear no stain finish is perfect for you. This finish has no sealant applied; we deliver the product with a fine sanded finish only.
Best Redwood offers 4 types of Redwood Finishes. Here are images showing the different types of redwood sealant options applied. From left to right: 1912 -Mission Brown, 1905 -Super Deck, 1910 -Super Deck and Clear No Stain finish.
If you have any questions, special requests or looking to create your custom redwood pergola please contact us via email to info@best-redwood.com or give us a call at (619) 391-9913 or toll free to 1800-393-4128.

 safe ZOnea
Maintaining a pest-free home requires attention throughout the year. Seasonal changes affect pest behavior, and understanding these patterns can save homeowners from costly damage and health hazards. In this guide, we will explore practical strategies for spring pest prevention tips, ensuring your property stays protected through every season. From spotting early signs to implementing proactive measures, these steps empower homeowners to take control before infestations occur.
Understanding Seasonal Pest Patterns
Pests adapt to changing weather, and knowing their patterns helps prevent infestations effectively.
Spring: Awakening Pests
Spring signals the end of winter dormancy for many pests. Rodents, ants, and termites start seeking food and warmth. Effective spring pest prevention tips include:
● Cleaning gutters and removing debris
● Sealing cracks and gaps in exterior walls
● Inspecting wood piles and compost areas
● Monitoring early signs of termite activity
Pro Tip: Conduct a termite inspection or a professional evaluation to catch infestations early before they spread.
Summer: Peak Pest Season
Warm temperatures accelerate pest breeding cycles. For a comprehensive summer pest prevention guide:
● Maintain lawns and trim vegetation away from homes
● Check window and door screens for tears
● Store food in sealed containers
● Inspect water sources that attract mosquitoes
Do You Know? Mosquitoes can lay eggs in a teaspoon of water. Eliminating stagnant water is crucial to reducing their population.
Fall: Preparing for Winter
As temperatures drop, pests search for warm indoor spaces. Key actions include:
● Inspecting for winter rodent entry points
● Sealing attic vents, crawl spaces, and foundation gaps
● Cleaning storage areas to minimize hiding spots
● Checking chimney and fireplace openings
Quick Fact: Rodents can enter homes through openings as small as ¼ inch.
Seasonal Pest Checklist for Homeowners
Creating a structured seasonal pest checklist simplifies preventive measures and ensures nothing is overlooked.
Season
Key Actions
Spring
Inspect for termites, seal exterior gaps, clean gutters, and check compost
Summer
Repair screens, trim vegetation, remove standing water, and secure food
Fall
Seal entry points, inspect attic/crawlspace, clear debris, and prepare storage
Winter
Monitor indoor activity, keep firewood away from walls, and maintain traps
Inspection & Maintenance Tips
● Schedule annual pest inspections by professional Virginia pest control consultation to detect hidden problems
● Keep a log of pest sightings and treatment dates
● Regularly replace weather stripping and caulk cracks
Note: Even small preventive steps, when consistently applied, drastically reduce infestations.
Common Pests and Their Seasonal Behaviors
Understanding how different pests behave each season helps homeowners take timely action to protect their property.
● Ants and Termites: Ants emerge in spring seeking food, while termites become active and can damage wood unnoticed. Early detection is critical.
● Rodents and Mice: Fall and winter increase rodent intrusions. Block all entry points and keep food sealed.
● Mosquitoes and Flies: Summer creates the ideal breeding environment for mosquitoes. Eliminate standing water and use physical barriers like nets.
● Spiders and Other Insects: Seasonal shifts cause spiders to move indoors. Regular vacuuming and decluttering reduce hiding spots.
Eco-Friendly Prevention Methods
● Use natural repellents like peppermint oil or diatomaceous earth
● Encourage beneficial insects, such as ladybugs, to reduce pest populations
● Plant pest-deterring plants near home boundaries, like marigolds or lavender
Integrated Pest Management (IPM)
Adopt an IPM approach by combining physical barriers, monitoring, and environmentally safe treatments. This minimizes chemical use while maintaining a pest-free home.
Quote: “Prevention is the most effective form of pest control.” – National Pest Management Association
Seasonal Pest Prevention Tools
● Snap traps and humane rodent traps
● Sticky traps for insects
● Outdoor perimeter sprays (eco-friendly)
● Moisture meters to detect early termite or mold problems
Pro Tip: Keep tools organized and accessible to act quickly when pest activity is noticed.
Planning: Annual Pest Calendar
Month
Recommended Action
March-April
Spring pest prevention tips: Inspect, seal, clean gutters
June-July
Summer pest prevention guide: Screens, standing water, food storage
September
Seasonal pest checklist: Seal entries, declutter, prep storage
November
Winter rodent entry points: Monitor indoors, maintain traps
Key Takeaways
● Seasonal awareness prevents infestations and property damage
● Consistent inspections and maintenance are essential
● Simple eco-friendly measures can significantly reduce pests
● Use a structured checklist and calendar for effective prevention
Conclusion
Homeowners who stay proactive and follow spring pest prevention tips, along with year-round monitoring, ensure their properties remain safe and comfortable. Using a summer pest prevention guide, checking winter rodent entry points, and maintaining a seasonal pest checklist ensure your home remains safe and comfortable. Remember to combine inspections, physical barriers, and environmentally friendly methods for the best results.
FAQs
Q1: How often should I perform a termite inspection?
A1: Conduct inspections annually, especially in spring, to detect early signs of termite activity and prevent extensive damage.
Q2: Can pests enter my home during winter?
A2: Yes, rodents and insects seek warmth and shelter indoors. Sealing entry points and monitoring for activity is crucial.
Q3: What is the most effective eco-friendly method for pest prevention?
A3: Using natural repellents, encouraging beneficial insects, and eliminating water sources effectively reduces pest populations without chemicals.
Ensure your home is ready for every season. Schedule a professional Virginia pest control consultation or a termite inspection in Suffolk, VA, today and stay ahead of potential infestations.

Sponsored
Delaware, OH

Buckeye Basements, Inc.
Central Ohio's Basement Finishing ExpertsBest Of Houzz '13-'21
 Gayler Design Build
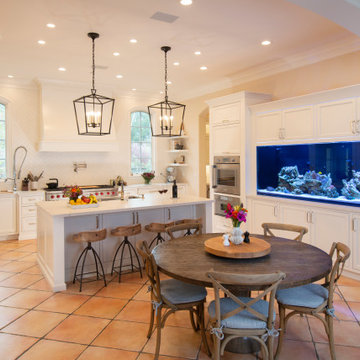
Gayler’s design team and construction crew worked closely with the aquarium experts. Several meetings were held to discuss and review every aspect of the 250-gallon saltwater fish tank. Among those details it was determined that the cabinet needed to be built with a steel frame in order to support the weight of the 3,000-pound tank. A chase cooling system was also installed below the tank in order to keep the water at a required, cooler temperature.
New cabinetry had to be measured with extreme care to cover the original cabinet footprint. Since the existing kitchen tile flooring would be difficult to find, Gayler also took special care during construction to protect the tile. The dated cabinetry in the kitchen and butler’s pantry was replaced with all new semi-custom inset maple cabinets painted in a Swiss Coffee finish.
A full overlay, custom-built kitchen hood, also in painted maple, anchors the kitchen’s large size and is complimented by a full ceiling-height backsplash in a herringbone pattern. Since the tile was custom-made, it had variations. Gayler Design Build took meticulous care to select and lay the tile to preserve the beautiful pattern.
The kitchen counters, the island, and the butler's pantry are finished in a marble-inspired Sereno Bianco Quartz.
To the delight of our client, they selected all new high-end appliances. Their appliance package included a SubZero 36” Integrated column refrigerator and freezer, a Wolf 60” dual fuel, 6 burner with a double griddle, a Thermador oven and microwave, a Thermador warming drawer, a Cove 24” dishwasher, a SubZero 15” Ice Maker and a SubZero 24” undercounter wine refrigerator.
Finally, pendant lighting, open and glass shelving, and dual sinks make a dramatic statement to this fantastic kitchen and butler's pantry transformation.
 Gayler Design Build
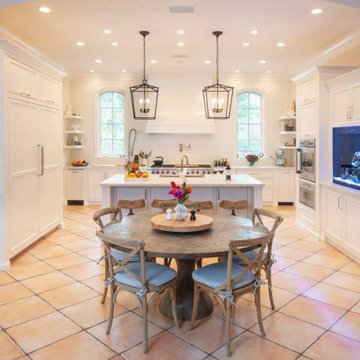
Gayler’s design team and construction crew worked closely with the aquarium experts. Several meetings were held to discuss and review every aspect of the 250-gallon saltwater fish tank. Among those details it was determined that the cabinet needed to be built with a steel frame in order to support the weight of the 3,000-pound tank. A chase cooling system was also installed below the tank in order to keep the water at a required, cooler temperature.
New cabinetry had to be measured with extreme care to cover the original cabinet footprint. Since the existing kitchen tile flooring would be difficult to find, Gayler also took special care during construction to protect the tile. The dated cabinetry in the kitchen and butler’s pantry was replaced with all new semi-custom inset maple cabinets painted in a Swiss Coffee finish.
A full overlay, custom-built kitchen hood, also in painted maple, anchors the kitchen’s large size and is complimented by a full ceiling-height backsplash in a herringbone pattern. Since the tile was custom-made, it had variations. Gayler Design Build took meticulous care to select and lay the tile to preserve the beautiful pattern.
The kitchen counters, the island, and the butler's pantry are finished in a marble-inspired Sereno Bianco Quartz.
To the delight of our client, they selected all new high-end appliances. Their appliance package included a SubZero 36” Integrated column refrigerator and freezer, a Wolf 60” dual fuel, 6 burner with a double griddle, a Thermador oven and microwave, a Thermador warming drawer, a Cove 24” dishwasher, a SubZero 15” Ice Maker and a SubZero 24” undercounter wine refrigerator.
Finally, pendant lighting, open and glass shelving, and dual sinks make a dramatic statement to this fantastic kitchen and butler's pantry transformation.

 Megorden Construction
powder coated stainless steel double gate with stainless steel cable
Outdoor kitchen deck - mid-sized contemporary backyard outdoor kitchen deck idea in San Diego
Outdoor kitchen deck - mid-sized contemporary backyard outdoor kitchen deck idea in San Diego
 Rocky Tops Granite & Marble LLC
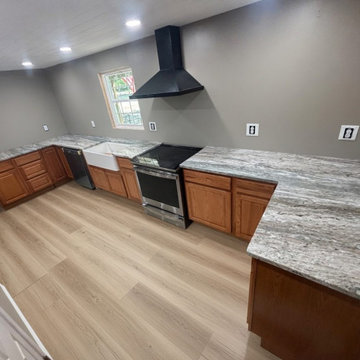
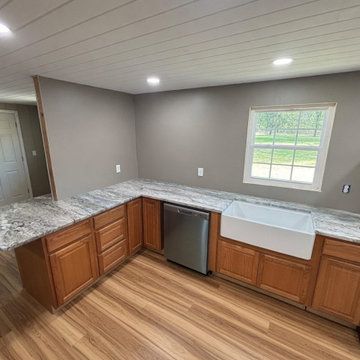
Fantasy Brown dolomite went into this kitchen in Gaston, and it's the kind of stone that changes how a room feels the minute the sun hits it. Dolomite has real depth to it, that soft natural movement running through the slab, along with a toughness that matters in a room where people actually cook. The background on this stone runs warm, brown and gold tones woven through with darker veining that breaks up the surface without turning busy. No two pieces off the same block look identical, so we spent real time on the layout, working out where the veining would land across the counters before anything got cut.
Templating a stone like this takes patience. We measure the kitchen precise, then we go back to the slab and figure out how to lay the template so the movement in the stone flows the right direction across the counter and doesn't fight itself at the seams. On a job like this one, getting the veining to carry across the seam near the sink or across an inside corner is the difference between a counter that reads as one piece and one that looks like two slabs pushed together. We took our time with it here.
The edge is eased, clean and simple, and it lets the stone do the talking instead of pulling attention to the edge itself. That's the right call on a material with this much natural character in the face of the slab.
Day to day, dolomite holds up well. It's a hard, dense stone, and it resists scratching better than a lot of people expect, though we still recommend a sealer to keep the surface protected from oil and acidic spills, same as we'd tell anyone with a natural stone counter. Wipe up wine or citrus before it sits too long, use a cutting board, and it'll look right for years. Heat isn't a worry either, you can set a hot pan down without thinking twice.
Gaston sits right in that stretch of the Midlands where we do a lot of our work, and it's always good seeing a kitchen come together with a stone this striking. Fantasy Brown dolomite gives the room warmth and texture that's hard to match, and installed with a tight, clean fit, it's going to be the centerpiece of that kitchen for a long time.
Sponsored
Sunbury, OH
J.Holderby - Renovations
Franklin County's Leading General Contractors - 2X Best of Houzz!
 Rocky Tops Granite & Marble LLC
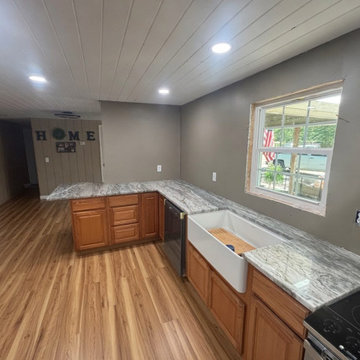
Fantasy Brown dolomite went into this kitchen in Gaston, and it's the kind of stone that changes how a room feels the minute the sun hits it. Dolomite has real depth to it, that soft natural movement running through the slab, along with a toughness that matters in a room where people actually cook. The background on this stone runs warm, brown and gold tones woven through with darker veining that breaks up the surface without turning busy. No two pieces off the same block look identical, so we spent real time on the layout, working out where the veining would land across the counters before anything got cut.
Templating a stone like this takes patience. We measure the kitchen precise, then we go back to the slab and figure out how to lay the template so the movement in the stone flows the right direction across the counter and doesn't fight itself at the seams. On a job like this one, getting the veining to carry across the seam near the sink or across an inside corner is the difference between a counter that reads as one piece and one that looks like two slabs pushed together. We took our time with it here.
The edge is eased, clean and simple, and it lets the stone do the talking instead of pulling attention to the edge itself. That's the right call on a material with this much natural character in the face of the slab.
Day to day, dolomite holds up well. It's a hard, dense stone, and it resists scratching better than a lot of people expect, though we still recommend a sealer to keep the surface protected from oil and acidic spills, same as we'd tell anyone with a natural stone counter. Wipe up wine or citrus before it sits too long, use a cutting board, and it'll look right for years. Heat isn't a worry either, you can set a hot pan down without thinking twice.
Gaston sits right in that stretch of the Midlands where we do a lot of our work, and it's always good seeing a kitchen come together with a stone this striking. Fantasy Brown dolomite gives the room warmth and texture that's hard to match, and installed with a tight, clean fit, it's going to be the centerpiece of that kitchen for a long time.
 Rocky Tops Granite & Marble LLC
Fantasy Brown dolomite went into this kitchen in Gaston, and it's the kind of stone that changes how a room feels the minute the sun hits it. Dolomite has real depth to it, that soft natural movement running through the slab, along with a toughness that matters in a room where people actually cook. The background on this stone runs warm, brown and gold tones woven through with darker veining that breaks up the surface without turning busy. No two pieces off the same block look identical, so we spent real time on the layout, working out where the veining would land across the counters before anything got cut.
Templating a stone like this takes patience. We measure the kitchen precise, then we go back to the slab and figure out how to lay the template so the movement in the stone flows the right direction across the counter and doesn't fight itself at the seams. On a job like this one, getting the veining to carry across the seam near the sink or across an inside corner is the difference between a counter that reads as one piece and one that looks like two slabs pushed together. We took our time with it here.
The edge is eased, clean and simple, and it lets the stone do the talking instead of pulling attention to the edge itself. That's the right call on a material with this much natural character in the face of the slab.
Day to day, dolomite holds up well. It's a hard, dense stone, and it resists scratching better than a lot of people expect, though we still recommend a sealer to keep the surface protected from oil and acidic spills, same as we'd tell anyone with a natural stone counter. Wipe up wine or citrus before it sits too long, use a cutting board, and it'll look right for years. Heat isn't a worry either, you can set a hot pan down without thinking twice.
Gaston sits right in that stretch of the Midlands where we do a lot of our work, and it's always good seeing a kitchen come together with a stone this striking. Fantasy Brown dolomite gives the room warmth and texture that's hard to match, and installed with a tight, clean fit, it's going to be the centerpiece of that kitchen for a long time.
 Bloomin Blinds of North Charlotte
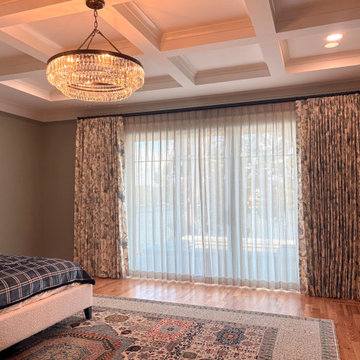
Custom sheer and blackout drapery installation in a custom-built waterfront home overlooking Lake Norman in Catawba, North Carolina. Designed to address the challenges of expansive lakefront windows, this layered window treatment combines elegant sheer drapes with custom blackout drapery on a double-rod traversing system.
The homeowners wanted to enjoy natural light and their Lake Norman views while gaining better control over harsh sunlight, daytime glare and privacy. The sheer drapery provides a softer layer of filtered natural light during the day, reducing the intensity of direct sunlight while maintaining an open, airy appearance. The blackout drapery provides a second layer of light control and privacy when needed, making the combination especially useful for rooms with significant sun exposure.
In addition to improving comfort, the layered drapery helps limit direct sunlight reaching hardwood floors, furniture and interior finishes. Reducing prolonged exposure to direct sunlight can help protect these surfaces from fading and discoloration. The double-rod traversing arrangement allows the sheer and blackout panels to operate independently, giving the homeowner flexibility throughout the day.
This project illustrates how custom window treatments can address the practical challenges of lakefront living without compromising interior design. Custom drapery offers an attractive solution for oversized windows, large glass openings and custom-built homes where glare reduction, privacy, natural light and outdoor views are important considerations.
Installed by Bloomin’ Blinds of North Charlotte, a locally owned father-and-son window treatment company. Rick and Cole provide in-home consultations, custom drapery, professional window measurements and installation, along with custom blinds, shades, shutters and motorized window treatment options.
Proudly serving Lake Norman and surrounding North Carolina communities, including Catawba, Sherrills Ford, Denver, Mooresville, Cornelius, Davidson, Huntersville and North Charlotte.
24