
Search results for "Reduced extra fat" in Home Design Ideas

 Cure Design Group
KITCHEN RENOVATION CURRENT CRAFTSMAN
This client started off just being curious about our services - what we could do, and if we could even help her update her kitchen. She and her husband with their two teenage kids have lived in their home for several years without updating anything since the house was originally built. They didn’t quite have a budget in mind yet. They didn’t know their style, or even if they had one. Their timeline was simple, “as fast as you can so we’re not without a kitchen for very long” (usually what we hear for kitchen updates).
After a very productive consultation: determining the scope of work and zeroing in on a budget, I was very excited to update this underwhelming space to something that is modern but timeless, something that is theirs. And, it was easy to see what type of design style they gravitated toward looking at the pieces they already own: Craftsman/Prairie Style. I left the meeting so excited to weave in yet another genre of design to my CDG portfolio! We circled in our contractor to discuss the changes they were looking to make and the scope of work that would be theirs. Then I was off to get designing:
// Because the kitchen’s footprint and the defined breakfast space delineated by the bay, we kept the perimeter cabinetry as it was originally laid out. We updated these cabinets to a beautiful soft Alabaster White with a Barn Wood Glaze to highlight the simplicity of the shaker style doors. We added transom cabinets above the uppers, with only the back wall having seeded glass inserts to highlight some of their collectables.
// The original shaped island was counter-productive (See what I did there?) in functionality and design. We squared this off to reduce some of the angles and gain more storage. We highlighted the new island with a contrasting oak cabinet in a dark finish, to pay our respects to the craftsman style, and topped with a concrete-like countertop as a nod to the Prairie Style, allowing the homeowners to gain two extra seats and a massive -uninterrupted- work surface.
// The small section of cabinetry between the garage entry and fridge now is the perfect dump-station for mail, electronics, whatever is in their hands when they come into the house; and completely hidden by the refrigerator.
// The disconnected cabinetry in the breakfast area makes for a great place to have a working office. Accessible from the kitchen or the adjacent great room, this is the perfect place for the kids to do their homework while mom and dad are putting together dinner. The base cabinets are built out for office-type storage: paper and pencil drawers, filing systems, and cord management. Additionally, the long counter provides a ton of worksurface to spread out.
// The largest transformation was the pantry. We raised the height of the doorway and added huge custom designed bypass sliding barndoors. Finished with a dark stain to compliment the island and cut to inset 4 stained glass windows, typical of this style of design, and driving home the concept for the whole space.
// They were desperate to replace their flooring with something extremely durable to flow throughout the kitchen and the whole main level. This beautiful new flooring is actually a textured LVT(!) Which allowed them to save on overall cost and extend the life of their new flooring purchase.
// They loved their copper table, so we kept it and added new simple, mid-century modern chairs around it and a shiny new craftsman-style chandelier above. We added bright barstools in a burnt orange-red accent, and a bright woven rug to tie it all together.
// Because the kitchen renovation was shaping up to be pretty spectacular, they decided they needed to now replace their ‘now-these-look-a-little-too-old’ upholstered seating in the neighboring great room with 2 new sofas. We found the perfect sage-y-grey fabric which we covered on sofa frames that have and exposed oak-wood base, which we finished in a warm weathered grey.
// As every designer knows, a room isn’t finished until there’s something on the windows. Now that the new flooring was installed and every other room on the main level ‘seemed’ to be updated, we needed to update the window treatments in the dining, and great rooms to reflect their new design concept.
I hope you find the ‘after’ photos refreshing (as refreshing as it was for me to work on something that’s not a “Farm House” style that’s saturating the industry right now!) This was such a fun project and a great collaboration with our contractor.
 Priority Remodeling
's Exquisite One-Bedroom ADU Project
In the world of home improvement and design, every so often, a project emerges that flawlessly marries aesthetics with functionality. The recent completion of a one-bedroom Accessory Dwelling Unit (ADU) by Priority Remodeling stands as a testament to this golden rule.
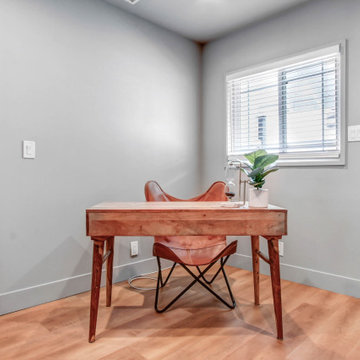
As one steps into the space, the first thing that catches the eye is the immaculate and contemporary design of the room. Muted gray walls serve as the perfect backdrop, enhancing the natural brightness of the room, thanks to the strategically positioned windows. The window blinds, neatly tucked away, provide options for privacy while allowing natural light to illuminate the space.
The minimalist office area showcases a sleek wooden desk paired with a luxurious leather chair. A simple potted plant adds a touch of organic green, giving a nod to the importance of biophilic design elements. With ample space for working or studying, it offers the perfect environment for productivity and focus.
Transitioning into the bedroom area, the understated elegance continues. The centerpiece - a comfortable bed with crisp white linens - invites rest and relaxation. The headboard's unique nailhead trim design adds a touch of sophistication without overpowering the room. Adjacent to it, a cozy sitting area with a leather lounge chair and throw pillow makes for an ideal reading or relaxation spot.
Both practical and aesthetic, the choice of wooden flooring complements the neutral color palette, warming up the space and providing continuity. The floor seamlessly ties the different areas together, creating a cohesive and harmonious environment.
In sum, Priority Remodeling's recent ADU project is a masterclass in modern interior design. Each element has been meticulously chosen and placed, ensuring both functionality and beauty. This ADU is not just a living space; it's an experience. A testament to the prowess and vision of Priority Remodeling.
---------
In recent years, Accessory Dwelling Units (ADUs) have surged in popularity among homeowners, and for a multitude of good reasons. These self-contained living spaces, often constructed in the backyard or converted from existing structures like garages, bring forth a myriad of benefits:
Additional Income Stream: One of the most immediate benefits of an ADU is the potential for rental income. Homeowners can rent out these units to tenants, providing a steady stream of revenue that can help offset mortgage payments or other expenses.
Increased Property Value: Well-designed and constructed ADUs can significantly increase a property's value. It's not just about the added square footage but also the flexibility and functionality that such a space offers.
Housing Flexibility: ADUs can serve multiple purposes over time. They can start as a home office, transition to a living space for a college-going child, and later serve as a residence for aging parents. This adaptability is invaluable in ever-changing life scenarios.
Sustainable Living: Smaller spaces typically consume fewer resources, both in their construction and daily operation. This makes ADUs an environmentally friendly choice for those keen on reducing their carbon footprint.
Community Building: ADUs can help address housing shortages in dense urban areas. By providing affordable rental options, they contribute to community diversity and vitality.
Privacy with Proximity: For families looking to support relatives (like elderly parents or adult children), an ADU offers the perfect balance. Family members live close by, fostering connection and support, yet both parties maintain their privacy.
Cost-effective Expansion: Compared to the costs associated with buying a larger home or constructing a full-fledged home addition, ADUs often present a more economical solution to gaining extra living space.
Incorporating an ADU into one's property is not just about creating additional space but about unlocking a range of benefits that enhance both the financial and functional aspects of homeownership. As seen in Priority Remodeling's recent project, an ADU can also be a pinnacle of design and comfort, proving that with the right vision, even compact spaces can offer a grand living experience.

 Eco Star Painting
Step #1 Apply BM CLEAN
As you can see in the 'Before' picture above, this cedar deck was extremly dirty. This required an extra step in comparison to the typical deck stripping process. My paint rep at Benjamin Moore recommended a product called CLEAN. It comes in one gallon plastic containers and can be applied out of a plastic pail or with a garden sprayer. We used a Garden sprayer and chose a flat tip for application. The three gallon garden sprayer was filled with 2 gallons of water and one gallon of the CLEAN solution. This is a strong mixture and can be reduced to up to 6 parts water and one part of the Benjamin Moore CLEAN.
This approximately 22x20 deck had a board running perpindicular to the rest of the floor boards which divided it into 2 equal parts. Our method was to apply the solution to 3-4 of these 10' boards at a time. Allow it to set up for a few minutes and then scrub away with the deck brush. The agitation loosens up the dirt and grime and is then removed with a pressure washer a board a time. The flat tip on the pressure washer was almost the same width as the floor board. It is important to clean the sides of the board too because any remaining dirt or stain will be visible.
Benjamin Moore Deck Restoration products named Clean,Restore,brighten
Step #2 Apply BM RESTORE
The second step is exactly the same as the first step but with a different solution called Benjamin Moore RESTORE. The deck was dry before we started the 2nd step becuase it was baking hot outside. You use the same 2/1 mixture of water to chemical. This chemical will remove the stain still present in the deck floor. Make sure to rinse the garden sprayer clean before adding the restore solution. Unlike the BM CLEAN, the BM RESTORE has an orange-ish color in appearance. It did a fine job of removing most of the stain, but not 100% of it. There were a few areas that required a 3rd coat of restore but the process was quicker.
Step #3 Apply BM BRIGHTEN
The third step is exactly the same as the first two step but the chemical solution used was Benjamin Moore 'BRIGHTEN'. Again, the garden sprayer was cleaned and filled with 2 parts water and one part Brighten. The brightener not only lightens the wood but it also neutralizes the previous stripper solution. As stated before the Restore adds a bit of color and the Brighten will remove any traces of it. you still have to agitate the brightener with a scrub brush and either pressure wash it off or use a garden hose. We used the pressure washer for faster results. After it dries the wood look a lot brighter but we still found some spots of stain that had not come off.
Apply Sikkens Stain
As stated above the stain we used is called "Sikkens Proluxe" which is basically just a slight re-branding of the classic Sikkens Stain. The formula is exactly the same. In fact, the secondary name is still called 'Cetol' SRD RE. The color chosen was "CEDAR".
The weather was quite hot for a typical Calgary Spring day so we stained a 10' section of floor board at a time. The deck has a metal railing so the supporting feet had to be brushed in with a 2.5" natural bristle paint brush. for the rest of the job a 6" Wooster natural bristle deck brush was used. The handle was remove and a broom handle was inserted. The stain was stirred frequently and poured into a plastic Simms brand roller pan. Semi transparent Oil based stain has the consistency of water so you need to be careful not to spill any of it. When applying to a board you hit the sides first with the brush and then fillin the rest. Ten feet of floor board can be stain in a short period of time. it's important not to leave any streaks so it is adviseable to back-brush the entie length before moving on to the next board. The staining only took about 2.5 hours to complete. One coat is the manufacturers recommendation.
One last thing about Sikkens Stain. To maintain this beautiful look the deck should be re- coated once a year, preferably every spring. It's like applying sunscreen yearly to protect the wood against further damage. Two gallons was enough to cover this 450 sq foot deck.
Find the right local pro for your project


 Sheila Rich Interiors, LLC
The great room is open to the kitchen and dining alcove. Outside is a large waterfront veranda - when a tent and heat are added, the room is enlarged and expanded for year round parties and dancing.
A feeling of waves is reflected in the velvet chair cushions, which tie the color scheme together. Chair bodies are brown leather accented with nail heads. Contemporary lines are softened by moldings that have a classic feel to them, as does the blown glass chandelier over the dining alcove. Glass kitchen cabinets continue the open feel of the space. Minimal window treatments were added for warmth and softness.
 Cure Design Group
KITCHEN RENOVATION CURRENT CRAFTSMAN
This client started off just being curious about our services - what we could do, and if we could even help her update her kitchen. She and her husband with their two teenage kids have lived in their home for several years without updating anything since the house was originally built. They didn’t quite have a budget in mind yet. They didn’t know their style, or even if they had one. Their timeline was simple, “as fast as you can so we’re not without a kitchen for very long” (usually what we hear for kitchen updates).
After a very productive consultation: determining the scope of work and zeroing in on a budget, I was very excited to update this underwhelming space to something that is modern but timeless, something that is theirs. And, it was easy to see what type of design style they gravitated toward looking at the pieces they already own: Craftsman/Prairie Style. I left the meeting so excited to weave in yet another genre of design to my CDG portfolio! We circled in our contractor to discuss the changes they were looking to make and the scope of work that would be theirs. Then I was off to get designing:
// Because the kitchen’s footprint and the defined breakfast space delineated by the bay, we kept the perimeter cabinetry as it was originally laid out. We updated these cabinets to a beautiful soft Alabaster White with a Barn Wood Glaze to highlight the simplicity of the shaker style doors. We added transom cabinets above the uppers, with only the back wall having seeded glass inserts to highlight some of their collectables.
// The original shaped island was counter-productive (See what I did there?) in functionality and design. We squared this off to reduce some of the angles and gain more storage. We highlighted the new island with a contrasting oak cabinet in a dark finish, to pay our respects to the craftsman style, and topped with a concrete-like countertop as a nod to the Prairie Style, allowing the homeowners to gain two extra seats and a massive -uninterrupted- work surface.
// The small section of cabinetry between the garage entry and fridge now is the perfect dump-station for mail, electronics, whatever is in their hands when they come into the house; and completely hidden by the refrigerator.
// The disconnected cabinetry in the breakfast area makes for a great place to have a working office. Accessible from the kitchen or the adjacent great room, this is the perfect place for the kids to do their homework while mom and dad are putting together dinner. The base cabinets are built out for office-type storage: paper and pencil drawers, filing systems, and cord management. Additionally, the long counter provides a ton of worksurface to spread out.
// The largest transformation was the pantry. We raised the height of the doorway and added huge custom designed bypass sliding barndoors. Finished with a dark stain to compliment the island and cut to inset 4 stained glass windows, typical of this style of design, and driving home the concept for the whole space.
// They were desperate to replace their flooring with something extremely durable to flow throughout the kitchen and the whole main level. This beautiful new flooring is actually a textured LVT(!) Which allowed them to save on overall cost and extend the life of their new flooring purchase.
// They loved their copper table, so we kept it and added new simple, mid-century modern chairs around it and a shiny new craftsman-style chandelier above. We added bright barstools in a burnt orange-red accent, and a bright woven rug to tie it all together.
// Because the kitchen renovation was shaping up to be pretty spectacular, they decided they needed to now replace their ‘now-these-look-a-little-too-old’ upholstered seating in the neighboring great room with 2 new sofas. We found the perfect sage-y-grey fabric which we covered on sofa frames that have and exposed oak-wood base, which we finished in a warm weathered grey.
// As every designer knows, a room isn’t finished until there’s something on the windows. Now that the new flooring was installed and every other room on the main level ‘seemed’ to be updated, we needed to update the window treatments in the dining, and great rooms to reflect their new design concept.
I hope you find the ‘after’ photos refreshing (as refreshing as it was for me to work on something that’s not a “Farm House” style that’s saturating the industry right now!) This was such a fun project and a great collaboration with our contractor.
 Cure Design Group
KITCHEN RENOVATION CURRENT CRAFTSMAN
This client started off just being curious about our services - what we could do, and if we could even help her update her kitchen. She and her husband with their two teenage kids have lived in their home for several years without updating anything since the house was originally built. They didn’t quite have a budget in mind yet. They didn’t know their style, or even if they had one. Their timeline was simple, “as fast as you can so we’re not without a kitchen for very long” (usually what we hear for kitchen updates).
After a very productive consultation: determining the scope of work and zeroing in on a budget, I was very excited to update this underwhelming space to something that is modern but timeless, something that is theirs. And, it was easy to see what type of design style they gravitated toward looking at the pieces they already own: Craftsman/Prairie Style. I left the meeting so excited to weave in yet another genre of design to my CDG portfolio! We circled in our contractor to discuss the changes they were looking to make and the scope of work that would be theirs. Then I was off to get designing:
// Because the kitchen’s footprint and the defined breakfast space delineated by the bay, we kept the perimeter cabinetry as it was originally laid out. We updated these cabinets to a beautiful soft Alabaster White with a Barn Wood Glaze to highlight the simplicity of the shaker style doors. We added transom cabinets above the uppers, with only the back wall having seeded glass inserts to highlight some of their collectables.
// The original shaped island was counter-productive (See what I did there?) in functionality and design. We squared this off to reduce some of the angles and gain more storage. We highlighted the new island with a contrasting oak cabinet in a dark finish, to pay our respects to the craftsman style, and topped with a concrete-like countertop as a nod to the Prairie Style, allowing the homeowners to gain two extra seats and a massive -uninterrupted- work surface.
// The small section of cabinetry between the garage entry and fridge now is the perfect dump-station for mail, electronics, whatever is in their hands when they come into the house; and completely hidden by the refrigerator.
// The disconnected cabinetry in the breakfast area makes for a great place to have a working office. Accessible from the kitchen or the adjacent great room, this is the perfect place for the kids to do their homework while mom and dad are putting together dinner. The base cabinets are built out for office-type storage: paper and pencil drawers, filing systems, and cord management. Additionally, the long counter provides a ton of worksurface to spread out.
// The largest transformation was the pantry. We raised the height of the doorway and added huge custom designed bypass sliding barndoors. Finished with a dark stain to compliment the island and cut to inset 4 stained glass windows, typical of this style of design, and driving home the concept for the whole space.
// They were desperate to replace their flooring with something extremely durable to flow throughout the kitchen and the whole main level. This beautiful new flooring is actually a textured LVT(!) Which allowed them to save on overall cost and extend the life of their new flooring purchase.
// They loved their copper table, so we kept it and added new simple, mid-century modern chairs around it and a shiny new craftsman-style chandelier above. We added bright barstools in a burnt orange-red accent, and a bright woven rug to tie it all together.
// Because the kitchen renovation was shaping up to be pretty spectacular, they decided they needed to now replace their ‘now-these-look-a-little-too-old’ upholstered seating in the neighboring great room with 2 new sofas. We found the perfect sage-y-grey fabric which we covered on sofa frames that have and exposed oak-wood base, which we finished in a warm weathered grey.
// As every designer knows, a room isn’t finished until there’s something on the windows. Now that the new flooring was installed and every other room on the main level ‘seemed’ to be updated, we needed to update the window treatments in the dining, and great rooms to reflect their new design concept.
I hope you find the ‘after’ photos refreshing (as refreshing as it was for me to work on something that’s not a “Farm House” style that’s saturating the industry right now!) This was such a fun project and a great collaboration with our contractor.
 Adar Moy
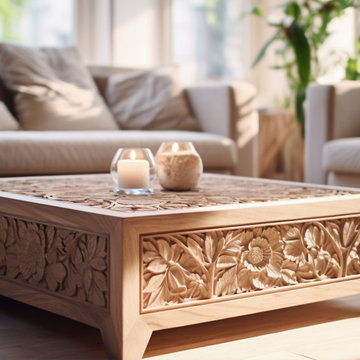
A coffee table is often the centerpiece of a living room, where family members gather to relax, entertain, and even work. Beyond its decorative role, a coffee table must also serve a functional purpose—holding beverages, snacks, or remote controls, and providing storage for books, magazines, or other essentials. This is where a coffee table with drawers shines. Combining practicality with style, these tables offer an elegant solution for keeping your living space organized while maintaining a chic aesthetic.
In this article, we’ll explore why a coffee table with drawers is a great choice for your home, discuss the different types available, and highlight some of the top options on the market today.
Why Choose a Coffee Table with Drawers?
Hidden Storage for a Clutter-Free Space
One of the most significant benefits of a coffee table with drawers is the hidden storage it provides. Whether it’s storing remote controls, extra coasters, TV guides, or even blankets, these drawers help you keep things organized without cluttering the surface of the table. This is especially useful in smaller living rooms or for people who like to keep their space tidy but need easy access to everyday items.
Maximizes Functionality
Coffee tables with drawers make the most of the space you have. If you’re working in a living area with limited storage, a table with built-in compartments allows you to declutter while still having a practical surface for holding drinks, snacks, or decorative objects. You get the best of both worlds—storage and functionality.
Versatility in Design
Coffee tables with drawers come in various styles and materials, meaning you can find one that perfectly complements your existing décor. Whether your taste leans toward modern, rustic, vintage, or industrial, there’s a coffee table out there that matches your vision. The added drawers often enhance the design, making them as stylish as they are practical.
Family-Friendly
Homes with children or pets can especially benefit from a coffee table with drawers. The hidden storage means that small, easily lost, or dangerous items (like pens, batteries, or scissors) can be tucked away safely. Plus, having a designated storage space can encourage tidiness in a household with busy family members.
Easy Organization
With drawers built into the coffee table, organizing your living room essentials becomes much easier. You can designate specific drawers for particular items (e.g., one for remotes, one for books, and one for magazines). This structured approach to storage reduces clutter and helps maintain an organized space.
Types of Coffee Tables with Drawers
Traditional Coffee Tables with Drawer Storage
These are classic designs with a set of drawers either on one side of the table or underneath the tabletop. They are often made from wood, offering a timeless appeal. You can find them in various wood finishes like oak, walnut, or mahogany, and they typically feature simple, clean lines.
Modern Coffee Tables with Drawer Storage
Modern coffee tables often feature sleek, minimalist designs with hidden drawers. They may include touches like glass tops, metallic legs, or smooth lacquered finishes. These tables focus on both aesthetics and practicality, offering ample storage without compromising on style.
Lift-Top Coffee Tables with Storage
For additional versatility, lift-top coffee tables combine the functionality of a regular coffee table with an elevated work surface. The top of the table lifts to reveal hidden storage beneath, while the surface can be used for eating, writing, or working. These tables often come with built-in drawers for even more organization options.
Storage Ottoman Coffee Tables
These hybrid pieces combine the cushioned comfort of an ottoman with the utility of a coffee table. Many storage ottomans come with a hinged top and internal compartments, while some models incorporate drawers along the sides. They are ideal for people who prefer a softer, more comfortable table but still need practical storage solutions.
Industrial Coffee Tables with Drawers
Industrial-style coffee tables use materials like metal and reclaimed wood, offering a rugged yet functional design. Often, these tables feature metal frames with wooden drawers or compartments. The utilitarian design makes them ideal for urban and loft-style interiors.
Top Coffee Tables with Drawers to Consider
Here are some of the best coffee tables with drawers available in 2024, each offering a unique style and excellent functionality:
1. Sauder Edge Water Coffee Table with Drawer
Material: Engineered wood
Features:
One large drawer and open storage underneath
Rustic charm with a driftwood-inspired finish
Easy to assemble and durable
Dimensions: 44.25" W x 19.25" H x 20" D
Why It's Great:
The Sauder Edge Water coffee table offers a charming rustic design with a drawer for hidden storage. The drawer is perfect for storing smaller items like remotes or coasters, while the open shelving below provides additional space for books or decorative items. The neutral wood finish can complement a variety of interior styles.
2. Furinno JAYA Coffee Table with Drawer Storage
Material: Engineered wood, plastic
Features:
Simple design with one large drawer
Available in multiple finishes (black, walnut, espresso)
Easy to clean and lightweight
Dimensions: 39.6" W x 17.6" H x 15.5" D
Why It's Great:
The Furinno JAYA coffee table offers a compact and budget-friendly option for those who need additional storage in a small living space. The drawer is spacious enough to store various items, and its simple, modern design ensures it fits in with many home décors.
3. West Elm Mid-Century Coffee Table with Drawers
Material: Solid wood and veneer
Features:
Two drawers for concealed storage
Mid-century modern aesthetic with clean lines
Available in walnut or oak finishes
Dimensions: 48" W x 16" H x 24" D
Why It's Great:
For those looking for a more sophisticated and stylish coffee table, the West Elm Mid-Century coffee table with drawers offers timeless appeal. The two drawers provide ample storage space for everyday items, while the sleek wood design adds elegance to your living room.
4. Vivo Lift-Top Coffee Table with Hidden Storage
Material: MDF with wood veneer
Features:
Lift-top design for elevated workspace
Hidden storage compartment beneath the top
Two side drawers for added storage
Dimensions: 40" W x 18" H x 19" D
Why It's Great:
The Vivo lift-top coffee table is perfect for those who need a dual-function piece. The top lifts to offer a higher surface for eating, working, or using your laptop, while the drawers on the sides are perfect for stashing away extra items. The hidden compartment is ideal for keeping things out of sight when not in use.
5. The Urban Port Industrial Coffee Table with Drawers
Material: Wood, metal
Features:
Industrial-style with metal frame and wood drawers
Large storage space with two drawers and a lower shelf
Dimensions: 48" W x 18" H x 24" D
Why It's Great:
The Urban Port industrial coffee table combines the charm of wood with the strength of metal. Its drawers and lower shelf offer generous storage options, while the rugged design makes it a standout piece for urban, loft, or industrial-style homes.
Tips for Styling a Coffee Table with Drawers
Keep the Top Clear for a Polished Look
While the drawers are perfect for storing smaller items, try to keep the surface of your coffee table relatively clear. Use a decorative tray, vase, or a stack of books to add style without creating clutter.
Use the Drawers for Hidden Storage
Use the drawers to store everyday essentials like remotes, magazines, or even small toys or blankets. This helps keep your living space organized without sacrificing style.
Coordinate with Other Furniture
To create a cohesive look, choose a coffee table that complements your other furniture pieces. If you have a sectional sofa, for example, consider a coffee table with a similar wood finish or metal accents.
Conclusion
A coffee table with drawers combines the best of both worlds—style and functionality. Not only does it serve as a central piece of furniture in your living room, but it also helps you keep your space organized and clutter-free. Whether you choose a modern, traditional, or industrial design, there’s a coffee table with drawers to suit your style and meet your storage needs. From hidden compartments for remotes to extra shelves for books and decorative items, these tables are a practical, stylish solution for any home.


 Cure Design Group
KITCHEN RENOVATION CURRENT CRAFTSMAN
This client started off just being curious about our services - what we could do, and if we could even help her update her kitchen. She and her husband with their two teenage kids have lived in their home for several years without updating anything since the house was originally built. They didn’t quite have a budget in mind yet. They didn’t know their style, or even if they had one. Their timeline was simple, “as fast as you can so we’re not without a kitchen for very long” (usually what we hear for kitchen updates).
After a very productive consultation: determining the scope of work and zeroing in on a budget, I was very excited to update this underwhelming space to something that is modern but timeless, something that is theirs. And, it was easy to see what type of design style they gravitated toward looking at the pieces they already own: Craftsman/Prairie Style. I left the meeting so excited to weave in yet another genre of design to my CDG portfolio! We circled in our contractor to discuss the changes they were looking to make and the scope of work that would be theirs. Then I was off to get designing:
// Because the kitchen’s footprint and the defined breakfast space delineated by the bay, we kept the perimeter cabinetry as it was originally laid out. We updated these cabinets to a beautiful soft Alabaster White with a Barn Wood Glaze to highlight the simplicity of the shaker style doors. We added transom cabinets above the uppers, with only the back wall having seeded glass inserts to highlight some of their collectables.
// The original shaped island was counter-productive (See what I did there?) in functionality and design. We squared this off to reduce some of the angles and gain more storage. We highlighted the new island with a contrasting oak cabinet in a dark finish, to pay our respects to the craftsman style, and topped with a concrete-like countertop as a nod to the Prairie Style, allowing the homeowners to gain two extra seats and a massive -uninterrupted- work surface.
// The small section of cabinetry between the garage entry and fridge now is the perfect dump-station for mail, electronics, whatever is in their hands when they come into the house; and completely hidden by the refrigerator.
// The disconnected cabinetry in the breakfast area makes for a great place to have a working office. Accessible from the kitchen or the adjacent great room, this is the perfect place for the kids to do their homework while mom and dad are putting together dinner. The base cabinets are built out for office-type storage: paper and pencil drawers, filing systems, and cord management. Additionally, the long counter provides a ton of worksurface to spread out.
// The largest transformation was the pantry. We raised the height of the doorway and added huge custom designed bypass sliding barndoors. Finished with a dark stain to compliment the island and cut to inset 4 stained glass windows, typical of this style of design, and driving home the concept for the whole space.
// They were desperate to replace their flooring with something extremely durable to flow throughout the kitchen and the whole main level. This beautiful new flooring is actually a textured LVT(!) Which allowed them to save on overall cost and extend the life of their new flooring purchase.
// They loved their copper table, so we kept it and added new simple, mid-century modern chairs around it and a shiny new craftsman-style chandelier above. We added bright barstools in a burnt orange-red accent, and a bright woven rug to tie it all together.
// Because the kitchen renovation was shaping up to be pretty spectacular, they decided they needed to now replace their ‘now-these-look-a-little-too-old’ upholstered seating in the neighboring great room with 2 new sofas. We found the perfect sage-y-grey fabric which we covered on sofa frames that have and exposed oak-wood base, which we finished in a warm weathered grey.
// As every designer knows, a room isn’t finished until there’s something on the windows. Now that the new flooring was installed and every other room on the main level ‘seemed’ to be updated, we needed to update the window treatments in the dining, and great rooms to reflect their new design concept.
I hope you find the ‘after’ photos refreshing (as refreshing as it was for me to work on something that’s not a “Farm House” style that’s saturating the industry right now!) This was such a fun project and a great collaboration with our contractor.

 KINGDOM WOODWORKS
Collaboration with Canonbury Homes and Frank Neely Design Associates.
Inspiration for a timeless open concept kitchen remodel in Atlanta with beaded inset cabinets and two islands
Inspiration for a timeless open concept kitchen remodel in Atlanta with beaded inset cabinets and two islands
 Cure Design Group
KITCHEN RENOVATION CURRENT CRAFTSMAN
This client started off just being curious about our services - what we could do, and if we could even help her update her kitchen. She and her husband with their two teenage kids have lived in their home for several years without updating anything since the house was originally built. They didn’t quite have a budget in mind yet. They didn’t know their style, or even if they had one. Their timeline was simple, “as fast as you can so we’re not without a kitchen for very long” (usually what we hear for kitchen updates).
After a very productive consultation: determining the scope of work and zeroing in on a budget, I was very excited to update this underwhelming space to something that is modern but timeless, something that is theirs. And, it was easy to see what type of design style they gravitated toward looking at the pieces they already own: Craftsman/Prairie Style. I left the meeting so excited to weave in yet another genre of design to my CDG portfolio! We circled in our contractor to discuss the changes they were looking to make and the scope of work that would be theirs. Then I was off to get designing:
// Because the kitchen’s footprint and the defined breakfast space delineated by the bay, we kept the perimeter cabinetry as it was originally laid out. We updated these cabinets to a beautiful soft Alabaster White with a Barn Wood Glaze to highlight the simplicity of the shaker style doors. We added transom cabinets above the uppers, with only the back wall having seeded glass inserts to highlight some of their collectables.
// The original shaped island was counter-productive (See what I did there?) in functionality and design. We squared this off to reduce some of the angles and gain more storage. We highlighted the new island with a contrasting oak cabinet in a dark finish, to pay our respects to the craftsman style, and topped with a concrete-like countertop as a nod to the Prairie Style, allowing the homeowners to gain two extra seats and a massive -uninterrupted- work surface.
// The small section of cabinetry between the garage entry and fridge now is the perfect dump-station for mail, electronics, whatever is in their hands when they come into the house; and completely hidden by the refrigerator.
// The disconnected cabinetry in the breakfast area makes for a great place to have a working office. Accessible from the kitchen or the adjacent great room, this is the perfect place for the kids to do their homework while mom and dad are putting together dinner. The base cabinets are built out for office-type storage: paper and pencil drawers, filing systems, and cord management. Additionally, the long counter provides a ton of worksurface to spread out.
// The largest transformation was the pantry. We raised the height of the doorway and added huge custom designed bypass sliding barndoors. Finished with a dark stain to compliment the island and cut to inset 4 stained glass windows, typical of this style of design, and driving home the concept for the whole space.
// They were desperate to replace their flooring with something extremely durable to flow throughout the kitchen and the whole main level. This beautiful new flooring is actually a textured LVT(!) Which allowed them to save on overall cost and extend the life of their new flooring purchase.
// They loved their copper table, so we kept it and added new simple, mid-century modern chairs around it and a shiny new craftsman-style chandelier above. We added bright barstools in a burnt orange-red accent, and a bright woven rug to tie it all together.
// Because the kitchen renovation was shaping up to be pretty spectacular, they decided they needed to now replace their ‘now-these-look-a-little-too-old’ upholstered seating in the neighboring great room with 2 new sofas. We found the perfect sage-y-grey fabric which we covered on sofa frames that have and exposed oak-wood base, which we finished in a warm weathered grey.
// As every designer knows, a room isn’t finished until there’s something on the windows. Now that the new flooring was installed and every other room on the main level ‘seemed’ to be updated, we needed to update the window treatments in the dining, and great rooms to reflect their new design concept.
I hope you find the ‘after’ photos refreshing (as refreshing as it was for me to work on something that’s not a “Farm House” style that’s saturating the industry right now!) This was such a fun project and a great collaboration with our contractor.
 Cure Design Group
KITCHEN RENOVATION CURRENT CRAFTSMAN
This client started off just being curious about our services - what we could do, and if we could even help her update her kitchen. She and her husband with their two teenage kids have lived in their home for several years without updating anything since the house was originally built. They didn’t quite have a budget in mind yet. They didn’t know their style, or even if they had one. Their timeline was simple, “as fast as you can so we’re not without a kitchen for very long” (usually what we hear for kitchen updates).
After a very productive consultation: determining the scope of work and zeroing in on a budget, I was very excited to update this underwhelming space to something that is modern but timeless, something that is theirs. And, it was easy to see what type of design style they gravitated toward looking at the pieces they already own: Craftsman/Prairie Style. I left the meeting so excited to weave in yet another genre of design to my CDG portfolio! We circled in our contractor to discuss the changes they were looking to make and the scope of work that would be theirs. Then I was off to get designing:
// Because the kitchen’s footprint and the defined breakfast space delineated by the bay, we kept the perimeter cabinetry as it was originally laid out. We updated these cabinets to a beautiful soft Alabaster White with a Barn Wood Glaze to highlight the simplicity of the shaker style doors. We added transom cabinets above the uppers, with only the back wall having seeded glass inserts to highlight some of their collectables.
// The original shaped island was counter-productive (See what I did there?) in functionality and design. We squared this off to reduce some of the angles and gain more storage. We highlighted the new island with a contrasting oak cabinet in a dark finish, to pay our respects to the craftsman style, and topped with a concrete-like countertop as a nod to the Prairie Style, allowing the homeowners to gain two extra seats and a massive -uninterrupted- work surface.
// The small section of cabinetry between the garage entry and fridge now is the perfect dump-station for mail, electronics, whatever is in their hands when they come into the house; and completely hidden by the refrigerator.
// The disconnected cabinetry in the breakfast area makes for a great place to have a working office. Accessible from the kitchen or the adjacent great room, this is the perfect place for the kids to do their homework while mom and dad are putting together dinner. The base cabinets are built out for office-type storage: paper and pencil drawers, filing systems, and cord management. Additionally, the long counter provides a ton of worksurface to spread out.
// The largest transformation was the pantry. We raised the height of the doorway and added huge custom designed bypass sliding barndoors. Finished with a dark stain to compliment the island and cut to inset 4 stained glass windows, typical of this style of design, and driving home the concept for the whole space.
// They were desperate to replace their flooring with something extremely durable to flow throughout the kitchen and the whole main level. This beautiful new flooring is actually a textured LVT(!) Which allowed them to save on overall cost and extend the life of their new flooring purchase.
// They loved their copper table, so we kept it and added new simple, mid-century modern chairs around it and a shiny new craftsman-style chandelier above. We added bright barstools in a burnt orange-red accent, and a bright woven rug to tie it all together.
// Because the kitchen renovation was shaping up to be pretty spectacular, they decided they needed to now replace their ‘now-these-look-a-little-too-old’ upholstered seating in the neighboring great room with 2 new sofas. We found the perfect sage-y-grey fabric which we covered on sofa frames that have and exposed oak-wood base, which we finished in a warm weathered grey.
// As every designer knows, a room isn’t finished until there’s something on the windows. Now that the new flooring was installed and every other room on the main level ‘seemed’ to be updated, we needed to update the window treatments in the dining, and great rooms to reflect their new design concept.
I hope you find the ‘after’ photos refreshing (as refreshing as it was for me to work on something that’s not a “Farm House” style that’s saturating the industry right now!) This was such a fun project and a great collaboration with our contractor.
 Cure Design Group
KITCHEN RENOVATION CURRENT CRAFTSMAN
This client started off just being curious about our services - what we could do, and if we could even help her update her kitchen. She and her husband with their two teenage kids have lived in their home for several years without updating anything since the house was originally built. They didn’t quite have a budget in mind yet. They didn’t know their style, or even if they had one. Their timeline was simple, “as fast as you can so we’re not without a kitchen for very long” (usually what we hear for kitchen updates).
After a very productive consultation: determining the scope of work and zeroing in on a budget, I was very excited to update this underwhelming space to something that is modern but timeless, something that is theirs. And, it was easy to see what type of design style they gravitated toward looking at the pieces they already own: Craftsman/Prairie Style. I left the meeting so excited to weave in yet another genre of design to my CDG portfolio! We circled in our contractor to discuss the changes they were looking to make and the scope of work that would be theirs. Then I was off to get designing:
// Because the kitchen’s footprint and the defined breakfast space delineated by the bay, we kept the perimeter cabinetry as it was originally laid out. We updated these cabinets to a beautiful soft Alabaster White with a Barn Wood Glaze to highlight the simplicity of the shaker style doors. We added transom cabinets above the uppers, with only the back wall having seeded glass inserts to highlight some of their collectables.
// The original shaped island was counter-productive (See what I did there?) in functionality and design. We squared this off to reduce some of the angles and gain more storage. We highlighted the new island with a contrasting oak cabinet in a dark finish, to pay our respects to the craftsman style, and topped with a concrete-like countertop as a nod to the Prairie Style, allowing the homeowners to gain two extra seats and a massive -uninterrupted- work surface.
// The small section of cabinetry between the garage entry and fridge now is the perfect dump-station for mail, electronics, whatever is in their hands when they come into the house; and completely hidden by the refrigerator.
// The disconnected cabinetry in the breakfast area makes for a great place to have a working office. Accessible from the kitchen or the adjacent great room, this is the perfect place for the kids to do their homework while mom and dad are putting together dinner. The base cabinets are built out for office-type storage: paper and pencil drawers, filing systems, and cord management. Additionally, the long counter provides a ton of worksurface to spread out.
// The largest transformation was the pantry. We raised the height of the doorway and added huge custom designed bypass sliding barndoors. Finished with a dark stain to compliment the island and cut to inset 4 stained glass windows, typical of this style of design, and driving home the concept for the whole space.
// They were desperate to replace their flooring with something extremely durable to flow throughout the kitchen and the whole main level. This beautiful new flooring is actually a textured LVT(!) Which allowed them to save on overall cost and extend the life of their new flooring purchase.
// They loved their copper table, so we kept it and added new simple, mid-century modern chairs around it and a shiny new craftsman-style chandelier above. We added bright barstools in a burnt orange-red accent, and a bright woven rug to tie it all together.
// Because the kitchen renovation was shaping up to be pretty spectacular, they decided they needed to now replace their ‘now-these-look-a-little-too-old’ upholstered seating in the neighboring great room with 2 new sofas. We found the perfect sage-y-grey fabric which we covered on sofa frames that have and exposed oak-wood base, which we finished in a warm weathered grey.
// As every designer knows, a room isn’t finished until there’s something on the windows. Now that the new flooring was installed and every other room on the main level ‘seemed’ to be updated, we needed to update the window treatments in the dining, and great rooms to reflect their new design concept.
I hope you find the ‘after’ photos refreshing (as refreshing as it was for me to work on something that’s not a “Farm House” style that’s saturating the industry right now!) This was such a fun project and a great collaboration with our contractor.
 STARWOOD INDUSTRY CO.,LTD
Smart Storage Ideas for Small Apartments with Flat-Pack Panel Furniture
Small apartments and rental homes often struggle with one thing: not enough storage. Clothes, books, luggage and daily items quickly fill every corner, and there is rarely space for bulky built-in furniture. With the right flat-pack panel furniture, you can still create a bright, organized home that feels calm instead of crowded.
Here are some practical ideas to make the most of every square meter using flat-pack wardrobes, beds and cabinets.
1. Build a Full-Height Storage Wall
When floor space is limited, think vertically. A full-height wardrobe or storage wall from floor to ceiling instantly adds a huge amount of hidden storage without taking more footprint.
Use tall cabinets around the bed or TV area. Closed doors keep the room looking clean, while a few open shelves in the middle can display books, plants or a TV. Slim handles and light wood tones help the design feel modern and not too heavy for a small room.
Flat-pack panel wardrobes are delivered in cartons and assembled on site, which makes them perfect for apartments with narrow stairs or elevators.
2. Turn the Bed Area into a Storage Zone
In small bedrooms, the bed is usually the largest piece of furniture. Instead of letting the space under and around it go to waste, transform it into extra storage:
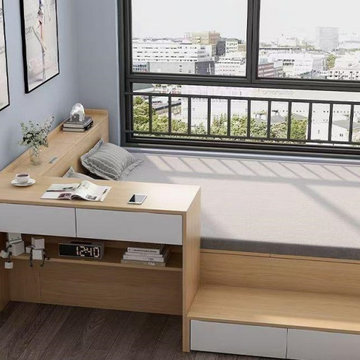
A platform bed with drawers underneath is ideal for bedding, seasonal clothes or suitcases.
Steps leading up to a raised bed can hide additional drawers or cabinets.
A headboard with shelves and small cabinets keeps phones, books and chargers within easy reach while freeing up the bedside floor.
These designs work very well with panel furniture. Standard board sizes and hardware make it easy to customize length, depth and internal layout according to each room.
3. Combine Desk, Wardrobe and Shelving
Many people now work or study from home, even in small apartments. Instead of using several separate pieces, consider a combined unit that integrates wardrobe, open shelves and a desk.
A corner desk with wall-mounted cabinets above and a wardrobe next to it creates a compact “working wall”. Open shelves can hold files and décor, while closed cabinets hide everything else. Keeping the furniture off the floor visually opens the room and makes cleaning easier.
Flat-pack construction means these modular units can be shipped in flat panels and assembled in different layouts: left-hand or right-hand desk, longer or shorter wardrobe, more or fewer shelves.
4. Choose Light Colors and Warm Wood Textures
Color has a big impact on how large or small a room feels. For compact spaces, light neutrals are your best friend: white, light grey and soft beige make walls and cabinets visually recede. Warm woodgrain fronts or accents add comfort and prevent the room from feeling cold.
You can mix white cabinet doors with oak or light walnut panels to create a fresh, Scandinavian-inspired look. Using the same material for wardrobes, beds and shelves also creates a calm, unified feeling instead of a busy, mismatched room.
5. Enjoy the Practical Benefits of Flat-Pack Furniture
Flat-pack panel furniture is not only space-saving in the room, it is also efficient before it arrives:
Products are packed flat in cartons, so more pieces fit into one container or truck.
Cartons are easier to carry through narrow hallways and up staircases.
Most systems use cam locks and dowels, allowing for quick assembly and disassembly when moving.
For landlords, student housing and rental projects, this makes installation faster and replacement simpler. For online brands and retailers, flat-pack furniture reduces shipping costs and makes warehousing more flexible.
6. Behind the Scenes: How Quality Flat-Pack Furniture Is Made
A good small-space design also depends on precise manufacturing. Modern CNC cutting lines, edge-banding machines and drilling centers ensure that every panel fits perfectly, doors stay aligned and hardware works smoothly. Consistent quality is key when many apartments or rooms need to be furnished with the same design.
About Starwood
Starwood is an OEM & ODM manufacturer based in Guangdong with over 12 years of experience in panel materials and furniture. We supply decorative papers, MDF, particleboard, plywood and custom-designed flat-pack furniture, including wardrobes, storage beds, study units and kitchen cabinets.
If you are a retailer, online brand, interior designer or project client looking for small-space furniture solutions, feel free to contact us to develop your own flat-pack collection or apartment package.
 STARWOOD INDUSTRY CO.,LTD
Smart Storage Ideas for Small Apartments with Flat-Pack Panel Furniture
Small apartments and rental homes often struggle with one thing: not enough storage. Clothes, books, luggage and daily items quickly fill every corner, and there is rarely space for bulky built-in furniture. With the right flat-pack panel furniture, you can still create a bright, organized home that feels calm instead of crowded.
Here are some practical ideas to make the most of every square meter using flat-pack wardrobes, beds and cabinets.
1. Build a Full-Height Storage Wall
When floor space is limited, think vertically. A full-height wardrobe or storage wall from floor to ceiling instantly adds a huge amount of hidden storage without taking more footprint.
Use tall cabinets around the bed or TV area. Closed doors keep the room looking clean, while a few open shelves in the middle can display books, plants or a TV. Slim handles and light wood tones help the design feel modern and not too heavy for a small room.
Flat-pack panel wardrobes are delivered in cartons and assembled on site, which makes them perfect for apartments with narrow stairs or elevators.
2. Turn the Bed Area into a Storage Zone
In small bedrooms, the bed is usually the largest piece of furniture. Instead of letting the space under and around it go to waste, transform it into extra storage:
A platform bed with drawers underneath is ideal for bedding, seasonal clothes or suitcases.
Steps leading up to a raised bed can hide additional drawers or cabinets.
A headboard with shelves and small cabinets keeps phones, books and chargers within easy reach while freeing up the bedside floor.
These designs work very well with panel furniture. Standard board sizes and hardware make it easy to customize length, depth and internal layout according to each room.
3. Combine Desk, Wardrobe and Shelving
Many people now work or study from home, even in small apartments. Instead of using several separate pieces, consider a combined unit that integrates wardrobe, open shelves and a desk.
A corner desk with wall-mounted cabinets above and a wardrobe next to it creates a compact “working wall”. Open shelves can hold files and décor, while closed cabinets hide everything else. Keeping the furniture off the floor visually opens the room and makes cleaning easier.
Flat-pack construction means these modular units can be shipped in flat panels and assembled in different layouts: left-hand or right-hand desk, longer or shorter wardrobe, more or fewer shelves.
4. Choose Light Colors and Warm Wood Textures
Color has a big impact on how large or small a room feels. For compact spaces, light neutrals are your best friend: white, light grey and soft beige make walls and cabinets visually recede. Warm woodgrain fronts or accents add comfort and prevent the room from feeling cold.
You can mix white cabinet doors with oak or light walnut panels to create a fresh, Scandinavian-inspired look. Using the same material for wardrobes, beds and shelves also creates a calm, unified feeling instead of a busy, mismatched room.
5. Enjoy the Practical Benefits of Flat-Pack Furniture
Flat-pack panel furniture is not only space-saving in the room, it is also efficient before it arrives:
Products are packed flat in cartons, so more pieces fit into one container or truck.
Cartons are easier to carry through narrow hallways and up staircases.
Most systems use cam locks and dowels, allowing for quick assembly and disassembly when moving.
For landlords, student housing and rental projects, this makes installation faster and replacement simpler. For online brands and retailers, flat-pack furniture reduces shipping costs and makes warehousing more flexible.
6. Behind the Scenes: How Quality Flat-Pack Furniture Is Made
A good small-space design also depends on precise manufacturing. Modern CNC cutting lines, edge-banding machines and drilling centers ensure that every panel fits perfectly, doors stay aligned and hardware works smoothly. Consistent quality is key when many apartments or rooms need to be furnished with the same design.
About Starwood
Starwood is an OEM & ODM manufacturer based in Guangdong with over 12 years of experience in panel materials and furniture. We supply decorative papers, MDF, particleboard, plywood and custom-designed flat-pack furniture, including wardrobes, storage beds, study units and kitchen cabinets.
If you are a retailer, online brand, interior designer or project client looking for small-space furniture solutions, feel free to contact us to develop your own flat-pack collection or apartment package.

 CairnsCraft Design & Remodel
Great spacious bathroom with lot of amenities.
Photographer: Jon Upson
Large elegant master beige tile and porcelain tile drop-in bathtub photo in San Diego with an undermount sink, raised-panel cabinets, medium tone wood cabinets, granite countertops, beige walls and a two-piece toilet
Large elegant master beige tile and porcelain tile drop-in bathtub photo in San Diego with an undermount sink, raised-panel cabinets, medium tone wood cabinets, granite countertops, beige walls and a two-piece toilet
 Mark Huff
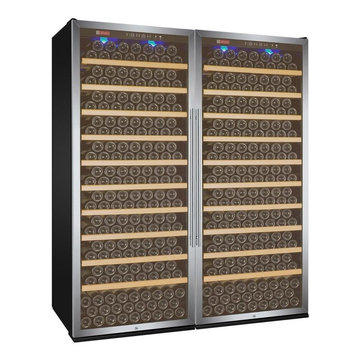
With versatile adjustable shelves, a massive storage capacity, and plenty of innovative features, Allavino's all-new 2X-YHWR305-1ST Dual-Zone Wine Cellar Refrigerator is the answer to all of your wine storage needs. Made up of two single zone 305-bottle wine refrigerators with opposite hinged doors, it can store an impressive 610 bottles of red and white wine in two distinct zones, each independently controlled using a clear digital display with user-friendly push button controls. Thanks to storage shelves that can be adjusted in 1-1/4" increments to accommodate larger bottles, you are no longer limited in the types of wine that you can store, allowing you complete customization for your personal storage needs.
Dual-Zone Digital Temperature Control:The 2X-YHWR305-1ST features two individual temperature zones that can each be set between 41°F and 72°F, allowing you to store all red, all white, or both red and white wines depending on your needs. Each zone is adjusted using a digital display with push button controls that make controlling your wine's environment easier than ever. For added convenience, you can easily monitor the lighted temperature displays through the glass at any time without needing to open the doors.
Fan-Forced Cooling:To provide additional cooling and help prevent large differences in temperature between the upper and lower zones, internal fans circulate air throughout the cabinets. These fan reduce initial cool down time by 50% and create a frost-free environment so you will not have to hassle with defrosting the unit.
Blue LED Interior Lights:Find the perfect bottle quickly and easily thanks to the YHWR305-1ST's cool blue LED lights, which illuminate your bottles without the heat created by incandescent bulbs. You can leave these lights on to show off your collection without needing to worry about a harmful hot spot affecting your wine.
Easy Rolling Hardwood Shelves:This wine cellar can safely store up to 610 standard size wine bottles on it's extra thick hardwood shelves, which glide-out smoothly on ball bearing tracks to provide easy access to every bottle. Twenty shelves can store up to 28 standard size bottles each, and two bottom shelves can store larger bottles or up to 25 standard bottles. Each shelf can be adjusted in 1-1/4" increments to accommodate larger diameter bottles.
Tinted Glass Door with Lock:Frost-free and condensation-free UV-protected glass doors provide an excellent view of your wine while keeping it safe from harmful light. The door comes equipped with a built-in key lock for added security, and two keys are included so that you can always have a spare on hand.
Height: 78-1/2"
Width: 63"
Depth: 27-1/2" (29-1/4" w/Handle)
Unit Weight: 650 lbs. (2 units - 325 lbs. each)
Labor: 1 Year
Parts: 1 Year
Compressor (Parts Only): 5 Years
Built-In Capable: No
Security Lock: Yes
Multiple / Dual Zone: Yes
Beverage Center: No
Cabinet Color / Material: Black
Ada Compliant: No
Commercial Use: No
Outdoor Use: No
Energy Star Rated: No
Wine Bottle Count: Up to 610 Bottles
Adjustable Thermostat: Yes
Digital: Yes
Type: Compressor
Defrost System: Auto
Front Ventilation: No
Type: Wood Presentation
Number Of Shelves: 20
Material: Hardwood
Removable: Yes
Adjustable: Yes
Glide-Out (Roller Assemblies): Yes
Bottles Per Shelf: 28
Color: Black
Compartments (Distinct Zones): 2
Lighting: Blue LED
Type: Glass
Number Of Doors: 2
Color / Material: Stainless Steel Frame
Door Handle: Towel Bar
Field Reversible: NO
Accepts Custom Panel: NO
Tinted / Uv Protective: Yes
Self-Closing: No
Dimensions
Height
78-1/2"
Width
63"
Depth
27-1/2" (29-1/4" w/Handle)
Weight
Unit Weight
650 lbs. (2 units - 325 lbs. each)
Warranty
Labor
1 Year
Parts
1 Year
Compressor (Parts Only)
5 Years
Key Features
Built-in Capable
No
Security Lock
Yes
Multiple / Dual Zone
Yes
Beverage Center
No
Cabinet Color / Material
Black
ADA Compliant
No
Commercial Use
No
Outdoor Use
No
Energy Star Rated
No
Capacity
Wine Bottle Count
Up to 610 Bottles
Controls
Adjustable Thermostat
Yes
Digital
Yes
Cooling System
Type
Compressor
Defrost System
Auto
Front Ventilation
No
Shelving
Type
Wood Presentation
Number of Shelves
20
Material
Hardwood
Removable
Yes
Adjustable
Yes
Glide-Out (Roller Assemblies)
Yes
Bottles per Shelf
28
Interior
Color
Black
Compartments (Distinct Zones)
2
Lighting
Blue LED
Door
Type
Glass
Number of Doors
2
Color / Material
Stainless Steel Frame
Door Handle
Towel Bar
Field Reversible
NO
Accepts Custom Panel
NO
Tinted / UV Protective
Yes
Self-Closing
No
 Free Lancing
Effective residential construction project management is crucial in today’s fast-moving building industry. It means overseeing every step of building a home, from planning to finishing, to ensure projects are completed time, within budget, and with high quality. Unlike commercial projects, residential projects require special attention to meet homeowners' unique needs and wishes, requiring a customized approach from the beginning to the end.
In 2025, the construction sector will use advanced technologies like AI and integrated project delivery (IPD) to streamline processes and improve stakeholder collaboration. However, project managers face significant challenges, including managing risks, maintaining quality control, and ensuring effective communication among team members.
A WIP Report (Work-in-Progress Report) is a key tool that helps track a project's budget, progress, and resource use. It provides clear insights, making managing costs easier, avoiding delays, and making informed decisions.
By adopting best practices and using modern construction management tools, project managers can overcome these challenges and deliver successful residential construction projects that meet client expectations and contribute to a sustainable future.
This article provides a brief overview of residential construction project management, highlights its importance, and touches on the challenges faced by project managers while incorporating the latest trends and technologies in the field.
Types of Residential Construction Management
Here are the different types of Residential Construction Management:
Single-Family Homes: These are standalone houses built for individual families. Managing these projects involves overseeing construction from planning to completion, ensuring that the home meets the owner's preferences and budget.
Multi-Family Housing: This includes apartments, condominiums, and townhouses. Projects of this type require managing multiple units, often with shared facilities, and ensuring compliance with local building codes.
Custom Home Building: This involves constructing homes tailored to specific client needs. Close collaboration with architects and designers is required to ensure the house reflects the owner's personality and preferences.
Home Renovation and Remodeling: These projects focus on updating or expanding existing homes. They often involve working with subcontractors for specialized tasks like electrical or plumbing work.
Components of Residential Construction Project Management
Managing a residential construction project requires carefully coordinating people, materials, and timelines. A well-structured approach ensures efficiency, cost control, and high-quality results.
Roles and Responsibilities
A project manager plays a vital role in residential construction. They oversee every step from planning to completion and ensure the project stays on schedule, within budget, and meets quality standards.
Project Manager’s Role in Home Construction
The project manager is responsible for organizing tasks, managing resources, and solving problems that arise during construction. They coordinate between different teams, track progress, and ensure safety regulations are followed.
Collaboration with Contractors, Architects, and Stakeholders
Successful residential construction requires teamwork. Project managers work closely with architects to bring designs to new heights, coordinate with contractors to manage labor and materials, and keep stakeholders (such as homeowners and investors) informed about project updates.
Client Communication and Expectations Management
Clear communication with clients is essential. The project manager keeps homeowners updated on timelines, changes, and challenges. Setting realistic expectations and providing regular updates, they help avoid misunderstandings and keep the project running smoothly.
Project Scope & Planning
Practical project planning sets the foundation for a successful residential construction project. It ensures clear goals, minimizes risks, and keeps the project on track.
Defining Project Objectives and Deliverables:
Clearly outlining what needs to be done and what the final result should look like is essential. This involves setting specific, measurable goals that align with the homeowner's vision and budget.
Managing Homeowner Expectations and Scope Creep:
Homeowners often have changing needs or ideas. Effective project managers must manage these expectations to prevent "scope creep," which can delay projects and increase costs. This involves open communication and setting clear boundaries.
Ensuring Compliance with Zoning Laws and Permits:
Before construction begins, it's crucial to ensure that all necessary permits are obtained and that the project complies with local zoning laws. This step avoids costly fines and delays, ensuring the project moves forward smoothly.
Budgeting & Cost Control
Proper budgeting is essential for keeping residential construction projects financially viable. Effective cost management prevents overspending and ensures profitability.
Accurate Cost Estimation for Residential Projects
A precise cost estimate considers labor, materials, permits, and unexpected expenses. Using historical data and Sage 300 CRE for financial management improves accuracy and helps set realistic budgets.
Budget Allocation and Tracking
Allocating funds efficiently ensures that each phase of the project receives the necessary resources. Tracking expenses through Construction & Financial Dashboards allows for real-time monitoring and early detection of budget deviations.
Preventing Budget Overruns
Uncontrolled costs can derail a project. Regular financial reviews, automated alerts for overspending, and contingency planning help keep expenses in check and prevent financial strain.
Scheduling & Timeline Management
Timely project completion is crucial in residential construction. Effective scheduling minimizes delays and ensures a smooth workflow.
Creating Detailed Project Schedules
A structured schedule outlines all tasks, deadlines, and dependencies. Breaking down the project into phases, planning, execution, and finishing, helps maintain order and clarity.
Preventing Delays & Meeting Deadlines
Delays can result from labor shortages, weather conditions, or supply chain issues. To avoid problems, it’s good to check for risks ahead of time, add extra time to schedules, and keep everyone on the same page.
Using Gantt Charts and Critical Path Methods
CPM for Construction helps identify critical activities that directly impact project completion, while Gantt charts provide a visual timeline of tasks. Both tools optimize scheduling and improve efficiency.
Residential Construction Project Management Phases
Managing a residential construction project effectively requires a structured approach through various phases. Each phase plays a critical role in ensuring the project's success, from initial planning to completion.
Pre-Construction Phase
The pre-construction phase sets the foundation for a smooth and efficient building process. Proper planning at this stage helps prevent costly changes and delays later.
Site Analysis & Approvals: A thorough site analysis assesses soil conditions, topography, and environmental factors. Feasibility studies evaluate project viability, including costs and regulatory compliance. Obtaining zoning approvals, permits, and other legal clearances is crucial before breaking ground.
Selecting Materials and Procurement Strategies: Choosing the right materials impacts durability, sustainability, and cost efficiency. A well-planned procurement strategy, including bulk purchasing and reliable supplier partnerships, ensures timely delivery and cost savings. Using Sage 300 CRE for procurement management helps streamline material sourcing and financial planning.
Construction Phase
The construction phase transforms plans into reality. Effective coordination and strict quality control ensure a successful build.
Resource Allocation and Workflow Coordination: Efficiently managing labor, equipment, and materials is key to maintaining progress. Using CPM for Construction, project managers can allocate resources strategically, prevent bottlenecks, and optimize workflows for timely completion.
Project Closeout & Handover
The final phase of residential construction project management is crucial for ensuring a smooth transition from construction to occupancy. Proper closeout procedures guarantee quality, client satisfaction, and long-term project success.
Final Inspections and Quality Assurance: Before finishing the project, a final inspection checks that everything meets safety rules and quality standards. Any problems need to be fixed quickly. Using Procore helps make inspections and tracking issues easier, ensuring a high-quality final product.
Client Walkthrough and Support: A final check helps homeowners see the finished work, ask questions, and make sure it meets their expectations. This is also a chance to explain important home features and maintenance tips. Good communication here builds trust and strengthens relationships.
Warranty Management and Feedback: Efficient warranty management ensures clients get quick help for any issues after construction. A clear process for tracking requests and keeping in touch with homeowners boosts satisfaction. Collecting feedback helps improve future projects. Using S-Curve Forecasting tracks performance trends and refines management strategies.
Software for Residential Construction Project Management
The integration of technology in residential construction project management has revolutionized the way projects are planned, executed, and monitored. Digital tools streamline operations, reduce costs, and improve communication, making them essential for modern construction firms.
Importance of Digital Tools
Investing in digital tools is crucial for construction firms as it transforms the industry by enhancing efficiency, accuracy, and collaboration across the entire project lifecycle. They also improve project management by streamlining processes, automating tasks, and facilitating real-time stakeholder communication.
Top Construction Management Software for Residential Projects
Several software solutions are available for managing residential construction projects:
Procore: Known for its comprehensive project management features, including document management and collaboration tools.
Sage 300 CRE: Offers robust accounting and financial management capabilities, ideal for large-scale construction projects.
Buildertrend: Specializes in residential construction, providing tools for project scheduling, budgeting, and client communication.
CoConstruct: Focuses on custom home building and remodeling, offering features for estimating, scheduling, and project management.
WIP Reports: Useful for tracking work-in-progress and managing project finances effectively.
Features Comparison and Best Use Cases:
Procore: Best for large projects requiring extensive collaboration and document management.
Sage 300 CRE: Ideal for firms needing robust financial management.
Buildertrend: Suitable for residential builders focusing on client communication and project scheduling.
CoConstruct: Perfect for custom home builders who need detailed estimating and scheduling tools.
WIP Reports: Useful for firms needing to track project finances closely.
How Software Improves Project Efficiency
Construction management software significantly enhances project efficiency in several ways:
Automating Accounting and Job Costing: Software like Sage 300 CRE automates financial tasks, reducing manual errors and improving budget tracking.
Streamlining Document Management and Communication: Tools like Procore centralize documents and facilitate real-time communication among team members, reducing misunderstandings and delays.
Mobile-Friendly Solutions for Real-Time Tracking: Mobile apps from platforms like Buildertrend allow for on-site access to project data, enabling real-time tracking and decision-making.
These digital tools and software solutions are essential for modern residential construction project management, offering benefits such as improved efficiency, enhanced collaboration, and better financial control.
Challenges in Residential Construction Project Management
Residential construction projects face a variety of challenges that can impact their success. Here are some of the key issues project managers encounter:
Managing Subcontractors and Labor Shortages
One of the biggest challenges in residential construction is managing subcontractors and dealing with labor shortages. Subcontractors often have their own schedules and priorities, which can lead to delays if not coordinated properly. Additionally, labor shortages can slow down projects and increase costs due to the need for overtime or hiring temporary workers.
Budget Overruns and Unexpected Costs
Budget overruns are common in residential construction due to factors like material price fluctuations, unexpected site conditions, or changes in project scope. Effective budget management involves regularly monitoring expenses and having contingency plans for unexpected costs.
Changing Construction and Eco Rules
Construction and Eco Rules are always changing, so project managers need to keep up with the latest regulations. This involves following guidelines for saving energy, protecting the environment, and ensuring safety. Ignoring these rules can lead to fines, delays, or even stopping the project.
Best Practices
To ensure your residential construction projects run smoothly and successfully, follow these essential best practices:
Setting Clear Project Goals and Milestones
Clearly defining what you want to achieve is the first step to success. Set specific, measurable, achievable, relevant, and time-bound (SMART) goals. This helps everyone involved understand what needs to be done and by when. For example, instead of saying "build a house," say "build a house with three bedrooms and two bathrooms within the next nine months."
Stakeholder Collaboration
Good communication is key to keeping everyone on the same page. Regular meetings with contractors, suppliers, and homeowners help prevent misunderstandings and ensure that everyone knows what's happening and what's next. This open dialogue also helps resolve issues quickly, preventing small problems from becoming big delays.
Using Data-Driven Insights for Decision-Making
Making decisions based on facts rather than guesses is crucial. Use data and analytics to understand project progress, identify potential issues early, and make informed decisions. For instance, if data shows that a particular material is consistently causing delays, you can plan ahead to avoid those delays in the future.
Proactive Risk Management Strategies
Things don't always go as planned, so being prepared is essential. Identify potential risks early and have a plan to manage them. This might include having backup suppliers, planning for weather conditions, or setting aside extra funds for unexpected expenses. Being proactive can prevent small issues from turning into major problems.
Conclusion
Effective residential construction project management requires careful planning, clear communication, and the right digital tools. From single-family homes to multi-family housing and custom projects, managing timelines, budgets, and quality is essential for success.
By following best practices, using project management software, and staying ahead of industry trends, project managers can ensure smooth execution and client satisfaction despite challenges like labor shortages, budget overruns, and regulatory compliance; modern technology and strategic planning help mitigate risks.
Construction firms can improve efficiency, enhance collaboration, and maintain financial control by adopting advanced tools like Procore, Sage 300 CRE, and Buildertrend. A well-managed project delivers a quality home and builds trust and long-term success in the industry.
FAQs
What is residential construction project management?
It involves overseeing all aspects of building residential properties, from initial planning and design to construction and completion, ensuring projects are completed on time, within budget, and to the desired quality standards.
How can I prevent budget overruns in my construction project?
Accurate cost estimation, continuous budget tracking, and having contingency plans for unexpected expenses are key strategies to prevent budget overruns.
What are the main stages of a residential construction project?
The primary stages include design, pre-construction, procurement, and construction.
How does construction management software improve project efficiency?
It streamlines processes like scheduling, budgeting, and communication, providing real-time data access and collaboration among stakeholders, which enhances overall project efficiency.
How can I ensure my project complies with local building codes and regulations?
Engage professionals familiar with local laws, obtain all necessary permits before starting, and conduct regular inspections to ensure adherence to building codes and regulations.
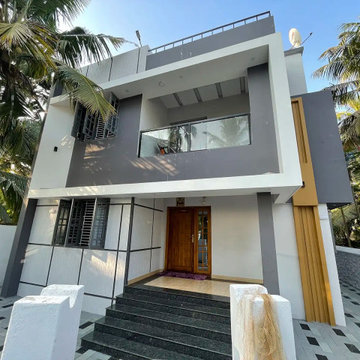 Free Lancing
Effective residential construction project management is crucial in today’s fast-moving building industry. It means overseeing every step of building a home, from planning to finishing, to ensure projects are completed time, within budget, and with high quality. Unlike commercial projects, residential projects require special attention to meet homeowners' unique needs and wishes, requiring a customized approach from the beginning to the end.
In 2025, the construction sector will use advanced technologies like AI and integrated project delivery (IPD) to streamline processes and improve stakeholder collaboration. However, project managers face significant challenges, including managing risks, maintaining quality control, and ensuring effective communication among team members.
A WIP Report (Work-in-Progress Report) is a key tool that helps track a project's budget, progress, and resource use. It provides clear insights, making managing costs easier, avoiding delays, and making informed decisions.
By adopting best practices and using modern construction management tools, project managers can overcome these challenges and deliver successful residential construction projects that meet client expectations and contribute to a sustainable future.
This article provides a brief overview of residential construction project management, highlights its importance, and touches on the challenges faced by project managers while incorporating the latest trends and technologies in the field.
Types of Residential Construction Management
Here are the different types of Residential Construction Management:
Single-Family Homes: These are standalone houses built for individual families. Managing these projects involves overseeing construction from planning to completion, ensuring that the home meets the owner's preferences and budget.
Multi-Family Housing: This includes apartments, condominiums, and townhouses. Projects of this type require managing multiple units, often with shared facilities, and ensuring compliance with local building codes.
Custom Home Building: This involves constructing homes tailored to specific client needs. Close collaboration with architects and designers is required to ensure the house reflects the owner's personality and preferences.
Home Renovation and Remodeling: These projects focus on updating or expanding existing homes. They often involve working with subcontractors for specialized tasks like electrical or plumbing work.
Components of Residential Construction Project Management
Managing a residential construction project requires carefully coordinating people, materials, and timelines. A well-structured approach ensures efficiency, cost control, and high-quality results.
Roles and Responsibilities
A project manager plays a vital role in residential construction. They oversee every step from planning to completion and ensure the project stays on schedule, within budget, and meets quality standards.
Project Manager’s Role in Home Construction
The project manager is responsible for organizing tasks, managing resources, and solving problems that arise during construction. They coordinate between different teams, track progress, and ensure safety regulations are followed.
Collaboration with Contractors, Architects, and Stakeholders
Successful residential construction requires teamwork. Project managers work closely with architects to bring designs to new heights, coordinate with contractors to manage labor and materials, and keep stakeholders (such as homeowners and investors) informed about project updates.
Client Communication and Expectations Management
Clear communication with clients is essential. The project manager keeps homeowners updated on timelines, changes, and challenges. Setting realistic expectations and providing regular updates, they help avoid misunderstandings and keep the project running smoothly.
Project Scope & Planning
Practical project planning sets the foundation for a successful residential construction project. It ensures clear goals, minimizes risks, and keeps the project on track.
Defining Project Objectives and Deliverables:
Clearly outlining what needs to be done and what the final result should look like is essential. This involves setting specific, measurable goals that align with the homeowner's vision and budget.
Managing Homeowner Expectations and Scope Creep:
Homeowners often have changing needs or ideas. Effective project managers must manage these expectations to prevent "scope creep," which can delay projects and increase costs. This involves open communication and setting clear boundaries.
Ensuring Compliance with Zoning Laws and Permits:
Before construction begins, it's crucial to ensure that all necessary permits are obtained and that the project complies with local zoning laws. This step avoids costly fines and delays, ensuring the project moves forward smoothly.
Budgeting & Cost Control
Proper budgeting is essential for keeping residential construction projects financially viable. Effective cost management prevents overspending and ensures profitability.
Accurate Cost Estimation for Residential Projects
A precise cost estimate considers labor, materials, permits, and unexpected expenses. Using historical data and Sage 300 CRE for financial management improves accuracy and helps set realistic budgets.
Budget Allocation and Tracking
Allocating funds efficiently ensures that each phase of the project receives the necessary resources. Tracking expenses through Construction & Financial Dashboards allows for real-time monitoring and early detection of budget deviations.
Preventing Budget Overruns
Uncontrolled costs can derail a project. Regular financial reviews, automated alerts for overspending, and contingency planning help keep expenses in check and prevent financial strain.
Scheduling & Timeline Management
Timely project completion is crucial in residential construction. Effective scheduling minimizes delays and ensures a smooth workflow.
Creating Detailed Project Schedules
A structured schedule outlines all tasks, deadlines, and dependencies. Breaking down the project into phases, planning, execution, and finishing, helps maintain order and clarity.
Preventing Delays & Meeting Deadlines
Delays can result from labor shortages, weather conditions, or supply chain issues. To avoid problems, it’s good to check for risks ahead of time, add extra time to schedules, and keep everyone on the same page.
Using Gantt Charts and Critical Path Methods
CPM for Construction helps identify critical activities that directly impact project completion, while Gantt charts provide a visual timeline of tasks. Both tools optimize scheduling and improve efficiency.
Residential Construction Project Management Phases
Managing a residential construction project effectively requires a structured approach through various phases. Each phase plays a critical role in ensuring the project's success, from initial planning to completion.
Pre-Construction Phase
The pre-construction phase sets the foundation for a smooth and efficient building process. Proper planning at this stage helps prevent costly changes and delays later.
Site Analysis & Approvals: A thorough site analysis assesses soil conditions, topography, and environmental factors. Feasibility studies evaluate project viability, including costs and regulatory compliance. Obtaining zoning approvals, permits, and other legal clearances is crucial before breaking ground.
Selecting Materials and Procurement Strategies: Choosing the right materials impacts durability, sustainability, and cost efficiency. A well-planned procurement strategy, including bulk purchasing and reliable supplier partnerships, ensures timely delivery and cost savings. Using Sage 300 CRE for procurement management helps streamline material sourcing and financial planning.
Construction Phase
The construction phase transforms plans into reality. Effective coordination and strict quality control ensure a successful build.
Resource Allocation and Workflow Coordination: Efficiently managing labor, equipment, and materials is key to maintaining progress. Using CPM for Construction, project managers can allocate resources strategically, prevent bottlenecks, and optimize workflows for timely completion.
Quality Control and Ensuring Compliance with Safety Regulations: Strict adherence to building codes and safety standards is non-negotiable. Regular inspections, worker training, and real-time quality monitoring ensure a structurally sound and legally compliant project. Proactive safety measures prevent accidents and project disruptions.
Project Closeout & Handover
The final phase of residential construction project management is crucial for ensuring a smooth transition from construction to occupancy. Proper closeout procedures guarantee quality, client satisfaction, and long-term project success.
Final Inspections and Quality Assurance: Before finishing the project, a final inspection checks that everything meets safety rules and quality standards. Any problems need to be fixed quickly. Using Procore helps make inspections and tracking issues easier, ensuring a high-quality final product.
Client Walkthrough and Support: A final check helps homeowners see the finished work, ask questions, and make sure it meets their expectations. This is also a chance to explain important home features and maintenance tips. Good communication here builds trust and strengthens relationships.
Warranty Management and Feedback: Efficient warranty management ensures clients get quick help for any issues after construction. A clear process for tracking requests and keeping in touch with homeowners boosts satisfaction. Collecting feedback helps improve future projects. Using S-Curve Forecasting tracks performance trends and refines management strategies.
Software for Residential Construction Project Management
The integration of technology in residential construction project management has revolutionized the way projects are planned, executed, and monitored. Digital tools streamline operations, reduce costs, and improve communication, making them essential for modern construction firms.
Importance of Digital Tools
Investing in digital tools is crucial for construction firms as it transforms the industry by enhancing efficiency, accuracy, and collaboration across the entire project lifecycle. They also improve project management by streamlining processes, automating tasks, and facilitating real-time stakeholder communication.
Top Construction Management Software for Residential Projects
Several software solutions are available for managing residential construction projects:
Procore: Known for its comprehensive project management features, including document management and collaboration tools.
Sage 300 CRE: Offers robust accounting and financial management capabilities, ideal for large-scale construction projects.
Buildertrend: Specializes in residential construction, providing tools for project scheduling, budgeting, and client communication.
CoConstruct: Focuses on custom home building and remodeling, offering features for estimating, scheduling, and project management.
WIP Reports: Useful for tracking work-in-progress and managing project finances effectively.
Features Comparison and Best Use Cases:
Procore: Best for large projects requiring extensive collaboration and document management.
Sage 300 CRE: Ideal for firms needing robust financial management.
Buildertrend: Suitable for residential builders focusing on client communication and project scheduling.
CoConstruct: Perfect for custom home builders who need detailed estimating and scheduling tools.
WIP Reports: Useful for firms needing to track project finances closely.
How Software Improves Project Efficiency
Construction management software significantly enhances project efficiency in several ways:
Automating Accounting and Job Costing: Software like Sage 300 CRE automates financial tasks, reducing manual errors and improving budget tracking.
Streamlining Document Management and Communication: Tools like Procore centralize documents and facilitate real-time communication among team members, reducing misunderstandings and delays.
Mobile-Friendly Solutions for Real-Time Tracking: Mobile apps from platforms like Buildertrend allow for on-site access to project data, enabling real-time tracking and decision-making.
These digital tools and software solutions are essential for modern residential construction project management, offering benefits such as improved efficiency, enhanced collaboration, and better financial control.
Challenges in Residential Construction Project Management
Residential construction projects face a variety of challenges that can impact their success. Here are some of the key issues project managers encounter:
Managing Subcontractors and Labor Shortages
One of the biggest challenges in residential construction is managing subcontractors and dealing with labor shortages. Subcontractors often have their own schedules and priorities, which can lead to delays if not coordinated properly. Additionally, labor shortages can slow down projects and increase costs due to the need for overtime or hiring temporary workers.
Budget Overruns and Unexpected Costs
Budget overruns are common in residential construction due to factors like material price fluctuations, unexpected site conditions, or changes in project scope. Effective budget management involves regularly monitoring expenses and having contingency plans for unexpected costs.
Changing Construction and Eco Rules
Construction and Eco Rules are always changing, so project managers need to keep up with the latest regulations. This involves following guidelines for saving energy, protecting the environment, and ensuring safety. Ignoring these rules can lead to fines, delays, or even stopping the project.
Best Practices
To ensure your residential construction projects run smoothly and successfully, follow these essential best practices:
Setting Clear Project Goals and Milestones
Clearly defining what you want to achieve is the first step to success. Set specific, measurable, achievable, relevant, and time-bound (SMART) goals. This helps everyone involved understand what needs to be done and by when. For example, instead of saying "build a house," say "build a house with three bedrooms and two bathrooms within the next nine months."
Stakeholder Collaboration
Good communication is key to keeping everyone on the same page. Regular meetings with contractors, suppliers, and homeowners help prevent misunderstandings and ensure that everyone knows what's happening and what's next. This open dialogue also helps resolve issues quickly, preventing small problems from becoming big delays.
Using Data-Driven Insights for Decision-Making
Making decisions based on facts rather than guesses is crucial. Use data and analytics to understand project progress, identify potential issues early, and make informed decisions. For instance, if data shows that a particular material is consistently causing delays, you can plan ahead to avoid those delays in the future.
Proactive Risk Management Strategies
Things don't always go as planned, so being prepared is essential. Identify potential risks early and have a plan to manage them. This might include having backup suppliers, planning for weather conditions, or setting aside extra funds for unexpected expenses. Being proactive can prevent small issues from turning into major problems.
Conclusion
Effective residential construction project management requires careful planning, clear communication, and the right digital tools. From single-family homes to multi-family housing and custom projects, managing timelines, budgets, and quality is essential for success.
By following best practices, using project management software, and staying ahead of industry trends, project managers can ensure smooth execution and client satisfaction despite challenges like labor shortages, budget overruns, and regulatory compliance; modern technology and strategic planning help mitigate risks.
Construction firms can improve efficiency, enhance collaboration, and maintain financial control by adopting advanced tools like Procore, Sage 300 CRE, and Buildertrend. A well-managed project delivers a quality home and builds trust and long-term success in the industry.
FAQs
What is residential construction project management?
It involves overseeing all aspects of building residential properties, from initial planning and design to construction and completion, ensuring projects are completed on time, within budget, and to the desired quality standards.
How can I prevent budget overruns in my construction project?
Accurate cost estimation, continuous budget tracking, and having contingency plans for unexpected expenses are key strategies to prevent budget overruns.
What are the main stages of a residential construction project?
The primary stages include design, pre-construction, procurement, and construction.
How does construction management software improve project efficiency?
It streamlines processes like scheduling, budgeting, and communication, providing real-time data access and collaboration among stakeholders, which enhances overall project efficiency.
How can I ensure my project complies with local building codes and regulations?
Engage professionals familiar with local laws, obtain all necessary permits before starting, and conduct regular inspections to ensure adherence to building codes and regulations.
43