
Search results for "Regularly maintained" in Home Design Ideas

 Robin's Nest Interiors
Homearama 2016: An Introduction
Welcome to Homearama 2016: An Introduction where we will take you into the process for creating a showcase home – a phenomenal 12 month long project filled with plenty of blood, sweat and tears. Mostly sweat with the actual even held in middle of a regular Kentucky July – consistently high 90s and a humidity that can steam any pair of glasses.
Our Team
Nevertheless, we are so proud of all those who helped contribute to creating a beautiful home for our ever-patient homeowners. This gorgeous “Southern Belle” took home 3 of the 6 awards given by the Building Industry Association at the River Crest Development: Best Kitchen Cabinetry (M&H Cabinetry), Best Closet Design (Closets by Design), and Best Lighting (Ferguson).
Also cheers to our builder, Chad Stoyell of Stoyell Built Homes for winning 3rd place in the popular vote for Best Builder! He, of course, is at the top of our list as Stoyell Built Homes pride themselves in custom homes built with impeccable craftsmanship. Our Southern Belle did not detour from his reputation! Beautifully executed detail can be found everywhere from the hot/cold exterior hose hookup to the wooden dormer over the front porch.
In addition, the house is a looker – a home you can’t find in just any neighborhood. Notice the bold symmetry with the stone walls flanking the large front porch. Windows placed high on either side of the front facade provide plenty of light while maintaining privacy.
Our landscaper, Chad Rodgers, complemented the symmetry with matching Japanese Maples that in due time will grow up to be perfectly positioned. Concrete planters anchor the front door, while bold blue rocking chairs brighten up the facade two by two.
Natural Wood Elements
Chad Stoyell, the builder, used real material throughout the house and the front door is no exception. This beauty is made of solid wood.
The natural beauty of wood is continued in this wooden open dormer. The lighting fixture keeps that southern charm going with lantern accents – also seen in the fixtures flanking the garage door.
Hydrangeas line the driveway along the side of the house. Great craftsmanship on the shake siding and stone application.
View of the back porch, including two seating areas-a cozy fireplace and a patio for those lazy, hazy, crazy days of summer!
And on a final note, we just love the accessibility of the patio from the garage! The door to the right of the table and chairs leads directly into the garage! Stay tuned for what door #2 leads to….
Stay Tuned for More
Hope you liked our introduction on this great project – Homearama 2016! Please stay tuned for more insight on the design process of each space. I can’t wait to show you the inside of this Southern Belle. Enjoy!

 Drury Design
Design Objectives:
Respect the home’s vintage feel while bringing the kitchen up to date
Open up the kitchen area to create an open space for gathering and entertaining
Upgrade appliances to top-of-the-line models
Include a large island with seating
Include seating for casual family meals in a space that won’t be a replacement for the adjacent formal dining room
THE REMODEL
Design Challenges:
Remove a load-bearing wall and combine smaller rooms to create one big kitchen
A powder room in the back corner of the existing kitchen was a huge obstacle to updating the layout
Maintain large windows with views of the yard while still providing ample storage
Design Solutions:
Relocating the powder room to another part of the first floor (a large closet under the stairs) opened up the space dramatically
Create space for a larger island by recessing the fridge/freezer and shifting the pantry to a space adjacent to the kitchen
A banquette saves space and offers a perfect solution for casual dining
The walnut banquette table beautifully complements the fridge/freezer armoire
Utilize a gap created by the new fridge location to create a tall shallow cabinet for liquor storage w/ a wine cubby
Closing off one doorway into the dining room and using the “between the studs” space for a tall storage cabinet
Dish organizing drawers offer handy storage for plates, bowls, and serving dishes right by main sink and dishwasher
Cabinetry backing up to the dining room offers ample storage for glassware and functions both as a coffee station and cocktail bar
Open shelves flanking the hood add storage without blocking views and daylight
A beam was required where the wall was removed. Additional beams added architectural interest and helped integrate the beams into the space
Statement lighting adds drama and personality to the space
THE RENEWED SPACE
This project exemplifies the transformative power of good design. Simply put, good design allows you to live life artfully. The newly remodeled kitchen effortlessly combines functionality and aesthetic appeal, providing a delightful space for cooking and spending quality time together. It’s comfy for regular meals but ultimately outfitted for those special gatherings. Infused with classic finishes and a timeless charm, the kitchen emanates an enduring atmosphere that will never go out of style.
 Drury Design
Design Objectives:
Respect the home’s vintage feel while bringing the kitchen up to date
Open up the kitchen area to create an open space for gathering and entertaining
Upgrade appliances to top-of-the-line models
Include a large island with seating
Include seating for casual family meals in a space that won’t be a replacement for the adjacent formal dining room
THE REMODEL
Design Challenges:
Remove a load-bearing wall and combine smaller rooms to create one big kitchen
A powder room in the back corner of the existing kitchen was a huge obstacle to updating the layout
Maintain large windows with views of the yard while still providing ample storage
Design Solutions:
Relocating the powder room to another part of the first floor (a large closet under the stairs) opened up the space dramatically
Create space for a larger island by recessing the fridge/freezer and shifting the pantry to a space adjacent to the kitchen
A banquette saves space and offers a perfect solution for casual dining
The walnut banquette table beautifully complements the fridge/freezer armoire
Utilize a gap created by the new fridge location to create a tall shallow cabinet for liquor storage w/ a wine cubby
Closing off one doorway into the dining room and using the “between the studs” space for a tall storage cabinet
Dish organizing drawers offer handy storage for plates, bowls, and serving dishes right by main sink and dishwasher
Cabinetry backing up to the dining room offers ample storage for glassware and functions both as a coffee station and cocktail bar
Open shelves flanking the hood add storage without blocking views and daylight
A beam was required where the wall was removed. Additional beams added architectural interest and helped integrate the beams into the space
Statement lighting adds drama and personality to the space
THE RENEWED SPACE
This project exemplifies the transformative power of good design. Simply put, good design allows you to live life artfully. The newly remodeled kitchen effortlessly combines functionality and aesthetic appeal, providing a delightful space for cooking and spending quality time together. It’s comfy for regular meals but ultimately outfitted for those special gatherings. Infused with classic finishes and a timeless charm, the kitchen emanates an enduring atmosphere that will never go out of style. This photo hones in on the lap drawers on seating side of island.
Find the right local pro for your project

 Tile Doctor Ltd
Recently I was contacted by a man in the town of Bedford who was worried that he had damaged his Victorian tiled hallway as a result of dragging a piano across the floor. I went round to the property to get a better look at the problem and, on closer inspection, realised that the tiles were actually fine; however, the piano had torn through the old surface seal.
The 150-year old tiles, dating back – as the name suggests – to the reign of Queen Victoria, had been poorly sealed and additionally had not been maintained correctly with the appropriate cleaning products. I was commissioned to remove the old sealer, clean and re-seal in order to restore this fantastic floor to its former glory.
My first task was to mix a solution of Tile Doctor Pro-Clean and water, which was then spread across the floor. Pro-Clean is a high alkaline cleaner which also contains stripping properties and this helped to break down the old, damaged sealer. The solution was left to dwell for approximately 20 minutes, giving it time to seep into the stone to get underneath, and lift out, any ingrained dirt. Pro-Clean was worked into the tiles using a heavy low speed rotary machine fitted with a black pad.
Once cleaned and stripped, we rinsed the floor using plain, clean water to neutralise the high alkaline Pro-Clean and the removed the resulting slurry using a wet-vac machine.
At this point I noticed that the white/magnolia tiles were particularly well worn and still very dirty and in need of further cleaning. Around this time Tile Doctor had also been discussing the successful use of Burnishing Pads (normally used on polished stone) on Victorian Tiles so I hand burnished the most stained tiles with a small 6 inch diamond encrusted burnishing pad with a little water to help lubricate the process. Following this, I rinsed the entire floor once again.
After leaving the floor to dry for four days, I returned to the house to seal the tiles opting to apply a single coat of Tile Doctor Colour Grow impregnating sealer first followed up with four coats of Tile Doctor Seal & Go. This combination of sealers provides a durable internal and surface stain protection whilst lifting the colours and adding a nice subtle sheen finish.
Once dried and cured, the floor was buffed using micro-fibre clothes to further enhance the appearance of the tiles further. My client was very pleased with the results, and couldn’t believe it was possible to get a floor that was so old appear brand new! The floor will dull with wear so I advised my client on the benefits of a regular maintenance plan going forward to ensure this great flooring feature remains in top condition.
Andrew Evans
Bedfordshire Tile Doctor
 Tile Doctor Ltd
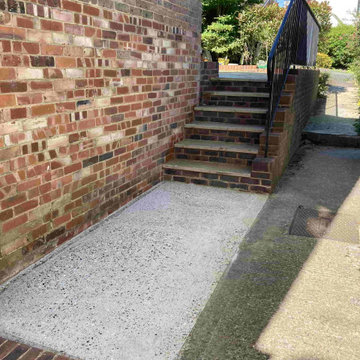
I am sure you will be able relate to this client in Folkstone who had a concrete and brick path and steps to the side of their house that had turned black with dirt. I know many of you reading this post will probably own a Karcher pressure washer and would be happy to do this job themselves, however for those that do not it’s good to know that we don’t just cover expensive patios and driveways and happily deep clean concrete paths as well.
The machine I use for this type of work operates at very high pressure, far higher than that of a Karcher and is so large and heavy its actually installed in a van. This type of machine is known in the trade as a Truck Mount and results in a much deeper clean that cleans and extracts the waste at the same time.
I popped over to see the client to see what needed to be done and gave them a quote for the work. Having looked round the property I was confident of making a difference. I also noted that steps were not only black with dirt but had become green with algae in places which is slippery when wet and dangerous for the elderly.
Before going over with the machine, I wetted the path with Tile Doctor Patio & Brick Driveway Cleaner and left it to soak into the concrete for a good twenty to thirty minutes so it could breakdown the dirt and deal with blackspots, lichen, moss, and general staining.
The concrete path was in several sections so whilst I was waiting for the cleaner to soak into one section, I was able to run the Truck Mount pressure washer over another section. When you use the jet wash at home, it can be a very messy business, bringing up all the dirt and spreading it around the nearby walls and usually the user. With our machine washing and extracting the dirt at the same time there is zero mess, and you can literally see the path become transformed in front of your eyes which is very satisfying.
Once done the concrete path looked like it was laid yesterday. The client was amazed saying it now complimented the work they had recently done on the front and back patios. It does show up the neighbour’s path though so I would not be surprised if I get a call soon to do their path as well!
There was no need to apply any type of sealer to this path. Regular cleaning will maintain it and a once a year deep clean like this would keep it in great shape.
Michael Conlon
South Kent Tile Doctor

 Atlas Roofing - Shingles
A roof is a very important, as well as expensive, feature of your home. Maintaining your roof is one of the best ways to protect you, your family and all you keep under that roof. Atlas Protects™ is more than a slogan as the company, with decades of experience, has the products and advice to help you reduce roof maintenance.
Atlas Roofing StormMaster® Slate and Shake shingles have high performance features that can help resist the many hazards that a roof can face each year. This strength means you, the homeowner, may face fewer maintenance issues.
Master The Storms
Underwriter’s Laboratory, UL 2218 is a national standard rating system for impact resistance that rates roofing materials from Class 1 through 4. A Class 4 rating indicates the highest level of impact resistance. Atlas StormMaster® Shake and StormMaster® Slate shingles have both earned Class 4 ratings. These shingles are strong enough to earn the Class 4 rating because they are manufactured with Styrene Butadiene Styrene (SBS), a rubberized polymer that gives them incredible flexibility and durability. The rubber-like quality gives StormMaster® shingles the highest protection against impact from hail, which can fracture shingles.
StormMaster® shingles are also high wind-rated which helps resist blown off shingles. Loss of shingles due to high velocity wind could lead to wind-driven rain flooding a house. StormMaster® Slate and Shake come with a Limited Wind Warranty that protects a roof up to 130 mph.
Black streaks on a roof not only look dirty, but also make a house appear old and reduce its curb appeal. Black streaks are the result of algae growth. Atlas StormMaster® shingles are built with the power of Scotchgard™ Protector, which helps a roof retain its color for years by resisting those black streaks. Atlas certifies this by having regular third-party laboratory testing to ensure an even spread of the Scotchgard™ protective copper granules. Both lines of StormMaster® are backed by an Atlas Lifetime Limited Warranty against the black streaks caused by algae.
The Final Word In Warranties
StormMaster® shingles are warranted against manufacturing defects with the exclusive Atlas Lifetime Limited Warranty for 20 years. That is the length of the Premium Protection Period for the initial non-prorated labor and material coverage of every new StormMaster® Slate roof installed with the Atlas Signature Select® System.
StormMaster® shingles give a house what it needs most; an incredibly impressive appearance and security that shelters everything and everyone under the roof. Read more about the full line of StormMaster® shingles.

 Five Star Tree Care
Spring brings the first rays of steady sunlight that encourage your trees to start sprouting fruit and flowers. However, sometimes at the start of spring, the cold weather makes a sudden and abrupt turn as winter tries to reassert its dominance. This can cause a late freeze, which is difficult for many trees to combat. Fruit trees are the most vulnerable during a late freeze, but Five Star Tree Services has some suggestions to help you protect your fruit and flowering trees from a late freeze.
Protecting Your Trees
Some fruit trees are better able to protect themselves from the cold, but all trees need to be protected from the frost. Depending on the type of tree you have, several methods of protection are effective.
Peach Trees: To protect peach trees, cover them with a blanket or a sheet during the day. This will allow heat to build up that will protect them at night during the freeze. Make sure to leave the cover in place until the freeze passes.
Citrus Trees: These are the most fragile of all trees. Small trees should be draped with burlap, a sheet, a tree frost blanket, or any other type of fabric at least a day before the freeze occurs. The cover has to surround the whole tree to trap the heat and prevent frost.
Apple Trees: These trees are pretty sturdy compared to other fruit-bearing trees. They can handle the cold, but it is still a good idea to cover them during sudden frost.
It is important to avoid placing ground covers, mulch, and weeds from around the base of a tree during cold weather and frost periods. The moist bare soil emits more heat than soil that is mulched. Watering trees ahead of a frost can also help to protect them as water also emits heat. When you expect a freeze, it is also best to furrow-irrigate at night or use a sprinkler on its low setting while ensuring there is proper drainage for your trees. Any time the outside temperature is forecast to drop below 32 degrees; you should cover your trees.
Which Trees Can Survive in the Cold?
No fruit-bearing trees are made for cold climates, but some are better equipped to handle the cold than others. The Plant Hardiness Zone can help you choose the right trees to plant for the area where you live. For example, lemon trees and other citrus trees need to be planted in zones 9-11 where the risk of cold weather is minimal. Pear trees, on the other hand, need cold weather to thrive and should be planted in zones 4-8.
Freezing Dangers
Some fruit or flowering trees that are caught unguarded during the late frost may lose their blossoms. In many cases, these trees will no longer sprout during the current growing season but will come back next spring as healthy as ever.
Younger trees are more prone to damage than mature trees. Trees that have closed buds are also able to handle the cold better than those that have already started to bloom. Of course, the longer a freeze is present, the more dangerous it is for your trees.
How We Can Help
The skilled arborists here at Five Star Tree Services are always on hand to help protect your trees from frost and with regular maintenance. Some of the other services we provide include tree removal, tree planting, and tree pruning in Richmond Hill and the Greater Toronto Area. If you require our assistance, give us a call at (416) 990-3355 today.

Sponsored
Sunbury, OH

J.Holderby - Renovations
Franklin County's Leading General Contractors - 2X Best of Houzz!

 Danze & Davis Architects, Inc.
Mid-sized mid-century modern galley medium tone wood floor and beige floor open concept kitchen photo in Austin with an undermount sink, flat-panel cabinets, quartzite countertops, green backsplash, subway tile backsplash, stainless steel appliances, an island and white countertops
 Five Star Tree Care
Utilizing the right plants can really spruce up the look of your property. But before you go and buy the first plant you see, it’s important to think about how dedicated you are to maintaining them and how much time you are willing to invest in them. All plants are alive and need love and attention. The amount of love and attention can vary depending on the plant. If you are a busy person who doesn’t have a lot of time to dedicate to the care of your plants, this doesn’t mean you can’t have plants and have them thrive.
There are many low-maintenance plants that you can choose from. These will allow you to add to the aesthetic of your property, without consuming your time to care for them. We here at Five Star Tree Services have come up with a list of the best low-maintenance shrubs for you to consider.
Flowering Shrubs
Looking to add colour and beauty to your landscape? You might be thinking regular flowers can do this, but have you considered flowering shrubs? These are something simple and beautiful that you can add to your yard.
Hibiscus
These plants come in many colours. It is also known as Chinese Hibiscus, China Rose, and Tropical Hibiscus. This evergreen perennial is native to warm temperature, subtropical and tropical places around the world. The flowers it produces can be 3-8 inches in diameter. Some resemble trumpets. Every flower has 5 or more petals and can range in colours from red, orange, yellow, purple, pink, and white. Flowers are constantly produced by this plant but each blossom only lasts a day. Its growth can be 24 inches a year and has the potential to reach 15 feet fully grown.
Forsythia
This shrub is part of the olive family. It is mostly native to eastern Asia but one is native to southeastern Europe. This plant is also known as golden bells. This is a deciduous shrub that can grow to 3-9 feet but ones with rough grey-brown bark have been known to grow to 20 feet. With opposite positioned leaves, that can grow between 2 and 10 cm in length. They produce bright yellow flowers and will bloom in early spring before the leaves come out.
Evergreen Shrubs
It is beneficial to have more green plants around you. There was a study done that showed women can have improved mental health and a longer life expectancy if you live in or near green areas. If you have a busy life and don’t have space in your home, you are able to still benefit from and experience evergreen shrubs. They are perfect for small yards and large ones alike.
Euonymus
This plant is native to places like East Asia, North America, Madagascar, the Himalayas, and Europe. Depending on what country you are in will determine the species you encounter. These have many names and you might have heard them referred to as a spindle tree, burning-bush, euonymus, strawberry-bush, spindle, or wintercreeper. There are 130 species of deciduous small trees, evergreen shrubs, and lianas.
The wintercreeper is a herbaceous perennial vine and it can grow to 70 feet. But it usually is left at 2-4 feet as a mounded shrub. It has egg-shaped leaves that measure to 1-2.5 inches long and 1-1.75 inches wide. They can vary in colour, such as dark green, green-gold, or green-white.
Blue Star Juniper
This is a needled shrub and is a member of the cypress family. It is native to the Himalayas, Afghanistan, and western China. You might also know it as flaky juniper, Himalayan juniper, or singleseed juniper. This is a dwarf shrub and when it gets to a mature size, it is a compact mound measuring from 1-3 feet high and 1.5-3 feet wide. It grows slow and has a tendency to grow out and not up. It has silvery-blue foliage and is densely packed with needles that are awl-shaped.
Privacy Shrubs
Everyone wants privacy while you are in your home or yard. Some people decide to install a fence in order to give themselves privacy. But there is a more creative way to acquire your privacy; with privacy shrubs! If you are looking for something that is different from a fence and low-maintenance, privacy shrubs are exactly what you are looking for. Not only do these plants provide you with the much-needed privacy you desire, they also add beauty to your landscaping. Some suggestions are as follows:
Thuja Green Giant
This is a genus of coniferous trees that belong to the cypress or Cupressaceae family. 3 out of 5 of these plants are native to Eastern Asia and the other 2 are from North America. This evergreen can also be known as Thuja green rocket or green giant arborvitae. They are fast growing and can grow to 3-5 feet in one season. Growing in a uniform shape, when mature, they can be 50-60 feet tall and 12-20 feet wide. They have tiny, glossy leaves that resemble scales. These overlap tightly together and create a fan of foliage.
Boxwood hedges
These evergreen shrubs and small trees are slow growing. You might also have heard them called boxes. They are native to numerous places that include Mexico, southern and eastern Asia, Africa, and southern and western Europe. These plants have been specifically grown for their foliage but they also produce a flower. They can grow from 1-20 feet tall and spread 2-8 feet wide. They have leathery feeling leaves that are lace-shaped or almost round. The colours can range from pale green to dark blue-green. They produce small yellow-green flowers in the spring.
WARNIIG: this plant produces a toxic alkaloid that can hurt humans and animals. If a person or animal were to eat the leaves, it can trigger convulsions, dizziness, intestinal distress, and respiratory failure. If you come in contact with the sap, it could cause skin irritation. It is best to avoid this plant if you have small children or pets.
Wax Myrtle Tree
This large shrub or small tree is native to the Caribbean and North and Central America. There are many names for this plant that include bayberry tree, southern wax myrtle, southern bayberry, tallow shrub, and candleberry. It is very adaptable to various habitats but it naturally will grow near rivers and streams, wetlands, dunes, fields, pine barrens, hillsides, and in mixed-broadleaf and coniferous forests. This shrub can grow 20-25 feet tall with light olive-green leaves that have serrated edges. It also has smooth thin gray-brown bark. It can also produce bluish-white fruit which grows on short stalks in clusters.
How Five Star Tree Service Can Help
When looking for privacy for your home, utilizing low-maintenance plants is a great way to do this. It is also a great way to add something unique to your yard. Some of these shrubs will require some maintenance, which is where our team at Five Star Tree Services can help! We offer shrub trimming services in Toronto and if you require our assistance, make sure to give us a call at (416) 990-3355.
 Tile Doctor Ltd
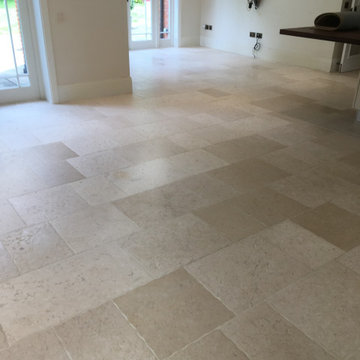
Our client had inherited this Travertine floor when purchasing in a lovely street in Walton-On-Thames, close by was the River Thames which runs all the way into London. The new owners were unhappy with the floor in that it did not look very clean, and they were keen to get this rectified. I arranged a site visit to survey the floor and see what could be done to restore its appearance.
The floor itself was in good physical condition, however, it was apparent from the level of dirt ingrained in the stone that it had not been maintained very well by the previous owner. I carried out a small test clean which came out well and they could see straight away what the floor should look really like! They were happy with my renovation quote and we agreed a mutually convenient time where I could work in relation to the COVID guidelines.
The Travertine floor was scrubbed using a mixture of Tile Doctor Pro Clean and Remove and Go. These are heavy duty cleaning products designed for use on tile and stone can be combined to form a powerful cleaning/stripping solution which is left to dwell on the floor surface. After a short while the solution was worked into the stone using a rotary machine fitted with a black scrubbing pad.
This cleaning recipe works extremely well breaking down dirt, stains, and grease in the stone. Following a machine scrub and a more manual hand scrub of the grout lines, we then pressure rinsed the soil away and then it was extracted using an industrial wet vacuum. In a couple of areas, it was necessary to repeat the process to ensure it was completely clean. Once we were satisfied that the stone was fresh and clean, the floor was left to dry off overnight, so it would be ready for sealing the following day.
After drying overnight, the floor was checked with a damp meter to make sure it was dry. Once reassured I started with the application of the fresh sealer to the floor using Tile Doctor Colour Grow Sealer which is a colour enhancing sealer that works from within by soaking into the pores of the stone. Several coats were applied allowing each one to dry before applying the next. This sealer does not provide a glossy finish, just a nice natural sheen. This brought back the contrast and natural colours in the stone, whilst adding protection to stone for many years to come.
The client was very happy with the work we carried out, the floor had come up much better than they had expected, and it really made a difference to the lovely kitchen space. The floor looked like new. I recommended the regular use of Tile Doctor Stone Soap for future cleaning which will keep the floor in great condition and ensure the longevity of the newly applied sealant.
Jonathan Oldham
South Middlesex Tile Doctor
 Free Lancing
Effective residential construction project management is crucial in today’s fast-moving building industry. It means overseeing every step of building a home, from planning to finishing, to ensure projects are completed time, within budget, and with high quality. Unlike commercial projects, residential projects require special attention to meet homeowners' unique needs and wishes, requiring a customized approach from the beginning to the end.
In 2025, the construction sector will use advanced technologies like AI and integrated project delivery (IPD) to streamline processes and improve stakeholder collaboration. However, project managers face significant challenges, including managing risks, maintaining quality control, and ensuring effective communication among team members.
A WIP Report (Work-in-Progress Report) is a key tool that helps track a project's budget, progress, and resource use. It provides clear insights, making managing costs easier, avoiding delays, and making informed decisions.
By adopting best practices and using modern construction management tools, project managers can overcome these challenges and deliver successful residential construction projects that meet client expectations and contribute to a sustainable future.
This article provides a brief overview of residential construction project management, highlights its importance, and touches on the challenges faced by project managers while incorporating the latest trends and technologies in the field.
Types of Residential Construction Management
Here are the different types of Residential Construction Management:
Single-Family Homes: These are standalone houses built for individual families. Managing these projects involves overseeing construction from planning to completion, ensuring that the home meets the owner's preferences and budget.
Multi-Family Housing: This includes apartments, condominiums, and townhouses. Projects of this type require managing multiple units, often with shared facilities, and ensuring compliance with local building codes.
Custom Home Building: This involves constructing homes tailored to specific client needs. Close collaboration with architects and designers is required to ensure the house reflects the owner's personality and preferences.
Home Renovation and Remodeling: These projects focus on updating or expanding existing homes. They often involve working with subcontractors for specialized tasks like electrical or plumbing work.
Components of Residential Construction Project Management
Managing a residential construction project requires carefully coordinating people, materials, and timelines. A well-structured approach ensures efficiency, cost control, and high-quality results.
Roles and Responsibilities
A project manager plays a vital role in residential construction. They oversee every step from planning to completion and ensure the project stays on schedule, within budget, and meets quality standards.
Project Manager’s Role in Home Construction
The project manager is responsible for organizing tasks, managing resources, and solving problems that arise during construction. They coordinate between different teams, track progress, and ensure safety regulations are followed.
Collaboration with Contractors, Architects, and Stakeholders
Successful residential construction requires teamwork. Project managers work closely with architects to bring designs to new heights, coordinate with contractors to manage labor and materials, and keep stakeholders (such as homeowners and investors) informed about project updates.
Client Communication and Expectations Management
Clear communication with clients is essential. The project manager keeps homeowners updated on timelines, changes, and challenges. Setting realistic expectations and providing regular updates, they help avoid misunderstandings and keep the project running smoothly.
Project Scope & Planning
Practical project planning sets the foundation for a successful residential construction project. It ensures clear goals, minimizes risks, and keeps the project on track.
Defining Project Objectives and Deliverables:
Clearly outlining what needs to be done and what the final result should look like is essential. This involves setting specific, measurable goals that align with the homeowner's vision and budget.
Managing Homeowner Expectations and Scope Creep:
Homeowners often have changing needs or ideas. Effective project managers must manage these expectations to prevent "scope creep," which can delay projects and increase costs. This involves open communication and setting clear boundaries.
Ensuring Compliance with Zoning Laws and Permits:
Before construction begins, it's crucial to ensure that all necessary permits are obtained and that the project complies with local zoning laws. This step avoids costly fines and delays, ensuring the project moves forward smoothly.
Budgeting & Cost Control
Proper budgeting is essential for keeping residential construction projects financially viable. Effective cost management prevents overspending and ensures profitability.
Accurate Cost Estimation for Residential Projects
A precise cost estimate considers labor, materials, permits, and unexpected expenses. Using historical data and Sage 300 CRE for financial management improves accuracy and helps set realistic budgets.
Budget Allocation and Tracking
Allocating funds efficiently ensures that each phase of the project receives the necessary resources. Tracking expenses through Construction & Financial Dashboards allows for real-time monitoring and early detection of budget deviations.
Preventing Budget Overruns
Uncontrolled costs can derail a project. Regular financial reviews, automated alerts for overspending, and contingency planning help keep expenses in check and prevent financial strain.
Scheduling & Timeline Management
Timely project completion is crucial in residential construction. Effective scheduling minimizes delays and ensures a smooth workflow.
Creating Detailed Project Schedules
A structured schedule outlines all tasks, deadlines, and dependencies. Breaking down the project into phases, planning, execution, and finishing, helps maintain order and clarity.
Preventing Delays & Meeting Deadlines
Delays can result from labor shortages, weather conditions, or supply chain issues. To avoid problems, it’s good to check for risks ahead of time, add extra time to schedules, and keep everyone on the same page.
Using Gantt Charts and Critical Path Methods
CPM for Construction helps identify critical activities that directly impact project completion, while Gantt charts provide a visual timeline of tasks. Both tools optimize scheduling and improve efficiency.
Residential Construction Project Management Phases
Managing a residential construction project effectively requires a structured approach through various phases. Each phase plays a critical role in ensuring the project's success, from initial planning to completion.
Pre-Construction Phase
The pre-construction phase sets the foundation for a smooth and efficient building process. Proper planning at this stage helps prevent costly changes and delays later.
Site Analysis & Approvals: A thorough site analysis assesses soil conditions, topography, and environmental factors. Feasibility studies evaluate project viability, including costs and regulatory compliance. Obtaining zoning approvals, permits, and other legal clearances is crucial before breaking ground.
Selecting Materials and Procurement Strategies: Choosing the right materials impacts durability, sustainability, and cost efficiency. A well-planned procurement strategy, including bulk purchasing and reliable supplier partnerships, ensures timely delivery and cost savings. Using Sage 300 CRE for procurement management helps streamline material sourcing and financial planning.
Construction Phase
The construction phase transforms plans into reality. Effective coordination and strict quality control ensure a successful build.
Resource Allocation and Workflow Coordination: Efficiently managing labor, equipment, and materials is key to maintaining progress. Using CPM for Construction, project managers can allocate resources strategically, prevent bottlenecks, and optimize workflows for timely completion.
Quality Control and Ensuring Compliance with Safety Regulations: Strict adherence to building codes and safety standards is non-negotiable. Regular inspections, worker training, and real-time quality monitoring ensure a structurally sound and legally compliant project. Proactive safety measures prevent accidents and project disruptions.
Project Closeout & Handover
The final phase of residential construction project management is crucial for ensuring a smooth transition from construction to occupancy. Proper closeout procedures guarantee quality, client satisfaction, and long-term project success.
Final Inspections and Quality Assurance: Before finishing the project, a final inspection checks that everything meets safety rules and quality standards. Any problems need to be fixed quickly. Using Procore helps make inspections and tracking issues easier, ensuring a high-quality final product.
Client Walkthrough and Support: A final check helps homeowners see the finished work, ask questions, and make sure it meets their expectations. This is also a chance to explain important home features and maintenance tips. Good communication here builds trust and strengthens relationships.
Warranty Management and Feedback: Efficient warranty management ensures clients get quick help for any issues after construction. A clear process for tracking requests and keeping in touch with homeowners boosts satisfaction. Collecting feedback helps improve future projects. Using S-Curve Forecasting tracks performance trends and refines management strategies.
Software for Residential Construction Project Management
The integration of technology in residential construction project management has revolutionized the way projects are planned, executed, and monitored. Digital tools streamline operations, reduce costs, and improve communication, making them essential for modern construction firms.
Importance of Digital Tools
Investing in digital tools is crucial for construction firms as it transforms the industry by enhancing efficiency, accuracy, and collaboration across the entire project lifecycle. They also improve project management by streamlining processes, automating tasks, and facilitating real-time stakeholder communication.
Top Construction Management Software for Residential Projects
Several software solutions are available for managing residential construction projects:
Procore: Known for its comprehensive project management features, including document management and collaboration tools.
Sage 300 CRE: Offers robust accounting and financial management capabilities, ideal for large-scale construction projects.
Buildertrend: Specializes in residential construction, providing tools for project scheduling, budgeting, and client communication.
CoConstruct: Focuses on custom home building and remodeling, offering features for estimating, scheduling, and project management.
WIP Reports: Useful for tracking work-in-progress and managing project finances effectively.
Features Comparison and Best Use Cases:
Procore: Best for large projects requiring extensive collaboration and document management.
Sage 300 CRE: Ideal for firms needing robust financial management.
Buildertrend: Suitable for residential builders focusing on client communication and project scheduling.
CoConstruct: Perfect for custom home builders who need detailed estimating and scheduling tools.
WIP Reports: Useful for firms needing to track project finances closely.
How Software Improves Project Efficiency
Construction management software significantly enhances project efficiency in several ways:
Automating Accounting and Job Costing: Software like Sage 300 CRE automates financial tasks, reducing manual errors and improving budget tracking.
Streamlining Document Management and Communication: Tools like Procore centralize documents and facilitate real-time communication among team members, reducing misunderstandings and delays.
Mobile-Friendly Solutions for Real-Time Tracking: Mobile apps from platforms like Buildertrend allow for on-site access to project data, enabling real-time tracking and decision-making.
These digital tools and software solutions are essential for modern residential construction project management, offering benefits such as improved efficiency, enhanced collaboration, and better financial control.
Challenges in Residential Construction Project Management
Residential construction projects face a variety of challenges that can impact their success. Here are some of the key issues project managers encounter:
Managing Subcontractors and Labor Shortages
One of the biggest challenges in residential construction is managing subcontractors and dealing with labor shortages. Subcontractors often have their own schedules and priorities, which can lead to delays if not coordinated properly. Additionally, labor shortages can slow down projects and increase costs due to the need for overtime or hiring temporary workers.
Budget Overruns and Unexpected Costs
Budget overruns are common in residential construction due to factors like material price fluctuations, unexpected site conditions, or changes in project scope. Effective budget management involves regularly monitoring expenses and having contingency plans for unexpected costs.
Changing Construction and Eco Rules
Construction and Eco Rules are always changing, so project managers need to keep up with the latest regulations. This involves following guidelines for saving energy, protecting the environment, and ensuring safety. Ignoring these rules can lead to fines, delays, or even stopping the project.
Best Practices
To ensure your residential construction projects run smoothly and successfully, follow these essential best practices:
Setting Clear Project Goals and Milestones
Clearly defining what you want to achieve is the first step to success. Set specific, measurable, achievable, relevant, and time-bound (SMART) goals. This helps everyone involved understand what needs to be done and by when. For example, instead of saying "build a house," say "build a house with three bedrooms and two bathrooms within the next nine months."
Stakeholder Collaboration
Good communication is key to keeping everyone on the same page. Regular meetings with contractors, suppliers, and homeowners help prevent misunderstandings and ensure that everyone knows what's happening and what's next. This open dialogue also helps resolve issues quickly, preventing small problems from becoming big delays.
Using Data-Driven Insights for Decision-Making
Making decisions based on facts rather than guesses is crucial. Use data and analytics to understand project progress, identify potential issues early, and make informed decisions. For instance, if data shows that a particular material is consistently causing delays, you can plan ahead to avoid those delays in the future.
Proactive Risk Management Strategies
Things don't always go as planned, so being prepared is essential. Identify potential risks early and have a plan to manage them. This might include having backup suppliers, planning for weather conditions, or setting aside extra funds for unexpected expenses. Being proactive can prevent small issues from turning into major problems.
Conclusion
Effective residential construction project management requires careful planning, clear communication, and the right digital tools. From single-family homes to multi-family housing and custom projects, managing timelines, budgets, and quality is essential for success.
By following best practices, using project management software, and staying ahead of industry trends, project managers can ensure smooth execution and client satisfaction despite challenges like labor shortages, budget overruns, and regulatory compliance; modern technology and strategic planning help mitigate risks.
Construction firms can improve efficiency, enhance collaboration, and maintain financial control by adopting advanced tools like Procore, Sage 300 CRE, and Buildertrend. A well-managed project delivers a quality home and builds trust and long-term success in the industry.
FAQs
What is residential construction project management?
It involves overseeing all aspects of building residential properties, from initial planning and design to construction and completion, ensuring projects are completed on time, within budget, and to the desired quality standards.
How can I prevent budget overruns in my construction project?
Accurate cost estimation, continuous budget tracking, and having contingency plans for unexpected expenses are key strategies to prevent budget overruns.
What are the main stages of a residential construction project?
The primary stages include design, pre-construction, procurement, and construction.
How does construction management software improve project efficiency?
It streamlines processes like scheduling, budgeting, and communication, providing real-time data access and collaboration among stakeholders, which enhances overall project efficiency.
How can I ensure my project complies with local building codes and regulations?
Engage professionals familiar with local laws, obtain all necessary permits before starting, and conduct regular inspections to ensure adherence to building codes and regulations.
 Robin's Nest Interiors
Homearama 2016: An Introduction
Welcome to Homearama 2016: An Introduction where we will take you into the process for creating a showcase home – a phenomenal 12 month long project filled with plenty of blood, sweat and tears. Mostly sweat with the actual even held in middle of a regular Kentucky July – consistently high 90s and a humidity that can steam any pair of glasses.
Our Team
Nevertheless, we are so proud of all those who helped contribute to creating a beautiful home for our ever-patient homeowners. This gorgeous “Southern Belle” took home 3 of the 6 awards given by the Building Industry Association at the River Crest Development: Best Kitchen Cabinetry (M&H Cabinetry), Best Closet Design (Closets by Design), and Best Lighting (Ferguson).
Also cheers to our builder, Chad Stoyell of Stoyell Built Homes for winning 3rd place in the popular vote for Best Builder! He, of course, is at the top of our list as Stoyell Built Homes pride themselves in custom homes built with impeccable craftsmanship. Our Southern Belle did not detour from his reputation! Beautifully executed detail can be found everywhere from the hot/cold exterior hose hookup to the wooden dormer over the front porch.
In addition, the house is a looker – a home you can’t find in just any neighborhood. Notice the bold symmetry with the stone walls flanking the large front porch. Windows placed high on either side of the front facade provide plenty of light while maintaining privacy.
Our landscaper, Chad Rodgers, complemented the symmetry with matching Japanese Maples that in due time will grow up to be perfectly positioned. Concrete planters anchor the front door, while bold blue rocking chairs brighten up the facade two by two.
Natural Wood Elements
Chad Stoyell, the builder, used real material throughout the house and the front door is no exception. This beauty is made of solid wood.
The natural beauty of wood is continued in this wooden open dormer. The lighting fixture keeps that southern charm going with lantern accents – also seen in the fixtures flanking the garage door.
Hydrangeas line the driveway along the side of the house. Great craftsmanship on the shake siding and stone application.
View of the back porch, including two seating areas-a cozy fireplace and a patio for those lazy, hazy, crazy days of summer!
And on a final note, we just love the accessibility of the patio from the garage! The door to the right of the table and chairs leads directly into the garage! Stay tuned for what door #2 leads to….
Stay Tuned for More
Hope you liked our introduction on this great project – Homearama 2016! Please stay tuned for more insight on the design process of each space. I can’t wait to show you the inside of this Southern Belle. Enjoy!
 Tile Doctor Ltd
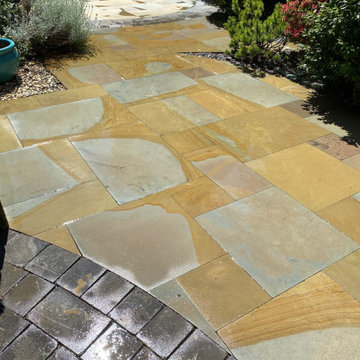
This Indian Sandstone Patio in Bolton-Le-Sands near Lancaster had not been cleaned successfully for several years. Although the owner had power washed it on occasion, that won’t rid you of Black Spot, Mould, Lichen etc and this will build-up over the years. It does clean the stone up to a certain standard but at some point, it will need further treatment.
My client had now reached this point and decided to give Tile Doctor a call to have it renovated. We discussed the Patio which ran around the house and calculated that it measured approximately 60m2. With the measurements and a summary of the issues I was able to work out a quote which they were happy to accept.
To improve the appearance of the stone I started by giving it a power wash to remove the general grime and dirt. I used a top of the range Karcher Pressure Washer for this which can apply up to 20 bars of pressure. The machine also comes with a spinner attachment results in a much more even clean than simply using the spray head.
The patio was left to dry for thirty minutes before applying neat Tile Doctor Patio & Brick Driveway Cleaner. Please note this is a very powerful product meant for professional use so if you’re using it always wear gloves and protective glasses. You leave it on the stone for ten minutes or longer before working it in. The directions on the back of the bottle say recommend leaving it for two to four hours, but its general advice. Personally, I find it is best to test the timing on a small inconspicuous area first, leave it on for say ten minutes then add a bit of water, scrub the surface and if the Black Spot disappears then that is all the time you need. If the stain is stubborn, increase the time. The two to four hour recommendation is really for difficult Black Spots that have become ingrained into the stone and then the product needs longer to digest the stain before it can work.
Once that was done, I used the power washer on low pressure to wash the products off the stone and into the sewerage drain, a wet vacuum comes in handy for this. Don’t dispose of it into the grass or planting areas as the strong chemicals in the product could upset them. Many properties have a soak away to capture rainwater from gutters, so you need to make sure it’s the sewage drain you are using.
As you can see on the pictures, this product really does work and got rid of the Black Spot completely. To maintain the patio a regular jet wash was recommended, the household versions are ideal for keeping it clean and tidy.
Due to the size of the Sandstone patio the whole process took around six hours to complete. Once done though the patio looked transformed and was all ready for a barbeque and some guests. Hopefully, it will stop raining long enough for this to happen.
Russell Taylor
Lancashire Tile Doctor
Sponsored
Sunbury, OH
J.Holderby - Renovations
Franklin County's Leading General Contractors - 2X Best of Houzz!

 Counter Intelligence, Inc.
Small bath design. Counter Intelligence, Inc.
Example of a classic bathroom design in DC Metro
Example of a classic bathroom design in DC Metro
 Free Lancing
Effective residential construction project management is crucial in today’s fast-moving building industry. It means overseeing every step of building a home, from planning to finishing, to ensure projects are completed time, within budget, and with high quality. Unlike commercial projects, residential projects require special attention to meet homeowners' unique needs and wishes, requiring a customized approach from the beginning to the end.
In 2025, the construction sector will use advanced technologies like AI and integrated project delivery (IPD) to streamline processes and improve stakeholder collaboration. However, project managers face significant challenges, including managing risks, maintaining quality control, and ensuring effective communication among team members.
A WIP Report (Work-in-Progress Report) is a key tool that helps track a project's budget, progress, and resource use. It provides clear insights, making managing costs easier, avoiding delays, and making informed decisions.
By adopting best practices and using modern construction management tools, project managers can overcome these challenges and deliver successful residential construction projects that meet client expectations and contribute to a sustainable future.
This article provides a brief overview of residential construction project management, highlights its importance, and touches on the challenges faced by project managers while incorporating the latest trends and technologies in the field.
Types of Residential Construction Management
Here are the different types of Residential Construction Management:
Single-Family Homes: These are standalone houses built for individual families. Managing these projects involves overseeing construction from planning to completion, ensuring that the home meets the owner's preferences and budget.
Multi-Family Housing: This includes apartments, condominiums, and townhouses. Projects of this type require managing multiple units, often with shared facilities, and ensuring compliance with local building codes.
Custom Home Building: This involves constructing homes tailored to specific client needs. Close collaboration with architects and designers is required to ensure the house reflects the owner's personality and preferences.
Home Renovation and Remodeling: These projects focus on updating or expanding existing homes. They often involve working with subcontractors for specialized tasks like electrical or plumbing work.
Components of Residential Construction Project Management
Managing a residential construction project requires carefully coordinating people, materials, and timelines. A well-structured approach ensures efficiency, cost control, and high-quality results.
Roles and Responsibilities
A project manager plays a vital role in residential construction. They oversee every step from planning to completion and ensure the project stays on schedule, within budget, and meets quality standards.
Project Manager’s Role in Home Construction
The project manager is responsible for organizing tasks, managing resources, and solving problems that arise during construction. They coordinate between different teams, track progress, and ensure safety regulations are followed.
Collaboration with Contractors, Architects, and Stakeholders
Successful residential construction requires teamwork. Project managers work closely with architects to bring designs to new heights, coordinate with contractors to manage labor and materials, and keep stakeholders (such as homeowners and investors) informed about project updates.
Client Communication and Expectations Management
Clear communication with clients is essential. The project manager keeps homeowners updated on timelines, changes, and challenges. Setting realistic expectations and providing regular updates, they help avoid misunderstandings and keep the project running smoothly.
Project Scope & Planning
Practical project planning sets the foundation for a successful residential construction project. It ensures clear goals, minimizes risks, and keeps the project on track.
Defining Project Objectives and Deliverables:
Clearly outlining what needs to be done and what the final result should look like is essential. This involves setting specific, measurable goals that align with the homeowner's vision and budget.
Managing Homeowner Expectations and Scope Creep:
Homeowners often have changing needs or ideas. Effective project managers must manage these expectations to prevent "scope creep," which can delay projects and increase costs. This involves open communication and setting clear boundaries.
Ensuring Compliance with Zoning Laws and Permits:
Before construction begins, it's crucial to ensure that all necessary permits are obtained and that the project complies with local zoning laws. This step avoids costly fines and delays, ensuring the project moves forward smoothly.
Budgeting & Cost Control
Proper budgeting is essential for keeping residential construction projects financially viable. Effective cost management prevents overspending and ensures profitability.
Accurate Cost Estimation for Residential Projects
A precise cost estimate considers labor, materials, permits, and unexpected expenses. Using historical data and Sage 300 CRE for financial management improves accuracy and helps set realistic budgets.
Budget Allocation and Tracking
Allocating funds efficiently ensures that each phase of the project receives the necessary resources. Tracking expenses through Construction & Financial Dashboards allows for real-time monitoring and early detection of budget deviations.
Preventing Budget Overruns
Uncontrolled costs can derail a project. Regular financial reviews, automated alerts for overspending, and contingency planning help keep expenses in check and prevent financial strain.
Scheduling & Timeline Management
Timely project completion is crucial in residential construction. Effective scheduling minimizes delays and ensures a smooth workflow.
Creating Detailed Project Schedules
A structured schedule outlines all tasks, deadlines, and dependencies. Breaking down the project into phases, planning, execution, and finishing, helps maintain order and clarity.
Preventing Delays & Meeting Deadlines
Delays can result from labor shortages, weather conditions, or supply chain issues. To avoid problems, it’s good to check for risks ahead of time, add extra time to schedules, and keep everyone on the same page.
Using Gantt Charts and Critical Path Methods
CPM for Construction helps identify critical activities that directly impact project completion, while Gantt charts provide a visual timeline of tasks. Both tools optimize scheduling and improve efficiency.
Residential Construction Project Management Phases
Managing a residential construction project effectively requires a structured approach through various phases. Each phase plays a critical role in ensuring the project's success, from initial planning to completion.
Pre-Construction Phase
The pre-construction phase sets the foundation for a smooth and efficient building process. Proper planning at this stage helps prevent costly changes and delays later.
Site Analysis & Approvals: A thorough site analysis assesses soil conditions, topography, and environmental factors. Feasibility studies evaluate project viability, including costs and regulatory compliance. Obtaining zoning approvals, permits, and other legal clearances is crucial before breaking ground.
Selecting Materials and Procurement Strategies: Choosing the right materials impacts durability, sustainability, and cost efficiency. A well-planned procurement strategy, including bulk purchasing and reliable supplier partnerships, ensures timely delivery and cost savings. Using Sage 300 CRE for procurement management helps streamline material sourcing and financial planning.
Construction Phase
The construction phase transforms plans into reality. Effective coordination and strict quality control ensure a successful build.
Resource Allocation and Workflow Coordination: Efficiently managing labor, equipment, and materials is key to maintaining progress. Using CPM for Construction, project managers can allocate resources strategically, prevent bottlenecks, and optimize workflows for timely completion.
Project Closeout & Handover
The final phase of residential construction project management is crucial for ensuring a smooth transition from construction to occupancy. Proper closeout procedures guarantee quality, client satisfaction, and long-term project success.
Final Inspections and Quality Assurance: Before finishing the project, a final inspection checks that everything meets safety rules and quality standards. Any problems need to be fixed quickly. Using Procore helps make inspections and tracking issues easier, ensuring a high-quality final product.
Client Walkthrough and Support: A final check helps homeowners see the finished work, ask questions, and make sure it meets their expectations. This is also a chance to explain important home features and maintenance tips. Good communication here builds trust and strengthens relationships.
Warranty Management and Feedback: Efficient warranty management ensures clients get quick help for any issues after construction. A clear process for tracking requests and keeping in touch with homeowners boosts satisfaction. Collecting feedback helps improve future projects. Using S-Curve Forecasting tracks performance trends and refines management strategies.
Software for Residential Construction Project Management
The integration of technology in residential construction project management has revolutionized the way projects are planned, executed, and monitored. Digital tools streamline operations, reduce costs, and improve communication, making them essential for modern construction firms.
Importance of Digital Tools
Investing in digital tools is crucial for construction firms as it transforms the industry by enhancing efficiency, accuracy, and collaboration across the entire project lifecycle. They also improve project management by streamlining processes, automating tasks, and facilitating real-time stakeholder communication.
Top Construction Management Software for Residential Projects
Several software solutions are available for managing residential construction projects:
Procore: Known for its comprehensive project management features, including document management and collaboration tools.
Sage 300 CRE: Offers robust accounting and financial management capabilities, ideal for large-scale construction projects.
Buildertrend: Specializes in residential construction, providing tools for project scheduling, budgeting, and client communication.
CoConstruct: Focuses on custom home building and remodeling, offering features for estimating, scheduling, and project management.
WIP Reports: Useful for tracking work-in-progress and managing project finances effectively.
Features Comparison and Best Use Cases:
Procore: Best for large projects requiring extensive collaboration and document management.
Sage 300 CRE: Ideal for firms needing robust financial management.
Buildertrend: Suitable for residential builders focusing on client communication and project scheduling.
CoConstruct: Perfect for custom home builders who need detailed estimating and scheduling tools.
WIP Reports: Useful for firms needing to track project finances closely.
How Software Improves Project Efficiency
Construction management software significantly enhances project efficiency in several ways:
Automating Accounting and Job Costing: Software like Sage 300 CRE automates financial tasks, reducing manual errors and improving budget tracking.
Streamlining Document Management and Communication: Tools like Procore centralize documents and facilitate real-time communication among team members, reducing misunderstandings and delays.
Mobile-Friendly Solutions for Real-Time Tracking: Mobile apps from platforms like Buildertrend allow for on-site access to project data, enabling real-time tracking and decision-making.
These digital tools and software solutions are essential for modern residential construction project management, offering benefits such as improved efficiency, enhanced collaboration, and better financial control.
Challenges in Residential Construction Project Management
Residential construction projects face a variety of challenges that can impact their success. Here are some of the key issues project managers encounter:
Managing Subcontractors and Labor Shortages
One of the biggest challenges in residential construction is managing subcontractors and dealing with labor shortages. Subcontractors often have their own schedules and priorities, which can lead to delays if not coordinated properly. Additionally, labor shortages can slow down projects and increase costs due to the need for overtime or hiring temporary workers.
Budget Overruns and Unexpected Costs
Budget overruns are common in residential construction due to factors like material price fluctuations, unexpected site conditions, or changes in project scope. Effective budget management involves regularly monitoring expenses and having contingency plans for unexpected costs.
Changing Construction and Eco Rules
Construction and Eco Rules are always changing, so project managers need to keep up with the latest regulations. This involves following guidelines for saving energy, protecting the environment, and ensuring safety. Ignoring these rules can lead to fines, delays, or even stopping the project.
Best Practices
To ensure your residential construction projects run smoothly and successfully, follow these essential best practices:
Setting Clear Project Goals and Milestones
Clearly defining what you want to achieve is the first step to success. Set specific, measurable, achievable, relevant, and time-bound (SMART) goals. This helps everyone involved understand what needs to be done and by when. For example, instead of saying "build a house," say "build a house with three bedrooms and two bathrooms within the next nine months."
Stakeholder Collaboration
Good communication is key to keeping everyone on the same page. Regular meetings with contractors, suppliers, and homeowners help prevent misunderstandings and ensure that everyone knows what's happening and what's next. This open dialogue also helps resolve issues quickly, preventing small problems from becoming big delays.
Using Data-Driven Insights for Decision-Making
Making decisions based on facts rather than guesses is crucial. Use data and analytics to understand project progress, identify potential issues early, and make informed decisions. For instance, if data shows that a particular material is consistently causing delays, you can plan ahead to avoid those delays in the future.
Proactive Risk Management Strategies
Things don't always go as planned, so being prepared is essential. Identify potential risks early and have a plan to manage them. This might include having backup suppliers, planning for weather conditions, or setting aside extra funds for unexpected expenses. Being proactive can prevent small issues from turning into major problems.
Conclusion
Effective residential construction project management requires careful planning, clear communication, and the right digital tools. From single-family homes to multi-family housing and custom projects, managing timelines, budgets, and quality is essential for success.
By following best practices, using project management software, and staying ahead of industry trends, project managers can ensure smooth execution and client satisfaction despite challenges like labor shortages, budget overruns, and regulatory compliance; modern technology and strategic planning help mitigate risks.
Construction firms can improve efficiency, enhance collaboration, and maintain financial control by adopting advanced tools like Procore, Sage 300 CRE, and Buildertrend. A well-managed project delivers a quality home and builds trust and long-term success in the industry.
FAQs
What is residential construction project management?
It involves overseeing all aspects of building residential properties, from initial planning and design to construction and completion, ensuring projects are completed on time, within budget, and to the desired quality standards.
How can I prevent budget overruns in my construction project?
Accurate cost estimation, continuous budget tracking, and having contingency plans for unexpected expenses are key strategies to prevent budget overruns.
What are the main stages of a residential construction project?
The primary stages include design, pre-construction, procurement, and construction.
How does construction management software improve project efficiency?
It streamlines processes like scheduling, budgeting, and communication, providing real-time data access and collaboration among stakeholders, which enhances overall project efficiency.
How can I ensure my project complies with local building codes and regulations?
Engage professionals familiar with local laws, obtain all necessary permits before starting, and conduct regular inspections to ensure adherence to building codes and regulations.
 Tile Doctor Ltd
I was recently contacted by a client who had just moved into a large Victorian property in the West Cheshire village of Tarvin about renovating their Victorian tiled hallway. Apparently, the floor was in good condition, and it would just be a case of removing what was left of the old sealer, deep cleaning the tiles and then applying a fresh seal. Unless the floor has been regularly maintained with the same sealer it’s important to remove all traces of old sealers before applying fresh.
Victorian Hallway Before Cleaning Tarvin Cheshire
A lot of the work we do at Tile Doctor can be a lot more involved, often requiring the sourcing of matching replacement tiles and rebuilding large sections of tiled flooring so straight forward clean and seal job is always welcome.
To remove what was left of the sealer and the ingrained dirt from the pores of the Victorian tile I dressed the floor with a strong dilution of Tile Doctor Pro-Clean. On this occasion I used a 1:3 dilution with water and applied it to the floor with a mop. I left it to soak into the tile for fifteen minutes before scrubbing so it could get to work breaking down the old sealer.
During this time, I set up a weighted floor buffer and fitted a black buffing pad, these pads are designed for scrubbing hard floors and lifting out the dirt. I applied a little water as required during this process to ensure the pad was lubricated. Shortly the cleaning solution darkened as the old sealer and dirt was released from the tile.
The soil was rinsed away with water and then removed using a wet vacuum. Once clear the floor was inspected and the process repeated until I was satisfied it was as clean as it could be and free of sealer.
I left the floor to dry off overnight and returned the next day to apply a new sealer. Before doing so however I like to use a damp meter to take moisture readings from the floor. This is needed to ensure it is dry enough to seal which is important as any moisture in the tile can affect the sealer and lead to an inconsistent finish.
To seal I started with the application of a single coat of Tile Doctor Colour Grow which is a colour intensifying breathable impregnator that soaks into the tile improving appearance and adding protection from within. Any excess sealant was removed by wiping the floor with a microfibre cloth and then it was left to dry for an hour.
This was followed with four coats of Tile Doctor Seal and Go Extra which is an acrylic breathable sealer which adds a pleasing subtle shine to the tile. This is an important feature when choosing a sealer for old floors where moisture needs to be allowed to rise through the tile, otherwise it can become trapped under the floor and reach out to the walls causing rising damp.
The customer was very happy with the revamped hallway which made the house a lot brighter and welcoming. Before closing I should mention that for aftercare cleaning I recommend Tile Doctor Neutral cleaner which is designed for the daily cleaning for sealed tiles, this is important as most domestic supermarket cleaners are simply too strong and can prematurely erode the sealer.
Alastair Robb
West Cheshire Tile Doctor
 Tile Doctor Ltd
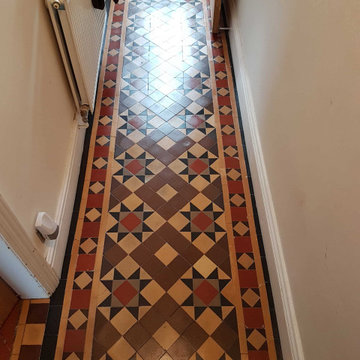
This client had just moved into a property in York and having pulled back the old carpet revealed a lovely old period Victorian tiled floor she didn’t know existed when she bought the house!
I went over at the beginning of this year to survey the floor and could see that fortunately, no glue or carpet grips had been used to secure the carpet; additionally the floor was in good physical condition considering its age with no cracks or loose tiles. The tiles were however very dusty and dirty with ingrained dirt and so had probably been covered with carpet for a very long time. The hallway was quite dark I’m afraid with little natural light so apologies for the photographs.
With old houses like this you never know what you are going to find so whilst I was there surveying the floor, I took some moisture readings with a damp meter on the floors and walls. The readings came back low so no sign of damp which was a relief to the owner.
We agreed a price for the work, and I arranged to come back the following week.
I must admit I do like York, its steeped in history and famous for its Cathedral and Viking museum. The houses in the city have loads of character and period features like this floor are quite common.
I deep cleaned the floor with a strong 1:3 dilution of Tile Doctor Pro-Clean worked in with a black scrubbing pad fitted to a rotary machine. Initially the solution was left to soak into the tile before being agitated by the machine. The soil was then rinsed off with minimal water and then extracted with a wet vacuum.
I followed this up with an Acid Wash using Tile Doctor Acid Gel to further clean up the tiles and help inhibit any potential efflorescent salt issues which are common in floors of this age due to the absence of the damp proof membrane. The floor was given a further rinse and extraction and allowed to dry out fully overnight. I needed the floor to be dry for the next day so it could be sealed.
I came back the next day and started by taking more damp readings which showed similar readings to the day before. Given the low readings I was able to move straight onto sealing which was done using four coats of Tile Doctor Seal and Go. This product works really well on old Victorian Tiles like these and being water based it doesn’t leave a smell as it dries.
Once the final coat of sealer had dried there was a significant improvement in the appearance of the floor which was much appreciated by client who was very happy with the end result.
For aftercare I recommended the use of Tile Doctor Neutral Tile Cleaner to maintain the floor, it has a nice fresh smell and can be used regularly due to its pH neutral nature which won’t prematurely erode the sealer like stronger bleach based cleaners.
Nigel Stoker
North West Yorkshire Tile Doctor


 Tile Doctor Ltd
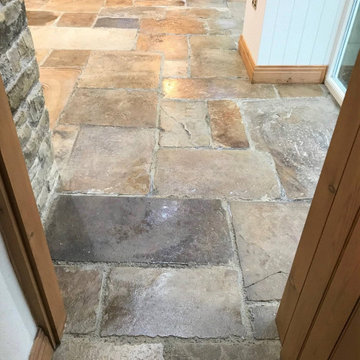
We had been to maintain this Sandstone floor about two years previously at a property in the pretty area of Windermere in the English Lake District. The client had run out of our Tile Doctor Neutral Tile Cleaner that we left after completing the job and had started using a standard cleaner instead (a well-known ecological cleaner). Unfortunately, this product has a 5% non-ionic surfactant in its chemical structure, which will strip a coat of stone sealer off the surface within 6 months, once that topcoat has been removed the sealed surface is only 50% as strong as it should be.
Readers of this article should be aware that even washing up liquid which is a degreaser will strip sealers although it will take many months of regular use before you will start to notice an issue. Stronger bleach-based cleaning products such as Flash and Domestos will cause instant damage to stone sealer which will often go an off-white colour as a result. So, the importance of using the right cleaner is imperative. Having used our services on this floor previously he client knew what to expect and was happy to go ahead with our quote.
My first task would be to clean the floor and completely remove what was left of the old sealer to ensure the floor would have a consistent appearance. On this occasion I used a strong 1:3 dilution of Tile Doctor Pro-Clean worked into the floor with a Black buffing pad fitted to a rotary buffing machine. The Sandstone floor was then rinsed with water, scrubbed again and then the waste extracted using a wet vacuum.
This was followed with acid rinse using a 1:5 dilution of Tile Doctor Grout Clean-Up, this is a Phosphoric Acid (not a Brick Acid). After being scrubbed into the tile it was rinsed off the floor as before using water and the wet vacuum. This process further cleans the stone and neutralises the floor after the use of the strong alkaline Pro-Clean used earlier.
Before leaving for the day I gave the floor one final rinse with water and then dried the floor as much as possible with the wet vacuum. The floor was now clean and free of sealer and left to fully dry off overnight.
I came back the following morning and started by testing the floor with the moisture meter. I always do this as I know from experience how important it is to ensure the floor is dry before applying a sealer.
Happy the Sandstone was dry I then proceed to apply the first of what would be four coats of sealer. For this I used Tile Doctor Seal and Go which leaves a nice low sheen finish. This product is specially formulated blend of acrylic polymers that provides will protect the floor from ingrained dirt and staining; it will make the floor easy to clean and has the added advantage of being water based so it doesn’t leave a solvent smell as it dries.
The client was left another complimentary bottle of Tile Doctor Neutral cleaner and hopefully the seal will last a long longer the 2nd time around. The client was pleased the floor had been restored and vowed to use nothing but Tile Doctor products on it in the future.
Heidi Taylor
South Cumbria Tile Doctor
 Five Star Tree Care
There are thousands of tree species all over the world and all these trees share the same anatomical features. All trees have trunks, branches, intricate rooting systems and leaves that make up their core systems. If you are curious about the anatomy and importance of each part, reading this guide by Five Star Tree Services is a great way to educate yourself.
Tree Branches & Twigs
The branches grow from the trunk of the tree and they help support the flowers, fruits and leaves the tree produces. The twigs and branches are also used as transport between the trunk and leaves. The top part of the tree along with the leaves is called the tree crown. This area filters dust and other debris from the atmosphere. In addition to cleaning the air, the crown also offers shade for animals and humans alike.
Tree Leaves
The leaves of a tree manage the photosynthesis process which ensures the tree has food and maintains its health. The leaves are also tasked with drawing in carbon monoxide and releasing oxygen for the rest of us to use. Many leaves have different edges which work to collect water, repel pests, and reduce wind resistance.
The Tree Trunk
The trunk of every tree has five layers. These layers consist of the inner bark, the outer bark, heartwood, sapwood, and cambium cell. The outer bark protects from harsh temperatures and pests, in addition to helping the tree retain moisture.
The inner bark, specifically the phloem is the digestive system that passes the food through to other parts of the tree. This part of the tree has a very short life, and it turns into cork before merging with the outer layer of bark when it dies. The cambium cell layer produces new tree bark and wood as the tree grows and this is generated from the hormones that come from the leaves and pass to the inner layer.
Sapwood is tasked with moving water to the leaves of the tree and as the wood ages, it transforms into heartwood, which is in the tree center. The heartwood is the main support of the tree structure and though it no longer grows, it won’t decay or become frail as long as it is protected by the outer layers.
The Tree Root System
One of the most important parts of the tree is its root system. These are found in the first three feet of soil around the tree and can extend as much as four times further away than the total circumference of the tree crown. The roots collect minerals and water from the ground, store food for the tree, and help secure it to its spot in the ground.
How Five Star Tree Services Can Help
Here at Five Star Tree Services, we care about the life and health of your trees. Our arborist offers 24-hour emergency services in addition to our regular tree and plant care services. If you are in need of trimming, tree assessment, deep root feeding, or tree removal in Toronto or the GTA, give us a call at (416) 990-3355 to set up an appointment.
20