
Search results for "Removable" in Home Design Ideas
 R&J Painting LLC
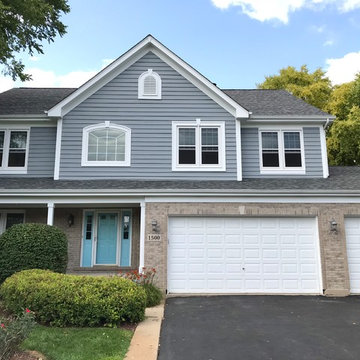
Pressure Wash the entire Exterior to remove all Mold and Mildew
Scraped all loose and peeling Stain
Spot Primed all bare wood
Caulked around all Windows, Doors, Siding and Trim where cracked
Filled all Woodpecker holes and knot holes to properly seal
Stained all Siding and Trim in two coats
Garage Access Door-
Carpentry-
Removed and Replace Garage Access Door Brick Mold
Removed and Replaced 4 Siding Boards in Front where warped and cracked
Removed and Replaced three second-story Soffits
Removed and Replaced 3-4’ of Soffit Ceiling Plywood
 Alair Homes Plano
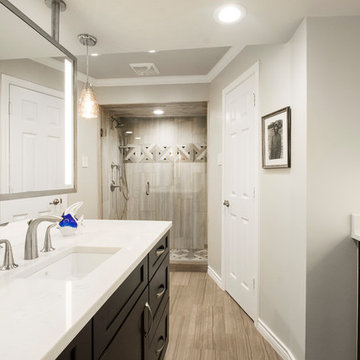
The client's master suite was dark with outdated wallpaper. They wanted the vanity with the floating mirrors to remain the focal point of the bathroom, so for the most part, the layout stayed the same. We went in, removed all finishes and started over; keeping with the style of the house. Grand Mirrors with integrated lighting were installed over the center vanities. The only change in the layout was that the bath tub was removed and replaced shower. The shower was lined with solid white marble tiles and accented with a cool Valentino parquet marble. The old shower became a linen storage closet and cabinets for additional storage. The lower cabinets are a deep espresso finish with contrasting linen finished cabinets up top. The door to the water closet was replaced with a pocket door, creating more space.
The guest bathroom felt claustrophobic with the wall between the vanity and toilet/shower area. We removed the wall and used a pony wall at the end of the vanity instead to hide the toilet. Being a guest bath there was no need double sinks, so one was removed, increasing the cabinet space. The crown molding stayed but the popcorn ceiling texture was removed in both bathrooms. The clients love their new sleek, brighter bathrooms.
Design/Remodel by Hatfield Builders & Remodelers | Photography by Versatile Imaging
 CVM Contractors
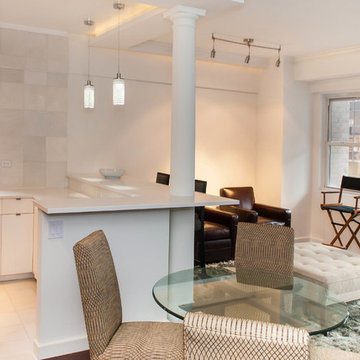
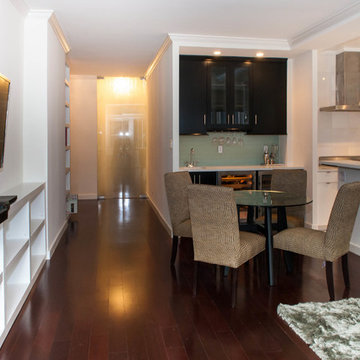
We removed existing closet and created a wet bar on the left, we also removed two kitchen walls adding two pendant lights and a white cesar stone counter top creation of an open kitchen by removing two walls, addition of bottom cabinets with adjustable shelves to maximize available space and added a cesar stone counter top.
Find the right local pro for your project
 New Horizon Construction
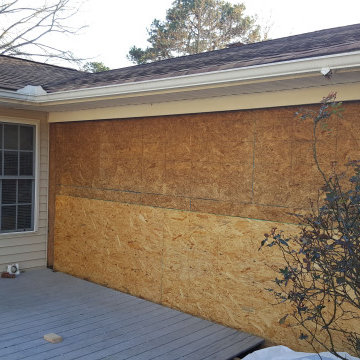
Damaged caused by a car that hit the side and corner of the garage. Had to remove and salvage brick (to be reused), support the roof before removing framing of the side wall and front corner of garage. Framed the wall and corner back. Removed existing beam over garage door opening and installed new LVL beams. New insulation in all exterior walls and sheetrock installed. New 20 foot garage door with belt-driven door opener with Wi-Fi capabilities. Removed existing deck and frame, built new deck with all new composite decking. Removed vinyl siding above door, installed new vinyl siding.
 ED Enterprises, Inc.
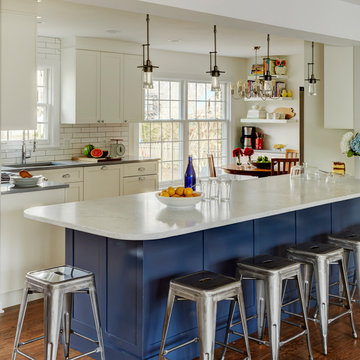
Designing and engineering this kitchen was a team effort between the owners and E D Enterprises, Inc. A twenty-four foot bearing wall was removed and replaced with a twenty-four foot steel beam to create a more open space. The existing soffits and electrical were removed, as well. The owners were then able to plan the kitchen of their dreams.
First, we shored up the second floor and roof, and rerouted the electrical and gas line.
Walls were then framed for the new kitchen footprint. The bearing wall was then removed. The new steel was delivered to the home. The steel was raised into position and the steel column was installed and bolted to the foundation.
We then framed and dry walled around the steel beam.
General Contractor / Remodel: E D Enterprises, Inc.
Michael Alan Kaskel Photography
 faizafatima
1. Removed Existing Overlay from Lead Walk (Approx 309sqft)
2. Removed Sealer and Color from Driveway. Expand Existing Driveway by 5 feet Remove section of driveway approach Expanded Approach by 5 feet (Approx 1,044 sqft)
3. Apply Stamped Concrete Overlay on Lead walkway, New and Existing Concrete Driveway (Approx 1,269 sqft)
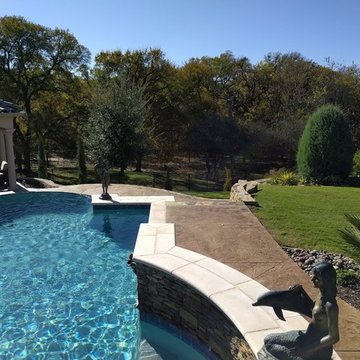
4. Removed Sealer and Color from Pool Deck (Approx 2,878 sqft)
5. Applied Stamped Concrete Overlay on Pool Deck (Approx 2,878 sqft)
6. Removed and Replaced Deck-o-Seal around Pool Deck (Approx 208 sqft)
 faizafatima
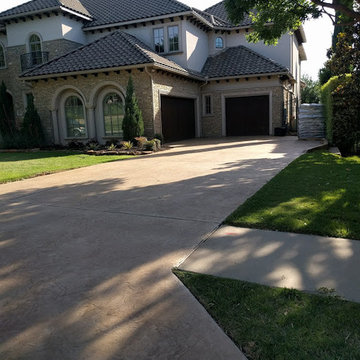
1. Removed Existing Overlay from Lead Walk (Approx 309sqft)
2. Removed Sealer and Color from Driveway. Expand Existing Driveway by 5 feet Remove section of driveway approach Expanded Approach by 5 feet (Approx 1,044 sqft)
3. Apply Stamped Concrete Overlay on Lead walkway, New and Existing Concrete Driveway (Approx 1,269 sqft)
4. Removed Sealer and Color from Pool Deck (Approx 2,878 sqft)
5. Applied Stamped Concrete Overlay on Pool Deck (Approx 2,878 sqft)
6. Removed and Replaced Deck-o-Seal around Pool Deck (Approx 208 sqft)......Salvatici's


 faizafatima
1. Removed Existing Overlay from Lead Walk (Approx 309sqft)
2. Removed Sealer and Color from Driveway. Expand Existing Driveway by 5 feet Remove section of driveway approach Expanded Approach by 5 feet (Approx 1,044 sqft)
3. Apply Stamped Concrete Overlay on Lead walkway, New and Existing Concrete Driveway (Approx 1,269 sqft)
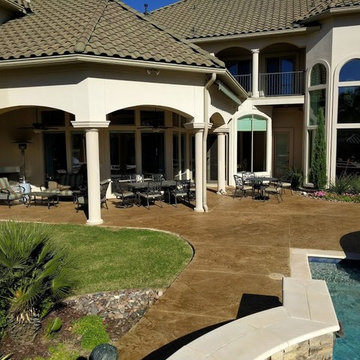
4. Removed Sealer and Color from Pool Deck (Approx 2,878 sqft)
5. Applied Stamped Concrete Overlay on Pool Deck (Approx 2,878 sqft)
6. Removed and Replaced Deck-o-Seal around Pool Deck (Approx 208 sqft)......Salvatici's
 Tile Doctor Ltd
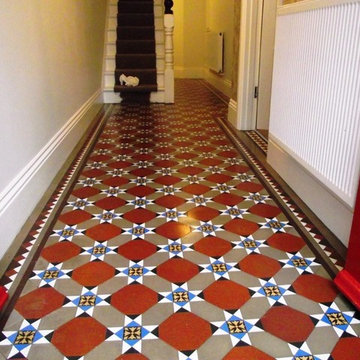
These Victorian hallway tiles were cleaned at a residence in the historic town of Bideford. As you can see from the photograph below the tiles were dull and had lost their vitality due to ingrained dirt, clearly it had been some time since they were given a good deep clean.
Cleaning a Victorian Floor
The first job was to protect the skirting with tape and then vacuum to remove any loose debris and grit. The next step was to cover the entire floor with a strong dilution of Tile Doctor Remove and Go which is a powerful cleaning and coating remover that is safe to use on tile and stone. It was left to dwell on the floor for twenty minutes so it could soak into the tile and make the job of removing any remaining sealer and ingrained dirt easier.
The solution was scrubbed into the tile using a black scrubbing pad fitted to a rotary machine and then the soiled cleaning solution rinsed off using a wet vacuum. This process was repeated a number of times until I was satisfied with the condition of the floor and followed with a final rinse with clean water to remove any trace of cleaning product. The water was extracted with the wet vacuum to get the floor as dry as possible before leaving for the day.
Sealing a Victorian Floor Sealing
The tiles were left to dry for 24 hours and I came back to seal the tiles using eight to nine coats of Tile Doctor Seal and Go which is an ideal sealer for Victorian Tiles as it leaves a nice sheen and provides excellent stain protection.
I think you will agree the hallway floor came up really well and now been given a new lease of life.
 Tile Doctor Ltd
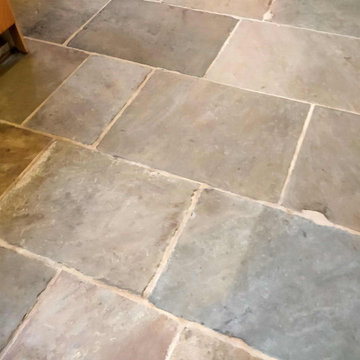
The owner of this period cottage in the old market town of Tadcaster near Leeds, had what was once a beautiful Yorkshire stone floor in the kitchen. It has been a long time since it had been given a proper clean so over the years and with the Kitchen being a high traffic area the whole floor including the grout had darkened and he now wanted it refurbished in time for Christmas.
I visited the property to assess what needed to be done and could see straight away that any protective sealer that was once on the floor had long since worn off. In fact, it was so consistently dirty with years of built-up grease and dirt I had to wonder if one had ever been applied.
I explained what the floor needed was a really deep intensive clean and then a sealer applied to make it easy to keep clean. The problem with most tile and stone is its porosity and if left unprotected dirt easily becomes lodged into its pores making cleaning a struggle.
To prove the difference that can be achieved and to allow me to work out a process on which I could base an accurate quote I ran a test clean on part of the kitchen floor. The test clean went very well, the difference was remarkable, and the cleaned section really stood out. Pleased with the potential of a clean floor they accepted my quote, and we pencilled a date in the diary.
I returned on the appointed date and began by removing the kickboards from under the kitchen units to protect them from splashing. Next, I set about spaying the floor with a strong dilution of Tile Doctor Pro-Clean, this is a purpose made tile and grout cleaner that eats into the grease and dirt so it can be removed. This product works best if you leave it for ten minutes before scrubbing in using a heavy-duty machine fitted with a heavy-duty brush. The soil released from the floor was then extracted using a wet vacuum.
The Pro-Clean did a good job on the grout however it was clear something stronger was required to really get the stone clean, so I stepped up a gear and applied Tile Doctor Remove and Go using the same process as before. This is a really good product for removing deeply ingrained grease and dirt.
The final step of the cleaning process was to give the stone and acid wash using Tile Doctor Grout Clean-Up to remove old grout haze and other mineral deposits; additionally, being an acidic product, it counters the alkaline cleaning products used earlier neutralising the pH level of the floor and leaving it ready for sealing.
Before sealing I like to discuss the different products available and the finishes they can provide. In this case my clients’ main concerns were that they wanted the stone to look natural and easy to maintain going forward.
With this in mind, Tile Doctor Seal & Go Extra was chosen, it’s a modern acrylic-based sealer that brings out the natural colours in the stone and gives a very slight smooth finish. The protection it provides will prevent dirt becoming ingrained int the pores of the stone and ensure the floor is easier to maintain. Several coats were applied, until we achieved the required finish.
The deep cleaning process and fresh sealer transformed the stone floor bringing out its original beauty and my customer couldn’t believe the difference in the floor and was highly delighted.
For aftercare I gave the client a bottle of Tile Doctor Neutral Cleaner, this product is pH neutral so it will clean the floor but won’t damage the sealer. Often people use household cleaners for cleaning tiled floors, but due to the strong chemicals they contain, they can do more harm than good by slowly stripping away the protective sealer and taking the floor back to square one. Tile Doctor Neutral Tile Cleaner is reasonably priced, and the concentrated formula means a small amount goes a long way so it’s well worth using.
This was a pleasurable job for me as it was good to see the floor transform from dull and lifeless to clean and showing the natural colour and beauty of the York stone, and always lovely to have another satisfied client.
Simon Testa
North East Yorkshire Tile Doctor
 faizafatima
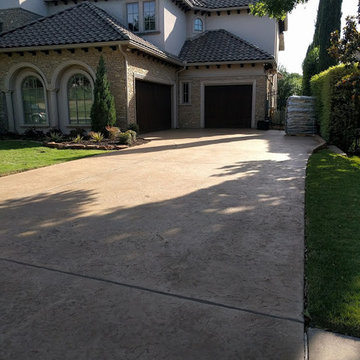
1. Removed Existing Overlay from Lead Walk (Approx 309sqft)
2. Removed Sealer and Color from Driveway. Expand Existing Driveway by 5 feet Remove section of driveway approach Expanded Approach by 5 feet (Approx 1,044 sqft)
3. Apply Stamped Concrete Overlay on Lead walkway, New and Existing Concrete Driveway (Approx 1,269 sqft)
4. Removed Sealer and Color from Pool Deck (Approx 2,878 sqft)
5. Applied Stamped Concrete Overlay on Pool Deck (Approx 2,878 sqft)
6. Removed and Replaced Deck-o-Seal around Pool Deck (Approx 208 sqft)
* * Salvatici's
 Tile Doctor Ltd
I was recently contacted by a client who had just moved into a large Victorian property in the West Cheshire village of Tarvin about renovating their Victorian tiled hallway. Apparently, the floor was in good condition, and it would just be a case of removing what was left of the old sealer, deep cleaning the tiles and then applying a fresh seal. Unless the floor has been regularly maintained with the same sealer it’s important to remove all traces of old sealers before applying fresh.
Victorian Hallway Before Cleaning Tarvin Cheshire
A lot of the work we do at Tile Doctor can be a lot more involved, often requiring the sourcing of matching replacement tiles and rebuilding large sections of tiled flooring so straight forward clean and seal job is always welcome.
To remove what was left of the sealer and the ingrained dirt from the pores of the Victorian tile I dressed the floor with a strong dilution of Tile Doctor Pro-Clean. On this occasion I used a 1:3 dilution with water and applied it to the floor with a mop. I left it to soak into the tile for fifteen minutes before scrubbing so it could get to work breaking down the old sealer.
During this time, I set up a weighted floor buffer and fitted a black buffing pad, these pads are designed for scrubbing hard floors and lifting out the dirt. I applied a little water as required during this process to ensure the pad was lubricated. Shortly the cleaning solution darkened as the old sealer and dirt was released from the tile.
The soil was rinsed away with water and then removed using a wet vacuum. Once clear the floor was inspected and the process repeated until I was satisfied it was as clean as it could be and free of sealer.
I left the floor to dry off overnight and returned the next day to apply a new sealer. Before doing so however I like to use a damp meter to take moisture readings from the floor. This is needed to ensure it is dry enough to seal which is important as any moisture in the tile can affect the sealer and lead to an inconsistent finish.
To seal I started with the application of a single coat of Tile Doctor Colour Grow which is a colour intensifying breathable impregnator that soaks into the tile improving appearance and adding protection from within. Any excess sealant was removed by wiping the floor with a microfibre cloth and then it was left to dry for an hour.
This was followed with four coats of Tile Doctor Seal and Go Extra which is an acrylic breathable sealer which adds a pleasing subtle shine to the tile. This is an important feature when choosing a sealer for old floors where moisture needs to be allowed to rise through the tile, otherwise it can become trapped under the floor and reach out to the walls causing rising damp.
The customer was very happy with the revamped hallway which made the house a lot brighter and welcoming. Before closing I should mention that for aftercare cleaning I recommend Tile Doctor Neutral cleaner which is designed for the daily cleaning for sealed tiles, this is important as most domestic supermarket cleaners are simply too strong and can prematurely erode the sealer.
Alastair Robb
West Cheshire Tile Doctor
 Tile Doctor Ltd
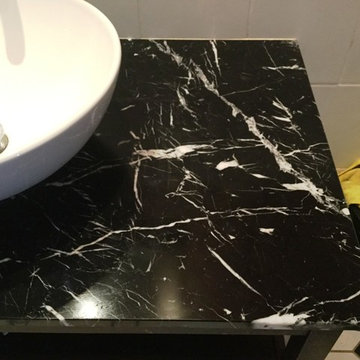
Marble is known for its premium quality, toughness and aesthetic, making it a very popular choice for bathroom countertops, such as this one at a house in Northampton. However just because it’s tough doesn’t mean that Marble can be cleaned with the usual household cleaners. Like all natural stone, Marble is acid sensitive and unsuitable products can have a very damaging effect on its appearance.
In this situation, the property owner had used a limescale remover to remove some unsightly marks from the countertop. Unfortunately, the product was acid-based and instead of making an improvement it just made it worse and caused severe etching.
The first photo above shows the limescale marks from where toiletries have been placed on the side whilst wet. Since Northampton is a hard water area, the limescale deposits over time caused these marks to appear.
The only way to effectively remove the Limestone deposits – while at the same time rectifying the damaged caused by the botched cleaning attempt – was to use a system of hand-held diamond encrusted pads and hand help blocks of various grits to cut back the stone and re-polish it, a process we call burnishing.
Before officially beginning the burnishing process, I ran a few tests to determine the type of pad I would need to use to achieve the best results. I found that, in most areas, I would need to use the Tile Doctor 400 Grit (Coarse) pad to resurface the tile and remove the damaged layer of stone, but in some areas where the etching was worse, I would need to use the 200 Grit (Very Coarse) pad.
After burnishing the affected areas with the Coarse and Very Coarse grit pads, I started to incrementally polish the stone to achieve a high-quality shine, working my up through the Medium, Fine and Very grit pads.
No chemicals were used during this process – only water for lubrication, combined with the six-inch diamond encrusted burnishing pads fitted to a hand-held buffing machine.
The final part of the restoration was to seal the stone to maintain a long-lasting, deep polished appearance. To do this, I used Tile Doctor Shine Powder, which is a crystallising sealer in powder form. The powder is applied directly and combined with water, before being worked into the stone to seal it.
The customer was very happy with the results and the level of shine achieved. I gave the customer a complimentary bottle of Tile Doctor Stone Soap, which is our aftercare cleaner for polished natural stone, along with instructions on periodic maintenance to help maintain the finish we had achieved for as long as possible.
Phil Vissian
Northamptonshire Tile Doctor

 New Horizon Construction
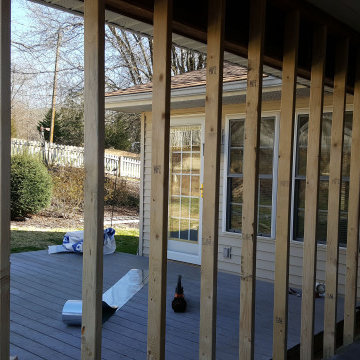
Damaged caused by a car that hit the side and corner of the garage. Had to remove and salvage brick (to be reused), support the roof before removing framing of the side wall and front corner of garage. Framed the wall and corner back. Removed existing beam over garage door opening and installed new LVL beams. New insulation in all exterior walls and sheetrock installed. New 20 foot garage door with belt-driven door opener with Wi-Fi capabilities. Removed existing deck and frame, built new deck with all new composite decking. Removed vinyl siding above door, installed new vinyl siding.

 Renovate Paint and Design
The kitchen remodel was a complete renovation project which included:
> Removed and Replaced the sink hardware, tile backsplash, and countertops.
> Removed old pantry door and installed 2X4s to wall off door area. Removed interior shelving. Constructed door on right side door. Installed new door unit and new shelving inside Pantry. Installed studs to wall off opening from entry hall. Installed drywall, tape, floated, and textured. Installed base boards.
> Removed and replaced the second level of countertop.
> Moved dishwasher over towards right side of sink area. Ran new hot/cold lines and drain line.
> Custom built center island shaker-style cabinets. Added pendant lights over island with new switch. Trenched the concrete to run electrical line to island cabinets.
> Constructed custom shaker-style cabinet walls and cabinet box over refrigeration.
> Reconfigured sink area and cabinets. Custom built new shaker-style lower cabinets at location.
> Installed level four Valley White VicoStone quartz countertops in kitchen. Countertops have a standard edge profile, double deep basin stainless steel sink. Installed a new garbage disposal unit. Installed faucet. and connect up plumbing.
> Installed ceramic Boutique Dark Grey Subway Tile backsplash with grout.
> Removed 22 cabinet doors and 11 drawer fronts. Constructed new cabinet doors and drawer fronts. Doors and drawers are a shaker design.
> Sanded the and painted the exterior of cabinets, both sides of doors, and drawer front, with Emerald Polyurethane paint to primed surfaces.
> Moved refrigerator with new electrical outlets
> Enlarged the opening between kitchen and dining room; installed drywall, taped, floated, and textured area.
> Constructed new kitchen island boxes and shaker fronts. This required channeling through foundation to install the electrical for island. Installed a level four countertop with standard edge profile.
> Install six recessed LED can lights on kitchen ceiling.
 Tile Doctor Ltd
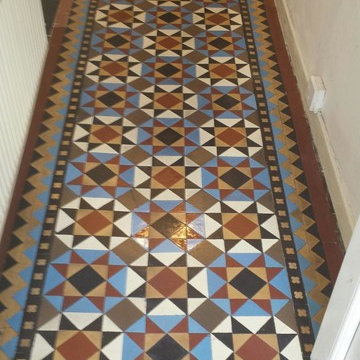
This set of photographs are from a house in the Warrington suburb of Stockton Heath where my client had discovered a Victorian Tiled floor under carpet in the hallway and was keen to have it restored back to its original condition. You can see from the photograph below that it was in quite a state with dirt and paint splashes however I was confident we could manage it.
On arrival I started to protect the skirting boards and entrance carpet to another room. Once that was done i started to strip the paint splashed and any remaining sealer from the floor using Tile Doctor Remove and Go which is an effective coatings and sealer remover that unlike some products is perfect safe to use on Victorian tiles
Working on the floor the product was diluted, scrubbed into the tile and then left to dwell for twenty minutes before being rinsed off with water which was then removed using a wet vacuum. The floor was now looking a lot cleaner, however I could see a number of stubborn areas that were going to need further treatment so I mixed the Remove and Go 50/50 with another Tile Doctor product called NanoTech HBU (Heavy Build-up Remover), which adds abrasive particles to the solution. This solution was scrubbed in and then rinsed off when i was happy with the condition of the floor. This process took much of the day and once done it was left to dry overnight ready for sealing the next day.
On my return the next morning i tested the floor in several places with a damp meter to ensure it was dry. When i was happy the floor was dry i started sealing with thin coats of Tile Doctor Seal and Go leaving thirty minutes between coats to allow it to dry; in total i gave the floor seven coats of sealer which gave the floor a nice shine which the customer was very happy with. As well as enhancing the look of the floor the sealer will provide stain protection going forward.
Alastair Robb
West Cheshire Tile Doctor
 CVM Contractors
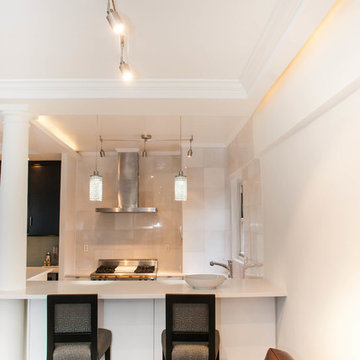
We removed existing closet and created a wet bar on the left, we also removed two kitchen walls adding two pendant lights and a white cesar stone counter top creation of an open kitchen by removing two walls, addition of bottom cabinets with adjustable shelves to maximize available space and added a cesar stone counter top.
 Spin Design Limited
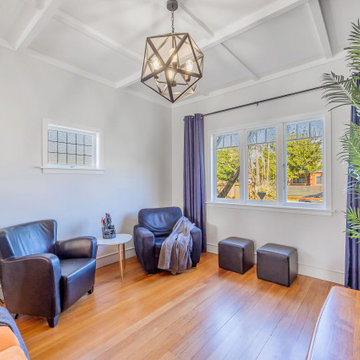
We created an open plan Kitchen / Laundry / Dining / Living Area by removing the wall between Kitchen and Dining as well as removing the chimney separating the Dining and the Living Areas. Where the chimney was removed we spliced in timber flooring to match existing. The entire floor was sanded and sealed.
 CVM Contractors
We removed existing closet and created a wet bar on the left, we also removed two kitchen walls adding two pendant lights and a white cesar stone counter top creation of an open kitchen by removing two walls, addition of bottom cabinets with adjustable shelves to maximize available space and added a cesar stone counter top.
 Tile Doctor Ltd
These pictures of a Victorian Tiled Hallway are from a property in Canterbury that was once a nursing home and was now being renovated to become a children’s home. The building was being gutted and extended at the same time and when the carpet was pulled up in the hallway, they were surprised to find a relatively intact Victorian tiled floor underneath.
Whilst they thought it bizarre that anyone would want to cover up such an attractive floor the carpet had protected it over the years. They realized it would make a marvellous feature at the entrance to the property, but professional restoration would be needed to do it justice. After a bit of research, they came across Tile Doctor and got in touch.
Canterbury comes under my North Kent designation, so I went to visit the property and survey the floor and quote for doing the restoration. There were a few missing and loose tiles that would need replacing and refixing also there was a lot of ingrained dirt so a deep clean and application of a new sealer would be required. I gave them a price for the work which they readily accepted, and we arranged a suitable time to carry out the work. Subject to the building schedule I had calculated the floor would take three days to restore.
On the first day I set about replacing and re-fixing the missing, broken, and loose tiles. This is delicate work as you need to extract the old tile without disturbing its neighbours and then clean up the area ready for its replacement. Being a Tile Doctor I keep a selection of stock tiles for repairs, some are reclaimed, and some are replica. Also, there are several companies still making Victorian style tiles so I can usually source what I need.
After the individual missing and broken tiles had been replaced and the adhesive had set, it was then a matter of renovating the floor as a whole. The tiles were covered in a thick layer of carpet adhesive which needed a combination of specialist tools and products to remove. First, a liberal layer of Tile Doctor Remove and Go was applied and left to dwell for thirty minutes. Next, Tile Doctor Pro-Clean was added and scrubbed in with a black pad.
This process softened the adhesive sufficiently in readiness for the next stage which involves using a set of diamond burnishing pads on a weighted buffing machine. Several applications were needed, each time with a successively finer grade of diamond pad and rinsing off the slurry in between. The tiles were first milled using a very coarse 50-grit pad, followed by 100, 200 and finally burnished with a 400-grit burnishing pads. This removed all the adhesive and dirt in the tiles, which was cleaned up using the wet vacuum.
Old Victorian floors like this do not have a damp proof membrane installed under the floor, and with a lot of water being used in the cleaning process I was concerned White efflorescence salts could appear later as the floor dried. To counter this, I gave the floor an acid wash using Tile Doctor Acid Gel to counter and dissolve the salts, it also gives the tiles another clean and will remove any old grout smears further improving the appearance of the tiles. Once done the floor was left to dry overnight.
On my return I tested the floor was dry by taking several moisture readings around the floor with a damp meter. Applying sealer to a damp floor is never advised and can lead to clouding and an unwanted finish.
Happy that the tiles were dry, a single coat of Tile Doctor Colour Grow sealer was applied. This is an impregnating sealer with a colour enhancing component to ‘lift’ the stronger colours of the floor. Colour Grow however does leave a matt appearance and as the client had asked for a shiny finish it was topped up with five coats of Tile Doctor Seal and Go. This is a compatible topical sealer which added a mid to high sheen.
By the end of the third day the Victorian floor looked brand new, and I received the following feedback from the client. Its rare to receive feedback from commercial customers so they were clearly overwhelmed with the transformation.
Did not think this glued covered bad old floor could look sooooo good Fabulous Fantastic job Looks Amazing Thank you
For aftercare I recommend the use of Tile Doctor Neutral Cleaner which isn’t as harsh as many of the products you find in supermarket. Stronger products can actually strip off the sealer over time leaving it vulnerable to dirt and detracting from its appearance.
Graham Davis
North Kent Tile Doctor
58