Search results for "Required" in Home Design Ideas

Wooden Classicism
Nesbitt House – Seaside, Florida
Architect: Robert A. M. Stern
Builder: O.B. Laurent Construction
E. F. San Juan produced all of the interior and exterior millwork for this elegantly designed residence in the influential New Urban town of Seaside, Florida.
Challenges:
The beachfront residence required adherence to the area’s strict building code requirements, creating a unique profile for the compact layout of each room. Each room was also designed with all-wood walls and ceilings, which meant there was a lot of custom millwork!
Solution:
Unlike many homes where the same molding and paneling profiles are repeated throughout each room, this home featured a unique profile for each space. The effort was laborious—our team at E. F. San Juan created tools for each of these specific jobs. “The project required over four hundred man-hours of knife-grinding just to produce the tools,” says Edward San Juan. “Organization and scheduling were critical in this project because so many parts were required to complete each room.”
The long hours and hard work allowed us to take the compacted plan and create the feel of an open, airy American beach house with the influence of 1930s Swedish classicism. The ceiling and walls in each room are paneled, giving them an elongated look to open up the space. The enticing, simplified wooden classicism style seamlessly complements the sweeping vistas and surrounding natural beauty along the Gulf of Mexico.
---
Photography by Steven Mangum – STM Photography

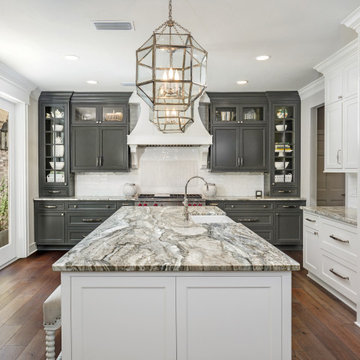
As a part of a larger transformation, the kitchen served as an anchor for rethinking how the home could feel and function. The goal was to create a space that felt truly integrated, flowed naturally within itself, and connected seamlessly to the outdoors. Storage was a top priority, with an emphasis on keeping countertops clean and the space feeling calm and open. Flow was equally important. What began as a layout optimized for entertaining evolved into a more intentional approach, where every sightline and transition was thoughtfully considered. The clients also needed the kitchen to work hard for their lifestyle, with a commercial-size refrigerator and freezer, generous prep space, and room to gather. The challenge was to bring purpose and polish to a space that didn’t quite feel like it belonged. The result is a kitchen that’s not only highly functional but finally feels like part of the home.
Project challenges:
- Maximizing storage was a primary challenge, especially with the inclusion of a commercial-sized fridge and freezer that occupied valuable cabinetry space.
- The need for clean, uninterrupted lines throughout the kitchen required thoughtful detailing, especially around cabinetry transitions and appliance integration.
- The oversized island design required two stone slabs and waterfall edges on both sides which posed both visual and logistical challenges.
- Incorporating electrical outlets into the island in a way that felt intentional and unobtrusive demanded creative problem-solving.
- The unique rooflines created strong visual angles that required a considered design approach to ensure the space felt cohesive rather than disjointed.
- Balancing symmetry and flow in a kitchen with structural constraints required precise layout planning to maintain a cohesive visual rhythm.
- Creating an intentional indoor/outdoor living flow, especially in the transitional space between the sliding doors to the backyard and the kitchen.
Project solutions:
- To balance the visual weight of the commercial-grade fridge and freezer, we flanked the range and hood with full-height pocket cabinetry, which created symmetry while reclaiming storage space. We also took a look into internal organization and carefully mapped out where every kitchen item would live. This allowed us to make informed decisions about drawer versus door configurations, and when to incorporate features like roll-out shelving to maximize accessibility and function.
- Linear light fixtures above the island were chosen for their low visual impact, allowing sightlines to remain clear and emphasizing the thoughtful spatial layout.
- The oversized island was carefully executed using two coordinated slabs, with a subtle brass inlay detail between them to turn a logistical challenge into a design feature.
- Pop-up electrical outlets were integrated into the island to keep surfaces clutter-free while maintaining easy access, which combined form and function seamlessly.
- With multiple focal points and a peaked vaulted ceiling, layout precision was key. The island, hood, and adjacent staircase were all perfectly centered on the vault, creating a sense of alignment across the open space.
- In the transitional area between kitchen and backyard, we added a wet bar that visually and functionally connects the indoor space with the outdoors. This addition provides extra storage and creates a dedicated entertainment spot for guests, enhancing the overall flow and usability of the home.

As a part of a larger transformation, the kitchen served as an anchor for rethinking how the home could feel and function. The goal was to create a space that felt truly integrated, flowed naturally within itself, and connected seamlessly to the outdoors. Storage was a top priority, with an emphasis on keeping countertops clean and the space feeling calm and open. Flow was equally important. What began as a layout optimized for entertaining evolved into a more intentional approach, where every sightline and transition was thoughtfully considered. The clients also needed the kitchen to work hard for their lifestyle, with a commercial-size refrigerator and freezer, generous prep space, and room to gather. The challenge was to bring purpose and polish to a space that didn’t quite feel like it belonged. The result is a kitchen that’s not only highly functional but finally feels like part of the home.
Project challenges:
- Maximizing storage was a primary challenge, especially with the inclusion of a commercial-sized fridge and freezer that occupied valuable cabinetry space.
- The need for clean, uninterrupted lines throughout the kitchen required thoughtful detailing, especially around cabinetry transitions and appliance integration.
- The oversized island design required two stone slabs and waterfall edges on both sides which posed both visual and logistical challenges.
- Incorporating electrical outlets into the island in a way that felt intentional and unobtrusive demanded creative problem-solving.
- The unique rooflines created strong visual angles that required a considered design approach to ensure the space felt cohesive rather than disjointed.
- Balancing symmetry and flow in a kitchen with structural constraints required precise layout planning to maintain a cohesive visual rhythm.
- Creating an intentional indoor/outdoor living flow, especially in the transitional space between the sliding doors to the backyard and the kitchen.
Project solutions:
- To balance the visual weight of the commercial-grade fridge and freezer, we flanked the range and hood with full-height pocket cabinetry, which created symmetry while reclaiming storage space. We also took a look into internal organization and carefully mapped out where every kitchen item would live. This allowed us to make informed decisions about drawer versus door configurations, and when to incorporate features like roll-out shelving to maximize accessibility and function.
- Linear light fixtures above the island were chosen for their low visual impact, allowing sightlines to remain clear and emphasizing the thoughtful spatial layout.
- The oversized island was carefully executed using two coordinated slabs, with a subtle brass inlay detail between them to turn a logistical challenge into a design feature.
- Pop-up electrical outlets were integrated into the island to keep surfaces clutter-free while maintaining easy access, which combined form and function seamlessly.
- With multiple focal points and a peaked vaulted ceiling, layout precision was key. The island, hood, and adjacent staircase were all perfectly centered on the vault, creating a sense of alignment across the open space.
- In the transitional area between kitchen and backyard, we added a wet bar that visually and functionally connects the indoor space with the outdoors. This addition provides extra storage and creates a dedicated entertainment spot for guests, enhancing the overall flow and usability of the home.
Find the right local pro for your project

These clients enjoy cooking and entertaining, so their vision was to open and connect three separate rooms—the kitchen, sitting, and formal dining rooms—to create a single open and modern space where everyone could engage and participate in the activities.
Opening these spaces required complex structural engineering. The wall removals required supporting the loads from the second floor and meeting the engineering requirements for shear wall and lateral support. These beams and their connections to the posts they sit on were a challenge to install because of the complex nature of the home's original framed. All these loads had to be carried through the finished basement below and rest on new footings below the basement floor.
The center kitchen island was expansive, with a single slab countertop that would provide both workspace and counter seating. This slab, at 64x120 and 789 lbs., required careful planning for on-site labor, transfer routing, and precision installation. Natural daylight now floods the space from all directions. Recessed can lighting runs throughout the space, all on dimmers for maximum control of ambiance.
The Better Builders design team guided the selection of hardwoods, staircase details, cabinetry, countertops, tile, and color. The muted palette and clean lines work well with our couple’s eclectic furnishings and artworks. Now, traffic and activities flow better, and every inch of the previously divided space is utilized and enjoyed. The outcome is exactly as our homeowners envisioned…and as we intended.

Made with soft white faux leather overlapping a foam-padded frame with engineered wood, this Malaysian-built creation sleeps like a dream. The queen-sized platform bed, which requires only a mattress, comes with wooden slats that serve the same function as a box spring would. Silver metal legs finish off this spectacular piece of modern bedroom furniture. The Barbara Bed is also available in black (queen size) and white (king size). To clean, wipe with a damp cloth. Assembly is required.
Features:
Contemporary platform bed (requires only a mattress; wooden slats included)
Queen size
Engineered wood frame
White faux leather upholstery with light foam padding
Faux crystal button-tufted headboard
Silver steel legs
Made in Malaysia
Assembly required
To clean, wipe with a damp cloth
Also available in black (queen) and white (king) (each sold separately)
Dimensions:
Queen Size: 63 "W x 86"D X 35.8"H
King Size: 80 "W x 86"D X 35.8"H
Side rail width: 81"Wx1"Dx11"H
Headboard width: 63"Wx3"Dx36"H
Footboard width: 63"Wx2.75"Dx12"H
Height to top of slat: 9 " height of the legs: 5.5" Internal Size : 61"W x 81.50"D

Interior stair hall with upper skylight well bathes the home with natural light. Views and access to the grass roof expand the home's indoor/outdoor approach to the second story.

This house was designed for a couple and their son. One of the design program requirements was to have two master suites on the main level. They enjoy cooking and entertaining so the public and food prep. areas are functional, attractive and conducive to people gathering around. Consequently, the square footage of the main level is large.
The house is also on a very steep slope which didn't help with the required footprint. In order to minimize the related costs of building with this site condition, the footprint of the house is long and not deep as it reaches down the slope.
The scale of the existing homes in the neighborhood are unimposing. In order to play down the size as viewed from the street, the facade is broken up into several different masses with low sloping roofs.
Once you're inside, the house opens up with 14 foot ceilings in the entry and living areas. The ceiling height of other spaces on the main level are 10 feet. Universal design was implemented on the main level to provide inherent accessibility for everyone.
The lower level accommodates several guest rooms and baths, an exercise room, a guest den with wet bar and a man cave.
Another design program requirement was to make the house as maintenance-free as possible. Exterior materials include stucco, Pennsylvania Blue Stone and a new aluminum siding product called Longboard. The siding comes in many wood grain finishes and to everyone that has seen it, they think it's real wood. It's also made from heavy gauge aluminum so it doesn't ding like traditional aluminum siding. The roofs are metal standing seam.
The house is energy efficient. It's fully insulated with spray foam insulation-lots of it. The exterior walls were designed with 2x6 studs and roof rafters are 2x12 to provide plenty of space for the insulation, exceeding the required R-values. Windows and doors of course are energy efficient as well. All lighting is LED.
The decking around the exterior is locust, a very hard native wood which is naturally insect and rot resistant.
The best part of the whole project are the owners who love their new home. They initially had plans to live in this house during the summer months and Florida during the winter. They are now seriously considering living here full-time.

As a part of a larger transformation, the kitchen served as an anchor for rethinking how the home could feel and function. The goal was to create a space that felt truly integrated, flowed naturally within itself, and connected seamlessly to the outdoors. Storage was a top priority, with an emphasis on keeping countertops clean and the space feeling calm and open. Flow was equally important. What began as a layout optimized for entertaining evolved into a more intentional approach, where every sightline and transition was thoughtfully considered. The clients also needed the kitchen to work hard for their lifestyle, with a commercial-size refrigerator and freezer, generous prep space, and room to gather. The challenge was to bring purpose and polish to a space that didn’t quite feel like it belonged. The result is a kitchen that’s not only highly functional but finally feels like part of the home.
Project challenges:
- Maximizing storage was a primary challenge, especially with the inclusion of a commercial-sized fridge and freezer that occupied valuable cabinetry space.
- The need for clean, uninterrupted lines throughout the kitchen required thoughtful detailing, especially around cabinetry transitions and appliance integration.
- The oversized island design required two stone slabs and waterfall edges on both sides which posed both visual and logistical challenges.
- Incorporating electrical outlets into the island in a way that felt intentional and unobtrusive demanded creative problem-solving.
- The unique rooflines created strong visual angles that required a considered design approach to ensure the space felt cohesive rather than disjointed.
- Balancing symmetry and flow in a kitchen with structural constraints required precise layout planning to maintain a cohesive visual rhythm.
- Creating an intentional indoor/outdoor living flow, especially in the transitional space between the sliding doors to the backyard and the kitchen.
Project solutions:
- To balance the visual weight of the commercial-grade fridge and freezer, we flanked the range and hood with full-height pocket cabinetry, which created symmetry while reclaiming storage space. We also took a look into internal organization and carefully mapped out where every kitchen item would live. This allowed us to make informed decisions about drawer versus door configurations, and when to incorporate features like roll-out shelving to maximize accessibility and function.
- Linear light fixtures above the island were chosen for their low visual impact, allowing sightlines to remain clear and emphasizing the thoughtful spatial layout.
- The oversized island was carefully executed using two coordinated slabs, with a subtle brass inlay detail between them to turn a logistical challenge into a design feature.
- Pop-up electrical outlets were integrated into the island to keep surfaces clutter-free while maintaining easy access, which combined form and function seamlessly.
- With multiple focal points and a peaked vaulted ceiling, layout precision was key. The island, hood, and adjacent staircase were all perfectly centered on the vault, creating a sense of alignment across the open space.
- In the transitional area between kitchen and backyard, we added a wet bar that visually and functionally connects the indoor space with the outdoors. This addition provides extra storage and creates a dedicated entertainment spot for guests, enhancing the overall flow and usability of the home.

This house was designed for a couple and their son. One of the design program requirements was to have two master suites on the main level. They enjoy cooking and entertaining so the public and food prep. areas are functional, attractive and conducive to people gathering around. Consequently, the square footage of the main level is large.
The house is also on a very steep slope which didn't help with the required footprint. In order to minimize the related costs of building with this site condition, the footprint of the house is long and not deep as it reaches down the slope.
The scale of the existing homes in the neighborhood are unimposing. In order to play down the size as viewed from the street, the facade is broken up into several different masses with low sloping roofs.
Once you're inside, the house opens up with 14 foot ceilings in the entry and living areas. The ceiling height of other spaces on the main level are 10 feet. Universal design was implemented on the main level to provide inherent accessibility for everyone.
The lower level accommodates several guest rooms and baths, an exercise room, a guest den with wet bar and a man cave.
Another design program requirement was to make the house as maintenance-free as possible. Exterior materials include stucco, Pennsylvania Blue Stone and a new aluminum siding product called Longboard. The siding comes in many wood grain finishes and to everyone that has seen it, they think it's real wood. It's also made from heavy gauge aluminum so it doesn't ding like traditional aluminum siding. The roofs are metal standing seam.
The house is energy efficient. It's fully insulated with spray foam insulation-lots of it. The exterior walls were designed with 2x6 studs and roof rafters are 2x12 to provide plenty of space for the insulation, exceeding the required R-values. Windows and doors of course are energy efficient as well. All lighting is LED.
The decking around the exterior is locust, a very hard native wood which is naturally insect and rot resistant.
The best part of the whole project are the owners who love their new home. They initially had plans to live in this house during the summer months and Florida during the winter. They are now seriously considering living here full-time.

Wooden Classicism
Nesbitt House – Seaside, Florida
Architect: Robert A. M. Stern
Builder: O.B. Laurent Construction
E. F. San Juan produced all of the interior and exterior millwork for this elegantly designed residence in the influential New Urban town of Seaside, Florida.
Challenges:
The beachfront residence required adherence to the area’s strict building code requirements, creating a unique profile for the compact layout of each room. Each room was also designed with all-wood walls and ceilings, which meant there was a lot of custom millwork!
Solution:
Unlike many homes where the same molding and paneling profiles are repeated throughout each room, this home featured a unique profile for each space. The effort was laborious—our team at E. F. San Juan created tools for each of these specific jobs. “The project required over four hundred man-hours of knife-grinding just to produce the tools,” says Edward San Juan. “Organization and scheduling were critical in this project because so many parts were required to complete each room.”
The long hours and hard work allowed us to take the compacted plan and create the feel of an open, airy American beach house with the influence of 1930s Swedish classicism. The ceiling and walls in each room are paneled, giving them an elongated look to open up the space. The enticing, simplified wooden classicism style seamlessly complements the sweeping vistas and surrounding natural beauty along the Gulf of Mexico.
---
Photography by Steven Mangum – STM Photography

As a part of a larger transformation, the kitchen served as an anchor for rethinking how the home could feel and function. The goal was to create a space that felt truly integrated, flowed naturally within itself, and connected seamlessly to the outdoors. Storage was a top priority, with an emphasis on keeping countertops clean and the space feeling calm and open. Flow was equally important. What began as a layout optimized for entertaining evolved into a more intentional approach, where every sightline and transition was thoughtfully considered. The clients also needed the kitchen to work hard for their lifestyle, with a commercial-size refrigerator and freezer, generous prep space, and room to gather. The challenge was to bring purpose and polish to a space that didn’t quite feel like it belonged. The result is a kitchen that’s not only highly functional but finally feels like part of the home.
Project challenges:
- Maximizing storage was a primary challenge, especially with the inclusion of a commercial-sized fridge and freezer that occupied valuable cabinetry space.
- The need for clean, uninterrupted lines throughout the kitchen required thoughtful detailing, especially around cabinetry transitions and appliance integration.
- The oversized island design required two stone slabs and waterfall edges on both sides which posed both visual and logistical challenges.
- Incorporating electrical outlets into the island in a way that felt intentional and unobtrusive demanded creative problem-solving.
- The unique rooflines created strong visual angles that required a considered design approach to ensure the space felt cohesive rather than disjointed.
- Balancing symmetry and flow in a kitchen with structural constraints required precise layout planning to maintain a cohesive visual rhythm.
- Creating an intentional indoor/outdoor living flow, especially in the transitional space between the sliding doors to the backyard and the kitchen.
Project solutions:
- To balance the visual weight of the commercial-grade fridge and freezer, we flanked the range and hood with full-height pocket cabinetry, which created symmetry while reclaiming storage space. We also took a look into internal organization and carefully mapped out where every kitchen item would live. This allowed us to make informed decisions about drawer versus door configurations, and when to incorporate features like roll-out shelving to maximize accessibility and function.
- Linear light fixtures above the island were chosen for their low visual impact, allowing sightlines to remain clear and emphasizing the thoughtful spatial layout.
- The oversized island was carefully executed using two coordinated slabs, with a subtle brass inlay detail between them to turn a logistical challenge into a design feature.
- Pop-up electrical outlets were integrated into the island to keep surfaces clutter-free while maintaining easy access, which combined form and function seamlessly.
- With multiple focal points and a peaked vaulted ceiling, layout precision was key. The island, hood, and adjacent staircase were all perfectly centered on the vault, creating a sense of alignment across the open space.
- In the transitional area between kitchen and backyard, we added a wet bar that visually and functionally connects the indoor space with the outdoors. This addition provides extra storage and creates a dedicated entertainment spot for guests, enhancing the overall flow and usability of the home.

Designing and building a kitchen addition is a complex process that involves multiple steps and considerations. Here is a general outline to help you get started on your kitchen addition project:
Define Your Goals and Budget:
• Determine the purpose of the kitchen addition. Is it for more cooking space, a dining area, or a combination of both?
• Establish a realistic budget for your project. Consider all costs, including construction, permits, materials, and furnishings.
Hire a Design Professional:
• Seek the services of a design build company who specializes in kitchen additions.
• Discuss your vision, needs, and budget with the design professional to create a design concept.
Site Evaluation:
• Assess the existing space and structural condition of your home to ensure it can support the addition.
• Consider factors like zoning regulations, setbacks, and building codes.
Design Development:
• Collaborate with your design professional to refine the concept, including the layout, size, and architectural style.
• Choose materials, finishes, and fixtures that fit your design and budget.
Obtain Permits:
• Consult with your local design build contractor to determine the necessary permits and approvals.
• Prepare and submit all required documents, including architectural drawings and engineering plans.
Create Construction Documents:
• Work with your design build professional to develop detailed construction drawings and specifications.
• These documents will serve as a guide for contractors during construction.
Hire a design build contractor:
• Check references, credentials, and licenses before selecting a contractor.
• Sign a detailed contract that outlines the scope of work, timeline, and payment schedule.
Construction Phase:
• Demolition: If needed, remove any existing structures or walls.
• Foundation: Construct the foundation for the addition.
• Framing: Build the structural framework of the addition.
• Plumbing, Electrical, and HVAC: Install or update utilities as required.
• Insulation: Ensure proper insulation for energy efficiency.
• Drywall and Finish Work: Complete the walls and ceilings.
• Flooring and Cabinetry: Install flooring and kitchen cabinets.
• Appliances and Fixtures: Add appliances, plumbing fixtures, and lighting.
• Paint and Finish: Apply paint and finishes to achieve the desired look.
• Final Inspection: Schedule inspections to ensure compliance with building codes.
Final Inspections and Approvals:
• Arrange for final inspections to ensure the addition meets all safety and code requirements.
• Obtain any necessary certificates of occupancy or compliance.
Move In and Enjoy:
• Once all inspections and approvals are received, you can move into your new kitchen addition and start enjoying it.
Remember that every kitchen addition project is unique, so adapt this outline to your specific needs and circumstances. Consulting with professionals and obtaining the required permits and inspections is crucial to a successful and safe project.

Wooden Classicism
Nesbitt House – Seaside, Florida
Architect: Robert A. M. Stern
Builder: O.B. Laurent Construction
E. F. San Juan produced all of the interior and exterior millwork for this elegantly designed residence in the influential New Urban town of Seaside, Florida.
Challenges:
The beachfront residence required adherence to the area’s strict building code requirements, creating a unique profile for the compact layout of each room. Each room was also designed with all-wood walls and ceilings, which meant there was a lot of custom millwork!
Solution:
Unlike many homes where the same molding and paneling profiles are repeated throughout each room, this home featured a unique profile for each space. The effort was laborious—our team at E. F. San Juan created tools for each of these specific jobs. “The project required over four hundred man-hours of knife-grinding just to produce the tools,” says Edward San Juan. “Organization and scheduling were critical in this project because so many parts were required to complete each room.”
The long hours and hard work allowed us to take the compacted plan and create the feel of an open, airy American beach house with the influence of 1930s Swedish classicism. The ceiling and walls in each room are paneled, giving them an elongated look to open up the space. The enticing, simplified wooden classicism style seamlessly complements the sweeping vistas and surrounding natural beauty along the Gulf of Mexico.
---
Photography by Steven Mangum – STM Photography

As a part of a larger transformation, the kitchen served as an anchor for rethinking how the home could feel and function. The goal was to create a space that felt truly integrated, flowed naturally within itself, and connected seamlessly to the outdoors. Storage was a top priority, with an emphasis on keeping countertops clean and the space feeling calm and open. Flow was equally important. What began as a layout optimized for entertaining evolved into a more intentional approach, where every sightline and transition was thoughtfully considered. The clients also needed the kitchen to work hard for their lifestyle, with a commercial-size refrigerator and freezer, generous prep space, and room to gather. The challenge was to bring purpose and polish to a space that didn’t quite feel like it belonged. The result is a kitchen that’s not only highly functional but finally feels like part of the home.
Project challenges:
- Maximizing storage was a primary challenge, especially with the inclusion of a commercial-sized fridge and freezer that occupied valuable cabinetry space.
- The need for clean, uninterrupted lines throughout the kitchen required thoughtful detailing, especially around cabinetry transitions and appliance integration.
- The oversized island design required two stone slabs and waterfall edges on both sides which posed both visual and logistical challenges.
- Incorporating electrical outlets into the island in a way that felt intentional and unobtrusive demanded creative problem-solving.
- The unique rooflines created strong visual angles that required a considered design approach to ensure the space felt cohesive rather than disjointed.
- Balancing symmetry and flow in a kitchen with structural constraints required precise layout planning to maintain a cohesive visual rhythm.
- Creating an intentional indoor/outdoor living flow, especially in the transitional space between the sliding doors to the backyard and the kitchen.
Project solutions:
- To balance the visual weight of the commercial-grade fridge and freezer, we flanked the range and hood with full-height pocket cabinetry, which created symmetry while reclaiming storage space. We also took a look into internal organization and carefully mapped out where every kitchen item would live. This allowed us to make informed decisions about drawer versus door configurations, and when to incorporate features like roll-out shelving to maximize accessibility and function.
- Linear light fixtures above the island were chosen for their low visual impact, allowing sightlines to remain clear and emphasizing the thoughtful spatial layout.
- The oversized island was carefully executed using two coordinated slabs, with a subtle brass inlay detail between them to turn a logistical challenge into a design feature.
- Pop-up electrical outlets were integrated into the island to keep surfaces clutter-free while maintaining easy access, which combined form and function seamlessly.
- With multiple focal points and a peaked vaulted ceiling, layout precision was key. The island, hood, and adjacent staircase were all perfectly centered on the vault, creating a sense of alignment across the open space.
- In the transitional area between kitchen and backyard, we added a wet bar that visually and functionally connects the indoor space with the outdoors. This addition provides extra storage and creates a dedicated entertainment spot for guests, enhancing the overall flow and usability of the home.

Features:
• M Touch innovative and revolutionary controls are both easy-to-operate and navigate. An intuitive swipe of the screen will quickly lead you to your desired selection
• MultiSteam technology delivers powerful steam generation and optimum steam distribution via 6 inlet ports
• Plumbed water supply and drainage
• Wired roast probe for perfect roasting
• 3-in-1 appliance
• True European convection oven
• Steam oven
• Combination of steam and convection oven
• MasterChef and MasterChef Gourmet menus offer over 150 food types to cook to perfection
• XL stainless steel cavity
• Lift up control panel conceals water and condensate container (both containers are dishwasher-safe)
• ComfortSwivel handle moves with the motion of your wrist, creating a more ergonomic feel when opening and closing the oven door
Dimensions:
Overall Unit Width - Excluding Fascia Dimension 219/16” (548mm)
Overall Height - Excluding Fascia Dimension 1711/16” (449mm)
Overall Unit Depth - Excluding Fascia Dimension 215/8” (550mm)
Oven Door Clearance 13” (330mm)
Depth with door open 3411/16” (898mm)
Overall Fascia Dimensions:
237/16” (595mm) W x 18” (455.5mm) H x 7/8” (22mm) D
Built-In Dimensions:
Minimum Cabinet Width 221/16” — 223/8” (560 - 568mm)
Minimum Cabinet Depth 217/8” (555mm)
Minimum Cabinet Opening Height 1711/16” — 1713/16” (450 — 452mm)
Minimum Base Support 60 lbs
Additional Cut-outs Required - Venting and plumbing cut-out required 1911/16” x 19/16” (500 x 40 mm)
Water Supply Requirements:
Connect to a cold water supply only. Must be connected to a shut-off valve. The water shut-off valve must be accessible after installation. The water pressure must be between 14.5 psi (1 bar) and may not exceed 87.02 psi (6 bar). If the pressure is higher than 87.02 psi (6 bar), a pressure reducing valve must be installed. The
supplied hose has a length of 59” (1500mm). The hose must not be shortened. The entire hose length must not exceed 24’7” (7.5m).
Drainage Requirements:
Drain hose loop may be positioned at or above the flood level of the sink or drain board to which it is connect to provide the proper air gap. The top of end the drain hose must not be higher than 1911/16” (500mm) to where it connects to the drain trap. The drain hose must not be shortened. The entire hose length must not exceed 24’7” (7.5m). See installation manual for additional information.

Designing and building a kitchen addition is a complex process that involves multiple steps and considerations. Here is a general outline to help you get started on your kitchen addition project:
Define Your Goals and Budget:
• Determine the purpose of the kitchen addition. Is it for more cooking space, a dining area, or a combination of both?
• Establish a realistic budget for your project. Consider all costs, including construction, permits, materials, and furnishings.
Hire a Design Professional:
• Seek the services of a design build company who specializes in kitchen additions.
• Discuss your vision, needs, and budget with the design professional to create a design concept.
Site Evaluation:
• Assess the existing space and structural condition of your home to ensure it can support the addition.
• Consider factors like zoning regulations, setbacks, and building codes.
Design Development:
• Collaborate with your design professional to refine the concept, including the layout, size, and architectural style.
• Choose materials, finishes, and fixtures that fit your design and budget.
Obtain Permits:
• Consult with your local design build contractor to determine the necessary permits and approvals.
• Prepare and submit all required documents, including architectural drawings and engineering plans.
Create Construction Documents:
• Work with your design build professional to develop detailed construction drawings and specifications.
• These documents will serve as a guide for contractors during construction.
Hire a design build contractor:
• Check references, credentials, and licenses before selecting a contractor.
• Sign a detailed contract that outlines the scope of work, timeline, and payment schedule.
Construction Phase:
• Demolition: If needed, remove any existing structures or walls.
• Foundation: Construct the foundation for the addition.
• Framing: Build the structural framework of the addition.
• Plumbing, Electrical, and HVAC: Install or update utilities as required.
• Insulation: Ensure proper insulation for energy efficiency.
• Drywall and Finish Work: Complete the walls and ceilings.
• Flooring and Cabinetry: Install flooring and kitchen cabinets.
• Appliances and Fixtures: Add appliances, plumbing fixtures, and lighting.
• Paint and Finish: Apply paint and finishes to achieve the desired look.
• Final Inspection: Schedule inspections to ensure compliance with building codes.
Final Inspections and Approvals:
• Arrange for final inspections to ensure the addition meets all safety and code requirements.
• Obtain any necessary certificates of occupancy or compliance.
Move In and Enjoy:
• Once all inspections and approvals are received, you can move into your new kitchen addition and start enjoying it.
Remember that every kitchen addition project is unique, so adapt this outline to your specific needs and circumstances. Consulting with professionals and obtaining the required permits and inspections is crucial to a successful and safe project.

>
Services
CATEGORIES OF SERVICES
~MEMORIAL FOUNTAINS KANSAS CITY
~ARCHITECTURAL POOL FOUNTAINS
KANSAS CITY
~SPRAY RINGS KANSAS CITY
~FLOATING FOUNTAINS KANSAS CITY
~ARCHITECTURAL FOUNTAINS KANSAS CITY
~INTERACTIVE FOUNTAINS KANSAS CITY
~STATUARY FOUNTAINS KANSAS CITY
~ROCK - BOULDER FOUNTAINS
KANSAS CITY
~WATERWALLS KANSAS CITY
~DISPLAY FOUNTAINS KANSAS CITY
~WATERFALL - FOUNTAINS KANSAS CITY
~RAINBARS AND RAIN CURTAINS
KANSAS CITY
~INTERIOR FOUNTAINS KANSAS CITY
~WATER FEATURE CONSTRUCTION
KANSAS CITY
~WATER FEATURE DESIGN AND
ENGINEERING KANSAS CITY
~CUSTOM FOUNTAIN FABRICATION
KANSAS CITY
-WATER FEATURE, FOUNTAIN, RAINBARS,
SPRAY RINGS, FLOATING FOUNTAINS
~BAPTISMAL FONT KANSAS CITY
~ARCHITECTURAL PARKING LOT FOUNTAIN KANSAS CITY
~INFINITY EDGE FOUNTAIN KANSAS CITY
~CURRENT WATER FEATURE PROJECT
KANSAS CITY
~FIRE AND WATER FOUNTAINS
KANSAS CITY
~HOSPITAL FOUNTAIN KANSAS CITY
~AMUSEMENT PARK FOUNTAINS
KANSAS CITY
~CORPORATE HEADQUARTERS FOUNTAINS KANSAS CITY
~POND FOUNTAIN KANSAS CITY
~RAINBARS *FEATURED ON CURB APPEAL*
KANSAS CITY
~FOUNTAIN PUMPS/PARTS KANSAS CITY
-LAKE MANAGEMENT KANSAS CITY
-POOL CONSTRUCTION KANSAS CITY
-POOL MAINTENANCE AND MANAGEMENT
KANSAS CITY
FOUNTAIN SERVICES KANSAS CITY
Fountain Design and Construction
Tile and Stone Installation
Underwater Fountain Lighting
Plumbing, Filtration and Waterproofing
Regular Fountain Maintenance
Water Feature Integration
Clean Pump Intake Screens
Clean Mechanical/Biological Filter Media
Clean Skimmer Baskets/Strainers
Clean Decorative Spitters, Nozzles, Art Pieces
Brush Interior Fountain Basin
Skim Surface Area to Remove Debris
Fountains - Monitor Water Chemical Levels
Add Water Chemicals as Required
Repair Fountain Equipment as Required
Ponds - Monitor Pond Water Levels
Add Natural Pond Products as Required
Repair Pond Equipment as Required
Evaluate if Replacement Parts are Needed (example: filter media pads, light bulbs)
Test Fountain/Pond Electrical & Lighting

Photo: Margot Hartford © 2016 Houzz
Design ideas for a landscaping in San Francisco.

Enjoy the warm days and cool nights seated at the Loft Outdoor Dining Set by Elan Furniture. Loft collection is known for the rich designer colors, paired with the designer aluminum frames. Made with recycled HDPE table top and seats that is impervious to moisture resulting in beautiful qualities such as resisting stains, mold and mildew. Seats six comfortably. Table includes umbrella hole. Some assembly required, chairs come fully assembled. Made in Elkhart, Indiana USA.
Loft Outdoor Dining Set Includes:
(1) Loft Outdoor 72" x 36" Dining Table
(6) Loft Outdoor Dining Chairs
Table Size:
72" W x 36" D x 36" H
Chair Size:
19" W x 20" D x 36" H
Seat Height: 18"
Features:
- Designer aluminum frames
- Premium all-weather HDPE seats and table top
- Stainless steel hardware
- Elan Furniture 10 year warranty
- Seats 6
- Made in Elkhart, IN USA
Shipping Info:
- Ships in 5 business days
- Curbside delivery via a freight carrier
- Requires assembly
Loft Outdoor Counter Height Set Includes:
(1) Loft Outdoor 72" x 36" Dining Table
(6) Loft Outdoor Counter Height Chairs
Table Size:
72" W x 36" D x 36" H
Chair Size:
19" W x 20" D x 43" H
Seat Height: 25"
Features:
- Designer aluminum frame
- Premium powder coat finish
- All-Weather HDPE top and backs
- Seats 6
- Crafted in Elkhart, Indiana - USA
- Chairs are fully assembled
- Table requires assembly
Technical Specs:
- Aluminum profile size: 2" x 2"
- Aluminum gauge: Heavy-duty .120 wall
- Aluminum finish: Premium powder coat
- Frame colors: Textured Black, Gloss Silver or Textured White
- HDPE colors: Venetian Cocoa
- HDPE thickness: 3/4"
Shipping Info:
- Ships in 5 business days
- Curbside delivery via a freight carrier
- Requires assembly

This house was designed for a couple and their son. One of the design program requirements was to have two master suites on the main level. They enjoy cooking and entertaining so the public and food prep. areas are functional, attractive and conducive to people gathering around. Consequently, the square footage of the main level is large.
The house is also on a very steep slope which didn't help with the required footprint. In order to minimize the related costs of building with this site condition, the footprint of the house is long and not deep as it reaches down the slope.
The scale of the existing homes in the neighborhood are unimposing. In order to play down the size as viewed from the street, the facade is broken up into several different masses with low sloping roofs.
Once you're inside, the house opens up with 14 foot ceilings in the entry and living areas. The ceiling height of other spaces on the main level are 10 feet. Universal design was implemented on the main level to provide inherent accessibility for everyone.
The lower level accommodates several guest rooms and baths, an exercise room, a guest den with wet bar and a man cave.
Another design program requirement was to make the house as maintenance-free as possible. Exterior materials include stucco, Pennsylvania Blue Stone and a new aluminum siding product called Longboard. The siding comes in many wood grain finishes and to everyone that has seen it, they think it's real wood. It's also made from heavy gauge aluminum so it doesn't ding like traditional aluminum siding. The roofs are metal standing seam.
The house is energy efficient. It's fully insulated with spray foam insulation-lots of it. The exterior walls were designed with 2x6 studs and roof rafters are 2x12 to provide plenty of space for the insulation, exceeding the required R-values. Windows and doors of course are energy efficient as well. All lighting is LED.
The decking around the exterior is locust, a very hard native wood which is naturally insect and rot resistant.
The best part of the whole project are the owners who love their new home. They initially had plans to live in this house during the summer months and Florida during the winter. They are now seriously considering living here full-time.
46