
Search results for "Routinely switch" in Home Design Ideas
 Maykke
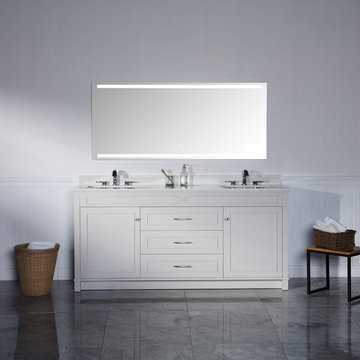
The Harper Mirror features LED lighting and a sleek, minimalist design for an ultra-modern feel. Sharp angles and clean, frameless lines make the Harper Mirror a truly versatile addition to your contemporary bathroom or home. The mirror features an inlaid LED strip that shines at a brilliant pure white, providing optimal ambient lighting for your daily morning prep it's especially ideal for cosmetics, skincare, and haircare routines, ensuring you'll always look your best before stepping out the door. The mirror can be installed with portrait or landscape orientation to suit your home's needs, making it perfect as a full-length standing mirror or as a vanity mirror for master bath double vanities and sinks. All necessary hardware for wall mounting is included, meaning hassle-free installation.
Features
- Energy Efficient White LED Lights
- On/Off Sensor Switch
- White Painted Steel Base
- Safe and easy to install
Additional Information
- Weight: 61.73lbs
- Need Assembly: No
- Dimension: 63"W x 8.69"D x 27.56"H
- Feature: Frameless
- Design: Modern
- Material: LED
- Shape: Rectangle
- Orientation: Both
- Mounting Hardware: Yes
Our mirror LED lights are not intended to be the sole light source in a room, but are appropriate for ambient or accent lighting, or as a night light. All LED mirrors include a hardwired connection.

 BZ Architects
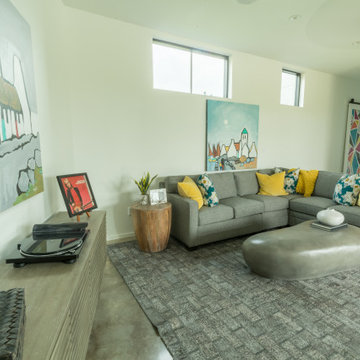
With a quiet site and good views to a stream-fed park to the east, this 1800 SF split-level had great potential. Here, as in many homes, the kitchen is the hub of family life. So it was crucial that the space worked well for both large gatherings and daily family routines. On the 1st floor, the key was to work within the existing house as much as possible, re-configuring the interior walls while simultaneously increasing the floor to ceiling height. Additional windows, patio doors and a small kitchen addition brightened the interior and expanded the house by providing a new, light-filled, double-height foyer. More space was gained by relocating the master bedroom to a new 2nd floor suite.
Taking down the walls that compartmentalized the first floor allowed the kitchen, dining and living rooms to be defined by tall cabinets. Outfitted as kitchen pantry storage on one side and built-in living room bookshelves on the other, these cabinets extend only partially to the new 9-foot high ceiling and allow the 1st floor to be viewed more as a single room. Switching the locations of the dining room and kitchen allowed for better functionality, views and access to the rear patio through wide sliding glass doors.
Access to the 2nd floor master suite is via a wood and steel-framed stair outfitted with stainless steel aircraft cable fittings. The high-ceiling master bedoom leads to an adjacent study and private deck overlooking the placid rear yard. The light-filled bath acts as a buffer to the street beyond and has been outfitted with a frameless glass shower, heated slate tile floor and sauna.

Find the right local pro for your project
 BZ Architects
With a quiet site and good views to a stream-fed park to the east, this 1800 SF split-level had great potential. Here, as in many homes, the kitchen is the hub of family life. So it was crucial that the space worked well for both large gatherings and daily family routines. On the 1st floor, the key was to work within the existing house as much as possible, re-configuring the interior walls while simultaneously increasing the floor to ceiling height. Additional windows, patio doors and a small kitchen addition brightened the interior and expanded the house by providing a new, light-filled, double-height foyer. More space was gained by relocating the master bedroom to a new 2nd floor suite.
Taking down the walls that compartmentalized the first floor allowed the kitchen, dining and living rooms to be defined by tall cabinets. Outfitted as kitchen pantry storage on one side and built-in living room bookshelves on the other, these cabinets extend only partially to the new 9-foot high ceiling and allow the 1st floor to be viewed more as a single room. Switching the locations of the dining room and kitchen allowed for better functionality, views and access to the rear patio through wide sliding glass doors.
Access to the 2nd floor master suite is via a wood and steel-framed stair outfitted with stainless steel aircraft cable fittings. The high-ceiling master bedoom leads to an adjacent study and private deck overlooking the placid rear yard. The light-filled bath acts as a buffer to the street beyond and has been outfitted with a frameless glass shower, heated slate tile floor and sauna.
 BZ Architects
With a quiet site and good views to a stream-fed park to the east, this 1800 SF split-level had great potential. Here, as in many homes, the kitchen is the hub of family life. So it was crucial that the space worked well for both large gatherings and daily family routines. On the 1st floor, the key was to work within the existing house as much as possible, re-configuring the interior walls while simultaneously increasing the floor to ceiling height. Additional windows, patio doors and a small kitchen addition brightened the interior and expanded the house by providing a new, light-filled, double-height foyer. More space was gained by relocating the master bedroom to a new 2nd floor suite.
Taking down the walls that compartmentalized the first floor allowed the kitchen, dining and living rooms to be defined by tall cabinets. Outfitted as kitchen pantry storage on one side and built-in living room bookshelves on the other, these cabinets extend only partially to the new 9-foot high ceiling and allow the 1st floor to be viewed more as a single room. Switching the locations of the dining room and kitchen allowed for better functionality, views and access to the rear patio through wide sliding glass doors.
Access to the 2nd floor master suite is via a wood and steel-framed stair outfitted with stainless steel aircraft cable fittings. The high-ceiling master bedoom leads to an adjacent study and private deck overlooking the placid rear yard. The light-filled bath acts as a buffer to the street beyond and has been outfitted with a frameless glass shower, heated slate tile floor and sauna.
 BZ Architects
With a quiet site and good views to a stream-fed park to the east, this 1800 SF split-level had great potential. Here, as in many homes, the kitchen is the hub of family life. So it was crucial that the space worked well for both large gatherings and daily family routines. On the 1st floor, the key was to work within the existing house as much as possible, re-configuring the interior walls while simultaneously increasing the floor to ceiling height. Additional windows, patio doors and a small kitchen addition brightened the interior and expanded the house by providing a new, light-filled, double-height foyer. More space was gained by relocating the master bedroom to a new 2nd floor suite.
Taking down the walls that compartmentalized the first floor allowed the kitchen, dining and living rooms to be defined by tall cabinets. Outfitted as kitchen pantry storage on one side and built-in living room bookshelves on the other, these cabinets extend only partially to the new 9-foot high ceiling and allow the 1st floor to be viewed more as a single room. Switching the locations of the dining room and kitchen allowed for better functionality, views and access to the rear patio through wide sliding glass doors.
Access to the 2nd floor master suite is via a wood and steel-framed stair outfitted with stainless steel aircraft cable fittings. The high-ceiling master bedoom leads to an adjacent study and private deck overlooking the placid rear yard. The light-filled bath acts as a buffer to the street beyond and has been outfitted with a frameless glass shower, heated slate tile floor and sauna.
 Homeowner Services of Michigan LLC
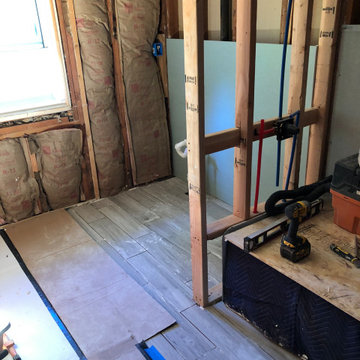
We transformed a small, outdated space into a modern, functional retreat for our recent bathroom remodeling project. This comprehensive renovation began with a complete demolition, taking the bathroom down to the studs. We removed all existing fixtures, walls, flooring, and old plumbing, creating a blank canvas for our vision.
First, we addressed the plumbing. The old, corroded pipes were replaced with new, durable materials, ensuring reliable water flow and pressure for years to come. We installed new supply lines and drainage to accommodate the new fixtures, including the vanity and shower.
Next, we updated the electrical system. The outdated wiring was replaced with new, up-to-code electrical work. We installed new outlets, switches, and light fixtures, providing ample lighting for the space. An exhaust fan was also installed to improve ventilation and prevent moisture buildup, essential for maintaining the bathroom's longevity and hygiene.
We then focused on HVAC improvements, adding a new duct and vent system to ensure proper heating and cooling. This upgrade enhances comfort and contributes to better air quality and energy efficiency.
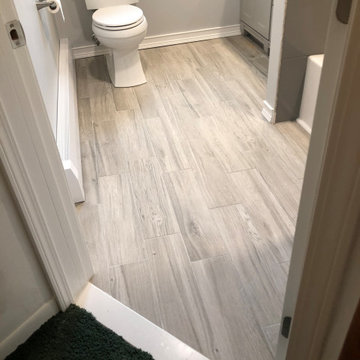
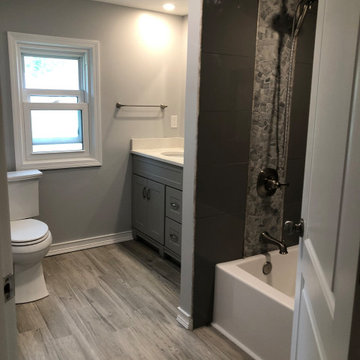
For the flooring, we chose ceramic tiles with a wood plank look. These tiles offer the warmth and elegance of wood while providing the durability and water resistance of ceramic. The flooring was meticulously installed, creating a seamless and visually appealing surface.
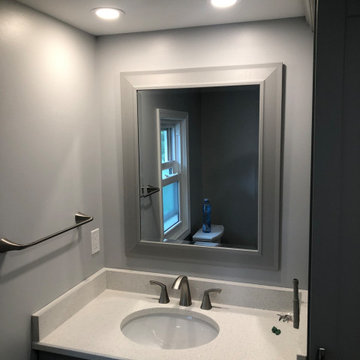
The centerpiece of the remodel is the stock single-sink vanity. This stylish yet practical addition provides ample storage and counter space, making daily routines more convenient. Above the vanity, we installed a sleek mirror that adds both functionality and a touch of sophistication.
The shower area received a complete makeover with new tiles and an adjustable rain shower head. The tile work extends from floor to ceiling, creating a cohesive and luxurious feel. The adjustable rain shower head offers a customizable bathing experience, combining both style and comfort.
This small bathroom remodel exemplifies our commitment to quality and attention to detail. By starting from the studs and rebuilding with modern, high-quality materials, we've created a space that is beautiful and built to last. Our client now enjoys a stylish, functional bathroom that meets their needs and enhances their home's value.
 Homeowner Services of Michigan LLC
We transformed a small, outdated space into a modern, functional retreat for our recent bathroom remodeling project. This comprehensive renovation began with a complete demolition, taking the bathroom down to the studs. We removed all existing fixtures, walls, flooring, and old plumbing, creating a blank canvas for our vision.
First, we addressed the plumbing. The old, corroded pipes were replaced with new, durable materials, ensuring reliable water flow and pressure for years to come. We installed new supply lines and drainage to accommodate the new fixtures, including the vanity and shower.
Next, we updated the electrical system. The outdated wiring was replaced with new, up-to-code electrical work. We installed new outlets, switches, and light fixtures, providing ample lighting for the space. An exhaust fan was also installed to improve ventilation and prevent moisture buildup, essential for maintaining the bathroom's longevity and hygiene.
We then focused on HVAC improvements, adding a new duct and vent system to ensure proper heating and cooling. This upgrade enhances comfort and contributes to better air quality and energy efficiency.
For the flooring, we chose ceramic tiles with a wood plank look. These tiles offer the warmth and elegance of wood while providing the durability and water resistance of ceramic. The flooring was meticulously installed, creating a seamless and visually appealing surface.
The centerpiece of the remodel is the stock single-sink vanity. This stylish yet practical addition provides ample storage and counter space, making daily routines more convenient. Above the vanity, we installed a sleek mirror that adds both functionality and a touch of sophistication.
The shower area received a complete makeover with new tiles and an adjustable rain shower head. The tile work extends from floor to ceiling, creating a cohesive and luxurious feel. The adjustable rain shower head offers a customizable bathing experience, combining both style and comfort.
This small bathroom remodel exemplifies our commitment to quality and attention to detail. By starting from the studs and rebuilding with modern, high-quality materials, we've created a space that is beautiful and built to last. Our client now enjoys a stylish, functional bathroom that meets their needs and enhances their home's value.
 Homeowner Services of Michigan LLC
We transformed a small, outdated space into a modern, functional retreat for our recent bathroom remodeling project. This comprehensive renovation began with a complete demolition, taking the bathroom down to the studs. We removed all existing fixtures, walls, flooring, and old plumbing, creating a blank canvas for our vision.
First, we addressed the plumbing. The old, corroded pipes were replaced with new, durable materials, ensuring reliable water flow and pressure for years to come. We installed new supply lines and drainage to accommodate the new fixtures, including the vanity and shower.
Next, we updated the electrical system. The outdated wiring was replaced with new, up-to-code electrical work. We installed new outlets, switches, and light fixtures, providing ample lighting for the space. An exhaust fan was also installed to improve ventilation and prevent moisture buildup, essential for maintaining the bathroom's longevity and hygiene.
We then focused on HVAC improvements, adding a new duct and vent system to ensure proper heating and cooling. This upgrade enhances comfort and contributes to better air quality and energy efficiency.
For the flooring, we chose ceramic tiles with a wood plank look. These tiles offer the warmth and elegance of wood while providing the durability and water resistance of ceramic. The flooring was meticulously installed, creating a seamless and visually appealing surface.
The centerpiece of the remodel is the stock single-sink vanity. This stylish yet practical addition provides ample storage and counter space, making daily routines more convenient. Above the vanity, we installed a sleek mirror that adds both functionality and a touch of sophistication.
The shower area received a complete makeover with new tiles and an adjustable rain shower head. The tile work extends from floor to ceiling, creating a cohesive and luxurious feel. The adjustable rain shower head offers a customizable bathing experience, combining both style and comfort.
This small bathroom remodel exemplifies our commitment to quality and attention to detail. By starting from the studs and rebuilding with modern, high-quality materials, we've created a space that is beautiful and built to last. Our client now enjoys a stylish, functional bathroom that meets their needs and enhances their home's value.
 LNC
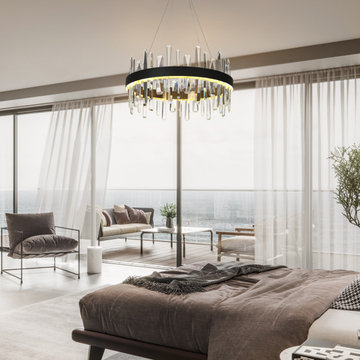
LNC"Using the luxurious K5 crystal in a more creative spread pattern, the Bertha collection expresses your courage to break through the usual routine. The warm 3045K LED light is dimmable with a dimmer, creating an ambient atmosphere. With a hint of an erogenous vibe, this collection is perfect to match your modern or contemporary kitchen island, dining area, or bedroom.Features
Model: HA04964B
Material: Metal,Crystal Glass
Color: Black, Brass
Style: Modern
Finish: Matte Black,Elelectroplated Brass,Crystal
Product Dimension: 23.6""W x 12""H x 23.6""E
Product Weight: 19 lbs.
Canopy Dimension: 6.3""D x 1.8""H
Shade Material: Crystal
Shade Color: Clear
Shade Shape: Drum
Shade Dimension: 23.6""W x 12""H x 23.6""E
Compatible ceiling types: flat, sloped, slanted and vaulted ceilings
Type of Drop: Wire
Height/Vertically Adjustable: Yes/No
Maximum Hanging Height: 71""
Minimum Hanging Height: 15""
Adjustable Height: Yes
Location: Dry
Dimmable: Yes, when used with dimmer switch and dimmable bulbs
Key Features
Integrated LED: Yes
Color Temperature: 3000K
Lumens: 2200LM
Color Rendering Index: >90
Rated Life: 20,000 Hours
Maximum Wattage: 40W
Number of Bulb: 1
Bulb Included: Yes
Voltage: 120V
Mount Type: Ceiling Mounts
Assembly Required: Yes
Mounting Accessory Included: Yes
Power Source: Hardwired
Professional installation recommended"
 Homeowner Services of Michigan LLC
We transformed a small, outdated space into a modern, functional retreat for our recent bathroom remodeling project. This comprehensive renovation began with a complete demolition, taking the bathroom down to the studs. We removed all existing fixtures, walls, flooring, and old plumbing, creating a blank canvas for our vision.
First, we addressed the plumbing. The old, corroded pipes were replaced with new, durable materials, ensuring reliable water flow and pressure for years to come. We installed new supply lines and drainage to accommodate the new fixtures, including the vanity and shower.
Next, we updated the electrical system. The outdated wiring was replaced with new, up-to-code electrical work. We installed new outlets, switches, and light fixtures, providing ample lighting for the space. An exhaust fan was also installed to improve ventilation and prevent moisture buildup, essential for maintaining the bathroom's longevity and hygiene.
We then focused on HVAC improvements, adding a new duct and vent system to ensure proper heating and cooling. This upgrade enhances comfort and contributes to better air quality and energy efficiency.
For the flooring, we chose ceramic tiles with a wood plank look. These tiles offer the warmth and elegance of wood while providing the durability and water resistance of ceramic. The flooring was meticulously installed, creating a seamless and visually appealing surface.
The centerpiece of the remodel is the stock single sink vanity. This stylish yet practical addition provides ample storage and counter space, making daily routines more convenient. Above the vanity, we installed a sleek mirror that adds both functionality and a touch of sophistication.
The shower area received a complete makeover with new tiles and an adjustable rain shower head. The tile work extends from floor to ceiling, creating a cohesive and luxurious feel. The adjustable rain shower head offers a customizable bathing experience, combining both style and comfort.
This small bathroom remodel exemplifies our commitment to quality and attention to detail. By starting from the studs and rebuilding with modern, high-quality materials, we've created a space that is beautiful and built to last. Our client now enjoys a stylish, functional bathroom that meets their needs and enhances their home's value.
 Bloomin Blinds of North Charlotte
Discover how premium light-filtering materials and smart-home automation can secure street-level entryway glass without losing natural daylight.
Choosing the right window treatments for a home's front entrance is one of the most challenging design decisions a homeowner can face. The front door is the focal point of a home's curb appeal, often featuring expansive glass panels or side-by-side double doors designed to make a grand architectural statement.
During the day, these large glass features are an asset, flooding entryways and foyers with beautiful natural daylight. However, for homes situated on busy local roads or highly trafficked street-level lots, the dynamic completely changes once the sun goes down.
The moment interior lights are switched on in the evening, a stark contrast is created with the dark outdoors. This creates a severe privacy issue, leaving the entire foyer completely exposed to passing traffic and pedestrians. Finding a solution that delivers absolute evening privacy without permanently plunging the front entrance into darkness during the day requires understanding how modern window treatment materials and operating systems interact.
Light-Filtering vs. Blackout Fabrics
The first step in solving street-level privacy is selecting the correct fabric type. Many homeowners mistakenly assume they need heavy, opaque blackout shades to secure their home from outside eyes at night. While blackout fabrics certainly block 100% of the view, they also block 100% of the natural daylight during the day, forcing you to constantly raise and lower the shades just to see inside your own foyer.
A more effective approach for entryways utilizes premium light-filtering materials. These specialized fabrics are engineered with a precise, tight weave that operates on the principles of directional light and optical density.
Daytime Functionality: When the sun is shining outside, the exterior light levels are significantly higher than the interior light levels. The light-filtering fabric diffuses the intense, direct sunlight into a soft, ambient glow throughout the entryway. This keeps the home bright, eliminates harsh glares, and protects interior hardwood flooring, paint, and trim from damaging UV rays.
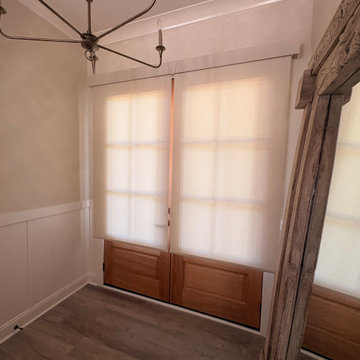
Night-Time Functionality: At night, the lighting dynamic reverses. The interior foyer lights make the inside bright, while the outside is dark. Because of the specialized tight weave, the fabric blocks the transmission of clear shapes and details. To a person standing out on the street or driving by on a busy road, the view inside is completely obstructed, delivering total privacy when the family is home for the evening.
Challenges of Front Door Installations
Securing privacy for a double wide front entrance introduces unique structural hurdles that standard windows do not face. Traditional blinds with hanging cords or manual pull chains are poorly suited for front doors. They disrupt the clean architectural lines of a grand foyer, create a safety hazard, and can easily get tangled or damaged when the doors are opened and closed.
The window treatments must be mounted high and wide enough above the door trim to ensure that the front doors can swing open and close freely without ever catching on the fabric or the lower hem bar.
How We Applied These Principles in Sherrills Ford, NC
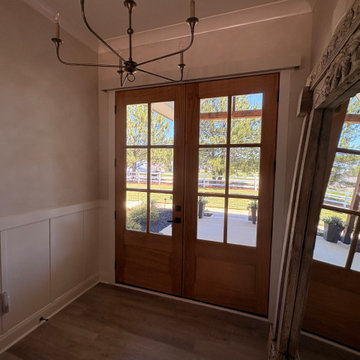
Applying these exact educational principles to real-world homes is what Cole and I do every day at Bloomin' Blinds of North Charlotte. We recently worked with a homeowner in Sherrills Ford whose beautiful new construction property sat on a highly trafficked road. They loved their double wide front door entrance but felt entirely too exposed to the street at night.
We brought our mobile showroom directly to their driveway. This allowed us to hold up premium light-filtering fabric samples directly against their entryway glass, matching the materials perfectly to their home's natural lighting, interior paint, and trim before making a single cut.
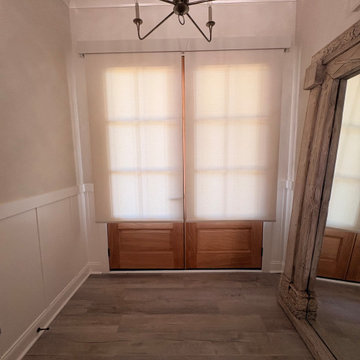
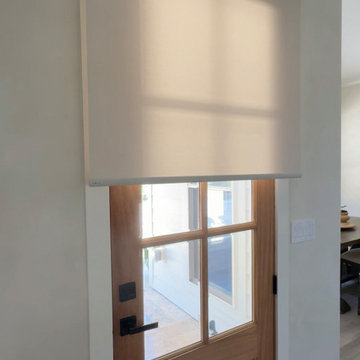
To solve their street-level privacy issue, we custom-built and installed two matching light-filtering roller shades, mounting them flawlessly side-by-side above the front door frame. To keep the home’s interior design completely cohesive, we carried the exact same style to the back of the house, installing a matching single roller shade on the rear door.
Smart Home Window Automation at Your Fingertips
Because entryway windows can be tall and awkward to reach manually, our family team integrated advanced smart-home motorization into this Sherrills Ford project.
Beyond the convenience of a handheld remote control, these automated roller shades feature seamless Wi-Fi integration. The homeowners can control their privacy through a dedicated smartphone app or link the system directly to their existing voice-activated smart home networks, including Amazon Alexa, Google Assistant, and Apple HomeKit.
This allows for complete hands-free window automation. The clients can program custom daily routines—such as setting the front entry shades to automatically lower exactly at sunset—or simply use a voice command to secure the foyer instantly from the comfort of the couch.
 Bloomin Blinds of North Charlotte
Discover how premium light-filtering materials and smart-home automation can secure street-level entryway glass without losing natural daylight.
Choosing the right window treatments for a home's front entrance is one of the most challenging design decisions a homeowner can face. The front door is the focal point of a home's curb appeal, often featuring expansive glass panels or side-by-side double doors designed to make a grand architectural statement.
During the day, these large glass features are an asset, flooding entryways and foyers with beautiful natural daylight. However, for homes situated on busy local roads or highly trafficked street-level lots, the dynamic completely changes once the sun goes down.
The moment interior lights are switched on in the evening, a stark contrast is created with the dark outdoors. This creates a severe privacy issue, leaving the entire foyer completely exposed to passing traffic and pedestrians. Finding a solution that delivers absolute evening privacy without permanently plunging the front entrance into darkness during the day requires understanding how modern window treatment materials and operating systems interact.
Light-Filtering vs. Blackout Fabrics
The first step in solving street-level privacy is selecting the correct fabric type. Many homeowners mistakenly assume they need heavy, opaque blackout shades to secure their home from outside eyes at night. While blackout fabrics certainly block 100% of the view, they also block 100% of the natural daylight during the day, forcing you to constantly raise and lower the shades just to see inside your own foyer.
A more effective approach for entryways utilizes premium light-filtering materials. These specialized fabrics are engineered with a precise, tight weave that operates on the principles of directional light and optical density.
Daytime Functionality: When the sun is shining outside, the exterior light levels are significantly higher than the interior light levels. The light-filtering fabric diffuses the intense, direct sunlight into a soft, ambient glow throughout the entryway. This keeps the home bright, eliminates harsh glares, and protects interior hardwood flooring, paint, and trim from damaging UV rays.
Night-Time Functionality: At night, the lighting dynamic reverses. The interior foyer lights make the inside bright, while the outside is dark. Because of the specialized tight weave, the fabric blocks the transmission of clear shapes and details. To a person standing out on the street or driving by on a busy road, the view inside is completely obstructed, delivering total privacy when the family is home for the evening.
Challenges of Front Door Installations
Securing privacy for a double wide front entrance introduces unique structural hurdles that standard windows do not face. Traditional blinds with hanging cords or manual pull chains are poorly suited for front doors. They disrupt the clean architectural lines of a grand foyer, create a safety hazard, and can easily get tangled or damaged when the doors are opened and closed.
The window treatments must be mounted high and wide enough above the door trim to ensure that the front doors can swing open and close freely without ever catching on the fabric or the lower hem bar.
How We Applied These Principles in Sherrills Ford, NC
Applying these exact educational principles to real-world homes is what Cole and I do every day at Bloomin' Blinds of North Charlotte. We recently worked with a homeowner in Sherrills Ford whose beautiful new construction property sat on a highly trafficked road. They loved their double wide front door entrance but felt entirely too exposed to the street at night.
We brought our mobile showroom directly to their driveway. This allowed us to hold up premium light-filtering fabric samples directly against their entryway glass, matching the materials perfectly to their home's natural lighting, interior paint, and trim before making a single cut.
To solve their street-level privacy issue, we custom-built and installed two matching light-filtering roller shades, mounting them flawlessly side-by-side above the front door frame. To keep the home’s interior design completely cohesive, we carried the exact same style to the back of the house, installing a matching single roller shade on the rear door.
Smart Home Window Automation at Your Fingertips
Because entryway windows can be tall and awkward to reach manually, our family team integrated advanced smart-home motorization into this Sherrills Ford project.
Beyond the convenience of a handheld remote control, these automated roller shades feature seamless Wi-Fi integration. The homeowners can control their privacy through a dedicated smartphone app or link the system directly to their existing voice-activated smart home networks, including Amazon Alexa, Google Assistant, and Apple HomeKit.
This allows for complete hands-free window automation. The clients can program custom daily routines—such as setting the front entry shades to automatically lower exactly at sunset—or simply use a voice command to secure the foyer instantly from the comfort of the couch.
 Bloomin Blinds of North Charlotte
Discover how premium light-filtering materials and smart-home automation can secure street-level entryway glass without losing natural daylight.
Choosing the right window treatments for a home's front entrance is one of the most challenging design decisions a homeowner can face. The front door is the focal point of a home's curb appeal, often featuring expansive glass panels or side-by-side double doors designed to make a grand architectural statement.
During the day, these large glass features are an asset, flooding entryways and foyers with beautiful natural daylight. However, for homes situated on busy local roads or highly trafficked street-level lots, the dynamic completely changes once the sun goes down.
The moment interior lights are switched on in the evening, a stark contrast is created with the dark outdoors. This creates a severe privacy issue, leaving the entire foyer completely exposed to passing traffic and pedestrians. Finding a solution that delivers absolute evening privacy without permanently plunging the front entrance into darkness during the day requires understanding how modern window treatment materials and operating systems interact.
Light-Filtering vs. Blackout Fabrics
The first step in solving street-level privacy is selecting the correct fabric type. Many homeowners mistakenly assume they need heavy, opaque blackout shades to secure their home from outside eyes at night. While blackout fabrics certainly block 100% of the view, they also block 100% of the natural daylight during the day, forcing you to constantly raise and lower the shades just to see inside your own foyer.
A more effective approach for entryways utilizes premium light-filtering materials. These specialized fabrics are engineered with a precise, tight weave that operates on the principles of directional light and optical density.
Daytime Functionality: When the sun is shining outside, the exterior light levels are significantly higher than the interior light levels. The light-filtering fabric diffuses the intense, direct sunlight into a soft, ambient glow throughout the entryway. This keeps the home bright, eliminates harsh glares, and protects interior hardwood flooring, paint, and trim from damaging UV rays.
Night-Time Functionality: At night, the lighting dynamic reverses. The interior foyer lights make the inside bright, while the outside is dark. Because of the specialized tight weave, the fabric blocks the transmission of clear shapes and details. To a person standing out on the street or driving by on a busy road, the view inside is completely obstructed, delivering total privacy when the family is home for the evening.
Challenges of Front Door Installations
Securing privacy for a double wide front entrance introduces unique structural hurdles that standard windows do not face. Traditional blinds with hanging cords or manual pull chains are poorly suited for front doors. They disrupt the clean architectural lines of a grand foyer, create a safety hazard, and can easily get tangled or damaged when the doors are opened and closed.
The window treatments must be mounted high and wide enough above the door trim to ensure that the front doors can swing open and close freely without ever catching on the fabric or the lower hem bar.
How We Applied These Principles in Sherrills Ford, NC
Applying these exact educational principles to real-world homes is what Cole and I do every day at Bloomin' Blinds of North Charlotte. We recently worked with a homeowner in Sherrills Ford whose beautiful new construction property sat on a highly trafficked road. They loved their double wide front door entrance but felt entirely too exposed to the street at night.
We brought our mobile showroom directly to their driveway. This allowed us to hold up premium light-filtering fabric samples directly against their entryway glass, matching the materials perfectly to their home's natural lighting, interior paint, and trim before making a single cut.
To solve their street-level privacy issue, we custom-built and installed two matching light-filtering roller shades, mounting them flawlessly side-by-side above the front door frame. To keep the home’s interior design completely cohesive, we carried the exact same style to the back of the house, installing a matching single roller shade on the rear door.
Smart Home Window Automation at Your Fingertips
Because entryway windows can be tall and awkward to reach manually, our family team integrated advanced smart-home motorization into this Sherrills Ford project.
Beyond the convenience of a handheld remote control, these automated roller shades feature seamless Wi-Fi integration. The homeowners can control their privacy through a dedicated smartphone app or link the system directly to their existing voice-activated smart home networks, including Amazon Alexa, Google Assistant, and Apple HomeKit.
This allows for complete hands-free window automation. The clients can program custom daily routines—such as setting the front entry shades to automatically lower exactly at sunset—or simply use a voice command to secure the foyer instantly from the comfort of the couch.
 Bloomin Blinds of North Charlotte
Discover how premium light-filtering materials and smart-home automation can secure street-level entryway glass without losing natural daylight.
Choosing the right window treatments for a home's front entrance is one of the most challenging design decisions a homeowner can face. The front door is the focal point of a home's curb appeal, often featuring expansive glass panels or side-by-side double doors designed to make a grand architectural statement.
During the day, these large glass features are an asset, flooding entryways and foyers with beautiful natural daylight. However, for homes situated on busy local roads or highly trafficked street-level lots, the dynamic completely changes once the sun goes down.
The moment interior lights are switched on in the evening, a stark contrast is created with the dark outdoors. This creates a severe privacy issue, leaving the entire foyer completely exposed to passing traffic and pedestrians. Finding a solution that delivers absolute evening privacy without permanently plunging the front entrance into darkness during the day requires understanding how modern window treatment materials and operating systems interact.
Light-Filtering vs. Blackout Fabrics
The first step in solving street-level privacy is selecting the correct fabric type. Many homeowners mistakenly assume they need heavy, opaque blackout shades to secure their home from outside eyes at night. While blackout fabrics certainly block 100% of the view, they also block 100% of the natural daylight during the day, forcing you to constantly raise and lower the shades just to see inside your own foyer.
A more effective approach for entryways utilizes premium light-filtering materials. These specialized fabrics are engineered with a precise, tight weave that operates on the principles of directional light and optical density.
Daytime Functionality: When the sun is shining outside, the exterior light levels are significantly higher than the interior light levels. The light-filtering fabric diffuses the intense, direct sunlight into a soft, ambient glow throughout the entryway. This keeps the home bright, eliminates harsh glares, and protects interior hardwood flooring, paint, and trim from damaging UV rays.
Night-Time Functionality: At night, the lighting dynamic reverses. The interior foyer lights make the inside bright, while the outside is dark. Because of the specialized tight weave, the fabric blocks the transmission of clear shapes and details. To a person standing out on the street or driving by on a busy road, the view inside is completely obstructed, delivering total privacy when the family is home for the evening.
Challenges of Front Door Installations
Securing privacy for a double wide front entrance introduces unique structural hurdles that standard windows do not face. Traditional blinds with hanging cords or manual pull chains are poorly suited for front doors. They disrupt the clean architectural lines of a grand foyer, create a safety hazard, and can easily get tangled or damaged when the doors are opened and closed.
The window treatments must be mounted high and wide enough above the door trim to ensure that the front doors can swing open and close freely without ever catching on the fabric or the lower hem bar.
How We Applied These Principles in Sherrills Ford, NC
Applying these exact educational principles to real-world homes is what Cole and I do every day at Bloomin' Blinds of North Charlotte. We recently worked with a homeowner in Sherrills Ford whose beautiful new construction property sat on a highly trafficked road. They loved their double wide front door entrance but felt entirely too exposed to the street at night.
We brought our mobile showroom directly to their driveway. This allowed us to hold up premium light-filtering fabric samples directly against their entryway glass, matching the materials perfectly to their home's natural lighting, interior paint, and trim before making a single cut.
To solve their street-level privacy issue, we custom-built and installed two matching light-filtering roller shades, mounting them flawlessly side-by-side above the front door frame. To keep the home’s interior design completely cohesive, we carried the exact same style to the back of the house, installing a matching single roller shade on the rear door.
Smart Home Window Automation at Your Fingertips
Because entryway windows can be tall and awkward to reach manually, our family team integrated advanced smart-home motorization into this Sherrills Ford project.
Beyond the convenience of a handheld remote control, these automated roller shades feature seamless Wi-Fi integration. The homeowners can control their privacy through a dedicated smartphone app or link the system directly to their existing voice-activated smart home networks, including Amazon Alexa, Google Assistant, and Apple HomeKit.
This allows for complete hands-free window automation. The clients can program custom daily routines—such as setting the front entry shades to automatically lower exactly at sunset—or simply use a voice command to secure the foyer instantly from the comfort of the couch.

 safe ZOnea
If you’re active on GardenWeb sharing plant photos, asking for advice, tracking seasonal progress you already understand how much detail goes into gardening. Soil pH, rainfall, emerging leaves, bloom counts, fertilizer schedules it adds up fast. But all that rich information often remains buried in posts, lists or memory. What if you could visualize that data and turn it into clear quick insights? That’s where a graph maker becomes a game-changer for your gardening workflow.
1. Why garden data belongs on a graph
On GardenWeb, you’ll find forums for everything from perennial care, vegetable gardening, patios, herbs, even cooking and craft projects. While plant lovers share observations and ask questions, many track progress manually in spreadsheets or memory. A graph maker flips that around:
Instead of a list of numbers (e.g., “Soil test: pH 6.4 in May, 6.1 in October”), you get a line graph showing the decline over time.
Instead of guessing which plant bloomed most, you see a bar chart comparing counts across plants.
Instead of manually calculating average rainfall effect, you plot scatter points of bloom count vs. rainfall.
By turning your data into visuals, you’re not just recording—you’re analysing, learning and improving. For GardenWeb users this means smarter decisions: Which fertilizer actually improves bloom count? Which shady spot recovers slower? A graph maker gives clarity.
2. What is a graph maker and how to use one
A graph maker is a web tool or software that lets you input raw data (numbers, dates, categories) and output visual charts like line graphs, bar charts, scatter plots, etc. It might allow you to import a spreadsheet, select chart type, customize colours, label axes, and export the image for your blog, forum post or personal log.
Here’s how you could apply it for gardening:
Log blooms per week for each rose plant.
Using the graph maker, choose line graph to track changes over weeks.
Label your y-axis “Number of Blooms”, x-axis “Week of Year”.
Add colour lines for each plant for easy comparison.
Export as PNG and embed it in a GardenWeb forum post: “See bloom trend for my ‘Peace’ vs ‘Knock Out’ roses”.
This isn’t just pretty-to-look-at: it makes the trend obvious, invites discussion (“Hey, your ‘Knock Out’ line dips after week 28—what changed?”) and helps you refine your routine.
3. Use these specific scenarios on GardenWeb
A. Soil pH and plant health tracking
After multiple tests you have pH values over time and bloom results. Upload both datasets into the graph maker, produce a dual-axis line graph: soil pH on one axis, bloom count on the other. Post your findings in the “Soil, Fertility & Nutrients” forum and get feedback.
B. Seasonal pest or disease appearance
Record number of aphids spotted each month and whether you used treatment. A bar chart via the graph maker can show pre- and post-treatment figures. Then ask the “Insect & Disease Control” forum for advice based on your visual data.
C. Yield comparison between varieties
You grow two zucchini varieties. You keep weekly yield in pounds. Use the graph maker for a side-by-side bar chart. Share in the “Vegetable Gardening” forum: “Which was better this year? See the chart”.
D. Rainfall vs growth rate
You log weekly rainfall and growth (in cm) of your tomato plants. Use scatter plot in graph maker. If a pattern emerges, you’re ready to post: “Is my growth plateau due to drought? Chart shows a clear correlation.”
4. Why this elevates your GardenWeb contributions
When you post with a chart made by a graph maker, you’re doing more than asking or showing off. You’re investigating. You’re analysing. You invite the community to give feedback on data, not just anecdotes. That elevates the discussion. Instead of “My plant died, any ideas?” you post “See this graph of pH drop and bloom count—what might be the limiting factor?” High-quality visuals raise your post’s value and garner more thoughtful responses.
Plus, your posts become useful references for others: someone else can say, “Cool graphic, can you share your data sheet?” You build credibility and help the forum become a learning hub—not just a Q&A board.
5. Tips for using a graph maker effectively in the GardenWeb context
Keep it simple: One chart, one insight. Don’t overcrowd.
Label clearly: Titles, axis labels, units (e.g., cm/week, mg/L, °F).
Use readable colours: Avoid faint tones that vanish on mobile.
Annotate when needed: Add notes like “Fertiliser switched week 12” or “Shade cloth added”.
Provide context in your post: Don’t leave the chart alone—write a few sentences explaining what it shows and what you’re seeking.
Embed carefully: Make sure your image displays properly in GardenWeb; check mobile view.
Share raw data: If possible link to your spreadsheet so others can replicate or comment.
Be open to feedback: The chart invites questions; embrace them.
6. Possible pitfalls and how to avoid them
Bad data = bad chart: If your measurements aren’t consistent, your graph will mislead. Use standardized data collection.
Too much complexity: Multi-axis charts, too many variables—confusing. Stick to one or two variables.
Overlooking mobile viewers: Many GardenWeb users browse via phones. Use large fonts and simple visuals.
Ignoring the narrative: Chart alone won’t answer. Explain what it means and what you need.
Outdated charts: If you update your data annually, keep your visuals current or label them clearly as “2024 data”.
7. Final thoughts
On GardenWeb you’ll find a vibrant community of gardeners, DIYers, cooks and design lovers.Using a graph maker for your posts and progress turns your experience from casual hobby-logging into smart data-driven gardening. You’ll not only learn more—your peers will learn more, too.
So next time you log your plant growth, record your yield, test your soil or track pests—don’t just note it. Plot it. Use a graph maker. Share it in the forum. Let your garden tell the story, and let the community help you write the next chapter.
 Homeowner Services of Michigan LLC
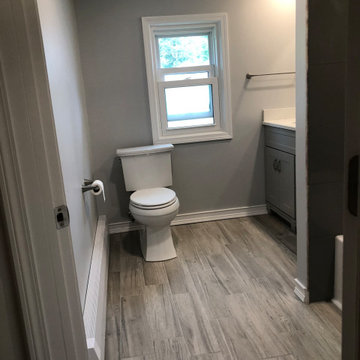
We transformed a small, outdated space into a modern, functional retreat for our recent bathroom remodeling project. This comprehensive renovation began with a complete demolition, taking the bathroom down to the studs. We removed all existing fixtures, walls, flooring, and old plumbing, creating a blank canvas for our vision.
First, we addressed the plumbing. The old, corroded pipes were replaced with new, durable materials, ensuring reliable water flow and pressure for years to come. We installed new supply lines and drainage to accommodate the new fixtures, including the vanity and shower.
Next, we updated the electrical system. The outdated wiring was replaced with new, up-to-code electrical work. We installed new outlets, switches, and light fixtures, providing ample lighting for the space. An exhaust fan was also installed to improve ventilation and prevent moisture buildup, essential for maintaining the bathroom's longevity and hygiene.
We then focused on HVAC improvements, adding a new duct and vent system to ensure proper heating and cooling. This upgrade enhances comfort and contributes to better air quality and energy efficiency.
For the flooring, we chose ceramic tiles with a wood plank look. These tiles offer the warmth and elegance of wood while providing the durability and water resistance of ceramic. The flooring was meticulously installed, creating a seamless and visually appealing surface.
The centerpiece of the remodel is the stock single-sink vanity. This stylish yet practical addition provides ample storage and counter space, making daily routines more convenient. Above the vanity, we installed a sleek mirror that adds both functionality and a touch of sophistication.
The shower area received a complete makeover with new tiles and an adjustable rain shower head. The tile work extends from floor to ceiling, creating a cohesive and luxurious feel. The adjustable rain shower head offers a customizable bathing experience, combining both style and comfort.
This small bathroom remodel exemplifies our commitment to quality and attention to detail. By starting from the studs and rebuilding with modern, high-quality materials, we've created a space that is beautiful and built to last. Our client now enjoys a stylish, functional bathroom that meets their needs and enhances their home's value.
2