
Search results for "Social issues" in Home Design Ideas
 Sosna Inc
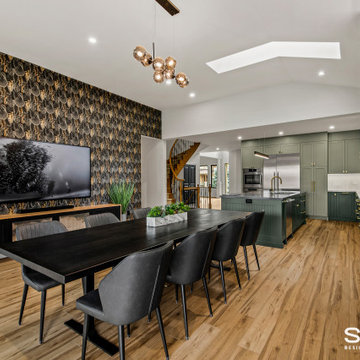
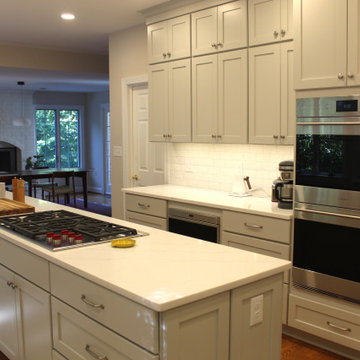
The client, a single man in his thirties, was unhappy with his dark, closed-off home. He wanted a space for entertaining but lacked a functional kitchen and dining area. The master bathroom also felt cramped and outdated.
To address these issues, we focused on creating an open-concept kitchen with a dedicated entertainment zone and a multifunctional island. We also updated the master bathroom with a walk-in shower and floating vanity. Additionally, we modernized the front entrance and mudroom with improved storage solutions.
Key features of the renovation include:
Open-concept kitchen: Removed the wall between the kitchen and dining room to create a more spacious and inviting area.
Entertainment zone: Added a stylish bar area and a space for a large TV to create a dedicated space for socializing and watching TV.
Multifunctional island: Designed a large island that can be used for food preparation, casual dining, and socializing.
Ample storage: Incorporated custom cabinets and drawers to keep the kitchen organized and clutter-free.
Master bathroom renovation: Installed a spacious walk-in shower and a floating vanity to create a more modern and spa-like feel.
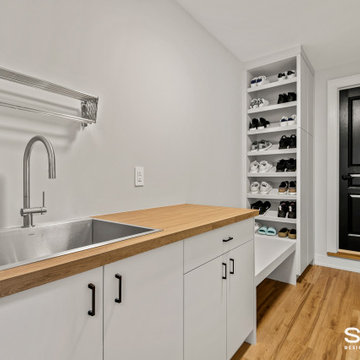
Front entrance and mudroom update: Modernized the entrance with updated fixtures and added clever storage solutions.
The final result is a stylish and functional home that perfectly reflects the client's personality and lifestyle.
 Sosna Inc
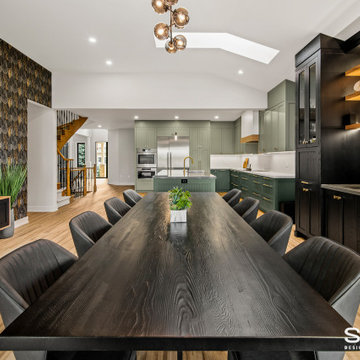
The client, a single man in his thirties, was unhappy with his dark, closed-off home. He wanted a space for entertaining but lacked a functional kitchen and dining area. The master bathroom also felt cramped and outdated.
To address these issues, we focused on creating an open-concept kitchen with a dedicated entertainment zone and a multifunctional island. We also updated the master bathroom with a walk-in shower and floating vanity. Additionally, we modernized the front entrance and mudroom with improved storage solutions.
Key features of the renovation include:
Open-concept kitchen: Removed the wall between the kitchen and dining room to create a more spacious and inviting area.
Entertainment zone: Added a stylish bar area and a space for a large TV to create a dedicated space for socializing and watching TV.
Multifunctional island: Designed a large island that can be used for food preparation, casual dining, and socializing.
Ample storage: Incorporated custom cabinets and drawers to keep the kitchen organized and clutter-free.
Master bathroom renovation: Installed a spacious walk-in shower and a floating vanity to create a more modern and spa-like feel.
Front entrance and mudroom update: Modernized the entrance with updated fixtures and added clever storage solutions.
The final result is a stylish and functional home that perfectly reflects the client's personality and lifestyle.
 Sosna Inc
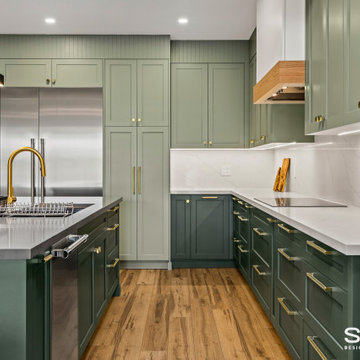
The client, a single man in his thirties, was unhappy with his dark, closed-off home. He wanted a space for entertaining but lacked a functional kitchen and dining area. The master bathroom also felt cramped and outdated.
To address these issues, we focused on creating an open-concept kitchen with a dedicated entertainment zone and a multifunctional island. We also updated the master bathroom with a walk-in shower and floating vanity. Additionally, we modernized the front entrance and mudroom with improved storage solutions.
Key features of the renovation include:
Open-concept kitchen: Removed the wall between the kitchen and dining room to create a more spacious and inviting area.
Entertainment zone: Added a stylish bar area and a space for a large TV to create a dedicated space for socializing and watching TV.
Multifunctional island: Designed a large island that can be used for food preparation, casual dining, and socializing.
Ample storage: Incorporated custom cabinets and drawers to keep the kitchen organized and clutter-free.
Master bathroom renovation: Installed a spacious walk-in shower and a floating vanity to create a more modern and spa-like feel.
Front entrance and mudroom update: Modernized the entrance with updated fixtures and added clever storage solutions.
The final result is a stylish and functional home that perfectly reflects the client's personality and lifestyle.
Find the right local pro for your project
 Sosna Inc
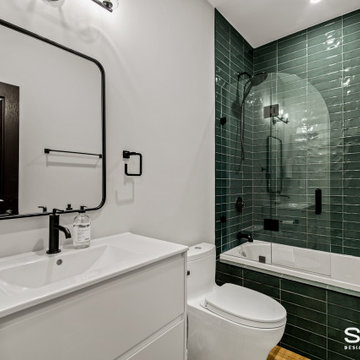
The client, a single man in his thirties, was unhappy with his dark, closed-off home. He wanted a space for entertaining but lacked a functional kitchen and dining area. The master bathroom also felt cramped and outdated.
To address these issues, we focused on creating an open-concept kitchen with a dedicated entertainment zone and a multifunctional island. We also updated the master bathroom with a walk-in shower and floating vanity. Additionally, we modernized the front entrance and mudroom with improved storage solutions.
Key features of the renovation include:
Open-concept kitchen: Removed the wall between the kitchen and dining room to create a more spacious and inviting area.
Entertainment zone: Added a stylish bar area and a space for a large TV to create a dedicated space for socializing and watching TV.
Multifunctional island: Designed a large island that can be used for food preparation, casual dining, and socializing.
Ample storage: Incorporated custom cabinets and drawers to keep the kitchen organized and clutter-free.
Master bathroom renovation: Installed a spacious walk-in shower and a floating vanity to create a more modern and spa-like feel.
Front entrance and mudroom update: Modernized the entrance with updated fixtures and added clever storage solutions.
The final result is a stylish and functional home that perfectly reflects the client's personality and lifestyle.
 Sosna Inc
The client, a single man in his thirties, was unhappy with his dark, closed-off home. He wanted a space for entertaining but lacked a functional kitchen and dining area. The master bathroom also felt cramped and outdated.
To address these issues, we focused on creating an open-concept kitchen with a dedicated entertainment zone and a multifunctional island. We also updated the master bathroom with a walk-in shower and floating vanity. Additionally, we modernized the front entrance and mudroom with improved storage solutions.
Key features of the renovation include:
Open-concept kitchen: Removed the wall between the kitchen and dining room to create a more spacious and inviting area.
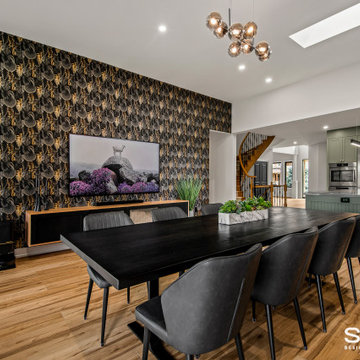
Entertainment zone: Added a stylish bar area and a space for a large TV to create a dedicated space for socializing and watching TV.
Multifunctional island: Designed a large island that can be used for food preparation, casual dining, and socializing.
Ample storage: Incorporated custom cabinets and drawers to keep the kitchen organized and clutter-free.
Master bathroom renovation: Installed a spacious walk-in shower and a floating vanity to create a more modern and spa-like feel.
Front entrance and mudroom update: Modernized the entrance with updated fixtures and added clever storage solutions.
The final result is a stylish and functional home that perfectly reflects the client's personality and lifestyle.
 Sosna Inc
The client, a single man in his thirties, was unhappy with his dark, closed-off home. He wanted a space for entertaining but lacked a functional kitchen and dining area. The master bathroom also felt cramped and outdated.
To address these issues, we focused on creating an open-concept kitchen with a dedicated entertainment zone and a multifunctional island. We also updated the master bathroom with a walk-in shower and floating vanity. Additionally, we modernized the front entrance and mudroom with improved storage solutions.
Key features of the renovation include:
Open-concept kitchen: Removed the wall between the kitchen and dining room to create a more spacious and inviting area.
Entertainment zone: Added a stylish bar area and a space for a large TV to create a dedicated space for socializing and watching TV.
Multifunctional island: Designed a large island that can be used for food preparation, casual dining, and socializing.
Ample storage: Incorporated custom cabinets and drawers to keep the kitchen organized and clutter-free.
Master bathroom renovation: Installed a spacious walk-in shower and a floating vanity to create a more modern and spa-like feel.
Front entrance and mudroom update: Modernized the entrance with updated fixtures and added clever storage solutions.
The final result is a stylish and functional home that perfectly reflects the client's personality and lifestyle.
 Tile Doctor Ltd
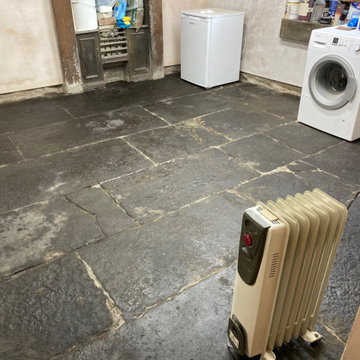
I was contacted by a client in Kendal to see if I could help with their Black Flagstone basement floor. As you can see from the photographs it was in a bit of a state and the stone looked mostly White rather than Black.
I carried out a site visit, to survey the floor and work out the best approach to restore its appearance. After testing a few different products and techniques I worked out an effective restoration plan and discussed this with the owner. Happy with my plan and costing’s we agreed a date to start the work. Being in the basement of the property had its challenges but it would mean we could work socially distanced from the owner.
To restore the floors appearance, I started with a set of coarse wire (60 and 120 grit) brushes lubricated with Tile Doctor Remove and Go which is a strong coatings remover. I had considered using milling pads on the tiles to reveal a new surface underneath but that does involve the use of an expensive set of coarse pads and given it was a basement the owners didn’t feel the extra expense would be justified.
The wire grits work well on rough stone floors when attached to a weighted buffing machine and we add some Tile Doctor Remove and Go to the mix. Once clean the floor was rinsed with water and the slurry extracted using an industrial wet vacuum. After cleaning the floor, it looked transformed, some pointing was required so we carried this out after the main clean.
The stone was left to dry out for a few days before returning to apply a sealer. For this floor I felt Tile Doctor X-Tra seal would be the best product and applied two coats. I chose X-Tra seal for this job as it ticks a lot of boxes, it’s a breathable oil-based resin sealer which being breathable will allow moisture to rise through the floor. Old floors like this don’t have a damp proof membrane so it is important to choose a sealer that can allow the floor to breath and not let damp build up under the floor where it can reach out to the walls and cause rising damp.
I also chose X-Tra Seal as it has a great ability to bring out the colour of the darker stone due to its high oil content, the oil will deter salts from forming if efflorescence is an issue. This is a unique property of this sealer as we never know if efflorescent salts are going to form or not so having this in place as a sealer is a great plus for a Tile Doctor, it is new to the market and is already proving popular on floors like this and for protecting external stone.
If the tiles are smooth Tile Doctor X-Tra Seal adds a bit of a sheen to the appearance of the stone however this stone was very rough, so we didn’t manage a shine, but the customer was happy with the matt finish and the slightly honed effect.
The floor looked great and much more appealing making the space more attractive and likely to be used. For aftercare I recommended Tile Doctor Neutral Tile Cleaner which will clean the floor without impacting the sealer which can be a problem with many of the stronger products you find in supermarkets.
Heidi Taylor
South Cumbria Tile Doctor
 Tile Doctor Ltd
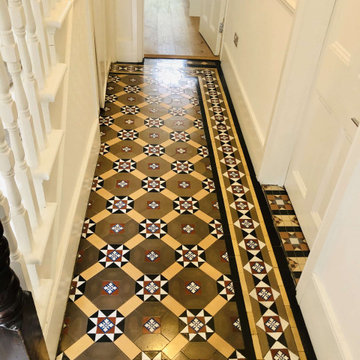
This customer had just moved into a property in Chesham around eighteen months ago. During that time, they had completely renovated the property and in the process had pulled up the hallway carpet to discover a lovely Victorian tiled floor which appeared to be in good condition but very dirty. Period features like these can add a lot of value to a house these days and so they decided to investigate having it professionally cleaned and contacted me for a quote.
Although I can give some indication of price over the phone you never know exactly what to expect so my preference is to visit the property a conduct a test clean. It’s a little trickier to do this now due to COVID-19 but using a combination of PPE, maximum ventilation and social distancing measures I was able to work on the floor. The tiles were in good order with no replacements needed so my focus would be removing carpet adhesive and ingrained dirt. The test went well, and I followed up with a quotation which was accepted, and a date arranged to do the work.
I had worked out previously that the quickest was to deep clean the floor and remove the glue and any old seal was to apply Tile Doctor Remove and Go which as its name suggests is a coatings removed designed for Tiled floors. My method was to spray strong a dilution of Remove and Go onto the Victorian tiles and leave it to soak in for fifteen minutes. Then it was scrubbed in with a black scrubbing pad fitted to a rotary machine. The soil was rinsed off using a minimal of water and extracted with a wet vacuum.
Once the floor had dried, I inspected the tiles and could see more work would be needed to get the white tiles really sparkling. For this I went over the floor using a 200-grit resurfacing pad using water to lubricate the process, I also used handheld burnishing blocks of different grits to do the edges. With this extra effort and another rinse with water to remove the soil the floor looked great, and so I left for the day so it could dry out ready for sealing.
I came back the next day and started by taking moisture readings with a damp meter to ensure the tiles were dry and ready for sealing. This is important as you don’t want to apply sealer to a damp tile and old floors can suffer from damp issues due to the lack of a damp proof membrane.
All was well with the floor, so I was able to move straight onto sealing which started with the application of a single coat of Tile Doctor Colour Grow. This is an impregnating sealer that soaks into the pores of the tile enhancing colour and adding protection. Once this had dried, I followed up with another seven coats of Tile Doctor Seal and Go which adds further protection and leaves a nice subtle sheen to the tiles. This product works really well on old Victorian Tiles like these and being water based it doesn’t leave a smell as it dries.
Andrew Newstead
South Buckinghamshire Tile Doctor

 Coates Design Architecture + Interiors
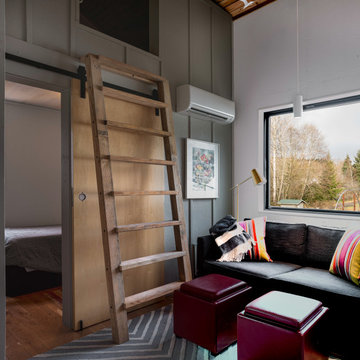
Architect Matthew Coates’ award-winning “ReHOME: Resilience & Regeneration” project takes on two pressing social and environmental issues: the lack of affordable housing in cities throughout the United States, and the vast amount of waste produced during construction and demolition.
This project won the prestigious 2022 AIA Seattle’s Award of Merit in “Research & Innovation” owing to its plan to save millions of dollars in resources while creating jobs that develop employable skills and constructing low-cost housing for diverse demographics. Through community engagement and volunteer work, future residents will benefit from the housing while learning skills of construction and management. The vision is to then introduce volunteers to industries wherein they might acquire future employment. This project introduces innovations not yet utilized in efforts to increase the inventory of affordable housing.
 Coates Design Architecture + Interiors
Architect Matthew Coates’ award-winning “ReHOME: Resilience & Regeneration” project takes on two pressing social and environmental issues: the lack of affordable housing in cities throughout the United States, and the vast amount of waste produced during construction and demolition.
This project won the prestigious 2022 AIA Seattle’s Award of Merit in “Research & Innovation” owing to its plan to save millions of dollars in resources while creating jobs that develop employable skills and constructing low-cost housing for diverse demographics. Through community engagement and volunteer work, future residents will benefit from the housing while learning skills of construction and management. The vision is to then introduce volunteers to industries wherein they might acquire future employment. This project introduces innovations not yet utilized in efforts to increase the inventory of affordable housing.
 Coates Design Architecture + Interiors
Architect Matthew Coates’ award-winning “ReHOME: Resilience & Regeneration” project takes on two pressing social and environmental issues: the lack of affordable housing in cities throughout the United States, and the vast amount of waste produced during construction and demolition.
This project won the prestigious 2022 AIA Seattle’s Award of Merit in “Research & Innovation” owing to its plan to save millions of dollars in resources while creating jobs that develop employable skills and constructing low-cost housing for diverse demographics. Through community engagement and volunteer work, future residents will benefit from the housing while learning skills of construction and management. The vision is to then introduce volunteers to industries wherein they might acquire future employment. This project introduces innovations not yet utilized in efforts to increase the inventory of affordable housing.

 Coates Design Architecture + Interiors
Architect Matthew Coates’ award-winning “ReHOME: Resilience & Regeneration” project takes on two pressing social and environmental issues: the lack of affordable housing in cities throughout the United States, and the vast amount of waste produced during construction and demolition.
This project won the prestigious 2022 AIA Seattle’s Award of Merit in “Research & Innovation” owing to its plan to save millions of dollars in resources while creating jobs that develop employable skills and constructing low-cost housing for diverse demographics. Through community engagement and volunteer work, future residents will benefit from the housing while learning skills of construction and management. The vision is to then introduce volunteers to industries wherein they might acquire future employment. This project introduces innovations not yet utilized in efforts to increase the inventory of affordable housing.
 Talon Construction Inc.
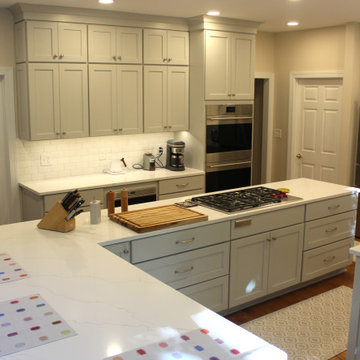
Renovating an open kitchen can be an exciting project that can improve the functionality, aesthetics, and value of your home. Here are some steps to guide you through the process:
Planning and Design:
Define your goals and budget for the renovation.
Determine the layout of your open kitchen. Consider factors like the work triangle (the relationship between the stove, sink, and refrigerator) and the flow of traffic.
Choose a design style and color scheme that suits your preferences and complements the rest of your home.
Research and Inspiration:
Collect inspiration from magazines, websites, and social media platforms to get ideas for your open kitchen design.
Create a mood board or vision board to help you visualize the final look.
Hiring Professionals:
Depending on the scale of your renovation, you may need to hire professionals, such as architects, interior designers, contractors, and electricians. Make sure to check references and get multiple quotes.
Demolition and Structural Work:
If your renovation involves structural changes, like removing walls, this is the time to do it. Ensure that the necessary permits are obtained.
Plumbing and Electrical Work:
Update or reconfigure plumbing and electrical systems as needed. This may include adding or moving outlets, switches, and lighting fixtures.
Cabinetry and Countertops:
Choose and install new kitchen cabinets and countertops. This is a significant part of your renovation and will greatly influence the kitchen's appearance and functionality.
Appliances:
Update or install new kitchen appliances, including the refrigerator, stove, oven, microwave, and dishwasher.
Flooring:
Select and install flooring that is suitable for a kitchen, such as hardwood, tile, laminate, or vinyl. Ensure it complements the overall design.
Backsplash and Wall Finishes:
Install a backsplash that matches your design and protects your walls. Consider materials like tile, glass, or stainless steel.
Lighting:
Choose and install various types of lighting, including ambient, task, and accent lighting. Pendant lights above an island or breakfast bar can add style and functionality.
Paint and Finishing Touches:
Paint the walls and ceiling in the colors you've selected. Add finishing touches like hardware, window treatments, and decorative elements.
Furniture and Accessories:
Bring in furniture, such as a dining table and chairs, barstools, and any other pieces you need to complete the space. Decorate with accessories like artwork, plants, and decorative items.
Final Inspection and Cleanup:
Ensure that all work meets safety and building code requirements. Clean the entire area thoroughly.
Enjoy Your New Kitchen:
Once the renovation is complete and everything is in its place, enjoy your beautiful, functional open kitchen.
Remember that open kitchen renovations can be complex and may require careful planning. It's essential to stay within your budget, communicate with your contractors and designers, and be flexible as unexpected issues may arise during the process. Ultimately, a well-executed open kitchen renovation can enhance the heart of your home and improve your overall living space.
 McHenry Architecture
Photography: David Maurand,
D. D. Cook Builders, Inc.
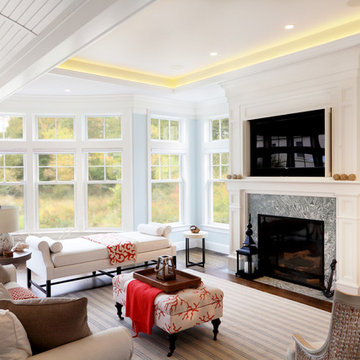
Large beach style open concept dark wood floor living room photo in Boston with a standard fireplace, a stone fireplace and a concealed tv
Large beach style open concept dark wood floor living room photo in Boston with a standard fireplace, a stone fireplace and a concealed tv
 Talon Construction Inc.
Renovating an open kitchen can be an exciting project that can improve the functionality, aesthetics, and value of your home. Here are some steps to guide you through the process:
Planning and Design:
Define your goals and budget for the renovation.
Determine the layout of your open kitchen. Consider factors like the work triangle (the relationship between the stove, sink, and refrigerator) and the flow of traffic.
Choose a design style and color scheme that suits your preferences and complements the rest of your home.
Research and Inspiration:
Collect inspiration from magazines, websites, and social media platforms to get ideas for your open kitchen design.
Create a mood board or vision board to help you visualize the final look.
Hiring Professionals:
Depending on the scale of your renovation, you may need to hire professionals, such as architects, interior designers, contractors, and electricians. Make sure to check references and get multiple quotes.
Demolition and Structural Work:
If your renovation involves structural changes, like removing walls, this is the time to do it. Ensure that the necessary permits are obtained.
Plumbing and Electrical Work:
Update or reconfigure plumbing and electrical systems as needed. This may include adding or moving outlets, switches, and lighting fixtures.
Cabinetry and Countertops:
Choose and install new kitchen cabinets and countertops. This is a significant part of your renovation and will greatly influence the kitchen's appearance and functionality.
Appliances:
Update or install new kitchen appliances, including the refrigerator, stove, oven, microwave, and dishwasher.
Flooring:
Select and install flooring that is suitable for a kitchen, such as hardwood, tile, laminate, or vinyl. Ensure it complements the overall design.
Backsplash and Wall Finishes:
Install a backsplash that matches your design and protects your walls. Consider materials like tile, glass, or stainless steel.
Lighting:
Choose and install various types of lighting, including ambient, task, and accent lighting. Pendant lights above an island or breakfast bar can add style and functionality.
Paint and Finishing Touches:
Paint the walls and ceiling in the colors you've selected. Add finishing touches like hardware, window treatments, and decorative elements.
Furniture and Accessories:
Bring in furniture, such as a dining table and chairs, barstools, and any other pieces you need to complete the space. Decorate with accessories like artwork, plants, and decorative items.
Final Inspection and Cleanup:
Ensure that all work meets safety and building code requirements. Clean the entire area thoroughly.
Enjoy Your New Kitchen:
Once the renovation is complete and everything is in its place, enjoy your beautiful, functional open kitchen.
Remember that open kitchen renovations can be complex and may require careful planning. It's essential to stay within your budget, communicate with your contractors and designers, and be flexible as unexpected issues may arise during the process. Ultimately, a well-executed open kitchen renovation can enhance the heart of your home and improve your overall living space.
 Talon Construction Inc.
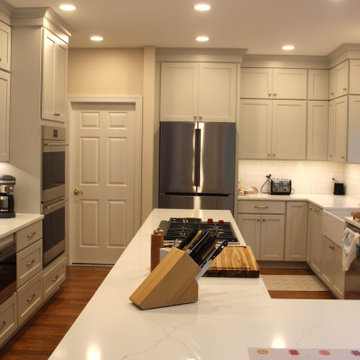
Renovating an open kitchen can be an exciting project that can improve the functionality, aesthetics, and value of your home. Here are some steps to guide you through the process:
Planning and Design:
Define your goals and budget for the renovation.
Determine the layout of your open kitchen. Consider factors like the work triangle (the relationship between the stove, sink, and refrigerator) and the flow of traffic.
Choose a design style and color scheme that suits your preferences and complements the rest of your home.
Research and Inspiration:
Collect inspiration from magazines, websites, and social media platforms to get ideas for your open kitchen design.
Create a mood board or vision board to help you visualize the final look.
Hiring Professionals:
Depending on the scale of your renovation, you may need to hire professionals, such as architects, interior designers, contractors, and electricians. Make sure to check references and get multiple quotes.
Demolition and Structural Work:
If your renovation involves structural changes, like removing walls, this is the time to do it. Ensure that the necessary permits are obtained.
Plumbing and Electrical Work:
Update or reconfigure plumbing and electrical systems as needed. This may include adding or moving outlets, switches, and lighting fixtures.
Cabinetry and Countertops:
Choose and install new kitchen cabinets and countertops. This is a significant part of your renovation and will greatly influence the kitchen's appearance and functionality.
Appliances:
Update or install new kitchen appliances, including the refrigerator, stove, oven, microwave, and dishwasher.
Flooring:
Select and install flooring that is suitable for a kitchen, such as hardwood, tile, laminate, or vinyl. Ensure it complements the overall design.
Backsplash and Wall Finishes:
Install a backsplash that matches your design and protects your walls. Consider materials like tile, glass, or stainless steel.
Lighting:
Choose and install various types of lighting, including ambient, task, and accent lighting. Pendant lights above an island or breakfast bar can add style and functionality.
Paint and Finishing Touches:
Paint the walls and ceiling in the colors you've selected. Add finishing touches like hardware, window treatments, and decorative elements.
Furniture and Accessories:
Bring in furniture, such as a dining table and chairs, barstools, and any other pieces you need to complete the space. Decorate with accessories like artwork, plants, and decorative items.
Final Inspection and Cleanup:
Ensure that all work meets safety and building code requirements. Clean the entire area thoroughly.
Enjoy Your New Kitchen:
Once the renovation is complete and everything is in its place, enjoy your beautiful, functional open kitchen.
Remember that open kitchen renovations can be complex and may require careful planning. It's essential to stay within your budget, communicate with your contractors and designers, and be flexible as unexpected issues may arise during the process. Ultimately, a well-executed open kitchen renovation can enhance the heart of your home and improve your overall living space.
5