
Search results for "Starting watering" in Home Design Ideas
 Tile Doctor Ltd
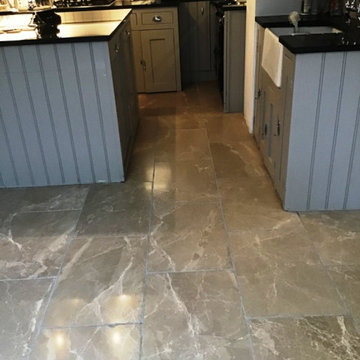
This Limestone tiled floor installed in a kitchen and family room at a property in Wellingborough is a great example of how this material can lose its appearance without a regular maintenance plan in place.
The customer called me as not only was she concerned that the floor had lost its lustre the grey grout had become very stained and almost black in heavy traffic areas, in fact my customer had originally asked about re-grouting but I was confident it could be cleaned.
I provided a quote which they were happy to accept.
The area was a nice wide 6 metre by 5 metre space and except for a few items of furniture that would need moving around there were relatively few obstacles. I reasoned the most efficient way to restore the polished appearance of the Limestone would be to use a set of diamond encrusted Burnishing Pads. These are fitted to a rotary machine and applied to the stone in sequence from coarse to smooth. It’s an effective process that cuts back the layer of dirt on the floor and then we build back up the polish.
We started burnishing the Limestone with a coarse 400-grit pad fitted to a rotary machine and applied with a little water for lubrication. The coarse pad is very good at removing dirt and old sealers from stone and once completed the resultant surface water and loose dirt is removed using a wet vacuum.
At this point I turned my attention to the badly stained grout lines, and applied a strong solution of Tile Doctor Pro-Clean which was scrubbed in along the grout lines using a stiff grout brush, this is necessary as the recessed nature of the grout makes it difficult for the rotary pads to reach it.
I then repeated the burnishing process with the medium 800-grit pad and fine 1500-grit pad, the 800-grit pad removes any small surface scratches and the 1500-grit further refines the look of the Limestone slowly restoring its polished appearance.
After the whole floor had been burnished in this way it was given a further rinse with water and the soil extracted as before. I then inspected the floor to see if more work would be needed.
I was not fully happy with how some of the grout lines had responded, some were still slightly stained, and some marks were visible in the high traffic areas. I had already discussed on my initial visit with the client that this might be the case and it was agreed between us that should this be the case I would apply a Tile Doctor Grout Colourant in Light Grey to recolour all the grout lines and achieve a uniform finish.
The stone and grout was still damp from cleaning and polishing, so I decided to leave the grout colouring until the following day.
On day two I started by grout recolouring all the grout lines, it’s a straight forward process but can be a little tedious where there is a lot of grout to cover. Once complete I allowed the grout colour to dry for a couple of hours before moving onto the next step.
The last pad to be applied in the stone burnishing process is the very fine 3000-grit polishing pad which is applied dry to the tiles using a small amount of water sprayed onto the floor and leaves the stone dry and with a polished silk finish.
The floor was then sealed using two coats of Tile Doctor Ultra Seal Sealant allowing the first coat to dry before applying the second. Ultra-Seal is an impregnating sealer that works by occupying the pores in the stone thereby preventing dirt from becoming ingrained there. It’s also a natural look sealer that doesn’t affect the appearance of the stone.
My customer was very happy with the transformation of her floor and provided the feedback copies below. In-fact she was so impressed with the results that she also used our services to restore the grout and silicon in one of her bathrooms.
“Phil was on time & easy to deal with and did an amazing job on my kitchen and bathroom floors and the carpets & sofa. No fuss, just a great job. Liz O.”
Phil Vissian
Northamptonshire Tile Doctor

 Braen Supply
Building a Dream Backyard
When this homeowner started the design process of a new backyard, Braen Supply was immediately there to supply all the stone materials. The home was part of a new development, so the challenge was to make the home stand out while still addressing specific areas of the existing backyard, such as the steep grade.
Working With the Experts
Taking the steep grade into consideration, moss rock boulders were selected to create stairs down to the lower area of the backyard where the fire pit sits. The grade of the backyard also allowed for the infinity pool, full color bluestone pattern was selected as the veneer for the back wall of the infinity pool.
Braen Supply chose Tennessee gray and bluestone to create a seamless transition from the front of the house to the back of the house. Although they are two different stones, they work nicely together to complete the overall design and tone of the home. It all came together and made the perfect backyard.
Materials Used:
Belgium Blocks
Full Color Bluestone Pattern
Bluestone Caps
Tennessee Gray Irregular
Moss Rock Boulders
Full Color Bluestone Irregular
Kearney Stone Steps
Granite Mosaic Veneer
Completed Areas:
Front Walkway & Porch
Driveway Edging
Backyard Walkways
Pool Patio & Coping
Pool Water Features
Fireplace Hearth & Mantal
Wading Pool
Raised Hot Tub
 Braen Supply
Building a Dream Backyard
When this homeowner started the design process of a new backyard, Braen Supply was immediately there to supply all the stone materials. The home was part of a new development, so the challenge was to make the home stand out while still addressing specific areas of the existing backyard, such as the steep grade.
Working With the Experts
Taking the steep grade into consideration, moss rock boulders were selected to create stairs down to the lower area of the backyard where the fire pit sits. The grade of the backyard also allowed for the infinity pool, full color bluestone pattern was selected as the veneer for the back wall of the infinity pool.
Braen Supply chose Tennessee gray and bluestone to create a seamless transition from the front of the house to the back of the house. Although they are two different stones, they work nicely together to complete the overall design and tone of the home. It all came together and made the perfect backyard.
Materials Used:
Belgium Blocks
Full Color Bluestone Pattern
Bluestone Caps
Tennessee Gray Irregular
Moss Rock Boulders
Full Color Bluestone Irregular
Kearney Stone Steps
Granite Mosaic Veneer
Completed Areas:
Front Walkway & Porch
Driveway Edging
Backyard Walkways
Pool Patio & Coping
Pool Water Features
Fireplace Hearth & Mantal
Wading Pool
Raised Hot Tub
Find the right local pro for your project
 Braen Supply
Building a Dream Backyard
When this homeowner started the design process of a new backyard, Braen Supply was immediately there to supply all the stone materials. The home was part of a new development, so the challenge was to make the home stand out while still addressing specific areas of the existing backyard, such as the steep grade.
Working With the Experts
Taking the steep grade into consideration, moss rock boulders were selected to create stairs down to the lower area of the backyard where the fire pit sits. The grade of the backyard also allowed for the infinity pool, full color bluestone pattern was selected as the veneer for the back wall of the infinity pool.
Braen Supply chose Tennessee gray and bluestone to create a seamless transition from the front of the house to the back of the house. Although they are two different stones, they work nicely together to complete the overall design and tone of the home. It all came together and made the perfect backyard.
Materials Used:
Belgium Blocks
Full Color Bluestone Pattern
Bluestone Caps
Tennessee Gray Irregular
Moss Rock Boulders
Full Color Bluestone Irregular
Kearney Stone Steps
Granite Mosaic Veneer
Completed Areas:
Front Walkway & Porch
Driveway Edging
Backyard Walkways
Pool Patio & Coping
Pool Water Features
Fireplace Hearth & Mantal
Wading Pool
Raised Hot Tub

 Infinite Home
Custom Home Built for Real Life
Our clients came to us with a clear vision: a home that could adapt to their lifestyle and growing family. They needed a home built with intention, designed with the future in mind, and built around the routines they loved and the people they loved more.
Open-Concept Living With Hosting in Mind
Our clients hosted often and lived actively, so the main level had to be flexible for all of life’s moments. The goal was a space that felt grand without losing its warmth.
Cooking together as a family mattered to our clients – the Wolf range, farmhouse sink, integrated appliances, and large island gave them a kitchen that flowed effortlessly while looking beautiful. This space also served as the bridge between other parts of the main level so that they would stay in view of the next. This created the perfect environment for gathering where everyone had their own spot without ever feeling apart from the whole group.
For the living room, our clients wanted space that felt open without losing its warmth. Soaring ceilings created that sense of scale, while warm tones and materials, like the wood coffered ceiling and fireplace wall, kept it grounded. That same warmth carried outside, where an outdoor lounge with a fireplace and dining area made sure guests felt welcomed the moment they stepped out.
A Backyard Built for Real Rest
Every corner of the backyard was designed with one goal: to be the ultimate outdoor retreat. The elevated, white-brick-framed pool and integrated spa hot tub gave them a place to truly exhale. As the sun set, the fire pit lounge next to the pool became the hangout spot when they hosted their youth groups and family gatherings.
Room to Grow
With kids in the house, “custom” had to also mean flexible. Our clients had 2 young sons and needed their rooms to grow with them through the years. The two bedrooms and a full bath sat beside a loft that served as both their hangout-and-homework spot. The guest suite sat on the same level where a four-poster bed, floor-to-ceiling wood-look tile, and a frameless glass shower welcomed their guests from day one.
A Retreat That’s Actually Theirs
Between hosting and raising kids, this couple needed a suite that felt like a true escape. The wood-planked tray ceiling and French doors grounded the room in warmth the moment you walked in, while the ensuite bathroom carried a spa-like feeling with a freestanding soaking tub, custom double vanity, and a glass-enclosed shower.
This Is What Approachable Luxury Looks Like
The approachable luxury experience meant starting with conversations about how they wanted their space to live with them – how they hosted, how their kids played, how they wanted to feel walking through their own front door, and how we took their goals and experience and used it as the foundation of every decision that was made from start to finish. We wanted our clients to feel taken care of through the process and, most importantly, feel heard.


 Ocean Quest Pools by Lew Akins
Gold Medal Design Award Winner at the 2015 Southwest Region Pool and Spa Show! This job is of a very rare scale for a residential pool and was under construction for nearly three years. This project actually began on a vacant lot, because once the house slab was in place there would have been no access. It was necessary to build a 300 foot long retaining wall then backfill behind it. Sixty truckloads of fill were compacted into place to provide the suitable base for this pool.
This massive pool begins with an elevated fountain built adjacent to the windows on the back of the home. The water spills into a mid-level fountain, which surrounds a zero edge spa capped with 3” by 3” travertine tile and also features a travertine arm rest under the water. Travertine capped stepping stones in the middle fountain give access to the spa. From both the mid-level fountain and the spa, the water finally returns to the main pool. The longest part of the pool is a 75 foot by 10 foot lap lane that is 6 feet deep. A diamond pattern lane maker made of glass tiles runs the length of the of the lap lane. The pool then steps up to 4 feet to provide a large play area then finally terminates with a 450 square foot sun shelf.
The pool elevation is 4 feet below the house. This accommodates the two levels of fountains dropping to the pool level. Numerous bullnose travertine capped steps and planter walls help to soften the transitions in elevation. The pool coping is 2 inch thick bullnose travertine. The matching travertine on the 3,500 sq. ft. patio is accented by a contrasting pattern.
The entire pool has a tile interior. There were four different tiles used on the project totaling over 5,100 square feet. The tile was a custom blend, ordered in advance and was warehoused for over two years while the home was being constructed.
As expected on a job of this magnitude, the pool features everything one might expect including cutting edge automation and equipment, 13 LED lights, and in-floor cleaning system.
This magnificent swimming pool has an equally spectacular elevated lake view as a backdrop. Over 80 feet from the back of the house where the pool started is a fire pit area positioned perfectly to take full advantage of that view.
Sponsored
Columbus, OH
Free consultation for landscape design!

Peabody Landscape Group
Columbus' Reliable Landscape Design & Contracting
 Braen Supply
Building a Dream Backyard
When this homeowner started the design process of a new backyard, Braen Supply was immediately there to supply all the stone materials. The home was part of a new development, so the challenge was to make the home stand out while still addressing specific areas of the existing backyard, such as the steep grade.
Working With the Experts
Taking the steep grade into consideration, moss rock boulders were selected to create stairs down to the lower area of the backyard where the fire pit sits. The grade of the backyard also allowed for the infinity pool, full color bluestone pattern was selected as the veneer for the back wall of the infinity pool.
Braen Supply chose Tennessee gray and bluestone to create a seamless transition from the front of the house to the back of the house. Although they are two different stones, they work nicely together to complete the overall design and tone of the home. It all came together and made the perfect backyard.
Materials Used:
Belgium Blocks
Full Color Bluestone Pattern
Bluestone Caps
Tennessee Gray Irregular
Moss Rock Boulders
Full Color Bluestone Irregular
Kearney Stone Steps
Granite Mosaic Veneer
Completed Areas:
Front Walkway & Porch
Driveway Edging
Backyard Walkways
Pool Patio & Coping
Pool Water Features
Fireplace Hearth & Mantal
Wading Pool
Raised Hot Tub
 Phoenix Home Remodeling
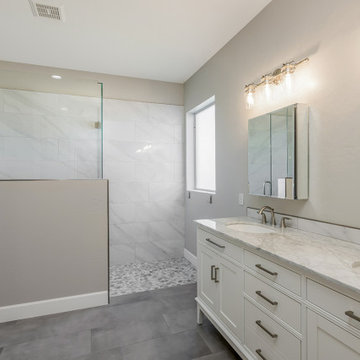
We are so happy to have had the opportunity to take care of Diana & Todd's master bathroom renovation. Everything was removed and we started from scratch.
The homeowners were looking to have more space and didn't need the bathtub anymore, so it was removed and we created a custom shower with a dry-off area.
We also removed and closed off one of the windows to allow the shower to be longer, improves aesthetics, and provide more privacy.
The new shower includes a pony wall with a long wall niche on it and new frameless tempered glass with a door. Cala Lenci Polished 12X24" Porcelain from Arizona Tile was used for the shower wall, and White Marble Flat 12x12" Mesh for the floor and the wall niche.
They chose Icon Silver Matte 12x24" Porcelain Tile for the master bathroom and water closet flooring.
A new 72” premade vanity was installed, with backsplash tile around the vanity top. Also, 2 new storage mirrors were placed to provide the necessary storage.
We replaced the vanity lights for 2 Kichler Brinley 3 Light 24" Wide Bathroom Light and installed 2 new faucets.
The vanity was shorter to provide more space for the dry-off area, which included moving the electrical for the vanity lights and plumbing for the sinks and faucets.

 Christiane Holmquist Landscape Design
With this client who has been passionate about plants all his life, there was naturally a close collaboration and a lot of input from him. Upon closer inspection you'd find some very exceptional plants that are sort of experimental but "all worth the try" in Gordon's eyes. And he is right! I relished the opportunity to use Star Magnolia stellata, Redbud Cercis 'Avondale' and 'Silver Cloud', Arabian Lilac 'Grand Duke of Tuscany', Royal Bromeliad Vriesea imperialis, also many unusual bulbs such as Scilla.
Besides structure providing shrubs and trees (Tecoma, existing Indian Hawthorne with beautiful structures, Sweet Pea Bush, Golden Breath of Heaven, Ilex, Ginkgo, Bronze Loquat etc.) you'll see here also my favorite perennials, succulents and grasses, all as low care and undemanding as well as low-water as possible, to keep the landscape colorful and interesting year round.
One of the highlights of this garden are the dry stream beds, bird bath and garden bench that we added. Built originally by himself and his wife, the dry stream beds were overgrown, mostly hidden by plant debris, or half rolling down hill. We had fun selecting a mixed collection of colorful and richly textured boulders of various sizes over, and with the input from 7 team members: Gordon, me, the contractor, the supervisor and three workers, we re-created the stream beds, making sure that anchor stones on the sides were well embedded in the slope, and that stone shelves and “top dressing” with smaller pebbles would add to the visual interest. Now these beds form very pleasing architectural features that look like they have always been there.
We were all surprised how quickly all plants adapted to the site and started growing and putting out bloom. Now the old birdbath, a traditional white thing with dove figurines resting on the scalloped bowl, looked out of place, and I suggested to replace it with a stone bowl. And that part of the garden just called for a bench under the Macademia nut tree, to observe the birds and contemplate the whole creation. Only stone would do, but not any stone! Gordon picked a Basalt boulder that was naturally bowl shaped. It’s so heavy that it took 8 men to heave it into place! The Basalt bench was not much lighter, and together they make a very inviting scene. This job should last for a while.
Photographed by Emma Almendarez at http://www.emmatheodoraphotography.com/

 HK Design Studio
 aims to provide creative, exceptional landscape designs that reflect the clients style and budget. Owner, Heather Koermer, is a licensed landscape architect on who will provide you with a complete and professional set of plans. Our job is to give the client a product that suits their needs, wants, and style.
We strive to create comfortable outdoor rooms that are designed to complement each client’s style. Each project is unique and given the personal attention to detail. A person’s garden should be an extension of their home.
Working in the industry since 1996, Heather started her own firm with the express intent of sharing her passion and knowledge with her clients. She is diligent and works in all phases of the projects from initial meetings, concepts, working drawings through construction observation. Let us share our passion for landscaping while providing you with a complete package to see your dreams fulfilled!

 Balber Architecture, Inc.
This is a clean-lined modern home on a "finger" of Old Tampa Bay. This house was inspired by mid-century modern architecture...to a point. The problem is that the clients wanted a 2-story home where mid-century modern homes tend to be one-story buildings. The fact that it is 2-stories in height right off the bat will make it deviate from the architectural vocabulary typically associated with mid-century modern design, however the home does take a few cues from that aesthetic. The house appears mysterious from the street in that it will be hard to tell how many stories there are, how the spaces are used, and how the roof works...but as one will view the home from the water it will reveal itself via large floor-to-ceiling glass walls, cascading infinity edge pool that starts over 4' off the ground, and an exterior, two-story spiral staircase that will take people from poolside all the way to the roof top terrace. The double height foyer has cantilevered stairs that appear to hang off he walls with open risers and the men's den area opens to the theater room via an interior glass and steel garage door. This house has nonstop "wow" factors around every turn including blue glass windows and a pool that is integrated into the building itself. This highly modern home was a joy to design.

 Custom Design & Construction
This design / build project in Redondo Beach, CA. focused on a family’s hall bathroom. There were multiple reasons that the homeowners decided to start this project but the issue that was most pressing was water damage from the shower. The homeowners knew it needed to be addressed ASAP. As long as a remodel was going to be completed they felt that it was time to address the layout as well. It was not efficient in its original state. Since bathrooms work so hard it was important that the remodel resolve this issue as well. The homeowners were also interested in new finishes.
Desiring something more light and fresh with a coastal feel we began reimagining the layout. The before and after pictures explain it best but basically the new shower was placed against the wall where there previously was a toilet and window. The location and size of the window was changed as well. The shower is now a three wall alcove with grab bars to allow the homeowners to age in place. The white subway tile is accented by a mosaic tile in the homeowners’ favorite coastal shades. The light and beachy feel is reinforced with the grey ceramic tile floor. The vanity is a furniture-style with details like decorative feet. The space is tied together with a backsplash that matches the border in the shower.
Sponsored
Columbus, OH
Free consultation for landscape design!
Peabody Landscape Group
Columbus' Reliable Landscape Design & Contracting

 Sunset Construction & Design
Our professional outdoor living specialist will use several different mediums to construct patios in Fresno and Clovis such as: blue stone, flagstone, silver quartzite, sandstone, granite, slate or tile. A unique patio that is custom designed to fit your landscape will give you maximum enjoyment by complimenting the existing elements of your yard. A well planned patio will give you a sense of balance and harmony by creating a stunning, usable outdoor living space.
Sunset Construction and Design specializes in creating residential gardens, patios, outdoor kitchens and fireplaces and luxurious outdoor living rooms. We can turn an ordinary back yard into a natural extension of your home giving you a whole new dimension for entertaining or simply unwinding at the end of the day. If you’re interested in converting a boring back yard or starting from scratch in a new home, give us a call today! A great patio and outdoor living area can easily be yours.
Greg, Sunset Construction

 Bay Area Kitchens
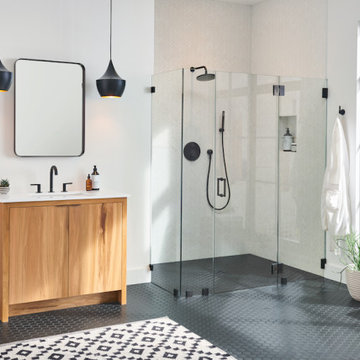
The freestanding bubble jet bathtub which features a remote air turbine, water warming system and back warmer is controlled by an iPhone and wall-mounted controller. No wires or pipes are visible going into the tub - all of that comes up through the bottom of the tub; fully concealed. The turbine is concealed inside the cabinet above the toilet, so all you hear while in the tub are the bubbles!
The open (door-less) shower features a rain head, hand shower and wall-mounted shower head.
 Custom Design & Construction
This design / build project in Los Angeles, CA. focused on a couple’s master bathroom. There were multiple reasons that the homeowners decided to start this project. The existing skylight had begun leaking and there were function and style concerns to be addressed. Previously this dated-spacious master bathroom had a large Jacuzzi tub, sauna, bidet (in a water closet) and a shower. Although the space was large and offered many amenities they were not what the homeowners valued and the space was very compartmentalized. The project also included closing off a door which previously allowed guests access to the master bathroom. The homeowners wanted to create a space that was not accessible to guests. Painted tiles featuring lilies and gold finishes were not the style the homeowners were looking for.
Desiring something more elegant, a place where they could pamper themselves, we were tasked with recreating the space. Chief among the homeowners requests were a wet room with free standing tub, floor-mounted waterfall tub filler, and stacked stone. Specifically they wanted the stacked stone to create a central visual feature between the shower and tub. The stacked stone is Limestone in Honed Birch. The open shower contrasts the neighboring stacked stone with sleek smooth large format tiles.
A double walnut vanity featuring crystal knobs and waterfall faucets set below a clearstory window allowed for adding a new makeup vanity with chandelier which the homeowners love. The walnut vanity was selected to contrast the light, white tile.
The bathroom features Brizo and DXV.

 Tile Doctor Ltd
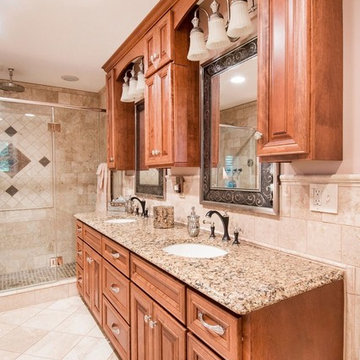
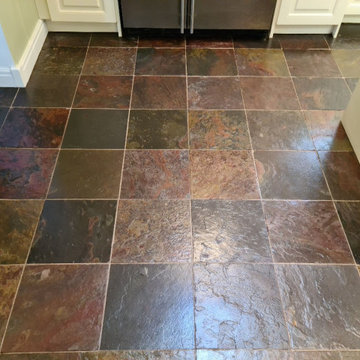
The pictures above are of a 12 metre squared Chinese slate floor in the kitchen of a property in Harrogate which had been laid ten years prior. You can see from the photographs that the grout had darkened and the slate itself had lost a lot of its character and colour.
Sealers typically last between three to five years so by now there was little protection left and so dirt had become trapped in the pores of the stone and grout making it difficult to keep clean. It was now overdue a deep clean and the application of a fresh seal.
I went over to survey the floor and provide a quote for stripping off what was left of the original sealer, cleaning the floor, and then resealing. I had been recommended by a previous customer so happy with my track record and the price I quoted, they asked me to do the work. They had received a quote from another firm which as it turned out was a lot more expensive than mine.
Given there was little sealer left to remove I decided to start by scrubbing the floor with a strong concentration of Tile Doctor Pro-Clean which was left to soak into the slate for ten minutes. Then I worked the solution in with a rotary machine fitted with a black scrubbing pad. Pro-Clean is a very versatile product that will strip the sealer off a floor when used in a strong dilution with water, it will also remove deep seated dirt too.
Due to the riven nature of the tiles however I found the black pad was struggling to reach into the crevices of the tile so to achieve the desired result I resorted to scrubbing the floor on my hands and knees with a scrubbing brush. Its important that the floor is as clean as it possibly can be before sealing otherwise you simply lock the dirt in and it will never look clean.
The floor was left to dry off overnight and I returned the next day to apply the new sealer. First, I checked to ensure that the floor was fully dry using a damp meter. The sealer would not cure properly if the floor damp and this can detract from the finished appearance.
I was happy with the readings, so I started to apply the first coat of Tile Doctor Seal and Go which I felt was the best product sealing Slate. The stone needed four coats; each one being left to dry before applying the next. Seal and Go is a stain resistant sealer which results in a low sheen silky appearance, it is good on surfaces such as the Chinese Slate which tend to be more porous and being water based it does not leave a smell as it dries.
The client was very happy with the result and mentioned to me that it had never looked that good even when new.
For aftercare cleaning I recommended the use of Tile Doctor Neutral Tile Cleaner which will keep the floor in the best condition. This is a pH neutral cleaner which can be used daily and won’t compromise the newly laid sealer like many of the stronger products you find in supermarkets.
Nigel Stoker
North West Yorkshire Tile Doctor
 Tile Doctor Ltd
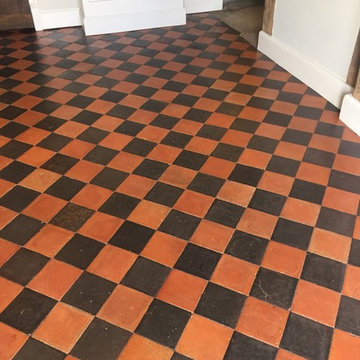
Sometimes it isn’t until you’ve deep cleaned your tiles that you realise just how dirty they were to begin with. This was the case with my customer in Thame, in the south of Oxfordshire where I worked on a classic red and black Quarry tiled floor which was far from being in its best condition.
My starting point in the cleaning process was to mix a strong solution of Tile Doctor Pro Clean, which is the reliable, multi-purpose alkaline cleaner that is safe to use on tile, stone and grout. The solution was left to soak into the tiles for ten minutes before being scrubbed into the floor with a rotary floor machine fitted with a stiff brush.
Following this, I rinsed the floor with clean water and then proceeded to wash it with Tile Doctor Grout Clean Up. This is a concentrated phosphoric acid cleaner designed to remove efflorescence and other mineral deposits such as grout smears.
Finally, I rinsed the tiles again with water and Tile Doctor Neutral Tile Cleaner, which is a pH neutral solution, to neutralise the chemicals and leave the floor fresh and clean, ready to be sealed. The floor was left to dry overnight.
The next day I returned to seal the floor after checking the tiles were dry. I opted to use two different sealers. The first was Tile Doctor Colour Grow, which is an impregnating sealer with the added effect of enhancing the natural colour in the stone. The second was Tile Doctor Seal & Go, a topical sealer that adds the high quality, durable sheen finish to the floor that the customer had requested.
I took the photograph below after sealing half the floor, it really shows the difference a sealer can make to a tiled floor.
Here’s the photo of theQuarry tiled floorafter sealing the whole floor. As you can see, they now have a new lease of life, and they’ll be much easier for the customer to keep looking great in the future.
Barry Woodward
Oxfordshire Tile Doctor

154