
Search results for "Subjected" in Home Design Ideas


 PI Photography Wall Art & Fine Art
 https://pipafineart.com/pages/california-dreamin-photorealistic-coastal-digital-artwork-prints-and-backgrounds
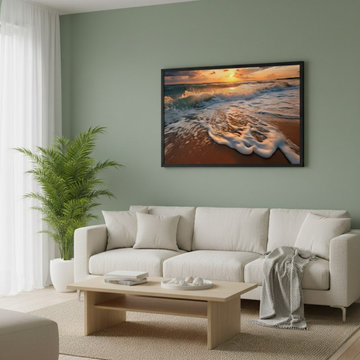
This captivating photorealistic digital artwork, "California Dreamin'," transports you to a vibrant coastal sunset, rendered with breathtaking detail that blurs the line between painting and photograph. The scene is dominated by the expansive ocean, with powerful waves crashing onto a sandy shore in the foreground. The foam of the receding wave nearest to you is particularly striking, catching the golden light of the setting sun and glowing with an ethereal luminescence. The water itself, further out, transitions from a rich turquoise closer to the shore to deeper blues where the waves are building. Dynamic splashes and whitecaps convey the raw energy of the sea, inviting you to almost hear the roar of the surf.
The horizon is a dramatic interplay of light and color. The sun, a brilliant orb of intense orange and yellow, is perfectly positioned, casting a dazzling reflection across the water's surface that stretches towards you. Above the horizon, the sky is a masterpiece of atmospheric beauty. Large, voluminous clouds are painted with fiery oranges and deep reds where they catch the direct sunlight, transitioning to soft blues and grays as they stretch towards the upper edges of the frame. This dramatic cloudscape adds immense depth and mood to the artwork, creating a sense of both grandeur and peacefulness. The meticulous attention to light, from the shimmering reflections on the water to the radiant glow filtering through the clouds, is a hallmark of this digital artwork's photorealistic quality. The overall composition balances the dynamic motion of the waves with the serene beauty of the sunset, creating a visually rich and emotionally evocative piece.
"California Dreamin'" is exceptionally versatile and would enhance a variety of decorating styles. Its natural subject matter and vibrant yet calming color palette make it an ideal fit for Coastal or Beach House decor, instantly transforming a room into a serene seaside retreat. For Bohemian interiors, its dramatic colors and natural theme resonate with an adventurous spirit and eclectic charm. In Modern or Contemporary settings, the artwork's clean lines and striking visual impact can serve as a powerful focal point, adding a burst of color and organic form. Even in Transitional or Eclectic spaces, it provides a beautiful balance, blending classic beauty with a contemporary feel. The artwork's ability to evoke relaxation and wonder makes it a fantastic addition to numerous rooms.
It would be a magnificent centerpiece in a Living Room, particularly over a sofa or fireplace, where its expansive view could invite conversation and contemplation. In a Bedroom, its tranquil yet dynamic energy could foster a sense of peace and inspiration, perfect for unwinding. For a Home Office or Study, "California Dreamin'" offers a captivating visual escape, providing a refreshing backdrop that promotes calm and creativity. It could also make a striking first impression in a Hallway or Entryway, welcoming guests with its breathtaking beauty.
 Sierra Living Concepts Inc
Dimension:
35.5" L X 15.5" D X 36" H
Drawer: 12" L X 10" D X 10" D X 3" H
Cabinet Shelves: 29" L X 13" D X 10" H
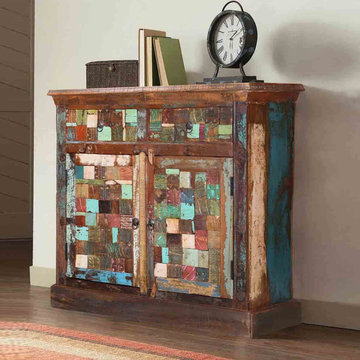
Brilliant colors, hand-made design, and beautiful reclaimed materials all combine gorgeously in our Campbell Multi-colored Mosaic Pattern Rustic Reclaimed Wood 2 Drawer Storage Cabinet. This 100% handcrafted piece is constructed of reclaimed solid wood and is finished in a natural medium wood tone.
In addition, some of the original paint and finishes are still present on the individual pieces which have been distressed in a way that truly brings out the rustic heart of this buffet sideboard. Decorating the front of the cabinet, each of the two drawers and two cabinet doors features an eye-catching mosaic pattern. Each piece of the mosaic begins as a larger hand-carved pattern which is then cut down into smaller tile-like pieces and reassembled by hand into the mosaic pattern that you see. Brilliant tones moving through varying hues of reds, blues, and yellows, decorate each carved piece creating a moving and captivating design. Two drawers rest just below the cabinet top and provide plenty of room for your dining and serving utensils. Beneath the drawers, two large cabinet doors open to reveal two wide storage shelves which span the length of the dining cabinet.
Your dining room will instantly come to life with the spirited color and warm rustic charms of this striking buffet sideboard. With two total shelves and two drawers, you will find ample room for all of your dining and serving needs.
The beautiful reclaimed solid wood is truly showcased in this piece. Each individual board is celebrated through the artful and tasteful use of finishes. Aged wood grain, weathered character, and even slight inconsistencies shine through and help to create the warm rustic charm that lies at the heart of this dining storage cabinet.
Special Features:
• 100% handcrafted
• Rustic design
• Tiled mosaic design
• Rustic Reclaimed solid wood materials
• Distressed original paint and hand-applied medium wood finish
• Two total storage shelves
• Two large cabinet doors with mosaic pattern
• Two wide utensil/accessory drawers
• Environmentally friendly materials
Note: Custom Options such as Size, Shape, Shade & Design are not applicable to this item.Furniture is subjected to have Slight Variations.
Find the right local pro for your project
 Tile Doctor Ltd
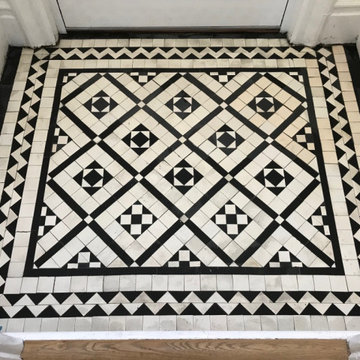
I visited this property in Lytham St Annes to survey a small Victorian tiled lobby which was in a sorry state. The client was keen to have it restored and wanted to know if it was possible. I discussed with them what we could do, and I gave them a quote for the work. Although it was only a small lobby, I could see the job could be quite involved and would be subject to the replacement tiles which I was confident we could source.
This is one of those jobs you wish you hadn’t started as there were a lot more tiles to remove than anticipated and it mushroomed into replacing half the floor. Once the area was cleaned up, I applied a self-levelling compound to bring up the height of the base.
Once the levelling compound had set, I was able relay the Victorian tiles using a combination of original tiles and replacements which had to be cut to shape. Cutting tiles to fit is quite intricate and time-consuming work especially when you consider new tiles are all metric in size and a 2mm difference becomes very telling after a foot or so! My solution was to use 150 mm tiles which are the biggest the stockist offers and then cut them down on my Rubi cutter using a template made from the original tiles. This the only way I could get it to look tight, it takes longer but it makes for a thorough job and a better finish.
I always use flexible floor adhesive when laying tiles, my preference is Keraquick Grey from Mapei. There are other brands off course but this one is quite easy to get hold of and as the term grouting is a relatively modern invention (in the past it was called pointing ) I find it looks right with this type of tile and similar to the screed cement the Victorians used in the past.
After the tiling had been completed, I left the floor to cure and fully dry and returned at a later date to give the floor an overall clean. For this I ran a coarse 200-grit diamond floor pad across the floor lubricated with water and used handheld diamond blocks for the edges where the pad can’t reach. The slurry was rinsed off with water and extracted with a wet vacuum.
With old floors like this, which don’t have a damp-proof membrane installed under the floor, efflorescence is always a concern and can lead to white salts appearing on the surface of the tile as moisture rises through the floor. To counter this, I finished cleaning the floor by scrubbing it with Tile Doctor Acid Gel. This was then rinsed off with water and the soil extracted using a wet vacuum.
The client was happy to seal the floor themselves (they wanted to save some money and it wasn’t a big area) so I supplied them with a bottle of Tile Doctor Colour Grow. I recommended this sealer as it will enhance the dark colours and being fully breathable it will cope with any moisture rising through the base. I recommended they apply two coats to start leaving time to allow the first coast to dry they could also then decide to leave it at that if they were happy with the finish.
Russell Taylor
Lancashire Tile Doctor
 annalynch
At the present level of development of the concept of "quality" is considered as a complex component, which includes the quality of the final product, the quality of management, quality of deliveries or work, the quality of life of people (employees) and society as a whole.
Quality management is coordinated and interconnected management activities, which was built in such a way as to ensure safe and smooth operation of the organization.
Organization Management, with regard to quality means that all activity is subject to the objectives set for quality, and to achieve these goals, the organization has developed a system of plans, have the necessary resources, carried out actions to achieve their goals.
Quality management - a very important element for any business. After all, quality is one of the criteria of the high popularity of a brand among consumers. Besides good quality will save the company from warranty repairs, lawsuits, etc.
Quality management includes four basic components:
• quality control;
• quality assurance;
• quality planning;
• quality improvement.
There are 8 basic principles of quality management system:
• The principle of orientation to the user. Product success primarily depends on how the user takes it. Moreover, this principle directs the company to study the needs of its customers.
• The principle of leadership or leadership role. Quality management in the first place depends directly on the company's management, which should by their actions show his concern for the produced goods, on its quality.
• The principle of staff involvement. From more - in less. If the head of the company must set an example in their interest in the quality of products, the company and each employee must also work to improve the quality of products and must want to improve it.
• The principle of the process approach. Based on the division of the company to suppliers and consumers. Suppliers - material security that comes into the company, and which must comply with certain quality. Consumers - the product, which is depending on the materials, must be of good quality. Because this is a direct product of your company.
• The principle of the system approach. It combines two previously identified types of organization in the common system. Moreover, he claims that this system should be a common goal, and general management.
• The principle of continuous improvement. Or to put it in simple words - "There is no limit to perfection." The principle involves constant monitoring of the quality of products in order to improve it.
• The principle of decision-making based on facts. It implies that all decisions will be taken by research, scientific evidence, public opinion polls, and not on an intuitive level head.
• Mutually beneficial supplier relationships. It's simple - the supplier delivers you high-quality materials and receives respective payment. The lower the quality of the goods, the less the cost.
• It is believed that the introduction of these 8 principles in any company will improve the quality of its products and the improvement of the production process. That, in turn, affect the overall good of the company success.
About Author: Anna Lynch is a freelance writer at http://online-check-in.org/, who creates papers about business and marketing. She has a long practice and great experience in the sphere of economics and now is able to help young people.

 Tile Doctor Ltd
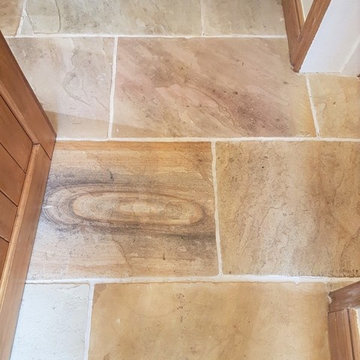
The pictures below are of a multi coloured sandstone floor installed at a property in East Keswick which is a village approximately halfway between Harrogate and Leeds. (Not to be confused with the more famous Keswick in the Lake District)
The stone floor had not been cleaned professionally for ten years and although the grout looked clean It was clear that any sealer that was once present had long since worn off leaving the stone unprotected. The result was dirt had become deeply ingrained in the Sandstone leading causing the stone to darken and hide its true beauty and rich colouring. The client had tried lots of different products to clean the floor but had not had any luck.
I visited the property and carried out a few successful patch tests resulting in the floor becoming much cleaner. They were happy to go ahead with my quote and we arranged a time to return and complete the work.
I prepared the area before starting, taping up the skirting boards and doors to protect them from the splashing that can happen during the intensive cleaning process.
To get the sandstone clean I applied a medium dilution of Tile Doctor Pro-Clean to the floor and allowed it to soak in for ten minutes. The solution was then worked into the Sandstone using a rotary floor machine fitted with a black scrubbing pad. More Pro-Clean was applied with a hand-held scrubbing brush to get deep into the grout lines and to reach into the corners.
Once done the floor was rinsed with water and the soil extracted with a wet vacuum. The floor was inspected, and the process repeated until I was satisfied that the stone and grout had released all the trapped dirt. After a final rinse, the wet vacuum was used to get as much moisture out of the stone as possible and then the floor left to dry out fully overnight.
Returning the following morning, I first checked that the floor was dry using a damp meter. The sealer won’t cure if there is any moisture in the stone and I’ve been known to reschedule sealing a floor if the readings are too high. On this occasion I was satisfied that the floor was within acceptable levels, so I was ready to seal the floor.
I used three coats of Tile Doctor Colour Grow to seal the floor, this is an impregnating sealer which intensifies natural colours whilst providing durable protection against stains, an essential feature in an area such as a hallway which is subject to constant foot traffic.
As you can see from the photos the transformation was quite impressive, the floor became much lighter and almost unrecognisable, the natural colours of the stone were now visible, and the floor looked beautiful. The client was very happy with the end result and has said they would not hesitate to recommend me to others.
Nigel Stoker
North West Yorkshire Tile Doctor

 VELUX
VELUXVELUX No Leak Solar Powered "Fresh Air" skylights fill this small living room with natural light to highlight color and textures used in the decor below. Blue room-darkening blinds give the ceiling a pop of color while also providing light control when needed.

 Jack Calderone
This bedroom and full bathroom are part of an adventuresome project my wife and I embarked upon to create a complete apartment in the basement of our townhouse. We designed a floor plan that creatively and efficiently used all of the 385-square-foot-space, without sacrificing beauty, comfort or function – and all without breaking the bank! To maximize our budget, we did the work ourselves and added everything from thrift store finds to DIY wall art to bring it all together.
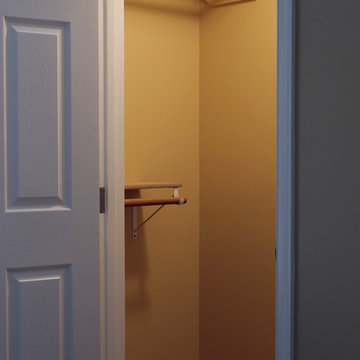
A partial double closet bar adds a little extra space while still leaving room for longer hanging clothes.

 contact7524
This stained glass window was created as part of our signature Aspen Stained Glass line. These windows look beautiful in cottage style or contemporary homes and are a great way for outdoor enthusiasts to celebrate their love of nature. The textured appearance of the glass provides the homeowners with a high level of privacy and comfort.
 Dana Austin Griggs | Real Estate Group
HIP URBAN PAD
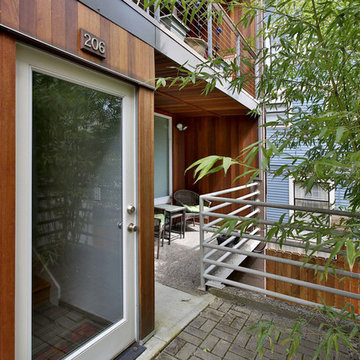
Super stylish condo at Zinc Condominiums in the heart of the NW Alphabet District. Great open layout, with lots of natural light - this top floor high efficiency corner unit is nicely appointed with modern finishes, bamboo floors, a private 5x17 balcony and storage unit. Walk-score of 91 in one of Portland's best neighborhoods!
Contact us for more information about this building and current availability via email at info@danagriggs.com or by visiting our website at www.DanaGriggs.com

 Serenity Design
There are few things we enjoy nearly as much as helping a homeowner create a statement that is so exclusively them that it’s all but impossible for another to duplicate what they’re creating in their home. Sure, there can be common colors and sometimes even common themes, but for as many homeowners as there are, there are as many individual tastes, thoughts, and ideas that can inspire creativity and design. Tapping into where each homeowner is coming from is what is what brings us so much joy and excitement.
Just imagine the excitement we felt when this homeowner asked us to help him with this unusual project! He received this Jack Daniels barrel as a gift from a close friend and wanted to create a new bar in his basement to entertain family and friends. The initial thought was to have the barrel as a stand alone conversation piece, but after some further discussion we suggested using it as a focal point and thus the project was born.
Jack was known to be a man of refinement and to pay him the appropriate respect it only made sense to approach this project with an equal sense of detail in the crafting of this project, if for no other reason, we hold the same values. To match all of this with our homeowner’s fondness of entertaining friends, the warm and relaxing feeling he was looking for and the aesthetics of the room, the use of reclaimed and live-edge wood made for a natural fit.
In fact aside from a few structural 2x4s beneath the surface, the entire project is built from reused, reclaimed, or re-purposed materials. The most obvious example would be the barrel itself. A bit of research revealed that Jack Daniels only uses their barrels one time before replacing them. Rather than simply destroying them or throwing them away, the barrels are made available to the public to use for other purposes. As a side note we appreciate seeing other companies taking this responsible and earth friendly approach to business.
As a part of our own mission to reduce, reuse, and recycle as often as we can, you’ll note the wall paneling is also re-purposed materials. These particular boards we retrieved from an old building that was being removed and rather than allowing all these materials to be bulldozed with the rest of the old structure, we took as much of the old building materials as we could to use elsewhere. For this project we had the old planks and beams them re-sawn into the wall paneling you see here. Look closely at the picture and you’ll see the original nail holes in the boards that made their new home in this project.
We even incorporated the reclaimed paneling into wrapping the column the previously exposed wood beams above bar area. It adds to the overall feel by incorporating the theme into an otherwise ungainly (and obviously necessary!) part of the house structure.
All the boards in the design of the bar itself come from re-purposed, urban Ash logs. These are either aging and at-risk trees that cities need removed. Ash trees can be subject to assorted infections and diseases and it’s an unfortunate truth that once the disease is discovered, the best way to reduce it’s spreading is to remove the trees in the surrounding area. To further our mission, we take these trees before they end up in a shredder and re-purpose as many of them as we can rather than seeing them simply turned to mulch. We believe this to be a much more responsible use of available materials and just as beautiful.
Each board has so much individual character with their natural knots and swirls. We particularly enjoyed the perfectly sized and shaped piece that became the support at the far end of the bar top. It’s as if nature knew we were going to make this project and grew that board to the perfect dimensions just for this purpose!
We also had a small leftover piece that was extra knotty and so full of character that we incorporated it as a small shelf just above the barrel. Just because it’s small doesn’t mean it can’t make a statement…
Of course no bar would be complete without the top itself. We had a few extra large pieces of Ash with live edges on both sides for the owner to choose from that fit the rough dimensions we needed. His decision made, we added just a very subtle hint of blue and green with our proprietary treatment before the final finishing with epoxy to a mirror finish. We added a few recessed lights to help highlight the natural patterns in the bar top and this bar is ready to serve.
This project was satisfying for several reasons. We were thrilled we were able to complete the project entirely out of reclaimed and re-purposed materials. The homeowner’s desire for a rustic feel made it easier to accomplish this and we appreciate that we can partake in projects like this, particularly one so unique.
Custom doesn’t come out of a catalog. At Serenity Design Studio our number one goal is to see your unique vision come to life.


 Ace Baby Furniture
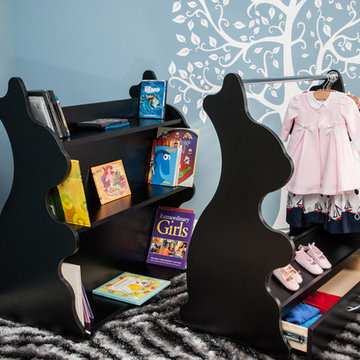
Mobile Wardrobe Closet Stand for Kids: Key Features
-Made of Sturdy and High Quality Melamine Panels
-Wardrobe Drawer with Full Extension Soft Closing Slides
-Angled Shoe Racks on Both Sides
-Easy Gliding Casters for Mobility
-Designed and Manufactured in the U.S.A.
Mobile Closet Stand Product Description
A mobile closet stand that you will cherish for years with your child! Versatile, functional, yet whimsically designed to fit your chic home decor. Perfect for keeping your child's wardrobe neat and tidy. A sturdy chrome-finished clothes rod offers ample space for you to mix, match and coordinate all of your child's outfits for school, play and events. A convenient pull-out drawer serves as additional storage space for blankets, sweaters, toys, or accessories. Wheel the clothes stand from room to room for playtime and dress-up or while cleaning and remodeling your space. Your child will have fun while learning to organize their clothes, toys, and shoes.
Adult assembly required. Step-by-step instruction manual included. Toll-Free phone support and customer service. No additional tools required! Includes a handy screwdriver for your convenience in the package!
Scratch resistant and easy to clean material made in U.S.A. Coordinates well with other popular furniture finishes. The Mobile Closet Bear comes in a variety of colors (subject to availability):
Black
Cherry
Espresso Wenge
Natural Maple
Product Dimensions: 19.5” D x 36” W x 41.5”
____________________________________________
Mobile Bookcase for Kids: Key Features
-Made in the USA of Quality Melamine Panels
-Double-Sided Bookcase Storage
-Easy Gliding and Locking Casters for Mobility and Safety
-Designed and Manufactured in the U.S.A.
Product Description:
Keep everything within reach with this NEW Double-Sided Children’s Bookcase from Ace Baby Furniture. The Mobile Children’s Bookcase is the latest addition to the whimsical, practical, and ultra-functional furniture collection. This bookcase offers two-sided storage, smooth-gliding and locking casters, and chic designs for both parents and children to enjoy for years to come. Wheel this bookcase from room to room while providing ample storage space for all of your child’s storybooks, toys, and other memorabilia. Versatile for the baby’s nursery, toddler’s bedroom, or even the playroom! Give your child easy access to their favorite fairytales, fables, and storybooks so they can learn to find and organize their own literature collection! Classic designs and colors match well with almost any décor. Quality materials ensure long-term usage as your child grows and transitions. This bookcase features three display shelves on both sides, which provide enough space and storage to showcase all of your child’s most precious belongings:
-Books, Trophies, and Framed Artwork or Awards
-Toys, Board-games, Plush Animals, and Dolls
-Storage Boxes and Toy Containers
-Video Games, Laptop, Radio, Clock, and other Electronic Devices
Product Options:
-3 Shapes (Rabbit, Lion and Bear)
-5 Luxurious Colors (Espresso Wenge, Cherry, Natural Maple, White, and Black)
Product Assembly and Support Information:
-Adult assembly required.
-Step-by-step instruction manual included.
-Toll-Free phone support and customer service.
-No additional tools required! Package includes a screwdriver for your convenience!

 Paula McDonald Design Build & Interiors
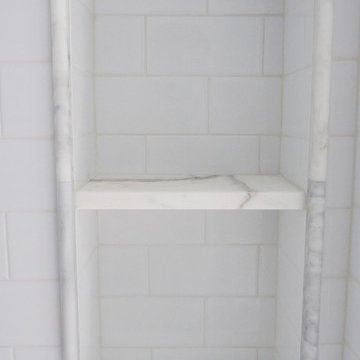
Sometimes it really is all in the details... and the storage! By gutting this small NYC bath back to its stub walls and all walls back to the underlying cinder block exterior wall we were not only able to expand the space by a few precious inches that make all the difference, but we were also able to create a beautiful shower storage solution in stunning Statuary honed marble.

 Bloomington Carpet One
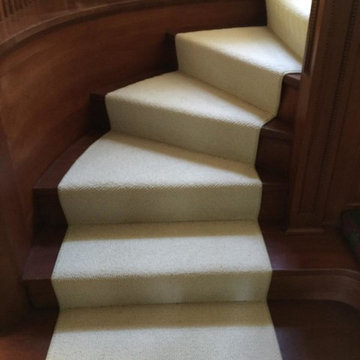
Beautiful custom runner to match the unique measurements of this staircase.
Small wooden curved staircase photo in Minneapolis with wooden risers
Small wooden curved staircase photo in Minneapolis with wooden risers
 Tile Doctor Ltd
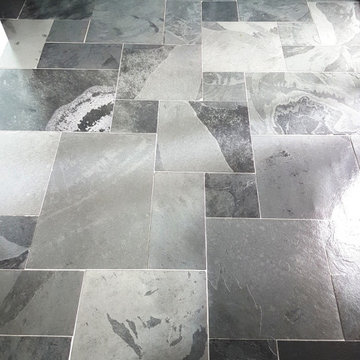
The pictures below are of a Riven Slate floor at a house in in the Leeds suburb of Horsforth which had been laid ten years prior. It’s probably difficult to appreciate from the images but the sealer on this floor was well worn through in the high traffic areas making it patchy in places. Without the protection of the sealer dirt was now ingrained in the pores of the stone leaving it looking dull. Riven slate is always tricky to clean thoroughly due to the rough surface and that combined with the ingrained dirt was making it very difficult to keep clean.
The floor now needed to be stripped of old sealer and then resealed and although I can provide a price for this over the phone my preference is to visit the property and survey the floor. In the case the owner had sent me some photographs via email however they were not too clear and so I felt it would be best if I paid the customer a visit to ensure I could give them an accurate price.
The floor was indeed overdue a clean and seal, as suspected dirt was ingrained into the areas where the seal had worn off. The house was home to a very busy family, so the area was subject to the significant traffic. I carried out a test clean on a small area and they were surprised by the results, when you live with a floor for so long you don’t notice the very slow decline in its appearance. They agreed to my quote and we arranged a time to return and carry the deep clean out.
When I arrived, I started off by protecting the skirting and surrounding woodwork. Given the rough surface of the floor I first applied Tile Doctor Wax Away which is a very effective coatings remover that is designed for removing wax but works very well in these situations. The product was left to dwell for a round ten minutes so it could get to work breaking down the old sealer and then scrubbed in using a black scrubbing pad fitted to a rotary machine.
This process removed most of the dirt and old sealer, but some stubborn patches remained. To treat these, I replaced the black pad with a coarse 200-grit burnishing pad and finally some handheld diamond burnishing blocks for the edges and corners where more intricate work was required, and the circular pads struggle to reach.
I gave the floor a rinse, and extracted the soil with a wet vacuum, the floor was then left to dry off overnight.
The next day I returned, first the slate floor was checked for moisture using the moisture meter. Once I was happy it was within the correct parameters, I then sealed with four coats of Tile Doctor Seal and Go. This is a modern water-based blend of acrylic polymers that provides both a stain resistant surface seal and a durable low-sheen finish also being water based there’s no smell as it dries.
The sealer really brought the stone to back to life and the lovely colours in the natural stones were now evident. The patchy appearance of the floor was gone, and the customer was happy.
I discussed with them how they should maintain the floor and advised them to use Tile Doctor Neutral Tile Cleaner. This is pH neutral cleaner that won’t prematurely erode the new sealer like the stronger products you find in Supermarkets which are only for use on Vinyl and Ceramic floors.
Nigel Stoker
North West Yorkshire Tile Doctor
89