
Search results for "Supermarket" in Home Design Ideas
 Tile Doctor Ltd
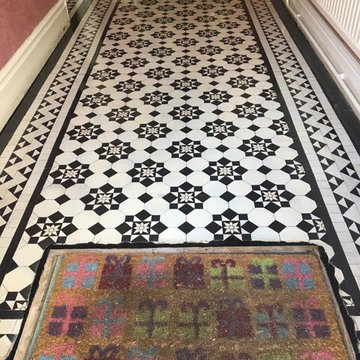
I was contacted by a professional couple who were despairing over the state of their Victorian tiled hallway floor which was dull and uninviting. The property was in Newport which is on the south east side of Wales around twelve miles east of the bustling city of Cardiff.
I went over to visit the property which was a beautiful Victorian period terrace house nestled amongst other properties of a similar age properties. The couple wanted their Victorian hallway floor to be brought back to life, so I demonstrated the cleaning process I intended to use on a small part of the floor. Immediately it had the desired effect and the floor looked much cleaner. I could see that there were no structural issues with the floor and the test clean proved it was just ingrained dirt that was the problem. The clients were happy with the result of the demonstration and subsequent quote, so we arranged a suitable date to come back and complete the work.
When I arrived, I started by protecting the skirting boards with tape and then set about giving the Victorian tiles a deep clean. I applied a combination of Tile Doctor Pro-Clean and Remove and Go leaving it to dwell for a short time to allow the products to soak into the pores of the tiles and start breaking down the ingrained dirt. After about ten minutes I scrubbed the floor with black scrubbing pad attached to a rotary floor buffer which released the years of grime and dirt. The floor was then rinsed with water and the soil removed using a wet vacuum. I repeated the process to ensure the floor was as clean as possible.
A further inspection of the Victorian tiles revealed a few stubborn marks which were dealt with using handheld diamond burnishing blocks. These are also handy for getting into the corners of the floor which were difficult to reach with the rotary machine. The floor was then left overnight to dry out.
The following day I returned, and I checked the floor was dry using a moisture meter to ensure it was dry. Once I was happy, I started to seal the floor with Tile Doctor Seal & Go which is a water-based sealer that works well on Victorian tiles. Several coats were applied building up layers to produce a stunning satin finish.
Once I had finished the floor was looking so much cleaner and brighter and the addition of the sealer will protect the floor from dirt and keep it looking good for some time to come. My clients were over the moon with the floor!
For aftercare I recommend Tile Doctor Neutral Tile Cleaner, which unlike the stronger products you find in supermarkets is ideal for cleaning sealed floors and will ensure the sealer stays in good condition.
Paul Wales
Monmouthshire Tile Doctor

 Cyprus buy properties
BEACHFRONT VILLAS FOR SALE IN LIMASSOL - CYPRUS
This modern design luxury beachfront villa for sale in Limassol is situated in close proximity to Limassol city centre as well as its golden sandy beaches. This estate is located on the Amathounta beachfront, near the prestigious St. Raphael Marina Yacht Club. Being so close to the centre gives this beachfront property in Limassol the great advantage of easy access to numerous services such as shops, schools, universities, supermarkets, bakeries, and pharmacies to name a few.
This outstanding villa for sale in Limassol is located on a plot of 570 square metres, covering 370 square metres and 200 square metres of verandas, including the remarkable roof garden. Not only do most of the areas of the villa have stunning views of the Mediterranean Sea, but its construction includes multiple glass walls and patio doors giving photographic images from inside. Moreover, the residents of this complex can enjoy a five-star lifestyle with a full concierge service, controlled entrance, security system, multiple use court, gym, relaxing spa, shared pools, children’s playground and even Clubcars to move around the complex. The residents of this exquisite villa can also enjoy their own private infinity pool and stunning lush garden whose design is evidently of exceptional quality and design.
With a location of just 200 metres from the coast, this striking beachfront villa for sale in Limassol offers a panoramic view of the cosmopolitan beach of Amathounta. Finesse merges with ultimate luxury, making this villa one of the most impressive, state-of-the-art properties for sale in the area of Limassol in the island of Cyprus. The presence of the sun is noticeable in every corner, while the majestic views of the sea take you to dreamy lands far, far away! Its impeccable architectural design together with its stylish décor offer a luxurious and relaxing lifestyle whilst enjoying the vivid blue of the sea, long stretches of golden sand and spotless beaches.
The historical site of Ancient Amathus is very close by, and the surrounding picturesque villages will enchant even the most meticulous visitor seeking something unique. Adding to this, Limassol is a gastronomical delight with its diverse cosmopolitan restaurants, as well as traditional Cypriot meze taverns in the graphic villages. Moreover, there are numerous bars are ideal for chilling out at the end of the day.
The unique character of this property in Limassol, favorable location, fascinating views of the Mediterranean ocean, superb architecture and advanced technology make this beachfront villa in Limassol is an ideal investment in Cyprus for even the most demanding buyer who dreams of living the dream!
For more properties for sale in Limassol you can visit our general page houses for sale in Limassol or our home page properties for sale in Cyprus.

 Analogue (formerly EN Architects)
Small minimalist master white tile and subway tile porcelain tile corner shower photo in Baltimore with flat-panel cabinets, medium tone wood cabinets, a one-piece toilet, white walls, a wall-mount sink and quartz countertops
Find the right local pro for your project
 Tile Doctor Ltd
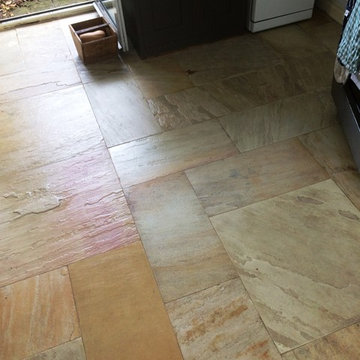
I was recently contacted by a client who had just moved into a house in Crowborough, a town in East Sussex which by the way was once home to Sir Arthur Conan Doyle, the author of the Sherlock Holmes novels and short stories. The riven Slate tiled floor in the kitchen had trapped bits of dirt and also food which had become ingrained in the tile. Needless to say, the new homeowner wanted to give the kitchen floor a thorough clean. However, she had tried every cleaning product she could find in the supermarket, but to no avail. Struggling to find a solution she sought out professional assistance and naturally I was happy to help.
My first task was to mix up a strong solution of Tile Doctor Pro-Clean. The product was only slightly diluted with water, since the floor was quite heavily soiled and a higher concentration of Pro-Clean was needed to help remove several layers of dirt and food waste. Once applied to the floor, the solution was left to dwell for roughly five minutes before I began to work it into the stone with a deck brush. I did the best I could here to clean the floor without using my buffing machine as, since the floor was riven, my black buffing pad would have been ruined by the ridges.
Making up for the lack of a buffing machine, I made sure to scrub the floor with Pro-Clean for several hours to remove as much grime as possible. One the cleaning was finally completed I rinsed the floor several times with clean, hot water. I then used a wet-dry vac machine to remove any excess moisture to clear the floor for sealing when I returned 48 hours later. Upon leaving, I left my client with instructions to avoid spilling anything on the floor as, again, any liquid left on the surface might affect the performance of the sealer.
After a period of two days, I returned to commence the sealing. My choice of sealer was Tile Doctor Seal & Go, which is suitable for use on internal, unsealed surfaces such as Slate, textured Quarry, Victorian tile, and others. Seal and Go is also a water based sealer so you there’s very little smell given off whilst it dries compares to solvent based sealers. In this case, the client did not want the surface of the floor to be too shiny, so I only used two coatings of Seal & Go, whereas for a shinier result I would have used a few more.
My client was exceptionally pleased with the results, which had not only cleaned the floor but brought out the beautiful colours in the stone that had once been hidden under several layers of muck.
 Tile Doctor Ltd
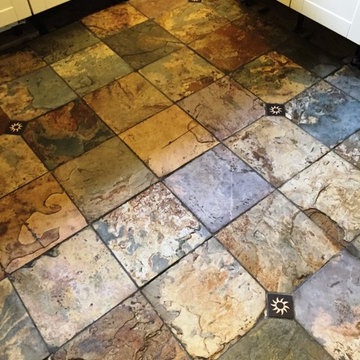
I recently visited a client living in the market town of Woodstock in Oxfordshire to rejuvenate a fantastic multi-coloured Slate floor that had been hidden under several years’ worth of dirt in their kitchen. Slate is a typically hard-wearing tile used for flooring high traffic areas of houses and public buildings but does need sealing to bring out its best features and in this case the sealer had long since worn off and dirt had become ingrained in the stone.
My first task in the cleaning process was to mix a strong solution of Tile Doctor Pro-Clean, which is a strong alkaline cleaner safe to use on Tile and Stone, and NanoTech HBU (Heavy Build-up Remover), which is a particularly powerful product that uses nano-sized particles to tackle muck in areas of the stone where typical cleaners simply can’t reach. I spread this solution across the floor and left it to seep into the stone, to get underneath and lift out the ingrained dirt.
After allowing the solution adequate time to dwell, I scrubbed the floor with a carbon brush to gradually reveal the fantastic natural colours of the Slate hidden beneath. Following this, I rinsed the entire floor several times with clean water, before soaking up the resulting soiled residue with a wet vacuum.
The next part of the cleaning process entailed paying particular attention to the grout lines. I used Tile Doctor Grout Clean-Up to scrub the grout lines and also to treat a small amount of efflorescence. The resulting residue was promptly extracted with the wet vacuum and I finished by giving the whole floor a rinse with Tile Doctor pH Neutral Tile Cleaner. This is a day to day tile cleaning product which is recommended for stone floors, many supermarket tile cleaning products are only suitable for ceramic tiles due to their acidic formula and can damage a floor over years of use so you should always read the label. I then left the floor to dry completely overnight.
On day two, the Slate tiled floor was dry and ready to seal. The floor had to be completely dry, as any excess moisture has the potential to the damage the performance of the sealer. Since my client had specifically requested a matte finish, I opted to use Tile Doctor Colour Grow. Colour Grow is an impregnating sealer that provides durable surface protection from within while also enhancing all of the natural mineral shades.
My client was very pleased with the results, particularly as they hadn’t realised they had such a great looking floor in their house when they had first purchased it!
Barry Woodward
Oxfordshire Tile Doctor


 Lands End Development - Designers & Builders
Corner shower - mid-sized rustic 3/4 metal tile ceramic tile and brown floor corner shower idea in Minneapolis with flat-panel cabinets, medium tone wood cabinets, a two-piece toilet, orange walls, a console sink and white countertops
 Tile Doctor Ltd
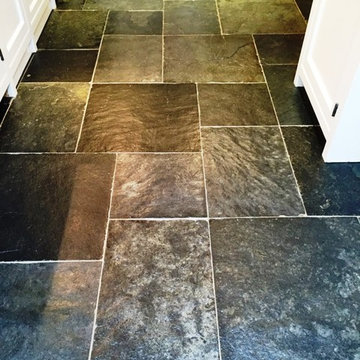
These photographs below are of a Slate Tiled Kitchen floor taken at a customer’s house in Henley-on-Thames which, as its name suggests, sits alongside the River Thames in Oxfordshire. My client’s Slate kitchen floor had recently been cleaned with unsuitable cleaning products which I suspect impacted the sealer leaving it looking dull. Sealers really to improve the look of a stone floor so unsurprisingly once the sealer had been damaged my client had been unable to find a cleaning product that could have any kind of positive effect on the tiles.
It’s fairly well known that many supermarket quality cleaners are only really designed for use on Ceramic or Porcelain tiled floors as they contain acids which strip away at sealers and acid sensitive stone floors, leaving the stone beneath vulnerable. So your select a cleaning product for your floor always read the small print on the back of the label and make sure you avoid anything that mentions not for use on acid sensitive stone; belter still Tile Doctor have a number of products for cleaning tiled floors including Neutral Cleaner and Stone Soap.
To clean the floor and remove any remaining sealer I first made a strong dilution of Tile Doctor Pro Clean which is a strong alkaline cleaner and then spread this over the floor, leaving it to dwell. This allows the cleaner to seep into the slate and get underneath, breakdown sealers and start to lift out ingrained dirt.
Following a dwelling period of roughly ten minutes, I agitated the floor periodically with a rotary machine fitted with a black scrubbing pad and scrubbed along the grout lines with a stiff grout brush. I then used a wet vacuum to extract the resultant slurry away and then followed up by rinsing the floor with clean water, and once again vacuumed up the residue.
Any stubborn areas were retreated until I was happy with the floor and then I left the floor to dry off completely overnight, in preparation for sealing the following day.
Upon my return to the house the following day, I ran some damp tests on different parts of the floor to check for any excess moisture which could potentially damage the performance of the sealer. Once I was satisfied that the floor was completely dry, I proceeded to seal the tiles using Tile Doctor Seal & Go. This will provide a robust surface seal for the future, along with an aesthetically pleasing low-sheen finish.
This sealer works particularly well on Slate tiles and, being a water-based sealant, additionally Seal & Go does not emit an unpleasant smell as it dries. Slate is quite a porous stone so I applied six coats of seal to provide long-lasting protection.
Barry Woodward
Oxfordshire Tile Doctor


 Tile Doctor Ltd
The pictures showed are of an Encaustic Cement tiled floor that had been installed in the bathroom of a property in Twickenham. At the time the tiles were installed, they did not seal them and had since accumulated dirt, especially in the grout lines.
Encaustic cement tiles have become extremely popular in the last few years with many beautiful artistic often geometric patterns available to choose from. The very nature of the cement-based tile however does make it slightly porous, and if left unsealed dirt will become ingrained in the tile making it difficult to remove and keep clean. Like grout they do therefore need to be sealed in order to keep them looking at their best for longer.
Now we normally recommend using diamond encrusted burnishing pads when renovating Encaustic Cement tiles however in this case the face of the tiles were not too bad and it was really the grout that needed the most attention. So, to cut the cost for customer, I advised a straightforward alkaline scrub clean and seal.
To clean the tile and grout I sprayed the floor with a strong dilution of Tile Doctor Pro-Clean and left it to soak into the dirt for ten minutes. Space in the bathroom was quite tight so instead of using a mechanical floor scrubber I scrubbed the tile and grout by hand working the alkaline cleaning solution into the pores to release the grout in dirt.
After scrubbing the floor was rinsed with a little water and the soil removed with a wet vacuum. Afterwards the floor was inspected, and any stubborn areas retreated with repeat of the process. After a final rinse, the floor was dried as much as possible with the wet vacuum.
Fortunately, the weather has been amazing of late and so it did not take long for the floor to dry, being a small space and a little encouragement from a heat gun always helps. Removing excess moisture before sealing is essential as even a small amount can cloud the sealer resulting in an uneven appearance.
Once satisfied that the floor was dry, I proceeded to seal it by applying a couple two coats of Tile Doctor Colour Grow across the Encaustic tile and grout. As an impregnating sealer Colour Grow penetrates the pores of the cement occupying the space and thus prevent any dirt from becoming ingrained there. Colour Grow’s colour intensifying properties also helped to deepen the black colour of the tile enhancing the contrast between the tiles and grout.
Now the floor has been properly sealed it will be far easier for the customer to keep them clean in future. For maximum longevity of the sealer I recommend maintenance cleaning with Tile Doctor Neutral Cleaner. Don’t be tempted to use supermarket cleaning products without reading the label first, many are simply too strong for cleaning sealed surfaces and will strip off the sealer prematurely leaving the tiles unprotected.
Jonathan Oldham
South Middlesex Tile Doctor

 HAUS | Architecture For Modern Lifestyles
Living space with curved clear cedar ceilings, built-in media and storage walls, custom artwork and custom furniture - Interior Architecture: HAUS | Architecture + LEVEL Interiors - Photography: Ryan Kurtz
 Tile Doctor Ltd
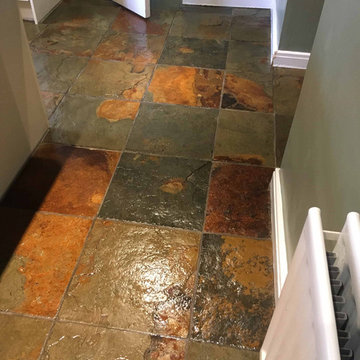
Except for general cleaning this multi-coloured slate floor had not been professionally cleaned since installation eleven years prior. Any sealer that had once been applied to the slate had long since worn off and dirt was now ingrained in the pores of the stone causing it to look dull and un-attractive. The property was in the lovely town of Staines Upon Thames, obviously situated on the banks of the River Thames and a popular place to live for London commuters.
I visited site to take a closer look at the floor and provide the client with an accurate price for renovating the stone. It turns out that the client had used all sorts of different household cleaners in an attempt to get the floor clean. Unfortunately, they were probably making the situation worse as these strong cleaning products would have actually stripped the sealant off the stone leaving it open to dirt. I carried out a test clean for them and they were very pleased to see how the floor could look. We agreed a price for the work and arranged a suitable date to carry out the work.
Cleaning a Multi-Coloured Slate Tiled Kitchen Floor
My first task was to strip off what was left of the old sealer and deep clean the stone using a dilution of Tile Doctor Remove and Go mixed 50:50 with Tile Doctor Pro-Clean. This powerful cocktail was applied to the floor and left to soak in for ten minutes before being scrubbed in using a rotary machine fitted with a black scrubbing pad.
The grout was hand scrubbed using more of the cleaning solution along the grout lines until I was happy the floor was as clean as it possibly could be. The floor was rinsed with water and the soil extracted by using the wet vacuum.
Once the floor was clear the Slate was inspected, and any stubborn areas were spot treated using the same process as before. After a final rinse and extraction, the floor was dried as much as possible using the wet vacuum and left to dry off overnight.
Sealing a Multi-Coloured Slate Tiled Kitchen Floor
I came back the next day and checked the moisture levels of the tiles using a damp meter. The floor had dried well so I had a green light for applying a new sealer. For this I used four Coats of Tile Doctor Seal and Go, allowing each coat to dry before applying the next. This product works really well on Slate and gave the tiles a nice sheen finish, the fresh sealer will also make maintenance cleaning far easier in the future.
The client was very happy with the result, the floor now looks great and the natural colours of the stone is so much more evident. For aftercare I recommended they throw away all those supermarket products and use Tile Doctor Neutral Tile Cleaner which is a pH neutral product that won’t prematurely erode the new sealer with use.
Jonathan Oldham
South Middlesex Tile Doctor
 Tile Doctor Ltd
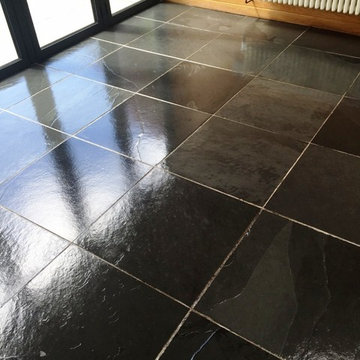
Tenuous link I know but I worked on this semi riven Black Brazilian Slate Tiles in the kitchen and dining room of a house in the seaside town of Thornton-Cleveleys around the time of the Rio Olympics. I love working on Slate as although it’s appearance can degrade without proper maintenance due to a build-up of dirt I knew they would look fantastic by the time I had finished.
The tile itself had lost its rich black colour and the grout lines had become stained, leaving the floor as a whole looking very unattractive. Out of interest honed Slate has a smooth, refined texture whereas the riven Slate has a rougher, more natural texture, and this can make it more difficult to keep clean. Needless to say, the customer was keen to have the tiles restored to looking their best.
To restore the appearance of the Slate, I cleaned the floor and removed what remained of the old sealer off using Tile Doctor Remove and Go. This was scrubbed into the floor using a scrubbing pad fitted to a rotary machine. The floor was then rinsed with water, and the process repeated where necessary to tackle particularly stubborn areas of dirt.
As mentioned previously, the grout lines were in a particularly bad state, and would need special cleaning attention. I cleaned carefully with a strong 5-to-1 dilution of Tile Doctor Pro Clean with water, which is our high alkaline cleaner. The cleaning solution was scrubbed I’m using a stiff handheld grout brush, with the grout lines looking immediately cleaner. When I was satisfied that the grout lines had been restored to the best possible condition, I gave the floor a thorough rinse using the wet pickup function of a wet wax machine to get the floor as dry as possible and then left the whole floor to dry off overnight.
Upon my return to the property I ran some quick damp tests to check that the floor was completely dry. This is important as any excess moisture would have prevented me from sealing the tiles, since it can cloud the sealer and damage it performance.
Previously I discussed sealer options with the customer and they stated that they would prefer a Satin finish, so I applied a sealer called Tile Doctor Seal and Go, our topical sealer which will both protect the Slate from dirt and stains, and also gave it the desired finish. As you can see from the below photographs, the rich, dark shades in the Slate were really enhanced.
The customer was very pleased with the finished result, but was also concerned about keeping the Slate clean in the long-term. For regular cleaning I advised the customer to use a pH neutral cleaner for aftercare called Tile Doctor Neutral Cleaner. As a pH neutral cleaner, it will not erode the sealer compared to acidic cleaners you so often find in supermarkets.
Russell Taylor
Lancashire Tile Doctor
 Tile Doctor Ltd
Shower and bathroom mould and soap scum growth are probably the most common, annoying and frustrating tile-related problems. Wet and high humidity areas with poor ventilation provide the perfect breeding ground for mould and stains. Soap residue and body oils also create a food source for soap scum, mould to grow.
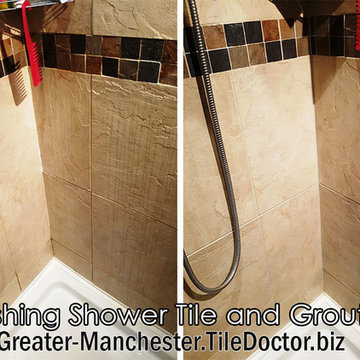
My customer in Dane Bank had the exact problem with dirty and mouldy grout lines in her shower cubicle. She had tried scrubbing the grout lines herself with a toothbrush and standard supermarket cleaners but never got the result she wanted.
Fortunately she was lucky to find Tile Doctor from the internet and I was asked to pop over and take a look to see what could be done. I was confident we could make a big difference so I went through the options with her and give her price for the job. She was happy with the price and we agreed a date for me to return and complete the work.
For grout lines cleaning I used Tile Doctor Grout Colorant Pre-Treat Cleaner, which successfully removes dirt, soil, soap scum and hard water deposits from grout joints. The product was sprayed on to the grout and left to dwell and seep into the pores for approximately five minutes to break down the soap scum and dirt before being scrubbed in using a stiff grout brush. The cleaning was successful but there were still few mouldy spots left. On these spots I used Tile Doctor Mould Away Spray that is meant for quick removal of mould from grout and silicone. One again product got sprayed on grout lines and left to dwell for five minutes and then scrubbed with stiff grout brush and then rinsed with clean water. After I had finished cleaning I express dried the tile and grout using high power heat gun.
With the area nice and dry, I had to choose the matching colour for the existing grout. There are ten colours to choose from the Tile Doctor range of Grout Colourant and on this occasion we chose Limestone as the best colour to match the tile.
The colourant is easily applied directly to the grout and in this case I applied two coats. The product is epoxy based and completely seals and rejuvenates the appearance of the grout, which not only drastically improves appearance it also makes it much easier to clean in the future. After applying the re-colourant I buffed all grout colorant excess off the tiles and the shower cubicle was ready.
My customer was very satisfied with the work and left the following comment on the Tile Doctor Feedback system
“Really, really happy with the service Tony provided and the recommendations he suggested. The work was carried out in a highly professional manner, to a high standard. I have already recommended him to friends. Thank you”
Tony Olmet
Greater Manchester Tile Doctor
 Tile Doctor Ltd
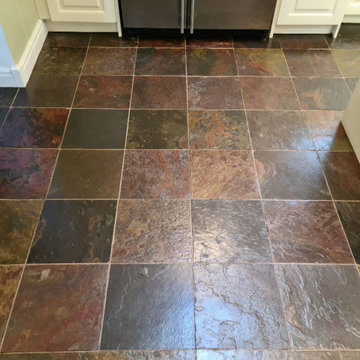
The pictures above are of a 12 metre squared Chinese slate floor in the kitchen of a property in Harrogate which had been laid ten years prior. You can see from the photographs that the grout had darkened and the slate itself had lost a lot of its character and colour.
Sealers typically last between three to five years so by now there was little protection left and so dirt had become trapped in the pores of the stone and grout making it difficult to keep clean. It was now overdue a deep clean and the application of a fresh seal.
I went over to survey the floor and provide a quote for stripping off what was left of the original sealer, cleaning the floor, and then resealing. I had been recommended by a previous customer so happy with my track record and the price I quoted, they asked me to do the work. They had received a quote from another firm which as it turned out was a lot more expensive than mine.
Given there was little sealer left to remove I decided to start by scrubbing the floor with a strong concentration of Tile Doctor Pro-Clean which was left to soak into the slate for ten minutes. Then I worked the solution in with a rotary machine fitted with a black scrubbing pad. Pro-Clean is a very versatile product that will strip the sealer off a floor when used in a strong dilution with water, it will also remove deep seated dirt too.
Due to the riven nature of the tiles however I found the black pad was struggling to reach into the crevices of the tile so to achieve the desired result I resorted to scrubbing the floor on my hands and knees with a scrubbing brush. Its important that the floor is as clean as it possibly can be before sealing otherwise you simply lock the dirt in and it will never look clean.
The floor was left to dry off overnight and I returned the next day to apply the new sealer. First, I checked to ensure that the floor was fully dry using a damp meter. The sealer would not cure properly if the floor damp and this can detract from the finished appearance.
I was happy with the readings, so I started to apply the first coat of Tile Doctor Seal and Go which I felt was the best product sealing Slate. The stone needed four coats; each one being left to dry before applying the next. Seal and Go is a stain resistant sealer which results in a low sheen silky appearance, it is good on surfaces such as the Chinese Slate which tend to be more porous and being water based it does not leave a smell as it dries.
The client was very happy with the result and mentioned to me that it had never looked that good even when new.
For aftercare cleaning I recommended the use of Tile Doctor Neutral Tile Cleaner which will keep the floor in the best condition. This is a pH neutral cleaner which can be used daily and won’t compromise the newly laid sealer like many of the stronger products you find in supermarkets.
Nigel Stoker
North West Yorkshire Tile Doctor
 Tile Doctor Ltd
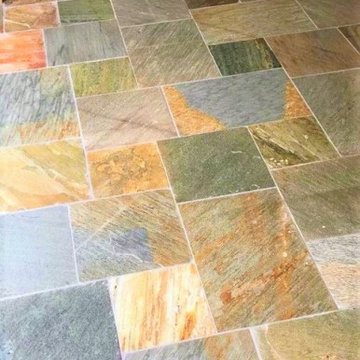
The tiles pictured are Chinese Slate which were laid in the Kitchen of a house in Chepstow around nine years ago. The town of Chepstow is located on the Welsh side of the River Seven and has the River Wye running through it.
The floor had not been professionally cleaned and sealed since installation. During this time the old sealer had mostly worn off allowing dirt to get into the pores of the stone leaving it looking dull, uninviting and dirty. The grout lines had also collected dirt and many of the lines had darkened.
I discussed with the client the process to get the floor cleaned and restored and demonstrated the effectiveness of the process on a small test area. They were impressed and were happy to go ahead with my quote, so we scheduled in the work which would take two days.
To get the floor clean and remove what was left of the old sealer I first made the floor wet and then added a strong dilution of Tile Doctor Pro-Clean mixed with Tile Doctor Remove and Go to give it extra power. This cleaning cocktail was left to soak into the tiles for ten minutes before being scrubbed in with a black scrubbing pad fitted to a rotary machine and by hand where necessary. This combination works well on really dirty floors such as this.
The scrubbing action released the years of dirt from the pores of the Slate and it wasn’t long before the cleaning solution turned black. This was then extracted off the floor using a wet vacuum. We then gave the floor a thorough inspection. There were one or two areas that were particularly stubborn, so these areas were retreated using the same process and the grout scrubbed by hand using more Tile Doctor Pro Clean.
The floor was then given another rinse with water and then dried as much as possible with the wet vacuum. This got the floor dry, but it would need to be completely dry before sealing so it was then left to dry off fully overnight.
I came back the next day to seal the floor first checking the moisture level of the stone by taking readings with a damp meter to ensure it was dry. I chose to use Tile Doctor Colour Grow for the sealer as the colour enhancing formula would be the best product to bring out the natural colours in the Chinese slate. Colour Grow is an impregnating sealer which will provides durable protection as well as allowing the surface to breath. Three coats were applied, allowing each to dry before applying the next one.
The client was so happy, so much that she said it looked better than when first laid!
I discussed aftercare with her and recommended the use of Tile Doctor Neutral Tile Cleaner, it’s pH balanced so it won’t prematurely erode the sealer which can be the problem with stronger products you find in supermarkets. It comes in concentrated form so one bottle lasts a long time.
Paul Wales
Monmouthshire Tile Doctor
 Tile Doctor Ltd
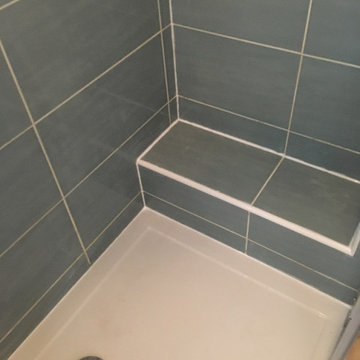
Pictured below is a very mouldy Ceramic Tiled Shower Cubicle at a property in the picturesque market town of Woodstock, which is very close to the famous Blenheim Palace and has a long history that dates to the Domesday Book and have many 17th century buildings.
As you can see mould had really got a grip on the white grout around the bottom of the shower and in most other places the grout had become discoloured. Mould and discolouration are a very common problem and is caused by a lack of ventilation in the bathroom as well as the dyes in soap and shampoos.
Most ceramic tiles have a glazed surface and so are fairly impervious to these problems, grout however is a problem due to its cementitious rough nature. I discussed with the client what could be done to restore the appearance of the shower cubicle for them, and they were pleased to hear we could do something about it. Happy with my quotation it wasn’t long before I got instructed to go ahead with the work.
To resolve the problem, I first sprayed the whole shower with Tile Doctor Duo Clean and left it to soak in. The bottle comes with a spray attachment that combines the product with air making it lighter and easier to stick to vertical surfaces. It is a fast effective cleaner which doubles up as a grout cleaner and mould remover.
Whilst the Tile Doctor Duo Clean was doing its magic I fetched the other tools I would need to complete this job. After about 30 minutes I sprayed the cubicle again and started to hand scrub the grout and tiles to remove the mould and dirt. I then rinsed with water and went over the stubborn stains again until I was happy. The walls where then dried with a clean towelling cloth. It is amazing the difference you can achieve with the right grout cleaning product and a lot of elbow grease.
The last step and “prise de la resistance” was to cut out all the original silicone sealant with a sharp knife and then replace with new white sealant which had an anti-mould formula. I am not convinced these anti-mould products work any better to be honest but with mould being such a problem it is definitely worth giving them a go.
The last step was to spray the grout with Tile Doctor Wall Tile and Grout Sealer to help protect the grout, it forms a protective barrier over the tile and the grout, so water just runs straight off the wall and into the shower tray.
For after care I recommended the use of Tile Doctor Aqua-Pro which is pH neutral cleaner designed for showers and will help the sealer last longer. Stronger supermarket products can actually strip a sealer off the tile over time so we don’t recommend their use.
I think you will agree the shower cubicle looked transformed by the time I had finished, certainly my client was very happy with the work we had carried out.
Barry Woodward
Oxfordshire Tile Doctor

 Morris Black Designs
Kitchen for a bi-coastal family with sophisticated taste. Designer Suzanne Joseph of Morris Black Designs created drama with a full granite backsplash - from hood to range, floating shelves and horizontal stainless pulls.
#SuzanneForMorrisBlack #MorrisBlackDesigns
 Tile Doctor Ltd
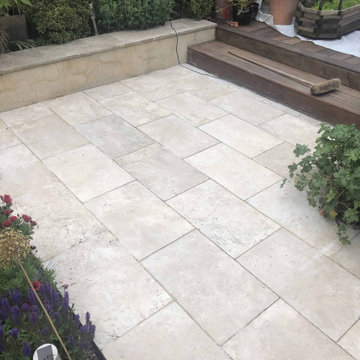
The picture shows an Travertine patio that was installed at a property in Hackney E5 around ten years ago and it had never been sealed. Over the year’s pollution and weather etc had taken its toll on the stone leaving the travertine stained with lichen, dull and grey as opposed to their original white/cream colour. Had the patio been sealed it would have provided some protection from the elements.
I conducted an initial visit where I tested several products to see what would be the most effective and establish what was required. Using that knowledge, I followed up with a written quote which was accepted, and a date arranged to complete the work.
We have adopted new working practices since the COVID-19 epidemic so we can work safely inside or outside but given the excellent weather this year this was an ideal and much easier to maintain social distancing.
During day 1 on site I started by sweeping away loose stones and other debris you typically find on patios. Then Tile Doctor Patio and Brick Driveway cleaner was applied neat to the stone and left for two hours. This is a very strong product designed for use by professionals which cuts through the dirt and was ideal for this situation. There are certain precautions you do need to take when using it such as wearing PPE and you must keep it away from ponds etc.
Using water to lubricate, the solution was then scrubbed into the stone using a coarse 200-grit pad fitted to a rotary machine and followed up with a lot of rinsing and extracting with water and a wet vacuum.
To refine the surface after the coarse Travertine the 200-grit pad I followed with 400, 800 and then 1500-grit burnishing pads in sequence rinsing with water and extracting after each pad was applied. This process is known as burnishing and closes the pores in the stone giving it a polished appearance. By this point the Travertine looked way better and we were starting to get the smooth finish back.
The weather held so the following morning a 3000-grit polishing pad was applied dry to the stone using only a little water. This brings up the appearance of the stone even further and has the added advantage of leaving it dry and ready for sealing.
The client wanted a natural appearance so two coats of Tile Doctor Ultra Seal were applied to seal the stone. Ultra-Seal is an impregnating sealer that soaks into the stone, protecting it from within yet without changing the appearance of the stone leaving a completely natural look.
The client very happy with job and now proud so show off her revamped patio. They hadn’t realised that the patio should have looked like this from the start. For aftercare I recommended they use Tile Doctor Stone Soap, many day to day cleaning products you find in supermarkets can strip off a sealer so if your using something else do check the label first.
Jackson Davis
East London Tile Doctor
 Tile Doctor Ltd
I was recently contacted by a client who had just moved into a large Victorian property in the West Cheshire village of Tarvin about renovating their Victorian tiled hallway. Apparently, the floor was in good condition, and it would just be a case of removing what was left of the old sealer, deep cleaning the tiles and then applying a fresh seal. Unless the floor has been regularly maintained with the same sealer it’s important to remove all traces of old sealers before applying fresh.
Victorian Hallway Before Cleaning Tarvin Cheshire
A lot of the work we do at Tile Doctor can be a lot more involved, often requiring the sourcing of matching replacement tiles and rebuilding large sections of tiled flooring so straight forward clean and seal job is always welcome.
To remove what was left of the sealer and the ingrained dirt from the pores of the Victorian tile I dressed the floor with a strong dilution of Tile Doctor Pro-Clean. On this occasion I used a 1:3 dilution with water and applied it to the floor with a mop. I left it to soak into the tile for fifteen minutes before scrubbing so it could get to work breaking down the old sealer.
During this time, I set up a weighted floor buffer and fitted a black buffing pad, these pads are designed for scrubbing hard floors and lifting out the dirt. I applied a little water as required during this process to ensure the pad was lubricated. Shortly the cleaning solution darkened as the old sealer and dirt was released from the tile.
The soil was rinsed away with water and then removed using a wet vacuum. Once clear the floor was inspected and the process repeated until I was satisfied it was as clean as it could be and free of sealer.
I left the floor to dry off overnight and returned the next day to apply a new sealer. Before doing so however I like to use a damp meter to take moisture readings from the floor. This is needed to ensure it is dry enough to seal which is important as any moisture in the tile can affect the sealer and lead to an inconsistent finish.
To seal I started with the application of a single coat of Tile Doctor Colour Grow which is a colour intensifying breathable impregnator that soaks into the tile improving appearance and adding protection from within. Any excess sealant was removed by wiping the floor with a microfibre cloth and then it was left to dry for an hour.
This was followed with four coats of Tile Doctor Seal and Go Extra which is an acrylic breathable sealer which adds a pleasing subtle shine to the tile. This is an important feature when choosing a sealer for old floors where moisture needs to be allowed to rise through the tile, otherwise it can become trapped under the floor and reach out to the walls causing rising damp.
The customer was very happy with the revamped hallway which made the house a lot brighter and welcoming. Before closing I should mention that for aftercare cleaning I recommend Tile Doctor Neutral cleaner which is designed for the daily cleaning for sealed tiles, this is important as most domestic supermarket cleaners are simply too strong and can prematurely erode the sealer.
Alastair Robb
West Cheshire Tile Doctor
9