
Search results for "Survey conducted" in Home Design Ideas

 FMSProjects, Inc.
Latch hardware in upper cabinets.
Inspiration for a mid-sized craftsman u-shaped medium tone wood floor eat-in kitchen remodel in San Francisco with a single-bowl sink, shaker cabinets, white cabinets, quartz countertops, green backsplash, ceramic backsplash, stainless steel appliances and a peninsula
Inspiration for a mid-sized craftsman u-shaped medium tone wood floor eat-in kitchen remodel in San Francisco with a single-bowl sink, shaker cabinets, white cabinets, quartz countertops, green backsplash, ceramic backsplash, stainless steel appliances and a peninsula

 Dianne Davant and Associates
Master Bedroom with Red Bed Frame and custom drapery and bedding.
Bedroom - traditional master light wood floor bedroom idea in Charlotte
Bedroom - traditional master light wood floor bedroom idea in Charlotte


Find the right local pro for your project

 Zelaya Properties LLC
We used: Custom cherry cabinetry in Arts & Crafts Shaker style by Kabinart in Boulder and Espresso stains. Liberty Hardware Venetian bronze 1-1/2" cabinet knobs. KitchenAid Architect II Series 22 CF counter-depth French door refrigerator. KitchenAid Architect Series II 27" convection single wall oven. KitchenAid 36" 6-burner dual fuel freestanding commercial-style range. KitchenAid Architect II Series 24" dishwasher. Sharp Insight Pro Series 24" built-in microwave drawer (Model #KB6524PS). Crystorama Solaris 12" wide pendant lights in English bronze. Granite countertops in Brown Fantasy. 3"x6" polished marble backsplash.
Paint colors:
Walls: Glidden Silver Cloud 30YY 63/024
Ceilings/Trims/Doors: Glidden Swan White GLC23
Robert B. Narod Photography

 Jordan Design Build Group
JDBG is wrapping up work on an expansive 2-story sunroom addition that also included modifications to the existing home’s interior and significant exterior improvements as well. The original project brief was to provide a conditioned 4-season sunroom addition where the homeowners could relax and enjoy their wooded views. As we delved deeper into our client’s overall objectives, it became clear that this would be no ordinary sunroom addition. The resulting 16’x25’ sunroom is a showstopper with 10’ high ceilings and wall to wall windows offering expansive views of the surrounding landscape.
As we recommend with most addition projects, the process started with our Preliminary Design Study to determine project goals, design concepts, project feasibility and associated budget estimates. During this process, our design team worked to ensure that both interior and exterior were fully integrated. We conducted in-depth programming to identify key goals and needs which would inform the design and performed a field survey and zoning analysis to identify any constraints that could impact the plans. The next step was to develop conceptual designs that addressed the program requirements.
Using a combination of 3-D massing, interior/exterior renderings, precedent imaging and space planning, the design concept was revised and refined. At the end of the study we had an approved schematic design and comprehensive budget estimates for the 2-story addition and were ready to move into design development, construction documentation, trade coordination, and final pricing. A complex project such as this involves architectural and interior design, structural and civil engineering, landscape design and environmental considerations. Multiple trades and subs are engaged during construction, from HVAC to electrical and plumbing, framers, carpenters and masons, roofers and painters just to name a few. JDBG was there every step of the way to ensure quality construction.
Other notable features of the renovation included expanding the home’s existing dining room, incorporating a custom ‘dish room,’ and providing fully conditioned storage and his & her workrooms on the lower level. A new front portico will visually connect the old and new structures and a brand new roof, shutters and paint will further transform the exterior. Thoughtful planning was also given to the landscape, including a back deck, stone patio and walkways, plantings and exterior lighting. Stay tuned for more photos as this sunroom addition nears completion.

 Moderne Builders
Gorgeous master bath with dramatic retro "wave" tile. Peak Photography
Example of a 1950s bathroom design in Los Angeles
Example of a 1950s bathroom design in Los Angeles
 Jordan Design Build Group
JDBG is wrapping up work on an expansive 2-story sunroom addition that also included modifications to the existing home’s interior and significant exterior improvements as well. The original project brief was to provide a conditioned 4-season sunroom addition where the homeowners could relax and enjoy their wooded views. As we delved deeper into our client’s overall objectives, it became clear that this would be no ordinary sunroom addition. The resulting 16’x25’ sunroom is a showstopper with 10’ high ceilings and wall to wall windows offering expansive views of the surrounding landscape.
As we recommend with most addition projects, the process started with our Preliminary Design Study to determine project goals, design concepts, project feasibility and associated budget estimates. During this process, our design team worked to ensure that both interior and exterior were fully integrated. We conducted in-depth programming to identify key goals and needs which would inform the design and performed a field survey and zoning analysis to identify any constraints that could impact the plans. The next step was to develop conceptual designs that addressed the program requirements.
Using a combination of 3-D massing, interior/exterior renderings, precedent imaging and space planning, the design concept was revised and refined. At the end of the study we had an approved schematic design and comprehensive budget estimates for the 2-story addition and were ready to move into design development, construction documentation, trade coordination, and final pricing. A complex project such as this involves architectural and interior design, structural and civil engineering, landscape design and environmental considerations. Multiple trades and subs are engaged during construction, from HVAC to electrical and plumbing, framers, carpenters and masons, roofers and painters just to name a few. JDBG was there every step of the way to ensure quality construction.
Other notable features of the renovation included expanding the home’s existing dining room, incorporating a custom ‘dish room,’ and providing fully conditioned storage and his & her workrooms on the lower level. A new front portico will visually connect the old and new structures and a brand new roof, shutters and paint will further transform the exterior. Thoughtful planning was also given to the landscape, including a back deck, stone patio and walkways, plantings and exterior lighting. Stay tuned for more photos as this sunroom addition nears completion.
 Jordan Design Build Group
JDBG is wrapping up work on an expansive 2-story sunroom addition that also included modifications to the existing home’s interior and significant exterior improvements as well. The original project brief was to provide a conditioned 4-season sunroom addition where the homeowners could relax and enjoy their wooded views. As we delved deeper into our client’s overall objectives, it became clear that this would be no ordinary sunroom addition. The resulting 16’x25’ sunroom is a showstopper with 10’ high ceilings and wall to wall windows offering expansive views of the surrounding landscape.
As we recommend with most addition projects, the process started with our Preliminary Design Study to determine project goals, design concepts, project feasibility and associated budget estimates. During this process, our design team worked to ensure that both interior and exterior were fully integrated. We conducted in-depth programming to identify key goals and needs which would inform the design and performed a field survey and zoning analysis to identify any constraints that could impact the plans. The next step was to develop conceptual designs that addressed the program requirements.
Using a combination of 3-D massing, interior/exterior renderings, precedent imaging and space planning, the design concept was revised and refined. At the end of the study we had an approved schematic design and comprehensive budget estimates for the 2-story addition and were ready to move into design development, construction documentation, trade coordination, and final pricing. A complex project such as this involves architectural and interior design, structural and civil engineering, landscape design and environmental considerations. Multiple trades and subs are engaged during construction, from HVAC to electrical and plumbing, framers, carpenters and masons, roofers and painters just to name a few. JDBG was there every step of the way to ensure quality construction.
Other notable features of the renovation included expanding the home’s existing dining room, incorporating a custom ‘dish room,’ and providing fully conditioned storage and his & her workrooms on the lower level. A new front portico will visually connect the old and new structures and a brand new roof, shutters and paint will further transform the exterior. Thoughtful planning was also given to the landscape, including a back deck, stone patio and walkways, plantings and exterior lighting. Stay tuned for more photos as this sunroom addition nears completion.
 Jordan Design Build Group
JDBG is wrapping up work on an expansive 2-story sunroom addition that also included modifications to the existing home’s interior and significant exterior improvements as well. The original project brief was to provide a conditioned 4-season sunroom addition where the homeowners could relax and enjoy their wooded views. As we delved deeper into our client’s overall objectives, it became clear that this would be no ordinary sunroom addition. The resulting 16’x25’ sunroom is a showstopper with 10’ high ceilings and wall to wall windows offering expansive views of the surrounding landscape.
As we recommend with most addition projects, the process started with our Preliminary Design Study to determine project goals, design concepts, project feasibility and associated budget estimates. During this process, our design team worked to ensure that both interior and exterior were fully integrated. We conducted in-depth programming to identify key goals and needs which would inform the design and performed a field survey and zoning analysis to identify any constraints that could impact the plans. The next step was to develop conceptual designs that addressed the program requirements.
Using a combination of 3-D massing, interior/exterior renderings, precedent imaging and space planning, the design concept was revised and refined. At the end of the study we had an approved schematic design and comprehensive budget estimates for the 2-story addition and were ready to move into design development, construction documentation, trade coordination, and final pricing. A complex project such as this involves architectural and interior design, structural and civil engineering, landscape design and environmental considerations. Multiple trades and subs are engaged during construction, from HVAC to electrical and plumbing, framers, carpenters and masons, roofers and painters just to name a few. JDBG was there every step of the way to ensure quality construction.
Other notable features of the renovation included expanding the home’s existing dining room, incorporating a custom ‘dish room,’ and providing fully conditioned storage and his & her workrooms on the lower level. A new front portico will visually connect the old and new structures and a brand new roof, shutters and paint will further transform the exterior. Thoughtful planning was also given to the landscape, including a back deck, stone patio and walkways, plantings and exterior lighting. Stay tuned for more photos as this sunroom addition nears completion.
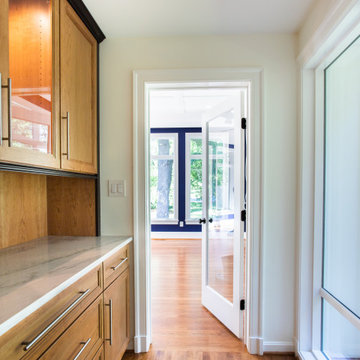 Jordan Design Build Group
JDBG is wrapping up work on an expansive 2-story sunroom addition that also included modifications to the existing home’s interior and significant exterior improvements as well. The original project brief was to provide a conditioned 4-season sunroom addition where the homeowners could relax and enjoy their wooded views. As we delved deeper into our client’s overall objectives, it became clear that this would be no ordinary sunroom addition. The resulting 16’x25’ sunroom is a showstopper with 10’ high ceilings and wall to wall windows offering expansive views of the surrounding landscape.
As we recommend with most addition projects, the process started with our Preliminary Design Study to determine project goals, design concepts, project feasibility and associated budget estimates. During this process, our design team worked to ensure that both interior and exterior were fully integrated. We conducted in-depth programming to identify key goals and needs which would inform the design and performed a field survey and zoning analysis to identify any constraints that could impact the plans. The next step was to develop conceptual designs that addressed the program requirements.
Using a combination of 3-D massing, interior/exterior renderings, precedent imaging and space planning, the design concept was revised and refined. At the end of the study we had an approved schematic design and comprehensive budget estimates for the 2-story addition and were ready to move into design development, construction documentation, trade coordination, and final pricing. A complex project such as this involves architectural and interior design, structural and civil engineering, landscape design and environmental considerations. Multiple trades and subs are engaged during construction, from HVAC to electrical and plumbing, framers, carpenters and masons, roofers and painters just to name a few. JDBG was there every step of the way to ensure quality construction.
Other notable features of the renovation included expanding the home’s existing dining room, incorporating a custom ‘dish room,’ and providing fully conditioned storage and his & her workrooms on the lower level. A new front portico will visually connect the old and new structures and a brand new roof, shutters and paint will further transform the exterior. Thoughtful planning was also given to the landscape, including a back deck, stone patio and walkways, plantings and exterior lighting. Stay tuned for more photos as this sunroom addition nears completion.
 Tile Doctor Ltd
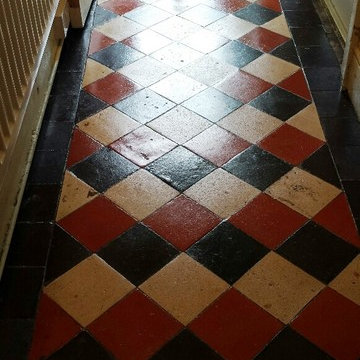
The pictures below were taken at a house in the town of Merthyr Tydfil, which is located not too far north of Cardiff. My client was keen to keep her very old Quarry tiled floor – which dated back to 1905 – intact. The floor had understandably seen a large amount of traffic in its lifetime, and was now in dire need of a professional restoration, including a thorough clean and seal.
First, I completed a survey of the area and provided my client with a quote. After completing many similar jobs in the past, I generally have a good idea of what the final result will look like. I passed on some images of a final result to my client, who was happy for me to begin my work.
On the first day, my first task was to take run some damp tests which were fine; it’s always good to know up front if there are likely to be any damp issues. Next I covered the floor with water to take the surface suction out and waited fifteen minutes before applying a cocktail of Tile Doctor NanoTech Heavy Build-Up cleaner mixed with Pro-Clean and Grout clean-up covering the whole floor. I then immediately starting to work the solution into the floor with a rotary machine fitted with a coarse black pad. The solution was then rinsed off with water which was then extracted with a wet vacuum as I worked. For stubborn areas I applied more of the previously mixed solution scrubbed into the floor with coarse wire wool by hand followed by further rinsing with water.
Each of the products used serves a particular purpose. Pro-Clean is a strong high-alkaline cleaner for natural stone, while NanoTech HBU is a particularly powerful cleaner that uses nano-sized particles to penetrate deep into the stone to get underneath and lift out ingrained dirt and stains. Grout Clean-Up, as the name implies, is a product for resolving grout related problems such as removing grout smears from tile surfaces aka grout haze.
After completing the clean I left the house for 48 hours, to leave enough time for the floor to dry completely in preparation for sealing. Upon my arrival back at the house I conducted some more damp tests to check that the floor was dry enough to seal using the previous readings as a benchmark. The results indicated that I was fine to proceed with the seal, so I applied a total of eight coats of Tile Doctor Seal & Go for durable protection. This was the product I recommended to my client as she wanted a nice, soft shine for her surface seal.
As you can see from the photos, the desired result was achieved to a high standard and needless to say my client was delighted with the transformation.
Julian Iancono
South East Wales

 Jack Calderone
This bedroom and full bathroom are part of an adventuresome project my wife and I embarked upon to create a complete apartment in the basement of our townhouse. We designed a floor plan that creatively and efficiently used all of the 385-square-foot-space, without sacrificing beauty, comfort or function – and all without breaking the bank! To maximize our budget, we did the work ourselves and added everything from thrift store finds to DIY wall art to bring it all together.
A partial double closet bar adds a little extra space while still leaving room for longer hanging clothes.
 Tile Doctor Ltd
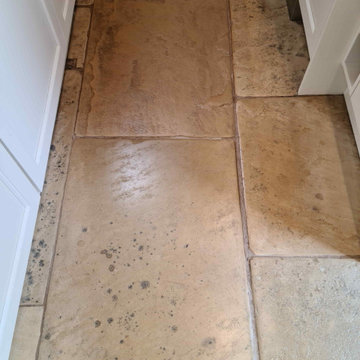
These pictures are of a beautiful Sandstone floor in Ilkley, the tiles were sourced from Lapicida of Harrogate and installed around twelve years prior. If you take a look at their website now you will see they are selling a similar London White Sandstone for nearly £100 per m2. This floor was 35 square metres so clearly this was a significant investment for the owner at the time.
After twelve years of use however the sealer had worn off the floor and dirt had become ingrained in the pores of the stone making it very difficult to keep clean. A good sealer takes a long time to wear off so the change to the appearance of the stone happens so slowly you don’t notice it. The floor was now looking permanently dirty, and the owner of the property had decided it was time to get it renovated.
Before quoting I paid a visit to the property to survey the floor and conduct an initial test clean which came out well. The test cleaning did not go as quickly as I had hoped it might however, due to traces of old satin sealer on some of the stone. It’s important to remove all the old sealer before applying new or you can end up with a patchy appearance. The remnants of old sealer proved challenging to remove as a result I had to try several products and methods before working out the right approach. In the end I resulted to using a product called Tile Doctor Wax Away. I had considered applying diamond burnishing pads which would have been a quicker option, but the flagstones had a riven finish, and the dirt was deeply pitted.
With a successful cleaning plan worked out I provided the client with a which was accepted, and a date agreed for my return.
The cleaning plan I had worked out was to apply a strong dilution of Tile Doctor Wax Away, leave it to soak into the stone for thirty minutes and then scrub it in with a rotary buffer fitted with a black scrubbing pad. The old sealer proved to be tough to remove and in total I used five litres of Tile Doctor Wax Away in the process, as I said it was a big floor!
On day three, I sealed the floor using three coats of Tile Doctor Seal and Go which gave the Sandstone a lovely satin finish that the client liked. This product is also water based so it doesn’t leave a smell as it dries.
Once done the floor was completely transformed, and my client very pleased with the floor which looked so much lighter and cleaner. For aftercare cleaning I recommended the use of Tile Doctor Neutral Tile Cleaner for maintenance, it is pH neutral so will ensure the newly applied seal is protected. It has a nice fresh smell and is gentle enough to use frequently keeping the newly renovated floor looking lovely.
Nigel Stoker
North West Yorkshire Tile Doctor

 Cypress Design Co.
Example of a large classic l-shaped ceramic tile eat-in kitchen design in Providence with an island, raised-panel cabinets, medium tone wood cabinets, granite countertops, beige backsplash, ceramic backsplash, stainless steel appliances, an undermount sink and green walls

 Budget Blinds of Cedar Falls / Waterloo, IA
Budget Blinds blackout roller shades, photo credit installer Adam Brannick
Example of a mid-sized transitional guest bedroom design in Cedar Rapids with gray walls and no fireplace
Example of a mid-sized transitional guest bedroom design in Cedar Rapids with gray walls and no fireplace

 Growsgreen Landscape Design
Dolores Garden by Growsgreen Landscape Design
Inspiration for a mid-sized modern full sun backyard concrete paver landscaping in San Francisco.
Inspiration for a mid-sized modern full sun backyard concrete paver landscaping in San Francisco.
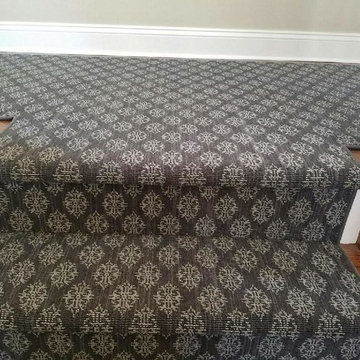
 J&S by STARK
Mid-sized elegant carpeted straight wood railing home design photo in New York with carpeted risers

 JM Carpets
Large country u-shaped medium tone wood floor kitchen photo in Milwaukee with white cabinets and a peninsula

 Carpet and Flooring Centers Of NJ, Inc.
Mid-sized elegant carpeted straight staircase photo in New York with carpeted risers


2