
Search results for "Test visit" in Home Design Ideas
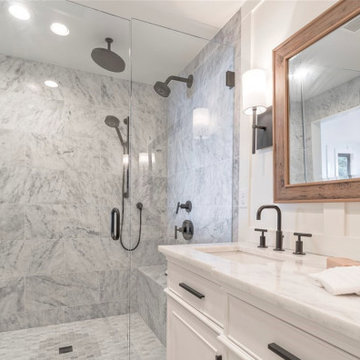
 DCS Built LLC
LAKE SAMMAMISH CONTEMPORARY LAKE FRONT
Are you ready to start your project?
We look forward to working with you on your next remodel or new custom built home, from the design process through construction and delivery.
Book a service with us!
Consultations, Property Research and Project Consultations, Permit Set, Pierce County Site Visit, Washington State Project Design Review.
Indoor, outdoor, and all general construction contracting services!
All other services, we have got you covered!
DCS BUILT: Contact Us
https://dcsbuilt.com/contact-us
Exterior, Porch, Structural, Concrete construction, Driveway, Concrete patio, Bedroom Additions, Square Footage, Custom Flatwork, remodel, renovate, near me, Electrical, Plumbing, Mechanical, Upgrades, Roofing, Paint, Windows, Doors, Finishing, Trim, Stairway, Framing, Existing, New Addition, fascia, siding, HVAC, fence contractor, fence company near me, fence company, fence installation near me, fence builders, fence installers, local, near me, deck company, house lift company, house foundation leveling, foundation repair, beam repair, flexural repair, non-destructive testing, repair materials, repeated loading, reinforce beam, structural beam repair near me, structural support, structural support jacks, beam support, floor joist repair, beam replacement, remodeler, bathroom renovation, kitchen renovation, new kitchen cost, bathroom remodelers, kitchen remodelers, bathroom designer, bathroom remodel, basement remodeling, cost to finish, basement finishing, deck builders near me, plumber near me, electrician near me, hvac near me, flooring near me, roofing near me, framing near me, carpentry near me, structural repair.
Anderson Island, Vashon Island, Mcneil Island, Washington, Puget Sound, Key Peninsula, Gig Harbor, University Place, Lakewood, Steilacoom, Long Branch, Fort Lewis, Fox Island, Mcchord, Olympia, Shelton, Belfair, Pierce County, King County, Sumner, Puyallup, South Hill, Edgewood, Auburn, Enumclaw, Federal Way, Parkland, Graham, Spanaway, Eatonville, Covington, Elk Plain, Tacoma, Kent, Lakewood, Maple Valley, Des Moines, Auburn, Issaquah, New Castle, Tukwilla
 DCS Built LLC
LAKE SAMMAMISH CONTEMPORARY LAKE FRONT
Are you ready to start your project?
We look forward to working with you on your next remodel or new custom built home, from the design process through construction and delivery.
Book a service with us!
Consultations, Property Research and Project Consultations, Permit Set, Pierce County Site Visit, Washington State Project Design Review.
Indoor, outdoor, and all general construction contracting services!
All other services, we have got you covered!
DCS BUILT: Contact Us
https://dcsbuilt.com/contact-us
Exterior, Porch, Structural, Concrete construction, Driveway, Concrete patio, Bedroom Additions, Square Footage, Custom Flatwork, remodel, renovate, near me, Electrical, Plumbing, Mechanical, Upgrades, Roofing, Paint, Windows, Doors, Finishing, Trim, Stairway, Framing, Existing, New Addition, fascia, siding, HVAC, fence contractor, fence company near me, fence company, fence installation near me, fence builders, fence installers, local, near me, deck company, house lift company, house foundation leveling, foundation repair, beam repair, flexural repair, non-destructive testing, repair materials, repeated loading, reinforce beam, structural beam repair near me, structural support, structural support jacks, beam support, floor joist repair, beam replacement, remodeler, bathroom renovation, kitchen renovation, new kitchen cost, bathroom remodelers, kitchen remodelers, bathroom designer, bathroom remodel, basement remodeling, cost to finish, basement finishing, deck builders near me, plumber near me, electrician near me, hvac near me, flooring near me, roofing near me, framing near me, carpentry near me, structural repair.
Anderson Island, Vashon Island, Mcneil Island, Washington, Puget Sound, Key Peninsula, Gig Harbor, University Place, Lakewood, Steilacoom, Long Branch, Fort Lewis, Fox Island, Mcchord, Olympia, Shelton, Belfair, Pierce County, King County, Sumner, Puyallup, South Hill, Edgewood, Auburn, Enumclaw, Federal Way, Parkland, Graham, Spanaway, Eatonville, Covington, Elk Plain, Tacoma, Kent, Lakewood, Maple Valley, Des Moines, Auburn, Issaquah, New Castle, Tukwilla
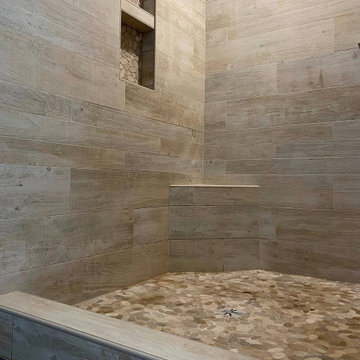
 Mi Tile Installation Experts
Almost five years ago, we completed this shower remodel using the Schluter waterproofing system and our full transparency approach.
From day one, our client knew every detail — every step, every deadline, and every material. No surprises. No delays. Just clear communication and results that stand the test of time.
Today, this shower still looks as beautiful and solid as the day it was finished. That same client continues to recommend us to friends and neighbors — and thanks to our Referral Program, he earns rewards for every new project that comes from his recommendation.
From that one neighborhood alone, we’ve completed four more full remodels, each one built on trust, craftsmanship, and proven results.
We take pride in knowing that our clients are not only satisfied — they’re proud to show their homes to others.
You can visit any of our past projects in person and see the same precision, durability, and beauty that define every Mi Tile Installation Experts project.
? Mikhailbelov37@gmail.com
? https://micatile.com
?️ Free Remodel Audit
Want to avoid hidden issues, costly delays, and budget surprises?
Comment “AUDIT” and we’ll provide a free expert review of your remodel — whether you’re just starting, already in progress, or recently completed.
We’ll help you:
✔️ Plan your project efficiently
✔️ Know what to expect
✔️ Identify common contractor shortcuts
✔️ Protect your investment from day one
? Exclusive Client Benefits
✨ Bonus Program — earn up to 15% back in bonus points to use toward your next project or gift to family/friends.
✨ Referral Program — get 10% cash back from every direct referral project, plus 3% from their referrals.
✨ Returning Client Discount — receive 10% off per sq ft on your second project.
Want the full details? Comment BONUS and we’ll send you the complete guide.
#longlastingquality #showerremodel #schlutersystem #trustworthycontractor #tileinstallation #referralprogram #customremodel #waterproofing #qualitycraftsmanship #loomis #granitebay #eldoradohills #mitileinstallationexperts #miauditmyremodel #beforeandafter #remodeljourney
Find the right local pro for your project
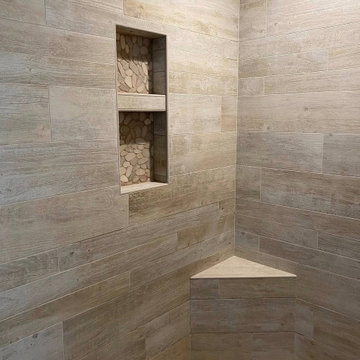 Mi Tile Installation Experts
Almost five years ago, we completed this shower remodel using the Schluter waterproofing system and our full transparency approach.
From day one, our client knew every detail — every step, every deadline, and every material. No surprises. No delays. Just clear communication and results that stand the test of time.
Today, this shower still looks as beautiful and solid as the day it was finished. That same client continues to recommend us to friends and neighbors — and thanks to our Referral Program, he earns rewards for every new project that comes from his recommendation.
From that one neighborhood alone, we’ve completed four more full remodels, each one built on trust, craftsmanship, and proven results.
We take pride in knowing that our clients are not only satisfied — they’re proud to show their homes to others.
You can visit any of our past projects in person and see the same precision, durability, and beauty that define every Mi Tile Installation Experts project.
? Mikhailbelov37@gmail.com
? https://micatile.com
?️ Free Remodel Audit
Want to avoid hidden issues, costly delays, and budget surprises?
Comment “AUDIT” and we’ll provide a free expert review of your remodel — whether you’re just starting, already in progress, or recently completed.
We’ll help you:
✔️ Plan your project efficiently
✔️ Know what to expect
✔️ Identify common contractor shortcuts
✔️ Protect your investment from day one
? Exclusive Client Benefits
✨ Bonus Program — earn up to 15% back in bonus points to use toward your next project or gift to family/friends.
✨ Referral Program — get 10% cash back from every direct referral project, plus 3% from their referrals.
✨ Returning Client Discount — receive 10% off per sq ft on your second project.
Want the full details? Comment BONUS and we’ll send you the complete guide.
#longlastingquality #showerremodel #schlutersystem #trustworthycontractor #tileinstallation #referralprogram #customremodel #waterproofing #qualitycraftsmanship #loomis #granitebay #eldoradohills #mitileinstallationexperts #miauditmyremodel #beforeandafter #remodeljourney
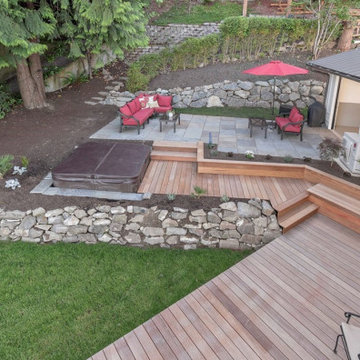 DCS Built LLC
LAKE SAMMAMISH CONTEMPORARY LAKE FRONT
Are you ready to start your project?
We look forward to working with you on your next remodel or new custom built home, from the design process through construction and delivery.
Book a service with us!
Consultations, Property Research and Project Consultations, Permit Set, Pierce County Site Visit, Washington State Project Design Review.
Indoor, outdoor, and all general construction contracting services!
All other services, we have got you covered!
DCS BUILT: Contact Us
https://dcsbuilt.com/contact-us
Exterior, Porch, Structural, Concrete construction, Driveway, Concrete patio, Bedroom Additions, Square Footage, Custom Flatwork, remodel, renovate, near me, Electrical, Plumbing, Mechanical, Upgrades, Roofing, Paint, Windows, Doors, Finishing, Trim, Stairway, Framing, Existing, New Addition, fascia, siding, HVAC, fence contractor, fence company near me, fence company, fence installation near me, fence builders, fence installers, local, near me, deck company, house lift company, house foundation leveling, foundation repair, beam repair, flexural repair, non-destructive testing, repair materials, repeated loading, reinforce beam, structural beam repair near me, structural support, structural support jacks, beam support, floor joist repair, beam replacement, remodeler, bathroom renovation, kitchen renovation, new kitchen cost, bathroom remodelers, kitchen remodelers, bathroom designer, bathroom remodel, basement remodeling, cost to finish, basement finishing, deck builders near me, plumber near me, electrician near me, hvac near me, flooring near me, roofing near me, framing near me, carpentry near me, structural repair.
Anderson Island, Vashon Island, Mcneil Island, Washington, Puget Sound, Key Peninsula, Gig Harbor, University Place, Lakewood, Steilacoom, Long Branch, Fort Lewis, Fox Island, Mcchord, Olympia, Shelton, Belfair, Pierce County, King County, Sumner, Puyallup, South Hill, Edgewood, Auburn, Enumclaw, Federal Way, Parkland, Graham, Spanaway, Eatonville, Covington, Elk Plain, Tacoma, Kent, Lakewood, Maple Valley, Des Moines, Auburn, Issaquah, New Castle, Tukwilla
 Mi Tile Installation Experts
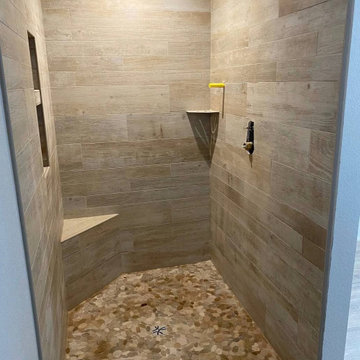
Almost five years ago, we completed this shower remodel using the Schluter waterproofing system and our full transparency approach.
From day one, our client knew every detail — every step, every deadline, and every material. No surprises. No delays. Just clear communication and results that stand the test of time.
Today, this shower still looks as beautiful and solid as the day it was finished. That same client continues to recommend us to friends and neighbors — and thanks to our Referral Program, he earns rewards for every new project that comes from his recommendation.
From that one neighborhood alone, we’ve completed four more full remodels, each one built on trust, craftsmanship, and proven results.
We take pride in knowing that our clients are not only satisfied — they’re proud to show their homes to others.
You can visit any of our past projects in person and see the same precision, durability, and beauty that define every Mi Tile Installation Experts project.
? Mikhailbelov37@gmail.com
? https://micatile.com
?️ Free Remodel Audit
Want to avoid hidden issues, costly delays, and budget surprises?
Comment “AUDIT” and we’ll provide a free expert review of your remodel — whether you’re just starting, already in progress, or recently completed.
We’ll help you:
✔️ Plan your project efficiently
✔️ Know what to expect
✔️ Identify common contractor shortcuts
✔️ Protect your investment from day one
? Exclusive Client Benefits
✨ Bonus Program — earn up to 15% back in bonus points to use toward your next project or gift to family/friends.
✨ Referral Program — get 10% cash back from every direct referral project, plus 3% from their referrals.
✨ Returning Client Discount — receive 10% off per sq ft on your second project.
Want the full details? Comment BONUS and we’ll send you the complete guide.
#longlastingquality #showerremodel #schlutersystem #trustworthycontractor #tileinstallation #referralprogram #customremodel #waterproofing #qualitycraftsmanship #loomis #granitebay #eldoradohills #mitileinstallationexperts #miauditmyremodel #beforeandafter #remodeljourney
 Tile Doctor Ltd
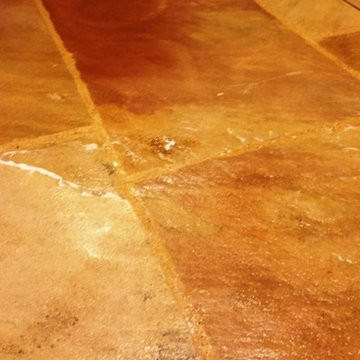
Sandstone is a particularly popular choice for kitchen and hallway floors amongst home owners in the UK. It not only possesses beautiful natural shades and features, but it is also typically hard wearing, making it an ideal stone for tiled flooring in high traffic areas of a house and can often be found laid as large riven flagstones in pubs and other commercial premises.
Naturally, just like any other type of tiled floor, Sandstone needs to be maintained using appropriate products and methods. A lack of adequate surface sealer in particular leaves Sandstone susceptible to ingrained dirt, and can leave distinct, unsightly patches such as those in the photograph below.
In this instance, I visited a client in the old Essex town of Thaxted, who believed that her four square meter Sandstone tiled floor might be suffering from damp issues after lifting up the mats covering the area.
However, when I arrived at the property and ran damp tests, I found the issue to be superficial. The Sandstone floor however did require attention in the form of a deep clean and a fresh seal to tackle the white patches and prevent further discolouration.
To begin the cleaning process I spread Tile Doctor Remove & Go evenly across the floor. It was left to dwell for approximately 15 minutes, during which time it worked to break down the old sealer remaining on the tiles. I then agitated the area twice over with both a black scrubbing pad fitted to a rotation machine lift away any dirt.
The resultant slurry was removed using a wet vacuum and the floor was then rinsed with water and then mixed a strong solution of one part Tile Doctor Pro Clean to three parts water which was used to give the floor a final clean and scrub the grout clean before using the wet vacuum again and giving the floor a final rinse with water.
After completing the cleaning process I left the floor to dry over the weekend. Upon my return to the house I proceeded to seal the tiles with three coats of Tile Doctor Colour Grow which is an impregnating sealer that soaks into the pores of the stone and provide durable surface protection going forward. Colour Grow is also specially designed to let the floor breathe and enhance the natural colours in the stone and, in this case, really helped to intensify the natural sand-coloured shades in the tiles.
The difference made to these Sandstone tiles was really noticeable, with the white patches completely removed and the surface more generally back to looking like new, needless to say, my client was very happy with the results.
Nick Murphy
South Essex Tile Doctor
Sponsored
Plain City, OH

The Creative Kitchen Company
Columbus Area Kitchen Remodeling and Refacing Professional
 DCS Built LLC
LAKE SAMMAMISH CONTEMPORARY LAKE FRONT
Are you ready to start your project?
We look forward to working with you on your next remodel or new custom built home, from the design process through construction and delivery.
Book a service with us!
Consultations, Property Research and Project Consultations, Permit Set, Pierce County Site Visit, Washington State Project Design Review.
Indoor, outdoor, and all general construction contracting services!
All other services, we have got you covered!
DCS BUILT: Contact Us
https://dcsbuilt.com/contact-us
Exterior, Porch, Structural, Concrete construction, Driveway, Concrete patio, Bedroom Additions, Square Footage, Custom Flatwork, remodel, renovate, near me, Electrical, Plumbing, Mechanical, Upgrades, Roofing, Paint, Windows, Doors, Finishing, Trim, Stairway, Framing, Existing, New Addition, fascia, siding, HVAC, fence contractor, fence company near me, fence company, fence installation near me, fence builders, fence installers, local, near me, deck company, house lift company, house foundation leveling, foundation repair, beam repair, flexural repair, non-destructive testing, repair materials, repeated loading, reinforce beam, structural beam repair near me, structural support, structural support jacks, beam support, floor joist repair, beam replacement, remodeler, bathroom renovation, kitchen renovation, new kitchen cost, bathroom remodelers, kitchen remodelers, bathroom designer, bathroom remodel, basement remodeling, cost to finish, basement finishing, deck builders near me, plumber near me, electrician near me, hvac near me, flooring near me, roofing near me, framing near me, carpentry near me, structural repair.
Anderson Island, Vashon Island, Mcneil Island, Washington, Puget Sound, Key Peninsula, Gig Harbor, University Place, Lakewood, Steilacoom, Long Branch, Fort Lewis, Fox Island, Mcchord, Olympia, Shelton, Belfair, Pierce County, King County, Sumner, Puyallup, South Hill, Edgewood, Auburn, Enumclaw, Federal Way, Parkland, Graham, Spanaway, Eatonville, Covington, Elk Plain, Tacoma, Kent, Lakewood, Maple Valley, Des Moines, Auburn, Issaquah, New Castle, Tukwilla
 Tile Doctor Ltd
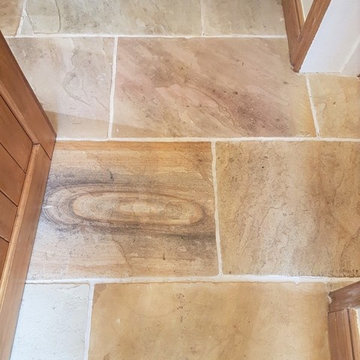
The pictures below are of a multi coloured sandstone floor installed at a property in East Keswick which is a village approximately halfway between Harrogate and Leeds. (Not to be confused with the more famous Keswick in the Lake District)
The stone floor had not been cleaned professionally for ten years and although the grout looked clean It was clear that any sealer that was once present had long since worn off leaving the stone unprotected. The result was dirt had become deeply ingrained in the Sandstone leading causing the stone to darken and hide its true beauty and rich colouring. The client had tried lots of different products to clean the floor but had not had any luck.
I visited the property and carried out a few successful patch tests resulting in the floor becoming much cleaner. They were happy to go ahead with my quote and we arranged a time to return and complete the work.
I prepared the area before starting, taping up the skirting boards and doors to protect them from the splashing that can happen during the intensive cleaning process.
To get the sandstone clean I applied a medium dilution of Tile Doctor Pro-Clean to the floor and allowed it to soak in for ten minutes. The solution was then worked into the Sandstone using a rotary floor machine fitted with a black scrubbing pad. More Pro-Clean was applied with a hand-held scrubbing brush to get deep into the grout lines and to reach into the corners.
Once done the floor was rinsed with water and the soil extracted with a wet vacuum. The floor was inspected, and the process repeated until I was satisfied that the stone and grout had released all the trapped dirt. After a final rinse, the wet vacuum was used to get as much moisture out of the stone as possible and then the floor left to dry out fully overnight.
Returning the following morning, I first checked that the floor was dry using a damp meter. The sealer won’t cure if there is any moisture in the stone and I’ve been known to reschedule sealing a floor if the readings are too high. On this occasion I was satisfied that the floor was within acceptable levels, so I was ready to seal the floor.
I used three coats of Tile Doctor Colour Grow to seal the floor, this is an impregnating sealer which intensifies natural colours whilst providing durable protection against stains, an essential feature in an area such as a hallway which is subject to constant foot traffic.
As you can see from the photos the transformation was quite impressive, the floor became much lighter and almost unrecognisable, the natural colours of the stone were now visible, and the floor looked beautiful. The client was very happy with the end result and has said they would not hesitate to recommend me to others.
Nigel Stoker
North West Yorkshire Tile Doctor
 Tile Doctor Ltd
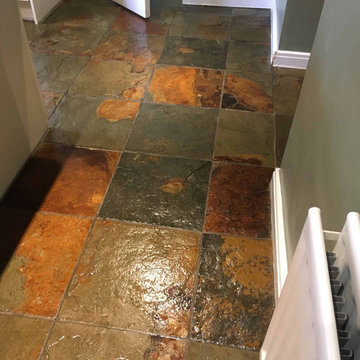
Except for general cleaning this multi-coloured slate floor had not been professionally cleaned since installation eleven years prior. Any sealer that had once been applied to the slate had long since worn off and dirt was now ingrained in the pores of the stone causing it to look dull and un-attractive. The property was in the lovely town of Staines Upon Thames, obviously situated on the banks of the River Thames and a popular place to live for London commuters.
I visited site to take a closer look at the floor and provide the client with an accurate price for renovating the stone. It turns out that the client had used all sorts of different household cleaners in an attempt to get the floor clean. Unfortunately, they were probably making the situation worse as these strong cleaning products would have actually stripped the sealant off the stone leaving it open to dirt. I carried out a test clean for them and they were very pleased to see how the floor could look. We agreed a price for the work and arranged a suitable date to carry out the work.
Cleaning a Multi-Coloured Slate Tiled Kitchen Floor
My first task was to strip off what was left of the old sealer and deep clean the stone using a dilution of Tile Doctor Remove and Go mixed 50:50 with Tile Doctor Pro-Clean. This powerful cocktail was applied to the floor and left to soak in for ten minutes before being scrubbed in using a rotary machine fitted with a black scrubbing pad.
The grout was hand scrubbed using more of the cleaning solution along the grout lines until I was happy the floor was as clean as it possibly could be. The floor was rinsed with water and the soil extracted by using the wet vacuum.
Once the floor was clear the Slate was inspected, and any stubborn areas were spot treated using the same process as before. After a final rinse and extraction, the floor was dried as much as possible using the wet vacuum and left to dry off overnight.
Sealing a Multi-Coloured Slate Tiled Kitchen Floor
I came back the next day and checked the moisture levels of the tiles using a damp meter. The floor had dried well so I had a green light for applying a new sealer. For this I used four Coats of Tile Doctor Seal and Go, allowing each coat to dry before applying the next. This product works really well on Slate and gave the tiles a nice sheen finish, the fresh sealer will also make maintenance cleaning far easier in the future.
The client was very happy with the result, the floor now looks great and the natural colours of the stone is so much more evident. For aftercare I recommended they throw away all those supermarket products and use Tile Doctor Neutral Tile Cleaner which is a pH neutral product that won’t prematurely erode the new sealer with use.
Jonathan Oldham
South Middlesex Tile Doctor
 Tile Doctor Ltd
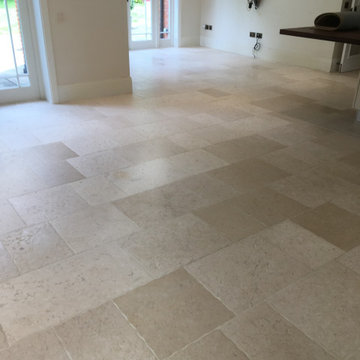
Our client had inherited this Travertine floor when purchasing in a lovely street in Walton-On-Thames, close by was the River Thames which runs all the way into London. The new owners were unhappy with the floor in that it did not look very clean, and they were keen to get this rectified. I arranged a site visit to survey the floor and see what could be done to restore its appearance.
The floor itself was in good physical condition, however, it was apparent from the level of dirt ingrained in the stone that it had not been maintained very well by the previous owner. I carried out a small test clean which came out well and they could see straight away what the floor should look really like! They were happy with my renovation quote and we agreed a mutually convenient time where I could work in relation to the COVID guidelines.
The Travertine floor was scrubbed using a mixture of Tile Doctor Pro Clean and Remove and Go. These are heavy duty cleaning products designed for use on tile and stone can be combined to form a powerful cleaning/stripping solution which is left to dwell on the floor surface. After a short while the solution was worked into the stone using a rotary machine fitted with a black scrubbing pad.
This cleaning recipe works extremely well breaking down dirt, stains, and grease in the stone. Following a machine scrub and a more manual hand scrub of the grout lines, we then pressure rinsed the soil away and then it was extracted using an industrial wet vacuum. In a couple of areas, it was necessary to repeat the process to ensure it was completely clean. Once we were satisfied that the stone was fresh and clean, the floor was left to dry off overnight, so it would be ready for sealing the following day.
After drying overnight, the floor was checked with a damp meter to make sure it was dry. Once reassured I started with the application of the fresh sealer to the floor using Tile Doctor Colour Grow Sealer which is a colour enhancing sealer that works from within by soaking into the pores of the stone. Several coats were applied allowing each one to dry before applying the next. This sealer does not provide a glossy finish, just a nice natural sheen. This brought back the contrast and natural colours in the stone, whilst adding protection to stone for many years to come.
The client was very happy with the work we carried out, the floor had come up much better than they had expected, and it really made a difference to the lovely kitchen space. The floor looked like new. I recommended the regular use of Tile Doctor Stone Soap for future cleaning which will keep the floor in great condition and ensure the longevity of the newly applied sealant.
Jonathan Oldham
South Middlesex Tile Doctor
 Windy City Painters
Iron Fence Painting in Wicker Park: A Windy City Painters Case Study
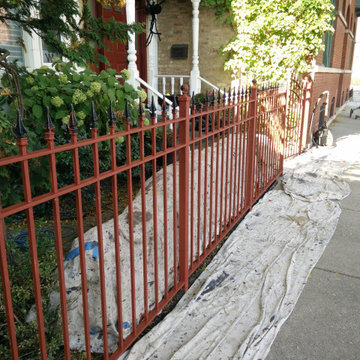
Iron fence painting in Wicker Park is one of the most requested exterior services Windy City Painters performs each season, and this recent project shows exactly why. Set behind an ornate 1890s greystone two-flat, the client's wrought iron fence had endured years of Chicago winters without professional attention. Rust had spread across the pickets, the original black enamel was flaking away in sheets, and the fence's structural hardware had begun to loosen at several joints.
As the trusted local expert for Chicago's North Side and Near West Side, Windy City Painters approached this project the same way we approach every iron fence painting job in Wicker Park: with a methodical, multi-step process designed to outlast Midwest weather rather than simply mask the damage.
The Process, Step by Step
Step 1 — Rust Removal and Surface Preparation. Our crew wire-brushed and mechanically ground every rusted section down to clean, stable metal. For pitted or heavily corroded areas, we applied a chemical rust converter to neutralize corrosion at the molecular level before any coating touched the surface. Furthermore, because this greystone was built well before 1978, Windy City Painters tested the existing paint layers for lead and followed strict containment protocols throughout the removal process.
Step 2 — Spot Repairs. Loose pickets were re-secured, small pits were filled, and hardware at the gate hinges was tightened. In contrast to a quick spray-paint refresh, this stage ensures the fence is structurally sound before a single drop of primer goes on.
Step 3 — Priming. A full coat of rust-inhibiting primer, engineered specifically for ferrous metal, was applied by brush to every surface — with particular attention to welds and joints where moisture tends to collect and restart the corrosion cycle.
Step 4 — Topcoat Application. Two finish coats of industrial-grade, direct-to-metal enamel were applied by brush and roller. This built a durable, uniform barrier in classic gloss black, the most popular finish among Wicker Park's historic properties. Finally, our team inspected every inch of the fence for thin spots or missed sections before calling the job complete.
Project Specs
Surface: Ornamental wrought iron fence, posts, and gate hardware
Products used: Rust-inhibiting DTM primer, chemical rust converter, industrial-grade direct-to-metal enamel
Coats applied: 1 primer coat, 2 finish coats
Finish: Gloss black
Timeline: Completed in under two days
Advice for Wicker Park Homeowners
Before starting a similar iron fence painting project in Wicker Park, homeowners should keep a few things in mind. Notably, never paint directly over active rust — trapped moisture underneath will cause the new coat to fail within a season. Additionally, always ask whether a contractor tests for lead paint on pre-1978 homes, since many Wicker Park greystones fall into that category. Meanwhile, hand brushwork matters: the intricate scrollwork common on Wicker Park ironwork requires careful, detailed application that spray equipment simply cannot replicate. Therefore, hiring a crew experienced specifically in historic Chicago ironwork, like Windy City Painters, makes a measurable difference in the finished result.
Windy City Painters also handles related exterior and interior work for Wicker Park properties, including interior painting, drywall and plaster repair, and additional metal refinishing for porches and railings.
Iron fence painting in Wicker Park protects one of the neighborhood's most defining architectural features while restoring curb appeal instantly. As a result, this greystone now has a fence that matches the quality of the home behind it — and will hold up through many more Chicago winters.
See more of our work and request a free estimate at www.windypainters.com.
Ready to transform your Wicker Park home? Contact Windy City Painters for a free estimate — visit www.windypainters.com today. Proudly serving Wicker Park, West Town, Lincoln Park, Roscoe Village, Lakeview, Ukrainian Village, River North, and all of Chicago.


Sponsored
Columbus, OH

Trish Takacs Design
Award Winning & Highly Skilled Kitchen & Bath Designer in Columbus

 CairnsCraft Design & Remodel
Great spacious bathroom with lot of amenities.
Photographer: Jon Upson
Large elegant master beige tile and porcelain tile drop-in bathtub photo in San Diego with an undermount sink, raised-panel cabinets, medium tone wood cabinets, granite countertops, beige walls and a two-piece toilet
Large elegant master beige tile and porcelain tile drop-in bathtub photo in San Diego with an undermount sink, raised-panel cabinets, medium tone wood cabinets, granite countertops, beige walls and a two-piece toilet
 Tile Doctor Ltd
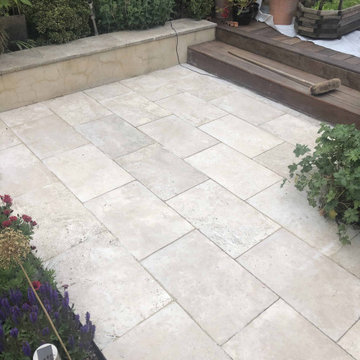
The picture shows an Travertine patio that was installed at a property in Hackney E5 around ten years ago and it had never been sealed. Over the year’s pollution and weather etc had taken its toll on the stone leaving the travertine stained with lichen, dull and grey as opposed to their original white/cream colour. Had the patio been sealed it would have provided some protection from the elements.
I conducted an initial visit where I tested several products to see what would be the most effective and establish what was required. Using that knowledge, I followed up with a written quote which was accepted, and a date arranged to complete the work.
We have adopted new working practices since the COVID-19 epidemic so we can work safely inside or outside but given the excellent weather this year this was an ideal and much easier to maintain social distancing.
During day 1 on site I started by sweeping away loose stones and other debris you typically find on patios. Then Tile Doctor Patio and Brick Driveway cleaner was applied neat to the stone and left for two hours. This is a very strong product designed for use by professionals which cuts through the dirt and was ideal for this situation. There are certain precautions you do need to take when using it such as wearing PPE and you must keep it away from ponds etc.
Using water to lubricate, the solution was then scrubbed into the stone using a coarse 200-grit pad fitted to a rotary machine and followed up with a lot of rinsing and extracting with water and a wet vacuum.
To refine the surface after the coarse Travertine the 200-grit pad I followed with 400, 800 and then 1500-grit burnishing pads in sequence rinsing with water and extracting after each pad was applied. This process is known as burnishing and closes the pores in the stone giving it a polished appearance. By this point the Travertine looked way better and we were starting to get the smooth finish back.
The weather held so the following morning a 3000-grit polishing pad was applied dry to the stone using only a little water. This brings up the appearance of the stone even further and has the added advantage of leaving it dry and ready for sealing.
The client wanted a natural appearance so two coats of Tile Doctor Ultra Seal were applied to seal the stone. Ultra-Seal is an impregnating sealer that soaks into the stone, protecting it from within yet without changing the appearance of the stone leaving a completely natural look.
The client very happy with job and now proud so show off her revamped patio. They hadn’t realised that the patio should have looked like this from the start. For aftercare I recommended they use Tile Doctor Stone Soap, many day to day cleaning products you find in supermarkets can strip off a sealer so if your using something else do check the label first.
Jackson Davis
East London Tile Doctor
 Tile Doctor Ltd
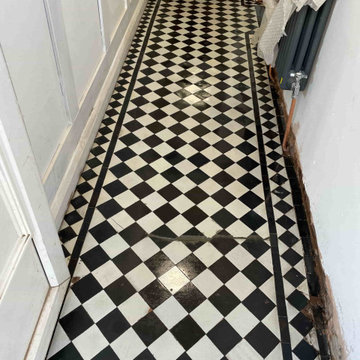
This 1920s single bay house in Earlsdon had been restored by the builder from top to bottom. The hallway floor had been covered in laminate flooring which had been removed, revealing an Edwardian tiled floor beneath. Unfortunately, the plasterer had not covered the floor when working on the walls, so the tiles were now covered in plaster!
The client was keen to keep as many original features as possible and called me in to see if the original 100-year-old floor could be renovated in keeping with the rest of the house. I visited the property to survey the tiles and explained that it certainly could be and having worked on hundreds of these renovations before I was confident of getting a good result. They were happy to go with my quotation and we arranged a time to carry out the work.
The floor tiles themselves were in good condition, but I had to hand carefully scrape the plaster off the tiles before starting on the deep clean. With the plaster removed from the floor I applied Tile Doctor Acid Gel and worked it into the tiles with a coarse 100-grit pad. The floor was then rinsed, and the waste extracted from the floor using a wet vacuum. The process was then repeated with a 200-Grit and then a 400-grit pad until I was happy.
The floor was then speed dried with fans whilst I worked on a repair around the threshold of one of the doors. The repair was relatively straight forward, and I managed to restore the tiling, so the repair was unnoticeable.
The floor was then left overnight to completely dry out. Floors of this age don’t have a damp proof membrane so moisture can build up if they have been covered as in this case. The next stage in the restoration would be to apply a sealer and the floor needs to be dry before you do this otherwise the result can be patchy.
Returning the following day, I first tested the floor with a damp meter to check the moisture levels in different parts of the floor to ensure it was dry enough to seal. The fans had done a good job and I was pleased to find that the floor was dry.
To seal this floor, I used Tile Doctor Seal and Go Extra, it’s a breathable acrylic based sealer that allows for moisture vapour to rise through the tile and evaporate at the surface. This makes it ideal for situations where no damp proof membrane has been installed and there is a low risk of mineral salt deposits being formed (efflorescence).
Once completed the transformation was huge and he Victorian tiles looked well suited to the hallway. Feedback from my client was they were over the moon with the newly restored floor!
For regular cleaning, I recommended Tile Doctor Neutral Tile Cleaner, this is a gentle pH neutral cleaner that will ensure the newly applied seal is retained and not eroded prematurely. This can be the problem with most household cleaning products which contain strong chemicals like bleach which can break down the sealer over time. Without a sealer dirt gets back into the pores of the tile which will mean the homeowner will need to get the floor cleaned and sealed again – a vicious circle!
Mick Gayton
Warwickshire Tile Doctor
 Tile Doctor Ltd
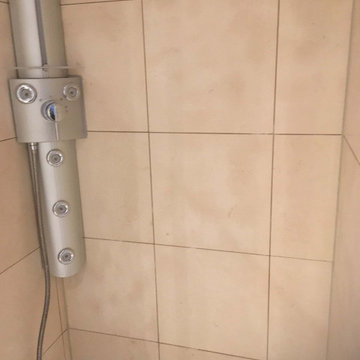
I was asked to look at renovating a shower cubicle at a property in in Manchester city centre that had been clad in White Limestone tiles. I understood the bathroom had been installed 12 years prior, but now the tiles were looking grubby, mouldy and dirty.
The client had lived at the property for the last two years and in an attempt to resolve the problems had used a few different household products such as flash and bleach, they had tried everything, and nothing had helped. I suspected that these strong acidic cleaners had actually made the problem worse by stripping off what was left of the sealer that was protecting the Limestone, allowing dirt to become ingrained in the stone.
I visited the property and ran a few cleaning tests in the shower cubicle with Tile Doctor products. This allows me to see which product will have the best results and gives the customer confidence that we can resolve their issues. The results were immediate, they could see the difference and they were happy to accept my quote and agree a date for my return to complete the work.
I arrived several weeks later and made a start. The tiles were scrubbed by hand with a strong dilution of Tile Doctor Remove and Go with excellent results. This product is designed to remove coatings and sealers, and in this case, it did a great job of drawing out the ingrained stains and dirt build-up. This removed what was left of the sealer and took off most of the dirt and mould. The Limestone tiles and grout were then rinsed with water to remove the soil.
Next I needed to restore the smooth surface of the limestone which had been etched by the use of strong acidic cleaning products. To do this I used a set of six-inch diamond burnishing pads attached to a hand buffer to hone and restore the stone.
I then dried the shower tiles and grout with a heat gun checking the moisture levels with damp meter until I was satisfied it was completely dry.
The last step was to re-seal the Limestone and Grout using a couple of coats of Tile Doctor Colour Grow. This is natural coloured intensifying sealer which provides durable protection to the surface allowing it to breathe and enhancing the colours.
The Customer was amazed with the difference and left the following feedback!
“Kamila was friendly, professional and kept me informed about what to expect before she took on the job and during the tile cleaning. The tiles look absolutely amazing after her work – I feel as though I have a brand new bathroom! Kamila also gave me helpful tips on looking after limestone tiles. I can’t recommend her highly enough.”
For future cleaning I recommended the use of Tile Doctor Aqua-Pro which is a pH neutral shower tile cleaner designed for use on sealed surfaces. Most cleaning products you find in supermarkets are overly strong and will erode the sealer prematurely, so when choosing a cleaning product always read the label and make sure it’s safe to use on Sealed Stone tiles.
Alex Logonzy
Greater Manchester Tile Doctor
 Tile Doctor Ltd
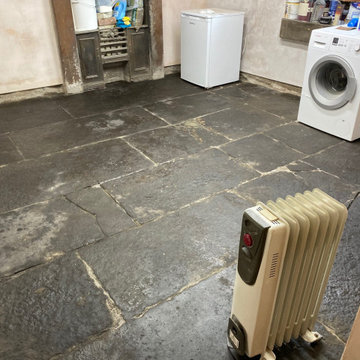
I was contacted by a client in Kendal to see if I could help with their Black Flagstone basement floor. As you can see from the photographs it was in a bit of a state and the stone looked mostly White rather than Black.
I carried out a site visit, to survey the floor and work out the best approach to restore its appearance. After testing a few different products and techniques I worked out an effective restoration plan and discussed this with the owner. Happy with my plan and costing’s we agreed a date to start the work. Being in the basement of the property had its challenges but it would mean we could work socially distanced from the owner.
To restore the floors appearance, I started with a set of coarse wire (60 and 120 grit) brushes lubricated with Tile Doctor Remove and Go which is a strong coatings remover. I had considered using milling pads on the tiles to reveal a new surface underneath but that does involve the use of an expensive set of coarse pads and given it was a basement the owners didn’t feel the extra expense would be justified.
The wire grits work well on rough stone floors when attached to a weighted buffing machine and we add some Tile Doctor Remove and Go to the mix. Once clean the floor was rinsed with water and the slurry extracted using an industrial wet vacuum. After cleaning the floor, it looked transformed, some pointing was required so we carried this out after the main clean.
The stone was left to dry out for a few days before returning to apply a sealer. For this floor I felt Tile Doctor X-Tra seal would be the best product and applied two coats. I chose X-Tra seal for this job as it ticks a lot of boxes, it’s a breathable oil-based resin sealer which being breathable will allow moisture to rise through the floor. Old floors like this don’t have a damp proof membrane so it is important to choose a sealer that can allow the floor to breath and not let damp build up under the floor where it can reach out to the walls and cause rising damp.
I also chose X-Tra Seal as it has a great ability to bring out the colour of the darker stone due to its high oil content, the oil will deter salts from forming if efflorescence is an issue. This is a unique property of this sealer as we never know if efflorescent salts are going to form or not so having this in place as a sealer is a great plus for a Tile Doctor, it is new to the market and is already proving popular on floors like this and for protecting external stone.
If the tiles are smooth Tile Doctor X-Tra Seal adds a bit of a sheen to the appearance of the stone however this stone was very rough, so we didn’t manage a shine, but the customer was happy with the matt finish and the slightly honed effect.
The floor looked great and much more appealing making the space more attractive and likely to be used. For aftercare I recommended Tile Doctor Neutral Tile Cleaner which will clean the floor without impacting the sealer which can be a problem with many of the stronger products you find in supermarkets.
Heidi Taylor
South Cumbria Tile Doctor
 Tile Doctor Ltd
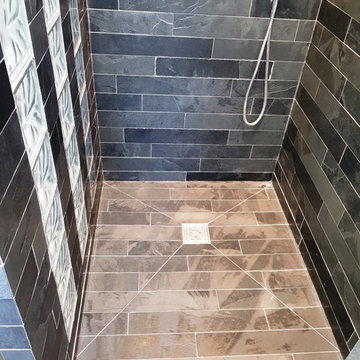
Our client contacted Tile Doctor as they were having problems cleaning their Slate tiled ensuite bathroom. We visited the property in nearby Stevenage, a London commuter town which is between Letchworth Garden City and Welwyn Garden City. The bathroom had been fitted some time ago, but due to the hard water in the area, there had been a large build up of limescale. The dark slate tiles showed this up even more.
My client had tried numerous household products on the tiles, but nothing was shifting the heavy build up. I discussed with them what Tile Doctor could do and completed a small demonstration. They were surprised how easily we were able to improve the tiles. We agreed a price and a timescale and booked the work in for a few weeks’ time.
The ensuite shower required intensive cleaning to the shower walls and floor where excessive limescale was present so we got to work cleaning with Tile Doctor Oxy-Gel, this is a strong alkaline based cleaner and degreaser, it is a gel so it works well on vertical surfaces where a long dwell time is required to break down dirt, grime, soap scum, oil based products. We left the product on the surface for approximately 10 minutes, removing all previous sealers and dirt. The residue was rinsed off and followed this up with a second clean using Tile Doctor Grout Clean-Up.
Grout Clean-Up is an acidic product designed to remove mineral deposits however you need to be careful with some types of stone as it can etch the surface if used incorrectly. To apply the product was diluted with water in a spray bottle and sprayed on to the wall tiles where it was scrubbed in and then rinsed off. The process was then repeated on the floor rinsing down thoroughly afterwards with water.
Once the slate was clean and dry we proceeded to cut out the existing silicone sealant which was equally stained and was beyond cleaning. This is a slow job and care needs to be taken not to scratch the tiles. It is important to ensure all the old silicone is removed so there is a nice clean surface to reapply the new. This also gave the shower area more time to dry out.
We tested with the moisture meter to ensure the shower area was fully dry and then applied the sealer. We chose to apply three coats of Tile Doctor Colour Grow, this is an impregnating sealer that works by occupying the pores in the stone, so dirt can’t become ingrained there, its also a colour enhancing sealer that provides durable protection. We applied the coats then lightly buffed off the excess with a soft cloth and allowed the slate to dry. The following day we returned to re-silicone all the edges and joints.
We recommended to the customer to use a mild solution of Tile Doctor Stone Soap as a maintenance cleaner for the slate. The client was very happy with the result and could see that cleaning with the appropriate product would ensure the ensuite bathroom continued to look good. The whole job took a day and a half to complete.
Robert Voyce
Hertfordshire Tile Doctor
 Tile Doctor Ltd
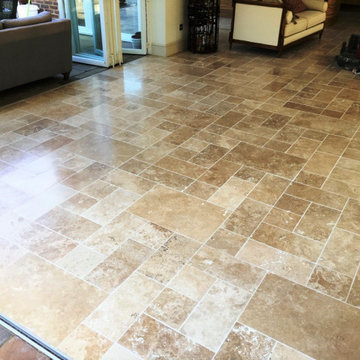
This property in Godalming had the whole downstairs floor tiled with Fired Earth Limestone tiles nine years prior and had never had it cleaned or maintained professionally. The once beautiful stone was now looking dull and the grout had turned black with dirt leaving the floor looking uninviting.
This is quite normal for stone floors as it is the sealer that protects the stone from dirt and enhances its look. Most sealers wear off after three to four years sealer and in this case after nine years it was well overdue a deep clean and reseal.
I visited the property to survey the floor. It was indeed looking in need of some attention and the kitchen was particularly bad. To restore the appearance of the Limestone tile and grout the floor would need to be stripped of what remains of the old sealer, then deep cleaned with attention to the grout, polished with burnishing pads and then finally resealed. I was confident I could get it restored to a nearly new finish and to prove it I completed a small demonstration clean which the homeowner was very happy with. They agreed to my quote and we scheduled in a couple of days to carry out the work.
On day one I started by cleaning the grout using a strong dilution of Tile Doctor Pro-Clean. its run along the grout line and then left to soak in for about ten minutes so it can get to work breaking down dirt and old sealer. The grout is then scrubbed using a grout brush which is then scrubbed backwards and forwards along the grout line until clean. The area is then rinsed with water and all the waste removed with a wet vacuum cleaner.
Next, I turned my attention to the Limestone tiles which needed stripping of any remaining sealer, cleaned and polished. I find the best way to do this is by apply a set of diamond encrusted Burnishing pads in sequence starting with a coarse 400-grit followed by 800, 1500 and finally finishing with an extra fine 3000 grit. Water is used to lubricate the burnishing process and the slurry is rinsed and extracted off the floor between pads. Each pad is run over the tiles three times, and it was a large floor so as you can imagine this process took most of the day.
I left the floor to dry out overnight and returned the next day to seal the Limestone. Before doing that, I reviewed my previous day’s work and I cleaned up any areas that needed further attention. Next step was to ensure the floor was dry as I don’t recommend applying a sealer to damp tile as you won’t get an even appearance, so before sealing a floor I tested for moisture using a damp meter.
To seal the floor, I applied two coats of Tile Doctor Ultra Seal which is an impregnating sealer that works by occupying the small pores in the stone to prevent dirt becoming ingrained there. Limestone is a light stone and most customers like that appearance so I find it best not to use a colour enhancing sealer as it can darken the stone. Ultra-Seal doesn’t contain any colour enhancer and leaves the floor with a natural finish whilst allowing the stone variations and patterns to show through.
Once the sealer was dry, I gave it a further polish with the 3000-grit pad which further brought out the natural beauty of the stone. My client was very happy with the floor, it really lifted the who area and the Kitchen in particular.
Rupert Mcleod
West Surrey Tile Doctor
13