
Search results for "Try safe" in Home Design Ideas

 SUPERIOR CHIMNEY SERVICES CORPORATION
To prepare your fireplace and chimney for winter, schedule a professional inspection and chimney cleaning. The temperatures are just about right to either fire up those logs or turn on the gas fireplace. Either way, you don’t want to miss out on a cozy night in front of the fireplace.
But why is it important to prepare your fireplace and chimney for winter? That’s what we going to talk about today, everything from the damper, to chimney cap to what to look out for and what to repair now. The team at Superior Chimney is ready to share practical tips for getting ready for the cold to start.
Why is it Important to Prepare the Fireplace for Winter?
Your fireplace works hard during the winter. Using your fireplace just on the weekends or everyday while you relax causes system stress behind the scenes regardless. While providing you warmth and comfort, the fire in the fireplace creates a byproduct called creosote, which is sticky and gives off a smokey smell. All winter long, this will be slowly building inside of the chimney walls. Now that’s what’s going on inside your home.
Outside, your chimney endures the elements every day with the snow, ice, freezing rain, and critters looking for a nice warm place to settle. All these things add up putting stress on the chimney structure.
Getting this done now will give you peace of mind and helps your system run efficiently. This way, heat stays in your living room where you want it.
Start with an Annual Chimney Inspection
The most important step to take now is to get a certified chimney inspection before you light your first fire. A certified technician can identify creosote buildup, cracked flue liners, damaged masonry and blockages that are hard to see from inside and outside the home.
The National Fire Protection Association standard for chimneys, fireplaces, and vents calls for chimneys to be inspected at least once a year and cleaned as needed for safe operation (NFPA 211).
The Chimney Safety Institute of America gives the same guidance, recommending that fireplaces, chimneys, and vents be inspected annually by a certified professional (CSIA).
Ventilation is a Breath of Fresh Air for Your Home
Proper ventilation allows your home to breathe. Your home relies on vents connected to the fireplace and natural gas appliances to carry harmful gases such as carbon monoxide safely outdoors.
During the winter, snow and ice can pile up around the vents. When that happens, pollutants have a harder time leaving the home.
Signs of a Blocked Chimney Vent
A blocked vent can cause symptoms such as headaches, nausea, fatigue, and dizziness. If symptoms go away once you or your family leave the house, that’s a sign of a blocked chimney vent, and it needs to be addressed right away. Be sure your carbon monoxide detectors are in working order and located on every level of your home.
Keep the Cold Air Out of Your Fireplace
Pay attention to the chimney effect, also called the stack effect, during winter. Warm air inside your home rises to meet the colder air outside. That cold air can rush down the chimney and into your home.
This pressure imbalance can also pull smoke back into the room when you light a fire. Keeping the damper closed whenever the fireplace is not working, is one of the best ways to stop cold drafts from entering your home.
Have You Tried to Preheat the Chimney Flue?
What? What is that? When you are ready to light the fireplace, warming the flue can help smoke travel up the chimney flue and out of your home. Light your gas starter without wood in there for a few minutes or a small bundle of kindling if you don’t have the convenience of a gas log starter. This will warm the air and cold chimney walls within the chimney flue so when the fire starts, it will go up and out of your home (Priming the system). Never roll up a sheet of newspaper, or any paper, and hold it up toward the open damper!
The New Critter Home?
For many animals, a chimney looks like a warm and safe place from the cold and freezing temperatures. Squirrels, raccoons, birds, bats, possum and other small creatures may try to nest inside.
How do you know if a critter made its way in? If you hear scratching, chirping, or the sounds of moving around in the chimney, or a foul smell call a certified chimney professional to inspect the chimney flue. A technician can safely remove the animals and check for any nesting material or structural damage it left behind.
Sometimes an animal can die inside the chimney. Typical first signs can be a strong odor, trouble venting smoke, seeing flesh flies or maggots. Any situation, you will want to call Superior Chimney at 877-244-6349 for help.
You may want to consider a tightly fitted stainless steel chimney cap with mesh sides is the best long term solution. It keeps wildlife out while still allowing smoke and gases to escape freely.
What are Common Chimney Repairs
Your chimney stands tall and is exposed to the weather all year long. In winter, snow builds up on the chimney crown and rain always finds its way into small crack in the chimney masonry. Anytime you have spalling or cracked bricks with or without missing or deteriorating mortar, you have a problem brewing with the chimney structure. When water from rain or snow freezes, it expands and widens the cracks. This process is known as the freeze and thaw cycle.
Water that enters the chimney can mix with creosote. That’s what creates a musty, smoky smell. A persistent odor from your fireplace is often an early sign that moisture is getting inside, so prompt repairs help protect your home.
Don’t Forget the Chimney Flashing
Metal step flashing seals the joint where your chimney meets the roof. Over time, it can loosen, rust, or pull away from the chimney.
Have a certified chimney professional inspect the flashing each year to confirm it remains watertight. Adding a waterproofing sealant to the masonry and a crown repair when needed gives your chimney lasting protection through the wettest months.
The Chimney from Bottom to Top
Each year when your chimney inspection is performed, the certified chimney technician will automatically check the firebox all the way up to the damper and out to the exterior chimney itself. The chimney technician will be looking for cracked or missing firebricks, gaps in the mortar joints, and loose pieces within the chimney walls especially if you do not have a chimney liner.
The chimney technician is searching for hairline cracks, damaged bricks, ineffective damper, damaged or missing chimney cap to name a few on the 14-point inspection. Because it is difficult for a homeowner to inspect on top of the roof or inside of the chimney as well as know exactly what to look for, it is best to have a trained, certified technician to do it for you. The technician will show you and the office staff will email you pictures so you have an understanding of what the technician has found.
Keep Fire Safety Essentials Nearby
A few simple tools make a fire experience safer for family, pets and guests.
Keep a sturdy metal fireplace screen in front of the opening to catch sparks and embers.
Place a fire extinguisher rated for household use in a safe, dry space. If you can have it near the fireplace, even better. Be sure to talk to family members or anyone else living in your home so they know where it is.
Test smoke alarms and carbon monoxide detectors monthly throughout the heating season.
Keep rugs, furniture, holiday decorations including Santa stockings at least three feet from the fireplace. This space gives you plenty of room to ensure the fire stays in the fireplace.
When it is time to clean out the ashes, wait until they have cooled down… at least until the next morning. Shovel them into a metal container with a tight lid and keep it outside away from your home.
Preparing a Gas Fireplace for Winter
Gas fireplaces need attention before starting it up too. Have a certified chimney technician check the burner, pilot assembly, gas connections, and venting system before you turn it on for the season. The chimney technician will continue to conduct a thorough cleaning and inspection from bottom to top according to the 14-point inspection.
As a homeowner, clean the protective glass front that’s attached or separate from the fireplace only once the unit is cool. Look for any soot buildup, which can be an indication that a burner or vent is experiencing a problem.
Frequently Asked Questions
How often should a chimney be inspected?
CSIA (the Chimney Safety Institute of America), NCSG (the National Chimney Sweep Guild), NFPA (the National Fire Protection Association) and IRC (International Residential Code) all specify a chimney inspection at least once a year. Cleaning is then scheduled based on how much buildup the technician finds.
Why does my fireplace smell bad in winter?
A strong odor can point to creosote mixed with moisture, a downdraft caused by the stack effect, or an animal in the chimney flue. A certified inspection can pinpoint the cause quickly.
Should I close the damper when the fireplace is off or cooled?
Yes, once the fire is completely out and the ashes are cool. A closed damper keeps warm air inside and cold air outside.
What is the best time of year to have my chimney cleaning?
Right now! Scheduling before the first cold snap gives you more appointment options and time for any repairs.
Do I need a chimney cap?
A chimney cap is critical to the function of your chimney. It keeps out rain, snow, debris and animals while allowing smoke to go up and out of your home properly. Every chimney needs a chimney cap for the same reasons every home needs a roof!
Get Your Fireplace Winter-Ready With Superior Chimney
A well maintained fireplace is one of the coziest parts of winter. With a yearly inspection, clear vents, a sturdy chimney cap, and sound masonry, you can enjoy every fire without unnecessary worry. Now that you know how to prepare your fireplace and chimney for winter, contact Superior Chimney today to schedule your inspection and sweeping, and enjoy a warm and comfortable season by the fire.


 Tile Doctor Ltd
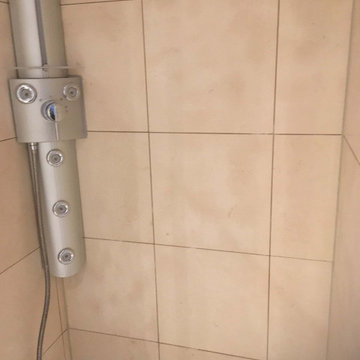
I was asked to look at renovating a shower cubicle at a property in in Manchester city centre that had been clad in White Limestone tiles. I understood the bathroom had been installed 12 years prior, but now the tiles were looking grubby, mouldy and dirty.
The client had lived at the property for the last two years and in an attempt to resolve the problems had used a few different household products such as flash and bleach, they had tried everything, and nothing had helped. I suspected that these strong acidic cleaners had actually made the problem worse by stripping off what was left of the sealer that was protecting the Limestone, allowing dirt to become ingrained in the stone.
I visited the property and ran a few cleaning tests in the shower cubicle with Tile Doctor products. This allows me to see which product will have the best results and gives the customer confidence that we can resolve their issues. The results were immediate, they could see the difference and they were happy to accept my quote and agree a date for my return to complete the work.
I arrived several weeks later and made a start. The tiles were scrubbed by hand with a strong dilution of Tile Doctor Remove and Go with excellent results. This product is designed to remove coatings and sealers, and in this case, it did a great job of drawing out the ingrained stains and dirt build-up. This removed what was left of the sealer and took off most of the dirt and mould. The Limestone tiles and grout were then rinsed with water to remove the soil.
Next I needed to restore the smooth surface of the limestone which had been etched by the use of strong acidic cleaning products. To do this I used a set of six-inch diamond burnishing pads attached to a hand buffer to hone and restore the stone.
I then dried the shower tiles and grout with a heat gun checking the moisture levels with damp meter until I was satisfied it was completely dry.
The last step was to re-seal the Limestone and Grout using a couple of coats of Tile Doctor Colour Grow. This is natural coloured intensifying sealer which provides durable protection to the surface allowing it to breathe and enhancing the colours.
The Customer was amazed with the difference and left the following feedback!
“Kamila was friendly, professional and kept me informed about what to expect before she took on the job and during the tile cleaning. The tiles look absolutely amazing after her work – I feel as though I have a brand new bathroom! Kamila also gave me helpful tips on looking after limestone tiles. I can’t recommend her highly enough.”
For future cleaning I recommended the use of Tile Doctor Aqua-Pro which is a pH neutral shower tile cleaner designed for use on sealed surfaces. Most cleaning products you find in supermarkets are overly strong and will erode the sealer prematurely, so when choosing a cleaning product always read the label and make sure it’s safe to use on Sealed Stone tiles.
Alex Logonzy
Greater Manchester Tile Doctor
Find the right local pro for your project

 Custom Surface Solutions
 (www.css-tile.com) - Owner Craig Thompson (512) 430-1215. This project shows the remodel of a small 1950's vintage home master bathroom. 8"" x 18" Calcutta gold marble tile was used on the shower walls and floor wall base and ceramic gray penny tile on the floor. Shower includes curbless pan / floor, dual shower boxes, frameless glass slider, trough duel fixture sink and chrome fixtures.
 Tile Doctor Ltd
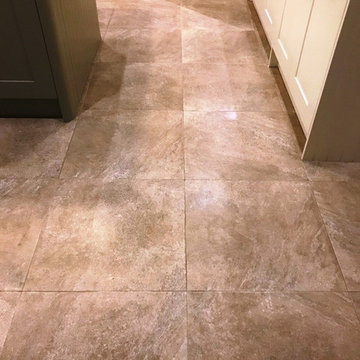
This request came from a client who lives in the Newcastle district of Jesmond who was unhappy with the appearance of their Textured Porcelain floor tiles. The problem was that the Porcelain Tiles were grouted in whilst the underfloor heating was switched on. This resulted in the grout drying out quicker than expected and the tiler struggled to get the excess grout off the tiles. To rectify the problem, the tiler tried to get the dried grout off with acid, but it didn’t work, and the floor was left looking dark and dull. Unable to rectify the problem the client was left with a disappointing pale floor and had searched around the internet for a solution.
Normally grout smears like these (aka Grout Haze) can be removed with an acidic product and Tile Doctor sell Grout Clean-up specially for this purpose. However, some grouts contain acid resistant polymers which need to broken down first. Fortunately, we have a solution for everything tile related and the system we use does not affect the main grout lines only the excess grout. I called in to do a site visit and having surveyed the problem I was confident it could resolved, I gave them a price for the work and agreed a date to return to do the job.
My first task was to spray the tiles with Tile Doctor Remove and Go, this was left to soak into the tile for around ten minutes before being scrubbed in. Remove and Go is a coatings remover that is safe to use on tile and grout; normally we use it to remove old sealers but in this case I applied it to break down the polymers. To work the product into the tile I use a buffing machine fitted with a black scrubbing pad, the mechanical advantage this gives makes the job a lot quicker. Then the slurry generated is rinsed off with water and removed with a wet vacuum. The floor was then left to dry for 30 minutes.
We were then able to remove the excess grout which was done by applying Tile Doctor Grout Clean-Up which I mentioned earlier. The process was the same, i.e. using the buffing machine and a wet vacuum to scrub the floor and extract the soil. The floor was rinsed with water to remove any trace of the products used and dried as much as possible using the wet vacuum. The underfloor heating really helped at this point to dry out the floor.
Once the floor was fully dry including the grout lines a single thin coat of Tile Doctor Colour Grow sealer was applied. The tiles were textured porcelain, so the dirt gets trapped into the textured surface if it is not sealed. We usually find one coat of Tile Doctor Colour Grow is more than enough for this, anything that hadn’t soaked in after three to five minutes was then polished off with clean dry cloths.
The client was very happy with the floor and pleased that the excess grout had been cleaned up and the floor looked as it should. Before leaving I recommended the use a pH Neutral tile cleaner for general cleaning such as Tile Doctor Neutral Tile Cleaner. There is no point sealing the tiles only to have it stripped off later with the use of a bleach based cleaner.
Raf Barrett
Tyneside Tile Doctor


 Inspired Closets Baton Rouge
You open your kitchen cabinet. It's a mess. An endless abyss.
You're looking for olive oil to sauté delicious garlic and onions for dinner.
You know you have it. Where could it be?
Cooking your favorite family meal can take longer than the Macy's Thanksgiving Day Parade without organization to find what you need.
That's what happened each & every time one of our recent Baton Rouge clients, Jan, tried to cook a meal in her home.
Searching For A Pantry Solution
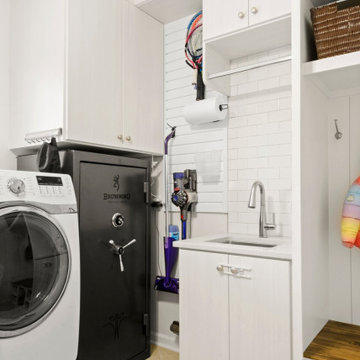
Jan and her family moved into their new home in 2017 despite not having a pantry. Knowing they needed one desperately, Jan wondered if a pantry could fit in their vast laundry room.
Instead of trying the DIY route, Jan wanted professional help to get it done right.
Jan saw an Inspired Closets sign on the lawn of a home in her neighborhood. She decided to visit their showroom to meet with our expert designer, Felicity.
After Jan shared her vision of what they wanted in a pantry, Felicity got to work! She created a custom design accomplishing everything Jan wanted. So there was never a need to shop around for other companies.
Let The Fun Begin: The Design & Construction Process
Jan thought the process was terrific. Much easier than they thought it would be. The 3D rendering of the project allowed them to see their dream space before installation began.
And, during the process, Jan realized she wanted to expand the project by redoing the laundry room as well!
Jan said, "I was able to make a few tweaks until it was perfect."
Felicity had a contractor she worked with closely. Together they handled it all, making it super easy for them with no mess or stress left behind.
A True Eye-Opening Experience: Make Getting The Ingredients The Easiest Part
"The functionality was the best part," says Jan. Finally, her family could see everything.
Inspired Closets put everything in plain sight by creating:
- clear acrylic snap drawers to see everything
- sliding pull-out drawers for canned goods
- a produce pull-out drawer
- a basket for chips and snacks that the kids loved
- a lazy Susan that holds vinegar, oils, and bottled items
Felicity maximized every inch of space in the design. Jan and her family were amazed the room had a wide-open feel, even with all the items in the room. The area was functional and beautiful.
Saving Time, Money, And Stress
But it wasn’t just pretty to look at. Now that everything is more accessible in her pantry, making a grocery list is a cinch. Jan found herself saving money by not buying things she already owned but simply couldn’t see.
"I love how the kids can find things so quickly. We never have to guess where stuff is, making daily life easier," Jan says.
Another Happy Ending
Jan’s family could not be more satisfied with their reimagined space, telling everyone they know not to be overwhelmed when considering a new project.
Let us help get rid of the mess and stress in your pantry or laundry space like we did for Jan!
Whether you’re embarking on your new construction, forever home, or a renovation to make life better, just imagine how we can help you create your dream come true.

Sponsored
Sunbury, OH

J.Holderby - Renovations
Franklin County's Leading General Contractors - 2X Best of Houzz!
 SUPERIOR CHIMNEY SERVICES CORPORATION
Preparing for the Thanksgiving holiday is turning out to be a bit different. Gone this year is the uncle who throws crumbs of food and bits of trash in the fireplace. Or the kids that like to poke the fireplace logs sending sparks in every direction.
This year, we get to create our own scene. Once you and your family have finished the delicious meal, now it’s time to make the rounds of Internet calls. Whether you use Zoom, Facebook, Skype or any other system, one thing is for sure…you need a warm, inviting, good-looking background.
The fireplace is the perfect go-to background, especially when you can see and hear the crackling of the fire. Put a little extra time in decorating around the fireplace, and of course, include the cookies and pumpkin pie. To ensure chaos isn’t erupting behind you, make sure your fireplace and chimney is ready to go.
Begin with a Chimney & Fireplace Inspection
By getting a chimney inspection you’ll help to ensure smoke goes up and out of the house, debris is not blocking it and any animals are safely living outside of your chimney. You certainly don’t want your online guests to think you smoked the turkey in the fireplace.
Chimney backup or a Smokey fireplace is usually caused by an insufficient draft in the flue. However, there are lots of other reasons for smoke backup including the partially open dampers, too small of a flue or a dirty chimney. This is one situation that’s best left to a certified technician to identify and repair.
Debris knows how to make its way into the chimney. Leaves, twigs, paper, plastic, and anything else flying around on windy days, has this special radar, and when it finds a chimney, it’ll try to make its way in. If the chimney doesn’t have a chimney cap, or if it was blown off or shifted from the high winds, debris found a new home!
Animals are wonderful to watch outside. We’ve watched a couple of the squirrels in our yard go from a lean body to a very plump size, all in preparation for winter. What comes next is a cozy place to sleep. The chimney is a perfect. It’s warm and protects the animals from the outdoor elements. If there isn’t a chimney cap or if the cap is loose or moved in a way to squeeze in…perfect!
What is a 14 Point Inspection?
A 14 point chimney inspection for your fireplace tells us a story about the events that occurred over the past year’s freeze and thaw cycle. It reveals to us any wear and tear, the frequency of use and the age of the chimney. This is great information to have in order to stay on top of any necessary chimney repairs and know the current conditions of worthiness for use.
Since the chimney is high on the roof, we take pictures of your chimney to show you the current condition. If any repairs are needed, you can see it for yourself.
You have a little time before the ‘live’ internet chat on Thanksgiving Day. As part of your preparations, get your chimney swept and inspected today. Call 877-244-6349.

 Traditional Door Design & Millwork Ltd.
Ontario’s Leading Manufacturer of Wood Doors, Mouldings & Millwork
Door Sales & Installation
Location: Woodbridge, Ontario L4L 8M3
Canada
Example of a transitional entryway design in Toronto
Example of a transitional entryway design in Toronto

 Armed & Safe Firearms Training
full [s3e1] Power Se.ason 3 Ep.isode 1 On.line Call Me James. Alright, everything looks perfect then, and let's getting started to watch for it finally, Power s03e01: Call Me James. As the premiere of season 3, what we could expect then? James gets ready to leave Ghost behind. Angela needs to choose between honor and love. A bit reminder from "Ghost Is Dead" Bodies from Ghost's organization drop left and right, each death inching closer to Ghost and Tommy.
Tasha learns of Shawn's death, believing it to have been Ghost's work. Kanan and Ghost fight with Ghost the victor, leaving him for dead and burning the evidence. Tommy Learns of Ghost's involvement with Holly. Ghost reveals to Tommy that he was the one killing most of the members from the organization.
Soon after, Tommy shows Ghost the fake ID of Holly and goes solo. Lobo's calls Tommy wanting him to work with him or lose everything. Angela and Ghost reconcile telling her Ghost is dead, but at the risk of her possibly losing her job. Greg threatens to put Angela and Ghost in jail. The police investigate a fire at Ghost's and Kanan's fight, revealing someone escaped, strongly implying Kanan is still alive.
Know further of this show, Power is an American crime drama television series airing on Starz. The show was created by Courtney Kemp Agboh and is produced by the rapper Curtis "50 Cent" Jackson. It premiered on June 7, 2014.
On June 11, 2014, Starz renewed Power for a ten-episode second season, which began on June 6, 2015 and ended on August 15, 2015. On June 10, 2015, after a very positive critical response to its season 2 premiere, Power was renewed for a ten-episode third season which is scheduled to premiere on July 17, 2016.
Very fantastic, The series follows James St. Patrick, nicknamed "Ghost," owner of a popular New York City nightclub "Truth." In addition, he is a major player in one of the city's biggest illegal drug networks. He struggles to balance these two lives, and the balance topples when he realizes he wants to leave the drug ring in order to support his legitimate business, and commit to his mistress. He seems eerily unhappy with his life, Tommy calling it a mid-life crisis, therefore getting in a relationship with Angela.
He also has to keep his marriage with Tasha (Naughton) and his relationship with AUSA agent Angela Valdez (Loren). With help from his partner in crime Tommy Egan (Sikora), he tries to manage a double life. In the second season James is thrown out of his penthouse after Tasha found out that James took Angela to Miami.
100% working here:
http://tinyurl.com/ju79smw
http://tinyurl.com/jejqwra
Kanan (50 Cent) who spent 10 years in a drug related crime, also believes Ghost set him up. Kanan has a son Shawn, who drives Ghost around and Kanan uses him to get information on Ghost. In the season 2 finale, Ghost and Kanan indulge in an extremely dangerous fight in a dilapidated building. Ghost eventually stabs Kanan and burns him. But in the final minutes of the season finale "Ghost Is Dead", it is revealed that sprinklers had put the fire out, resulting in Kanan escaping and ends with the line "Nobody broke in, somebody broke out". Go and start watching for it after all, Power season 3, episode 1 : Call Me James.
 Tile Doctor Ltd
Here’s a job I completed just before Christmas last year, at a house in Northampton which has a rich history and mix of architectural styles. The run up to Christmas is always popular as people try to get their household projects finished off in time for celebrating the festive season with family so this is always a busy time for Tile Doctor.
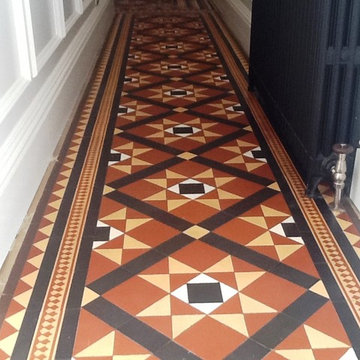
The photos below show a neglected Victorian Quarry tiled floor in need of repair, with cracked tiles along the edges. These were caused by somebody in the past using brute force to remove carpet gripper rods which had been glued to the tiles. These cracks were present around the edges of the entire hallway, however; this particular type of tile is very hard to get hold of. Furthermore, it is a costly process to replace the tiles as the skirting boards would have had to have been removed.
As well as the physical issues the floor had a dull appearance due to the build-up of builder’s dust and the general wearing down of the paintwork over time. I agreed with the client that the best course of action would be to fill the tiles, and paint the damaged tiles using a colour that matched as close as possible. Many of my Tile Doctor colleagues would disagree with this approach opting to source the correct tile and rebuild the damaged section however unfortunately in this case we didn’t have the time or the budget.
My first action was to use a brush and vacuum to remove as much loose debris and dust as possible. I followed this by agitating the tiles with a dilution of Tile Doctor Pro Clean which is a strong alkaline product and safe to use on tile and stone. I use a combination of a coarse burnishing pad fitted to a rotary machine and hand held brushes, in order to get the floor clean. The resulting slurry was then rinsed and removed using a wet vacuum. This process was repeated twice followed by a thorough rinse to ensure any trace of cleaning agent had been removed and the floor neutralised.
As this was such an old property, I then used a steamer to heat up the tiles in order to draw out any contaminants and assist with the drying process. I installed a fan to dry the floor before starting repairs, mixing up some coloured grout and filling all holes and cracks along the edges, including the doormat area.
I allowed the coloured grout to dry overnight, before hand painting the black and Terracotta tiles. These were then given time to dry (about a couple of hours). Following this, I carefully painted in the other colours: brown and cream. The overall effect was quite convincing and you had to look very closely to notice.
Due to the fact that there were other tradesmen working in the house at the time, the floors were sheeted up to protect from additional dust and muck. I then left the house for a week, allowing the floor ample time to dry completely in preparation for sealing.
Upon my return, I took damp meter readings, and once satisfied with the dryness of the tiles, I began the sealing process with the impregnating, colour-enhancing sealer Tile Doctor Colour Grow. The sealer provides both durable surface protection and an aesthetically pleasing matte finish.
The below photos show how the product has enriched the colours with the two coats applied.
The process of restoring this wonderful Victorian Quarry tiled floor was certainly time consuming, but very rewarding. I am exceptionally pleased with the results myself, and my client couldn’t have been happier and I’m sure the newly revitalised hallway will have been a talking point for all their visitors during the Christmas break.
Phil Vissian
Northamptonshire Tile Doctor

 Metro Tile Inc
Alcove shower - small contemporary 3/4 gray tile, white tile and matchstick tile porcelain tile and beige floor alcove shower idea in New York with a one-piece toilet

 Bill Fry Construction - Wm. H. Fry Const. Co.
Covid During Construction and Making Face Masks
Dear Houzz Folks,
We've started getting back to work and are educating everyone at our projects on how to be safe during COVID, posting signage, and we've been making masks for our employees, colleagues, friends, family etc... Here's some information on what I've learned so far in sewing the best fitting face mask for COVID.
1. Put in a wire at the nose bridge (about 3.5 inches) - it helps with fit and if you wear glasses, it keeps them from fogging up. I found that doorbell wire, available at the hardware store, seems to work well. It isn't too thin or too fat, bends easily and holds its shape. I attach it by using a zigzag stitch on the interior seam of the outside of the mask (so there's a bit more cushion on the inside).
2. For the shaped masks, I make a pocket in case my friends, family, colleagues, want to insert a filter - it also allows for three layers of fabric in the breathing area and less bulk where the ties go. For patterns that don't offer pockets, I just make my own pattern pocket. I also first baste the two inside pieces first and then sew the front on. This way, there's no worries about slipping. No pins are needed and no pins minimizes the number of extra air holes in the fabric.
3. So that the ties/loops can be replaced or modified, I make a channel for rather than sewing it in permanently. Many videos show using a safety pin to pull the elastic through. If you sew much, you might have a bodkin in your sewing box, but it might be a bit too wide. Instead, I use a long hairpin (you could probably make a long loop with a paper clip). I run the hairpin through the channel, loop the elastic through the end of the pin and pull through. That takes much less time than piercing it with a safety-pin.
4. For the inside of the masks, it is nice to have softer fabric inside, so high-thread-count sheets purchased on sale work great. Then you can easily tell what is inside as well.
5. For surgical-style masks, there's a pattern with a pocket on the inside and a wire. I like the ideas in this video but use 2 fabrics and make them bigger. About a 9x9 inch for the outside and 9x8 inch for the inside. 5/8 seam on the nose and 1/4 seam on the bottom.
6. For the fitted masks, there are two patterns that I like. For this one, https://moinliz.de/mundschutz-naehen-mit-schnittmuster it expects you to print on European-sized paper, so if you want to get the size right, print at 100%
I also really like this pattern and I added a pocket and lengthened the ends to make channels https://intermountainhealthcare.org/covid19-coronavirus/homemade-cloth-face-coverings/ (scroll down to a link to download the pdf) Lots of folks sew craftpassion, but I like the fit of these patterns better. There are still some other patterns I have left to try!
6. After breaking lots of needles, I realized that I really didn't need to topstich the fitted masks over the bridge, so I just started skipping the bridge.
7. If you're going to wear a face-covering for a really long time, you might want to skip the ear hangers and go for ties behind the head. Instead of two ties, I'll use one long one so that the bottom one is a loop and the top one ties. Bungee cord works nice.
Happy Sewing!
: ) Rhoda Fry, Bill Fry Construction
Sponsored
Sunbury, OH
J.Holderby - Renovations
Franklin County's Leading General Contractors - 2X Best of Houzz!
 Bill Fry Construction - Wm. H. Fry Const. Co.
Covid During Construction and Making Face Masks
Dear Houzz Folks,
We've started getting back to work and are educating everyone at our projects on how to be safe during COVID, posting signage, and we've been making masks for our employees, colleagues, friends, family etc... Here's some information on what I've learned so far in sewing the best fitting face mask for COVID.
1. Put in a wire at the nose bridge (about 3.5 inches) - it helps with fit and if you wear glasses, it keeps them from fogging up. I found that doorbell wire, available at the hardware store, seems to work well. It isn't too thin or too fat, bends easily and holds its shape. I attach it by using a zigzag stitch on the interior seam of the outside of the mask (so there's a bit more cushion on the inside).
2. For the shaped masks, I make a pocket in case my friends, family, colleagues, want to insert a filter - it also allows for three layers of fabric in the breathing area and less bulk where the ties go. For patterns that don't offer pockets, I just make my own pattern pocket. I also first baste the two inside pieces first and then sew the front on. This way, there's no worries about slipping. No pins are needed and no pins minimizes the number of extra air holes in the fabric.
3. So that the ties/loops can be replaced or modified, I make a channel for rather than sewing it in permanently. Many videos show using a safety pin to pull the elastic through. If you sew much, you might have a bodkin in your sewing box, but it might be a bit too wide. Instead, I use a long hairpin (you could probably make a long loop with a paper clip). I run the hairpin through the channel, loop the elastic through the end of the pin and pull through. That takes much less time than piercing it with a safety-pin.
4. For the inside of the masks, it is nice to have softer fabric inside, so high-thread-count sheets purchased on sale work great. Then you can easily tell what is inside as well.
5. For surgical-style masks, there's a pattern with a pocket on the inside and a wire. I like the ideas in this video but use 2 fabrics and make them bigger. About a 9x9 inch for the outside and 9x8 inch for the inside. 5/8 seam on the nose and 1/4 seam on the bottom.
6. For the fitted masks, there are two patterns that I like. For this one, https://moinliz.de/mundschutz-naehen-mit-schnittmuster it expects you to print on European-sized paper, so if you want to get the size right, print at 100%
I also really like this pattern and I added a pocket and lengthened the ends to make channels https://intermountainhealthcare.org/covid19-coronavirus/homemade-cloth-face-coverings/ (scroll down to a link to download the pdf) Lots of folks sew craftpassion, but I like the fit of these patterns better. There are still some other patterns I have left to try!
6. After breaking lots of needles, I realized that I really didn't need to topstich the fitted masks over the bridge, so I just started skipping the bridge.
7. If you're going to wear a face-covering for a really long time, you might want to skip the ear hangers and go for ties behind the head. Instead of two ties, I'll use one long one so that the bottom one is a loop and the top one ties. Bungee cord works nice.
Happy Sewing!
: ) Rhoda Fry, Bill Fry Construction

 CairnsCraft Design & Remodel
Great spacious bathroom with lot of amenities.
Photographer: Jon Upson
Large elegant master beige tile and porcelain tile drop-in bathtub photo in San Diego with an undermount sink, raised-panel cabinets, medium tone wood cabinets, granite countertops, beige walls and a two-piece toilet
Large elegant master beige tile and porcelain tile drop-in bathtub photo in San Diego with an undermount sink, raised-panel cabinets, medium tone wood cabinets, granite countertops, beige walls and a two-piece toilet
 safe ZOnea
In 2026, DIY home design and renovation will become easier than ever. Free mobile apps like Houzz, Homestyler, and Planner 5D will put professional tools in everyone’s pocket, letting users visualize layouts, test colors, and estimate costs before buying materials. Experts predict that over 50% of homeowners will use apps to plan upgrades. It will save money and reduce costly mistakes. Even now, about 54% prefer mobile tools.
Why Mobile Apps are Changing Home Renovation
DIY renovation has changed a lot in recent years. Homeowners don’t have to rely on sketches or guesswork anymore. Thanks to AR, AI, and 3D renderings, apps can show exactly how furniture and cabinets will fit. By 2026, many of these tools will be free - and packed with features that rival expensive software. With just a smartphone, anyone can try out layouts, test colors, and even create detailed floor plans.
The Tech Behind Modern Design Apps
Most renovation apps now leverage AI to generate design suggestions. They are based on your space and preferences. Upload a photo of your room. The algorithms will check the sizes, lighting, and features. Then, they’ll suggest furniture layouts or color schemes. Some apps use your phone’s camera and sensor. They make accurate measurements, so you won’t need tape measures or notepads.
Top Free Apps Transforming DIY Projects
Houzz continues to lead the pack with its massive photo library and ability to connect users with local contractors. The platform now gives AI design suggestions. It looks at your style preferences across millions of professional spaces.
For anyone serious about planning their next project, exploring comprehensive resources helps narrow down what works. It’s just like in iGaming, where review platforms like Slotzilla help gamblers to find casinos with user-friendly tools, bonus rounds, and progressive jackpots that will work for them.
Planner 5D shines with realistic 3D renderings and a huge furniture catalog, letting you switch between 2D plans and 3D walkthroughs - even in VR. Room Planner helps you design practical layouts. You can easily arrange furniture and check dimensions. It offers real-time 3D views and features items from real brands.
Apps for Specific Renovation Tasks
Not every project needs full 3D renderings - sometimes you just want to try paint colors or test tile patterns. ColorSnap by Sherwin-Williams uses AR to show colors on your actual walls and even matches shades from photos. Magicplan makes creating floor plans easy by measuring rooms with your phone as you walk around. Both apps help plan renovations and communicate ideas without the guesswork.
Budget Tracking and Project Management
Renovation apps do more than make spaces look good - managing budgets and timelines is just as important. HomeZada even uses AI to predict your budget and track material prices, so DIYers don’t get hit with surprise costs. Trello is a lifesaver - set deadlines, track progress, and share updates with anyone helping on the project.
How Apps Reflect 2026 Design Trends
This year’s popular apps reflect the largest home design trends. Colorful rooms are on the rise. Zillow shows a 149% increase in listings. Plus, apps like Houzz let users test bold shades before making a choice. Cozy reading nooks are also on the rise, showing up in nearly half of listings. Renovation apps now provide templates. They include tips for shelves and lighting. This helps create cozy, thoughtful spaces.
Here’s a quick comparison of what different free apps offer:
App name
Best feature
Learning curve
Platform
Houzz
25M+ inspiration photos
Easy
iOS, Android
Planner 5D
Photorealistic 3D renders
Moderate
iOS, Android, Web
Room Planner
Accurate measurements
Easy
iOS, Android
Magicplan
Auto floor plan creation
Easy
iOS, Android
Natural materials and earthy tones will lead design trends in 2026. Warm neutrals will take over from the grey-and-white minimalism of the last ten years.
The AI Revolution in Home Design
AI is no longer just a gimmick in renovation apps. Chat features can suggest furniture layouts, color palettes, and materials for your budget. It’s like having a designer on call. Renovate AI turns photos of your room into multiple style ideas in seconds, from mid-century to rustic farmhouse. It’s great for brainstorming and getting past the “I don’t know what I want” stage.
Practical Tips for Using Renovation Apps
Getting the most from design apps requires a strategic approach. Here are essential steps every DIYer should follow:
Start by gathering inspiration. Look through photo libraries on Houzz or Pinterest. Then, dive into detailed planning.
Don’t rely solely on screen colors; get actual paint chips and fabric swatches.
Save multiple design versions. Create variations of your plan to compare options side-by-side.
This workflow helps you avoid common mistakes. It leads to better design choices before you buy anything.
When Apps Aren’t Enough
Digital tools can’t do everything. Big structural changes, electrical work, or plumbing always need a pro. Apps are great for planning and talking with contractors, but they can’t replace expertise. And always check textures in real life - that sofa might look perfect on screen, but feel different.
The Future of DIY Renovation
In 2026, renovation apps will become smarter. They’ll have voice control and better AR. Improved AI will make DIY design feel more like professional services. Creating beautiful, functional spaces is easier than ever. For homeowners, it’s important to use apps that match local materials and building codes. The biggest benefit is confidence - seeing your design in 3D makes projects far less intimidating.
 Wiler Fence Company
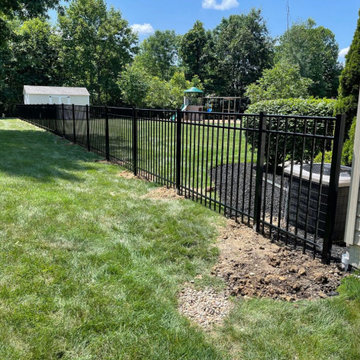
Elegant 4-Foot Black Ornamental Aluminum Fence by Wiler Fence Company – Elite EFF-20 Model Installed for a New Inground Pool in Medina, OhioWiler Fence Company recently completed a stunning 4-foot tall black ornamental aluminum fence installation in Medina, Ohio, perfectly complementing a brand-new inground swimming pool for a growing family. Manufactured by Elite Fence Products (a trusted American-made brand), the EFF-20 model delivers timeless wrought-iron style with modern durability and zero-maintenance appeal—making it an ideal choice for poolside safety, curb appeal, and long-term value.The EFF-20 is one of Elite's most popular residential-grade styles, featuring a clean, flat top rail with a subtle beveled edge for a sleek, contemporary look that mimics traditional wrought iron without the rust or upkeep. Key specifications include:Height: 4 feet (48 inches) – precisely meeting Medina's minimum 4-foot requirement for residential pool enclosures while keeping the yard feeling open and inviting.
Construction: Extruded aluminum panels with 1-1/8" x 1" horizontal rails (three rails total for strength and stability), 5/8" x 5/8" vertical pickets spaced approximately 3-13/16" apart (standard residential spacing that allows visibility while preventing small children or pets from slipping through).
Finish: Premium powder-coated black – a durable TGIC polyester coating that resists fading, chipping, and corrosion, backed by Elite's limited lifetime warranty. This rich matte-to-semi-gloss black finish enhances any home's exterior and blends beautifully with modern landscaping.
Strength: Residential-grade design supports up to 350 lbs of pressure on the top rail, ensuring it stands up to Ohio's weather extremes and everyday use.
Panels: Pre-assembled sections (typically 72.5" wide) for efficient, precise installation with minimal visible hardware (screws on one side only for a cleaner appearance from the street).
This installation was specifically chosen for the new inground pool to provide essential safety and code compliance. In Medina, Ohio, local regulations require pool fences to be at least 4 feet tall, with no more than 3 inches of ground clearance, self-closing/latching gates, and spacing that prevents a 4-inch sphere from passing through—standards the Elite EFF-20 easily satisfies (and often exceeds for pool applications). The open picket design maintains great sightlines for supervision while creating a secure barrier that deters unsupervised access.Wiler Fence Company's expert crew handled the full process seamlessly:Coordinated with the City of Medina for the required building permit and zoning certificate (including site plans and pool setback compliance—no front-yard placement, minimum distances from structures, etc.).
Called 811 for utility locates and prepared post holes to frost-line depth (typically 36-42 inches in Medina's soil) for rock-solid concrete footings.
Installed line, corner, and end posts (2" x 2" or 2-1/2" x 2-1/2" aluminum) with matching black powder coat.
Set pre-assembled EFF-20 panels level and plumb, then added self-closing, self-latching gates (with child-proof latches at least 54 inches high) for easy pool access.
Left the site spotless, with final walkthrough and city inspection passed on the first try.
The homeowners now enjoy a safe, elegant pool area that looks upscale and professional—enhancing their backyard oasis without the ongoing painting, rust worries, or sagging common with other materials. The black aluminum provides a sophisticated contrast against the pool's blue water and surrounding greenery, while the 4-foot height keeps the view open to the house and yard.At Wiler Fence Company, we're proud to bring Elite Fence Products' high-quality craftsmanship to Northeast Ohio homes. If you're adding an inground pool, upgrading your perimeter, or seeking low-maintenance elegance, the EFF-20 in black is a top performer for safety, style, and satisfaction.Ready for your own Elite aluminum fence project in Medina, Brunswick, or surrounding areas? Contact us for a free estimate today! (216) 714-3337
www.wiler.org
#WilerFenceCompany #EliteFence #OrnamentalAluminumFence #PoolFence #MedinaOhio #IngroundPool #BlackAluminumFence #NortheastOhioFencing

Sponsored
Columbus, OH

Trish Takacs Design
Award Winning & Highly Skilled Kitchen & Bath Designer in Columbus
 Five Star Tree Care
During the summer, certain tree pests are particularly active and bent on the destruction of your beloved trees. Spider mites are one of these pests that like to make themselves at home all over your plants. Their only goal in life is to eat plant leaves. A great way to stop their destruction is being able to recognize the warning signs of their infestation. Once you have identified them, you can take care of them and put in precautions in order to keep them away and stop any future problems from them. We here at Five Star Tree Services have come up with ways that you can identify this pest and get rid of it before it’s too late for your precious plants.
Some Info on Spider Mites
You might have seen these little pests before but didn’t know what they were. They are these tiny creatures that are related to ticks and spiders.
What They Look Like
In order to see them properly, you will need to look at them through a magnifying glass. These little bugs come in a number of different patterns and colours. Being so incredibly small, they are roughly a millimeter at the most. For reverence, that’s about as thick as your credit card. Trying to look at them without a magnifying glass, all you might see are these tiny moving dots that might be brown, red, black, or yellow.
Causes of Spider Mites
Due to their shier tininess, these little invaders can waltz right into your gardens undetected. It’s even possible that you have bought a plant for a nursery or garden center that has had spider mites on them. They can even be brought into your garden by the wind. These little pests have the ability to spread very quickly due to their ability to eat a number of different plants. They are not very picky when it comes to eating your plants. They like outdoor and indoor plants, deciduous and evergreen, virtually nothing is safe from them.
How To Tell You Have Spider Mites
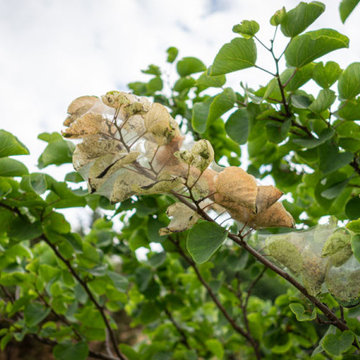
Spider mites prefer to cut and feed on the bottoms of tree leaves, however, the damage they do can be seen at the top of the leaf. Three key things to look for that indicate you have a spider mite infestations are:
Yellowing or bronze look to your tree in one or many different areas (common with a big infestation)
Silky webs that are woven around the leaves and stems
Little yellow or white spots appearing at the top of the leaves/needles
If you are suspicious that your plant has spider mites, one way to know for sure is holding a sheet of paper under an infected branch and shaking it. You will be able to see the little mites on the paper.
Rid Your Plants of Spider Mites
Whether it’s the summer or winter, follow these tips for treating spider mites.
Summer:
You can use a forceful water spray to knock them off of your tree. Once they are gone, periodically use your hose to rinse your trees for the season. Make sure to get the bottom of the leaves because this is where the mites like to live.
Winter:
This also includes any time before the buds come out in the spring. If your tree has spider mites, during this time, you will only see the eggs settled on the branches of your tree. Apply dormant oil to all the eggs before they hatch.
It is also handy to know what natural predators eat spider mites. Certain rival insects such as lacewings and predator beetles will aid in getting rid of your pesky mites.
Preventing Spider Mites
Spider mites are most active during drought season. When trees are stressed, this is when they attack. If you are experiencing extended hot days and long dry periods, it is important to keep your trees hydrated. This means giving them at least an inch of water a week and making sure you have enough mulch around them.
How Five Star Tree Service Can Help
Spider mites are a pest. Catching them before they do any permanent damage is important. If using the dormant oil or spraying your tree with water doesn’t seem to be working, you can give us at Five Star Tree Services a call at (416) 990-3355 and we will come and help take care of them. Visit our website to see a full list of our available tree care services in Toronto!


 Five Star Tree Care
Winter has arrived and this means many months of snow and ice are ahead. When trees shed their leaves and go dormant for the winter, this is like how bears hibernate; they are both sleeping through the cold and waiting until the warm spring weather comes back. But unlike hibernating bears, who are safe and snuggled up in a warm cave somewhere, trees are left to withstand the harsh, cold elements throughout the entire winter. This means that they are more impacted than you might believe.
It is easier for mature trees to be able to handle the long winter months due to their extensive root system and thick bark. But saplings and other newly planted trees are not yet fully equipped with these natural defenses to handle the cold. No matter if you have new or older trees, following our tips will help them prosper during the cold Canadian winter ahead. Our team at Five Star Tree Services has come up with some winter maintenance essentials for your trees that will give them an extra hand over the winter.
One Last Water
Getting one last good watering in before the ground freezes is helpful to newly planted and young trees. Always make sure to water your tree slowly and gently. This allows the water to seep down into the root system as opposed to it running off the top and freezing.
Apply Mulch
When you use mulch, it acts like a barrier between the tree roots and the cold snow, it helps to insulate it. When you are applying mulch, make sure you spread it around the base of the tree so that it is no more than 3 inches deep. You also need to make sure to spread the mulch all the way to the drip line surrounding the tree. Make sure to not exceed 3 inches around your entire tree and keep the mulch away from the trunk of the tree.
Wrap Tree Trunks
There is a condition called sunscalding that can occur during the winter months. This happens when there is a temperature change that happens quickly. You might notice it when the sun warms the trees, which thaws the bark but during the night, when it gets cold again, it causes the melted water in the bark to rupture, causing cracks in the tree’s trunk. Young trees are especially susceptible to this happening. To help stop this from happening, it is best to wrap your trees with tree wraps or a plastic guard. It is advisable to wrap the trunk from the ground up and stop just below the first branch.
Shelter Your Trees
Young or newly planted trees are fairly defenseless for the first handful of years. Older and more mature trees have had time to develop a strong root system and hardy bark that help to protect them against things like animals and the freezing cold. If you want to help your little sapling along this winter, you can build a shelter that can handle having snow piled on it. You can also periodically use a broom to brush off the snow that accumulates on a tree’s branches. But try to avoid breaking off any ice that has formed on the branches, as this can actually end up hurting the tree if you accidentally break one of its branches instead.
Keep Road Salt Away
It’s no big secret that the use of road salt is detrimental to trees. When it gets on them, the end result come springtime is a dead tree, or at least, a severely damaged one. As much as you can, protect your trees and limit their exposure to salt over the winter.
Protect Your Trees
Winter is not only limiting for trees, but for a lot of other animals as well. This includes rabbits, mice, moles, squirrels, and other furry little creatures, who like to use trees as a food source during the summer months. During the winter, this food is now cut off when the trees go dormant. This only leaves the tree’s bark as an alternative food source for these critters. They seem to especially like young tree bark to chew on over the winter. In order to stop this from happening, you need to protect the bark with things like a fence surrounding your tree, wrapping the trunk with a plastic guard or hardware cloth.
Winter Pruning
The best time to prune any tree is during the winter months when the tree is dormant. Pruning allows you to rid the tree of any excess branches and control disease. Winter pruning is highly beneficial and lets your tree improve branch development in the spring.
Don’t Use
Always make sure to avoid products that are known to hurt trees, especially ones containing sodium chloride. Products like that cause negative reactions in trees or any plants, as it hinders their water intake. Instead, look for products that have potassium, calcium, and magnesium chloride.
How Five Star Tree Services Can Help
For newly planted and young trees, it is especially important to help them through the winter as best you can. We here at Five Star Tree Services are here to help you get your trees through the winter. If you require Toronto Tree Care, make sure to give us a call at (416) 990-3355.
13