
Search results for "Videos same" in Home Design Ideas

 RAJ Kitchen and Bath, LLC
“Full apartment design”.
IF you have not yet seen this apartment conversion before, we strongly urge you to go to the bottom left of this page and click on the short 2-minutes video. It would put a lot of things into perspective when you come back and continue reading this.
It is true we were literally handed the keys and told a list of things that they wanted to have happen and we were to go into the apartment, look at the space and come up with a design that would satisfy all of that need. UNTIL we showed up! The unit had really seen some better days but we knew we had to look past that and come up with a concept that would work for them.
The immediate challenges were centered around 3 big ideas:
1. Adding a second bedroom to the already small footprint
2. Figuring out a way to make the kitchen bigger, better and brighter
3. Creating a master room walk in closet
It’s always difficult to add new rooms into existing footprint without expanding out or up and not incurring any opportunity cost. In this case, that was exactly what we had to do. Item one and two above had to be tackled as one. We went ahead and switched out the location of the dining room and eliminating an area where there was a “nook” type eat-in area. By doing so, we were able to cut right into that footprint and change the layout of the kitchen.
That one move allowed us to dig into the kitchen design because it was now the main focal point in the apartment. It was no longer an option to keep it in that tiny hole where it was, so we had to ensure that this design was functional and aesthetically pleasing at the same time. By adding the table into the space where an Island typically would go, we were able to both cut cost and still provide a dining experience. The Table serves as an Island as well when cooking.
We then proceeded to block in the existing doorway to the dining room. By doing this, we were able to create a full room which allowed us to put a door on the other side and called that room Bedroom #2. This was easier to do because all of the mechanicals were already in that space (light, heater and windows). By shifting things around, we also achieved a huge wall to wall closet from inside. PERFECT!
Then we moved into the Single bedroom. We thought it was a big room with a small closet, so by creatively adding an L shaped wall and steal some footprint into the bedroom side, we were able to put a door on that new room and design it for the walk-in closet. Even after this, the bedroom still holds a queen size bed with 2 night stands, a TV on the wall, a sitting chair and plenty of room to walk around. This was done by rethinking the location for the bed and night stands.
The bathroom was gutted to make sure there was no leaks and rebuild from the ground up. We kept all of the plumbing where it was, added a new vanity, medicine cabinet, tiles and lighting and it was done.
From there, the rest of the unit had new flooring all throughout, paint, and lighting. After completion and walk through, this project was handed over back to the clients.
Execution and collaboration between all the trades were: Reggie and his team from Premier Interiors and Rohan from RD Mechanical Services.
p.s. Please see our website to see the video.
 RAJ Kitchen and Bath, LLC
“Full apartment design”.
IF you have not yet seen this apartment conversion before, we strongly urge you to go to the bottom left of this page and click on the short 2-minutes video. It would put a lot of things into perspective when you come back and continue reading this.
It is true we were literally handed the keys and told a list of things that they wanted to have happen and we were to go into the apartment, look at the space and come up with a design that would satisfy all of that need. UNTIL we showed up! The unit had really seen some better days but we knew we had to look past that and come up with a concept that would work for them.
The immediate challenges were centered around 3 big ideas:
1. Adding a second bedroom to the already small footprint
2. Figuring out a way to make the kitchen bigger, better and brighter
3. Creating a master room walk in closet
It’s always difficult to add new rooms into existing footprint without expanding out or up and not incurring any opportunity cost. In this case, that was exactly what we had to do. Item one and two above had to be tackled as one. We went ahead and switched out the location of the dining room and eliminating an area where there was a “nook” type eat-in area. By doing so, we were able to cut right into that footprint and change the layout of the kitchen.
That one move allowed us to dig into the kitchen design because it was now the main focal point in the apartment. It was no longer an option to keep it in that tiny hole where it was, so we had to ensure that this design was functional and aesthetically pleasing at the same time. By adding the table into the space where an Island typically would go, we were able to both cut cost and still provide a dining experience. The Table serves as an Island as well when cooking.
We then proceeded to block in the existing doorway to the dining room. By doing this, we were able to create a full room which allowed us to put a door on the other side and called that room Bedroom #2. This was easier to do because all of the mechanicals were already in that space (light, heater and windows). By shifting things around, we also achieved a huge wall to wall closet from inside. PERFECT!
Then we moved into the Single bedroom. We thought it was a big room with a small closet, so by creatively adding an L shaped wall and steal some footprint into the bedroom side, we were able to put a door on that new room and design it for the walk-in closet. Even after this, the bedroom still holds a queen size bed with 2 night stands, a TV on the wall, a sitting chair and plenty of room to walk around. This was done by rethinking the location for the bed and night stands.
The bathroom was gutted to make sure there was no leaks and rebuild from the ground up. We kept all of the plumbing where it was, added a new vanity, medicine cabinet, tiles and lighting and it was done.
From there, the rest of the unit had new flooring all throughout, paint, and lighting. After completion and walk through, this project was handed over back to the clients.
Execution and collaboration between all the trades were: Reggie and his team from Premier Interiors and Rohan from RD Mechanical Services.
p.s. Please see our website to see the video.
 RAJ Kitchen and Bath, LLC
“Full apartment design”.
IF you have not yet seen this apartment conversion before, we strongly urge you to go to the bottom left of this page and click on the short 2-minutes video. It would put a lot of things into perspective when you come back and continue reading this.
It is true we were literally handed the keys and told a list of things that they wanted to have happen and we were to go into the apartment, look at the space and come up with a design that would satisfy all of that need. UNTIL we showed up! The unit had really seen some better days but we knew we had to look past that and come up with a concept that would work for them.
The immediate challenges were centered around 3 big ideas:
1. Adding a second bedroom to the already small footprint
2. Figuring out a way to make the kitchen bigger, better and brighter
3. Creating a master room walk in closet
It’s always difficult to add new rooms into existing footprint without expanding out or up and not incurring any opportunity cost. In this case, that was exactly what we had to do. Item one and two above had to be tackled as one. We went ahead and switched out the location of the dining room and eliminating an area where there was a “nook” type eat-in area. By doing so, we were able to cut right into that footprint and change the layout of the kitchen.
That one move allowed us to dig into the kitchen design because it was now the main focal point in the apartment. It was no longer an option to keep it in that tiny hole where it was, so we had to ensure that this design was functional and aesthetically pleasing at the same time. By adding the table into the space where an Island typically would go, we were able to both cut cost and still provide a dining experience. The Table serves as an Island as well when cooking.
We then proceeded to block in the existing doorway to the dining room. By doing this, we were able to create a full room which allowed us to put a door on the other side and called that room Bedroom #2. This was easier to do because all of the mechanicals were already in that space (light, heater and windows). By shifting things around, we also achieved a huge wall to wall closet from inside. PERFECT!
Then we moved into the Single bedroom. We thought it was a big room with a small closet, so by creatively adding an L shaped wall and steal some footprint into the bedroom side, we were able to put a door on that new room and design it for the walk-in closet. Even after this, the bedroom still holds a queen size bed with 2 night stands, a TV on the wall, a sitting chair and plenty of room to walk around. This was done by rethinking the location for the bed and night stands.
The bathroom was gutted to make sure there was no leaks and rebuild from the ground up. We kept all of the plumbing where it was, added a new vanity, medicine cabinet, tiles and lighting and it was done.
From there, the rest of the unit had new flooring all throughout, paint, and lighting. After completion and walk through, this project was handed over back to the clients.
Execution and collaboration between all the trades were: Reggie and his team from Premier Interiors and Rohan from RD Mechanical Services.
p.s. Please see our website to see the video.
Find the right local pro for your project
 RAJ Kitchen and Bath, LLC
“Full apartment design”.
IF you have not yet seen this apartment conversion before, we strongly urge you to go to the bottom left of this page and click on the short 2-minutes video. It would put a lot of things into perspective when you come back and continue reading this.
It is true we were literally handed the keys and told a list of things that they wanted to have happen and we were to go into the apartment, look at the space and come up with a design that would satisfy all of that need. UNTIL we showed up! The unit had really seen some better days but we knew we had to look past that and come up with a concept that would work for them.
The immediate challenges were centered around 3 big ideas:
1. Adding a second bedroom to the already small footprint
2. Figuring out a way to make the kitchen bigger, better and brighter
3. Creating a master room walk in closet
It’s always difficult to add new rooms into existing footprint without expanding out or up and not incurring any opportunity cost. In this case, that was exactly what we had to do. Item one and two above had to be tackled as one. We went ahead and switched out the location of the dining room and eliminating an area where there was a “nook” type eat-in area. By doing so, we were able to cut right into that footprint and change the layout of the kitchen.
That one move allowed us to dig into the kitchen design because it was now the main focal point in the apartment. It was no longer an option to keep it in that tiny hole where it was, so we had to ensure that this design was functional and aesthetically pleasing at the same time. By adding the table into the space where an Island typically would go, we were able to both cut cost and still provide a dining experience. The Table serves as an Island as well when cooking.
We then proceeded to block in the existing doorway to the dining room. By doing this, we were able to create a full room which allowed us to put a door on the other side and called that room Bedroom #2. This was easier to do because all of the mechanicals were already in that space (light, heater and windows). By shifting things around, we also achieved a huge wall to wall closet from inside. PERFECT!
Then we moved into the Single bedroom. We thought it was a big room with a small closet, so by creatively adding an L shaped wall and steal some footprint into the bedroom side, we were able to put a door on that new room and design it for the walk-in closet. Even after this, the bedroom still holds a queen size bed with 2 night stands, a TV on the wall, a sitting chair and plenty of room to walk around. This was done by rethinking the location for the bed and night stands.
The bathroom was gutted to make sure there was no leaks and rebuild from the ground up. We kept all of the plumbing where it was, added a new vanity, medicine cabinet, tiles and lighting and it was done.
From there, the rest of the unit had new flooring all throughout, paint, and lighting. After completion and walk through, this project was handed over back to the clients.
Execution and collaboration between all the trades were: Reggie and his team from Premier Interiors and Rohan from RD Mechanical Services.
p.s. Please see our website to see the video.
 RAJ Kitchen and Bath, LLC
“Full apartment design”.
IF you have not yet seen this apartment conversion before, we strongly urge you to go to the bottom left of this page and click on the short 2-minutes video. It would put a lot of things into perspective when you come back and continue reading this.
It is true we were literally handed the keys and told a list of things that they wanted to have happen and we were to go into the apartment, look at the space and come up with a design that would satisfy all of that need. UNTIL we showed up! The unit had really seen some better days but we knew we had to look past that and come up with a concept that would work for them.
The immediate challenges were centered around 3 big ideas:
1. Adding a second bedroom to the already small footprint
2. Figuring out a way to make the kitchen bigger, better and brighter
3. Creating a master room walk in closet
It’s always difficult to add new rooms into existing footprint without expanding out or up and not incurring any opportunity cost. In this case, that was exactly what we had to do. Item one and two above had to be tackled as one. We went ahead and switched out the location of the dining room and eliminating an area where there was a “nook” type eat-in area. By doing so, we were able to cut right into that footprint and change the layout of the kitchen.
That one move allowed us to dig into the kitchen design because it was now the main focal point in the apartment. It was no longer an option to keep it in that tiny hole where it was, so we had to ensure that this design was functional and aesthetically pleasing at the same time. By adding the table into the space where an Island typically would go, we were able to both cut cost and still provide a dining experience. The Table serves as an Island as well when cooking.
We then proceeded to block in the existing doorway to the dining room. By doing this, we were able to create a full room which allowed us to put a door on the other side and called that room Bedroom #2. This was easier to do because all of the mechanicals were already in that space (light, heater and windows). By shifting things around, we also achieved a huge wall to wall closet from inside. PERFECT!
Then we moved into the Single bedroom. We thought it was a big room with a small closet, so by creatively adding an L shaped wall and steal some footprint into the bedroom side, we were able to put a door on that new room and design it for the walk-in closet. Even after this, the bedroom still holds a queen size bed with 2 night stands, a TV on the wall, a sitting chair and plenty of room to walk around. This was done by rethinking the location for the bed and night stands.
The bathroom was gutted to make sure there was no leaks and rebuild from the ground up. We kept all of the plumbing where it was, added a new vanity, medicine cabinet, tiles and lighting and it was done.
From there, the rest of the unit had new flooring all throughout, paint, and lighting. After completion and walk through, this project was handed over back to the clients.
Execution and collaboration between all the trades were: Reggie and his team from Premier Interiors and Rohan from RD Mechanical Services.
p.s. Please see our website to see the video.
 RAJ Kitchen and Bath, LLC
“Full apartment design”.
IF you have not yet seen this apartment conversion before, we strongly urge you to go to the bottom left of this page and click on the short 2-minutes video. It would put a lot of things into perspective when you come back and continue reading this.
It is true we were literally handed the keys and told a list of things that they wanted to have happen and we were to go into the apartment, look at the space and come up with a design that would satisfy all of that need. UNTIL we showed up! The unit had really seen some better days but we knew we had to look past that and come up with a concept that would work for them.
The immediate challenges were centered around 3 big ideas:
1. Adding a second bedroom to the already small footprint
2. Figuring out a way to make the kitchen bigger, better and brighter
3. Creating a master room walk in closet
It’s always difficult to add new rooms into existing footprint without expanding out or up and not incurring any opportunity cost. In this case, that was exactly what we had to do. Item one and two above had to be tackled as one. We went ahead and switched out the location of the dining room and eliminating an area where there was a “nook” type eat-in area. By doing so, we were able to cut right into that footprint and change the layout of the kitchen.
That one move allowed us to dig into the kitchen design because it was now the main focal point in the apartment. It was no longer an option to keep it in that tiny hole where it was, so we had to ensure that this design was functional and aesthetically pleasing at the same time. By adding the table into the space where an Island typically would go, we were able to both cut cost and still provide a dining experience. The Table serves as an Island as well when cooking.
We then proceeded to block in the existing doorway to the dining room. By doing this, we were able to create a full room which allowed us to put a door on the other side and called that room Bedroom #2. This was easier to do because all of the mechanicals were already in that space (light, heater and windows). By shifting things around, we also achieved a huge wall to wall closet from inside. PERFECT!
Then we moved into the Single bedroom. We thought it was a big room with a small closet, so by creatively adding an L shaped wall and steal some footprint into the bedroom side, we were able to put a door on that new room and design it for the walk-in closet. Even after this, the bedroom still holds a queen size bed with 2 night stands, a TV on the wall, a sitting chair and plenty of room to walk around. This was done by rethinking the location for the bed and night stands.
The bathroom was gutted to make sure there was no leaks and rebuild from the ground up. We kept all of the plumbing where it was, added a new vanity, medicine cabinet, tiles and lighting and it was done.
From there, the rest of the unit had new flooring all throughout, paint, and lighting. After completion and walk through, this project was handed over back to the clients.
Execution and collaboration between all the trades were: Reggie and his team from Premier Interiors and Rohan from RD Mechanical Services.
p.s. Please see our website to see the video.

 Elegant Hardwood Floors
maple hardwood floor, water-popped, and stained with 50% rosewood and 50% neutral stains.
Inspiration for a timeless medium tone wood floor living room remodel in Salt Lake City
Inspiration for a timeless medium tone wood floor living room remodel in Salt Lake City

Sponsored
Sunbury, OH

J.Holderby - Renovations
Franklin County's Leading General Contractors - 2X Best of Houzz!

 Gappsi
This 20' by 50' gunite swimming pool was built in Cold Spring Harbor Long Island, NY. This gunite swimming pool has a double Roman end shape with a raised spillover spa along the 50' side. Steps are incorporated on each side of the spa for entering and exiting the pool. A full-width sun deck is equipped with reversed circular steps to mirror the pool Roman end. The 6' high Porcelain tile was installed and styled to create a unique mosaic design, under the entire pool, coping and spa. The finish for the inside of the pool is Taho Blue Diamond Bright, which was applied on the walls and then acid washed for an etched texture and finish. The masonry for the pool was designed to complement the pool shape and give the customer plenty of patio area around the entire pool. The masonry was also designed to work with the great changes in the backyard slopes. The pool coping, patio and venire for the spa walls, including the retaining walls and steps, are the Melfi natural stones selected from the Gappsi natural stone collection. The pool coping is a multi-sized pattern with a split tumble rock face front. The venire is a combination of 2’ and 4’ split face Tumble. The pavers is a roman pattern, multi-sized natural stones with a natural cleft and tumbled. A 5’ aluminum fencing was installed to surround the entire pool area and a simple landscaping was needed for the aesthetic. The pool and patio design layout have an immaculate beauty because when using the same color and type of stones for the floors/walls in different finishes gives the appearance of a cohesive finish. The design was manufactured by Giuseppe Abbrancati and the job was constructed by Gappsi Group. For more info visit www.gappsi.com or call us at 631-543-1177.
Youtube Video: https://www.youtube.com/watch?v=mBi2ngE57FQ

 Margot Hartford Photography
Photo: Margot Hartford © 2016 Houzz
Victorian exterior home idea in San Francisco
Victorian exterior home idea in San Francisco
 Gappsi
This 20' by 50' gunite swimming pool was built in Cold Spring Harbor Long Island, NY. This gunite swimming pool has a double Roman end shape with a raised spillover spa along the 50' side. Steps are incorporated on each side of the spa for entering and exiting the pool. A full-width sun deck is equipped with reversed circular steps to mirror the pool Roman end. The 6' high Porcelain tile was installed and styled to create a unique mosaic design, under the entire pool, coping and spa. The finish for the inside of the pool is Taho Blue Diamond Bright, which was applied on the walls and then acid washed for an etched texture and finish. The masonry for the pool was designed to complement the pool shape and give the customer plenty of patio area around the entire pool. The masonry was also designed to work with the great changes in the backyard slopes. The pool coping, patio and venire for the spa walls, including the retaining walls and steps, are the Melfi natural stones selected from the Gappsi natural stone collection. The pool coping is a multi-sized pattern with a split tumble rock face front. The venire is a combination of 2’ and 4’ split face Tumble. The pavers is a roman pattern, multi-sized natural stones with a natural cleft and tumbled. A 5’ aluminum fencing was installed to surround the entire pool area and a simple landscaping was needed for the aesthetic. The pool and patio design layout have an immaculate beauty because when using the same color and type of stones for the floors/walls in different finishes gives the appearance of a cohesive finish. The design was manufactured by Giuseppe Abbrancati and the job was constructed by Gappsi Group. For more info visit www.gappsi.com or call us at 631-543-1177.
Youtube Video: https://www.youtube.com/watch?v=mBi2ngE57FQ

 SKP Design
After finalizing the layout for their new build, the homeowners hired SKP Design to select all interior materials and finishes and exterior finishes. They wanted a comfortable inviting lodge style with a natural color palette to reflect the surrounding 100 wooded acres of their property. http://www.skpdesign.com/inviting-lodge
SKP designed three fireplaces in the great room, sunroom and master bedroom. The two-sided great room fireplace is the heart of the home and features the same stone used on the exterior, a natural Michigan stone from Stonemill. With Cambria countertops, the kitchen layout incorporates a large island and dining peninsula which coordinates with the nearby custom-built dining room table. Additional custom work includes two sliding barn doors, mudroom millwork and built-in bunk beds. Engineered wood floors are from Casabella Hardwood with a hand scraped finish. The black and white laundry room is a fresh looking space with a fun retro aesthetic.
Photography: Casey Spring
 Kitchen Solvers of Jacksonville
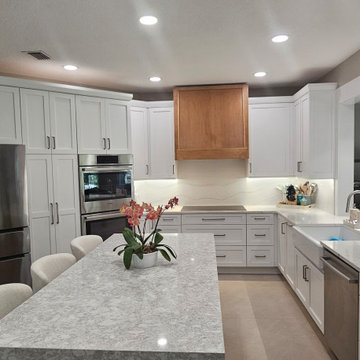
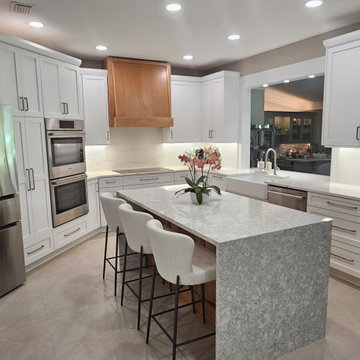
Our clients love to entertain, and they needed a kitchen to fit their style. They had a space with an odd shaped island and they could not visualize how to best redesign this to get a larger island without all the angles. They also had no pantry storage area in the kitchen which they really wanted. We used our Kitchen Solvers app to create a video walkthrough to showcase the design we came up with, which they loved.
The kitchen had a window that looked out into another room that had been converted into a bar and entertainment space. We took out the window and enlarged the opening, creating a pass-through and serving area to the adjoining room.
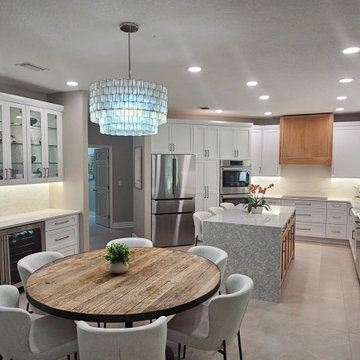
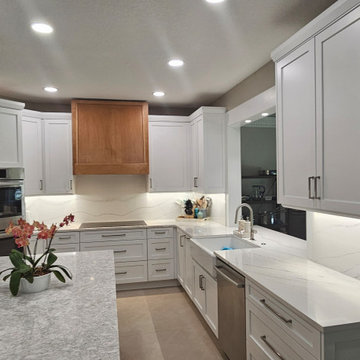
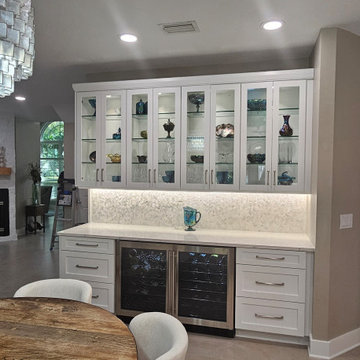
On one side of the kitchen, we created a long bar area with dual wine coolers that serves as the bar and another serving area. Glass upper cabinets with thick glass shelves were used to display their collection of glass vases and bowls. Inside the cabinet, lighting was added to highlight the collection and shine through the glass shelves. A large pantry cabinet was built between the refrigerator and ovens with an adjustable height rollout system in the lower section. The new cabinets are from our Kitchen Solvers Legacy Collection in a classic white. The hood was custom designed to be the focal point of the kitchen and the honey maple wood matches what we did with the island cabinets.
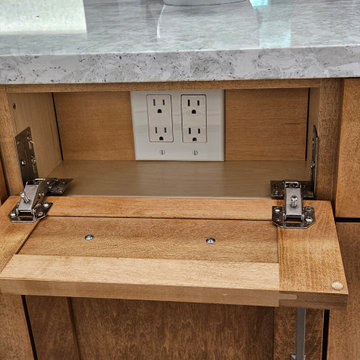
For the counters, we did the island with a waterfall edge in a Sandgate quartz, while the perimeter counters were done in a Lakedale quartz. We also did a full height backsplash in the same Lakedale quartz. The entire kitchen has no visible light switches or electrical outlets. Can lights in the ceiling was added over the new island. Undercabinet lighting is in two zones, the bar area and the rest of the kitchen. Down facing “hockey puck” lighting was built over the passthrough and hidden in the custom trim work. The center drawer in the island has hidden outlets behind the drawer face. Just look at this amazing kitchen transformation!
 Kitchen Solvers of Jacksonville
Our clients love to entertain, and they needed a kitchen to fit their style. They had a space with an odd shaped island and they could not visualize how to best redesign this to get a larger island without all the angles. They also had no pantry storage area in the kitchen which they really wanted. We used our Kitchen Solvers app to create a video walkthrough to showcase the design we came up with, which they loved.
The kitchen had a window that looked out into another room that had been converted into a bar and entertainment space. We took out the window and enlarged the opening, creating a pass-through and serving area to the adjoining room.
On one side of the kitchen, we created a long bar area with dual wine coolers that serves as the bar and another serving area. Glass upper cabinets with thick glass shelves were used to display their collection of glass vases and bowls. Inside the cabinet, lighting was added to highlight the collection and shine through the glass shelves. A large pantry cabinet was built between the refrigerator and ovens with an adjustable height rollout system in the lower section. The new cabinets are from our Kitchen Solvers Legacy Collection in a classic white. The hood was custom designed to be the focal point of the kitchen and the honey maple wood matches what we did with the island cabinets.
For the counters, we did the island with a waterfall edge in a Sandgate quartz, while the perimeter counters were done in a Lakedale quartz. We also did a full height backsplash in the same Lakedale quartz. The entire kitchen has no visible light switches or electrical outlets. Can lights in the ceiling was added over the new island. Undercabinet lighting is in two zones, the bar area and the rest of the kitchen. Down facing “hockey puck” lighting was built over the passthrough and hidden in the custom trim work. The center drawer in the island has hidden outlets behind the drawer face. Just look at this amazing kitchen transformation!
Sponsored
Sunbury, OH
J.Holderby - Renovations
Franklin County's Leading General Contractors - 2X Best of Houzz!
 Kitchen Solvers of Jacksonville
Our clients love to entertain, and they needed a kitchen to fit their style. They had a space with an odd shaped island and they could not visualize how to best redesign this to get a larger island without all the angles. They also had no pantry storage area in the kitchen which they really wanted. We used our Kitchen Solvers app to create a video walkthrough to showcase the design we came up with, which they loved.
The kitchen had a window that looked out into another room that had been converted into a bar and entertainment space. We took out the window and enlarged the opening, creating a pass-through and serving area to the adjoining room.
On one side of the kitchen, we created a long bar area with dual wine coolers that serves as the bar and another serving area. Glass upper cabinets with thick glass shelves were used to display their collection of glass vases and bowls. Inside the cabinet, lighting was added to highlight the collection and shine through the glass shelves. A large pantry cabinet was built between the refrigerator and ovens with an adjustable height rollout system in the lower section. The new cabinets are from our Kitchen Solvers Legacy Collection in a classic white. The hood was custom designed to be the focal point of the kitchen and the honey maple wood matches what we did with the island cabinets.
For the counters, we did the island with a waterfall edge in a Sandgate quartz, while the perimeter counters were done in a Lakedale quartz. We also did a full height backsplash in the same Lakedale quartz. The entire kitchen has no visible light switches or electrical outlets. Can lights in the ceiling was added over the new island. Undercabinet lighting is in two zones, the bar area and the rest of the kitchen. Down facing “hockey puck” lighting was built over the passthrough and hidden in the custom trim work. The center drawer in the island has hidden outlets behind the drawer face. Just look at this amazing kitchen transformation!
 Kitchen Solvers of Jacksonville
Our clients love to entertain, and they needed a kitchen to fit their style. They had a space with an odd shaped island and they could not visualize how to best redesign this to get a larger island without all the angles. They also had no pantry storage area in the kitchen which they really wanted. We used our Kitchen Solvers app to create a video walkthrough to showcase the design we came up with, which they loved.
The kitchen had a window that looked out into another room that had been converted into a bar and entertainment space. We took out the window and enlarged the opening, creating a pass-through and serving area to the adjoining room.
On one side of the kitchen, we created a long bar area with dual wine coolers that serves as the bar and another serving area. Glass upper cabinets with thick glass shelves were used to display their collection of glass vases and bowls. Inside the cabinet, lighting was added to highlight the collection and shine through the glass shelves. A large pantry cabinet was built between the refrigerator and ovens with an adjustable height rollout system in the lower section. The new cabinets are from our Kitchen Solvers Legacy Collection in a classic white. The hood was custom designed to be the focal point of the kitchen and the honey maple wood matches what we did with the island cabinets.
For the counters, we did the island with a waterfall edge in a Sandgate quartz, while the perimeter counters were done in a Lakedale quartz. We also did a full height backsplash in the same Lakedale quartz. The entire kitchen has no visible light switches or electrical outlets. Can lights in the ceiling was added over the new island. Undercabinet lighting is in two zones, the bar area and the rest of the kitchen. Down facing “hockey puck” lighting was built over the passthrough and hidden in the custom trim work. The center drawer in the island has hidden outlets behind the drawer face. Just look at this amazing kitchen transformation!
 Kitchen Solvers of Jacksonville
Our clients love to entertain, and they needed a kitchen to fit their style. They had a space with an odd shaped island and they could not visualize how to best redesign this to get a larger island without all the angles. They also had no pantry storage area in the kitchen which they really wanted. We used our Kitchen Solvers app to create a video walkthrough to showcase the design we came up with, which they loved.
The kitchen had a window that looked out into another room that had been converted into a bar and entertainment space. We took out the window and enlarged the opening, creating a pass-through and serving area to the adjoining room.
On one side of the kitchen, we created a long bar area with dual wine coolers that serves as the bar and another serving area. Glass upper cabinets with thick glass shelves were used to display their collection of glass vases and bowls. Inside the cabinet, lighting was added to highlight the collection and shine through the glass shelves. A large pantry cabinet was built between the refrigerator and ovens with an adjustable height rollout system in the lower section. The new cabinets are from our Kitchen Solvers Legacy Collection in a classic white. The hood was custom designed to be the focal point of the kitchen and the honey maple wood matches what we did with the island cabinets.
For the counters, we did the island with a waterfall edge in a Sandgate quartz, while the perimeter counters were done in a Lakedale quartz. We also did a full height backsplash in the same Lakedale quartz. The entire kitchen has no visible light switches or electrical outlets. Can lights in the ceiling was added over the new island. Undercabinet lighting is in two zones, the bar area and the rest of the kitchen. Down facing “hockey puck” lighting was built over the passthrough and hidden in the custom trim work. The center drawer in the island has hidden outlets behind the drawer face. Just look at this amazing kitchen transformation!
 Kitchen Solvers of Jacksonville
Our clients love to entertain, and they needed a kitchen to fit their style. They had a space with an odd shaped island and they could not visualize how to best redesign this to get a larger island without all the angles. They also had no pantry storage area in the kitchen which they really wanted. We used our Kitchen Solvers app to create a video walkthrough to showcase the design we came up with, which they loved.
The kitchen had a window that looked out into another room that had been converted into a bar and entertainment space. We took out the window and enlarged the opening, creating a pass-through and serving area to the adjoining room.
On one side of the kitchen, we created a long bar area with dual wine coolers that serves as the bar and another serving area. Glass upper cabinets with thick glass shelves were used to display their collection of glass vases and bowls. Inside the cabinet, lighting was added to highlight the collection and shine through the glass shelves. A large pantry cabinet was built between the refrigerator and ovens with an adjustable height rollout system in the lower section. The new cabinets are from our Kitchen Solvers Legacy Collection in a classic white. The hood was custom designed to be the focal point of the kitchen and the honey maple wood matches what we did with the island cabinets.
For the counters, we did the island with a waterfall edge in a Sandgate quartz, while the perimeter counters were done in a Lakedale quartz. We also did a full height backsplash in the same Lakedale quartz. The entire kitchen has no visible light switches or electrical outlets. Can lights in the ceiling was added over the new island. Undercabinet lighting is in two zones, the bar area and the rest of the kitchen. Down facing “hockey puck” lighting was built over the passthrough and hidden in the custom trim work. The center drawer in the island has hidden outlets behind the drawer face. Just look at this amazing kitchen transformation!
Sponsored
Delaware, OH

Buckeye Basements, Inc.
Central Ohio's Basement Finishing ExpertsBest Of Houzz '13-'21
 Kitchen Solvers of Jacksonville
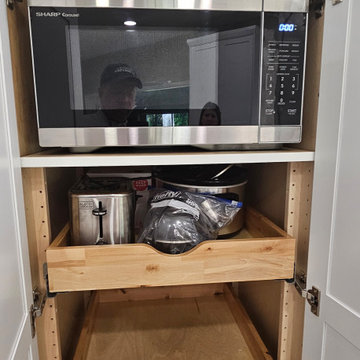
Our clients love to entertain, and they needed a kitchen to fit their style. They had a space with an odd shaped island and they could not visualize how to best redesign this to get a larger island without all the angles. They also had no pantry storage area in the kitchen which they really wanted. We used our Kitchen Solvers app to create a video walkthrough to showcase the design we came up with, which they loved.
The kitchen had a window that looked out into another room that had been converted into a bar and entertainment space. We took out the window and enlarged the opening, creating a pass-through and serving area to the adjoining room.
On one side of the kitchen, we created a long bar area with dual wine coolers that serves as the bar and another serving area. Glass upper cabinets with thick glass shelves were used to display their collection of glass vases and bowls. Inside the cabinet, lighting was added to highlight the collection and shine through the glass shelves. A large pantry cabinet was built between the refrigerator and ovens with an adjustable height rollout system in the lower section. The new cabinets are from our Kitchen Solvers Legacy Collection in a classic white. The hood was custom designed to be the focal point of the kitchen and the honey maple wood matches what we did with the island cabinets.
For the counters, we did the island with a waterfall edge in a Sandgate quartz, while the perimeter counters were done in a Lakedale quartz. We also did a full height backsplash in the same Lakedale quartz. The entire kitchen has no visible light switches or electrical outlets. Can lights in the ceiling was added over the new island. Undercabinet lighting is in two zones, the bar area and the rest of the kitchen. Down facing “hockey puck” lighting was built over the passthrough and hidden in the custom trim work. The center drawer in the island has hidden outlets behind the drawer face. Just look at this amazing kitchen transformation!

 Sunrise Design LLC
Large elegant l-shaped enclosed kitchen photo with an undermount sink, recessed-panel cabinets, green cabinets, quartz countertops, black appliances, an island and beige countertops
 Wood Floors of Dallas
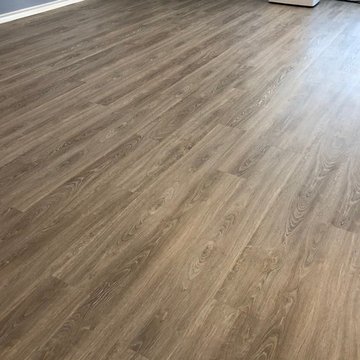
Beautiful Luxury Vinyl Plank that we installed. Luxury vinyl is extremely durable, and a great option for any home.
Example of a classic home design design in Dallas
Example of a classic home design design in Dallas
23