Software
Houzz Logo Print
bjs496

tree removal

19 years ago
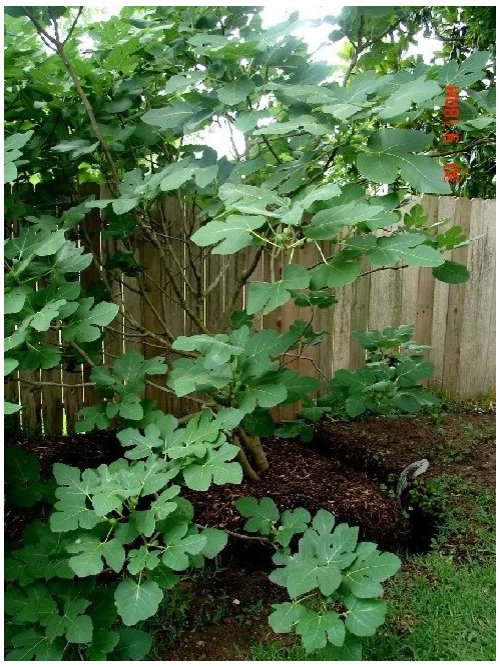
Hi All,

I have posted several times this picture of a tree I was planning on removing from the ground.

In December, I removed the tree from the ground. I wanted to document the removal process, however the person I enlisted to photograph had to cancel and I ran out of time to remove it due to an impending trip.

I used a pitch fork to loosen the soil around the perimeter and free it from the roots. I started one side and got to within 8 inches of the trunk. I then moved to the next side and so on. I then rocked the tree back and forth to try to loosen it a bit from the ground. I continued working soil away from the roots. This was not nearly as easy as I thought it would be (and not anywhere as close to as easy as bare-rooting a containerized tree). When I removed enough of the soil to lean the tree over, I pushed it over and inspected the bottom of the tree. I saw that there were two (if my memory serves me) that went down into the grown. I began to dig those out, but quickly realized I would be cutting them anyway, so I cut them on the spot and freed the tree from the ground.

Even though this picture was taken a month after the tree was removed and some of the soil had been washed back into the hole by the rain, you can still see from this picture that I did not dig very deep to get the tree out of the ground.

Once the tree was removed, I propped it with roots up on a trash can and rinsed off the roots. Once I had a clear view of the root system, I looked for the best place to separate the tree in two, which was my goal. I found the line and proceeded to split the tree in two with a reciprocating saw and a 9 inch blade. The cut gave both sides with a large root mass but it also left a 20ish square inch scar on both halves. I did not root prune the two as much as I had originally thought I would because the trees were big and I knew I was not going to be able to prune the tops before I left.

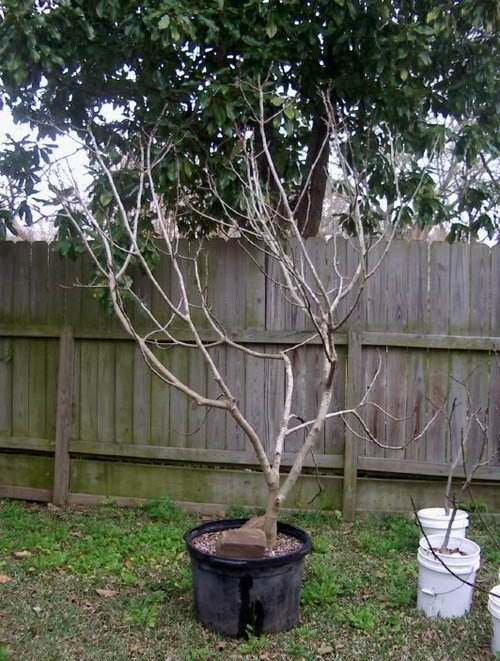
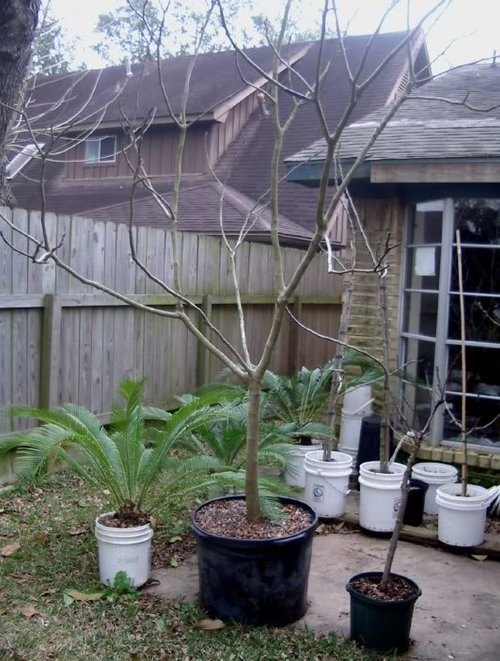
I potted the two halves each in its own 30ish gallon pot using a mix of 1 part pine bark mulch, 1 part Tru Gro (an expanded shale product) and 1 (slightly less because that was all I had) Perlite. Here are the results:


this is the aft trunk in the first picture


this is the trunk originally in front

Both trees seem to be happy, they should be starting to break dormancy within the month and then any ramifications of what I have done will become evident.

I have not removed the tree in the ground next to it, yet. I was purposefully hard on this one to see if it would take all the abuse and still survive. If it does survive, I will remove the other tree at the end of this year.

~james

Comments (10)

  • 19 years ago
    last modified: 11 years ago

    James,

    Thanks for the pictures, and I'll be watching for the results as I may need to move some next winter.
    I noticed you didn't prune the branches; I would have thought that would be required to accommodate the loss of roots?

  • 19 years ago
    last modified: 11 years ago

    Hi Glenn,

    As I mentioned, I ran out of time to do much to the trees. I left more of the root mass than I wanted to, since I knew I would not be pruning the tops. Not pruning the top is a little bit of a problem on the larger one. I had to set to rocks on top of the soil to keep the tree from falling over.

    My plan for this year (if they survive the experience) is:

    -Let them leaf and fruit as normal.
    -After fruiting but before going dormant, air-layer some of the larger limbs.
    -Remove air-layers and prune smaller limbs when dormant.
    -Root-prune and repot again at the end of the year.

    I am planning to prune so the crown starts about six feet (including container) high.

    When I do this again, my plan is to airlayer/prune the tree BEFORE it comes out of the ground. I wanted to do this with this tree, but I had a hard time visualizing what the tree would look like separated and in containers.

    ~james

  • 19 years ago
    last modified: 11 years ago

    Glenn,

    I neglected to mention, I dug the moat around the tree in Dec 05 and Jan 06. It had a year to push new roots from the base. I developed this principle from the Air-Pot concept. So the tree (and eventually both halves) had a pretty substantial root mass. Also, I removed it from the ground and potted them up during the second week of Dec 06, which allowed the root system to grow and establish itself in the container before the tree breaks dormancy.

    ~james

  • 19 years ago
    last modified: 11 years ago

    Even without any pruning, all of the limbs on both trees have leafed out. Both leaf and figlet production seem to be inline with the sister tree still in the ground. I pulled back some of the growing mix, and both have new root growth.

    I'll give progress reports as the year goes on. For now it looks like business as usual.

    ~james

  • 19 years ago
    last modified: 11 years ago

    It's OT, but in one of your pictures above I think I see Sago palm's?
    If so, I am in need of some information and maybe you can help. I purchased a couple last summer and they seemed to acclimate "so-so" and now one of them appears to have frozen to the ground. There's still some green in the "stump" portion but no new fronds have started to develop. Do you have any idea whether it will come back from the root or stump? Thanks.

  • 19 years ago
    last modified: 11 years ago

    I am not sure, but I think most palms only grow from the growing tip. They kill palm trees to serve the heart of the leaves in tropical areas. It's called something like million dollar salad. Keep trying though. I have heard the same of phaleanopsis orchids and I have seen them produce a new growth tip near the roots if conditions are right. Good luck.
    Dawn

  • 19 years ago
    last modified: 11 years ago

    Glenn,

    I really don't know much about Sagos. The ones in the containers are from a palm in the front yard. They are waiting there until I re-landscape the front.

    It could be that the main palm has died, but its possible that it will put off babies off to the side. I have also seen around here some Sagos that have started growing off the side of the mother plant well above the soil line. I would think if it does not recover this year, its a goner.

    ~james

    Here is a link that might be useful: Palms and Cycads Forum

  • 19 years ago
    last modified: 11 years ago

    OK James,
    In you transplant post you promised progress reports. How did it do? I love the pictures.

    Were both of the split trees slated to go back in the ground, or were you aiming to keep them potted?

  • 19 years ago
    last modified: 11 years ago

    The picts are great! I also want to see what happened James! Thanks!

  • 19 years ago
    last modified: 11 years ago

    The reason I took them out of the ground was due to an RKN infestation. Because of that, I am growing all of my trees in containers. I took this tree out as a test before taking another one out. Basically, my thought was if this one died, I'd learn what not to do on the other one.

    Both survived, leafed out and put out a modest number of fruit. Because of the rains this year, everything (including the fruit on these two) split.

    Despite (or maybe because of) the RKN infestation, both trees seem to have rooted vigorously in the containers. This may be another reason why top production was modest this year. I had root pruned very heavily not only to fit into the container, but also to remove any visible galls on the roots.

    In short, the trees removal was a success. What would I do differently? Well, as I mentioned, I am pruning the next tree to come out of the ground by air-layering it (the pictures in Air-Layering with Air-Pots are from one of these two trees or the one being removed at the end of the next growing season) now and pruning again before taking it out of the ground. Also, I think I need to find larger containers.

    ~james

Sponsored
Peabody Landscape Group
Average rating: 3.5 out of 5 stars8 Reviews
Columbus' Reliable Landscape Design & Contracting