Software
Houzz Logo Print
jimmieldavis

Finding What Media & Methods Work...For Me

16 years ago
I am testing media and methods (M&M) on cuttings of equal size, same variety, and same protocol. Being as Noahian as possible, the goal is an 'on/off' comparison hoping to vary just one variable per test. Clearly, consistent cups would increase integrity and reliability but this is the best that time and resources allow...for now.

M&M #3: Sphagnum/Pro-Mix BX & Turface/Perlite

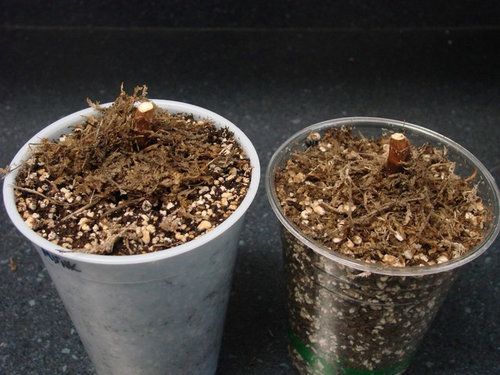
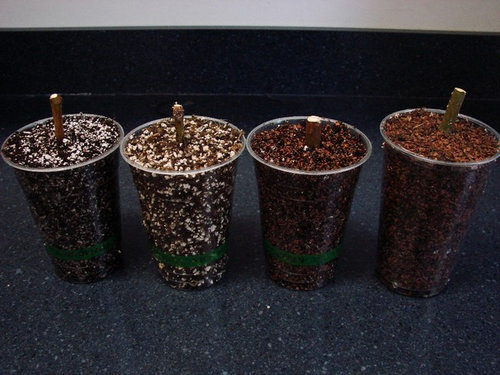
Four cuttings of Martin's Unknown went directly to cups on W 16 December 2009. From left to right:

Two pencil think, branch tip cuttings (with tips cut off); Cup 1 = 50/50 Perlite/Pro-Mix BX and Cup 2 = 50/50 Perlite/Chopped Sphagnum.

Next two index finger thick, mid-branch cuttings; Cup 3 = 50/50 Turface/Pro-Mix BX and Cup 4 = 50/50 Turface/Chopped Sphagnum.

Note: After a prescription of daily doses of 3% peroxide, 10% bleach solution, and cornmeal solution, the pencil thick group still had an uncontrollable case of MKS (Mold Keeps Spawning). On a whim, I piled some moist Sphagnum at the spawn site on the troubled cuttings and lo and behold, to date, the mold has been halted. Hooha!

M&M #2: Direct to Cup

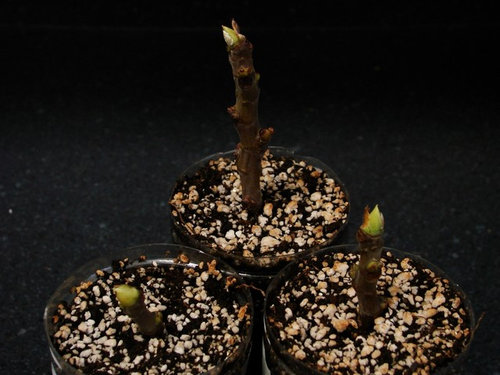
Prior to reading about Turface (and hence its inclusion in the aforementioned test), I started a direct to cup test on 24 November of 50:50 Perlite:Pro-Mix BX for three Stallion Unknown #2 cuttings. They appear to be healthy:

M&M #1: Show Me the Roots

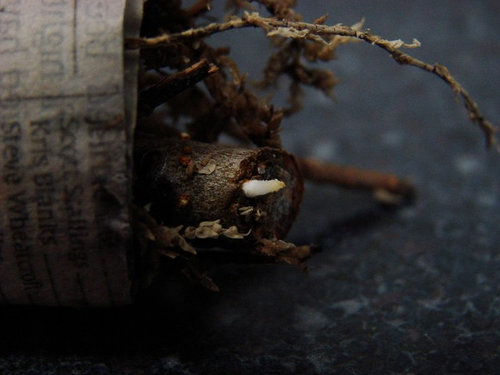
I put some Stallion Unknown #1 cuttings in sphagnum in baggie, in newspaper-wrapped sphagnum in baggie, and directly into 50:50 Perlite:Pro-Mix BX for for this original, let's root some cuttings experiment. The newspaper-wrapped sphagnum had the first visual evidence (and is now in a cup), however, the direct to cup cuttings look happy as well.

JD

Comments (5)

  • 16 years ago
    last modified: 11 years ago

    Great fun stuff and thanks for sharing. Let us know how many plantable trees you end up producing. Have fun........

    Dan

  • 16 years ago
    last modified: 11 years ago

    I transferred my Direct To Cup test specimens from a trimmed water bottle to larger 24 oz cups, and they are doing well. Two are looking good and overall the cutting greenhouse is going well. Other than the fact that I lost my only cuttings of Martin's Unknown due to a major mold battle that the cutting and I could not overcome - I am bummed about it - it has been a fun experience and I think I know what works...for me. This low point was offset by the continued root growth of my Stallion Unknown #1. I cannot call them monster or spaghetti roots but it is exciting for a rookie like me.

    When do I up pot?

  • 16 years ago
    last modified: 11 years ago

    Those are some nice clear pictures , thanks for shareing them.
    I know you are having lots of fun .
    Best Health
    Martin

  • 16 years ago
    last modified: 11 years ago

    Continuing my education...

    I am on a day trip - from work to home for my daughter's recital - and I peeked in on my experiment to find the tip of my best rooted cutting drying up. Upon closer inspection it appears as if a new tip is about to push forth. Is this how it works or is something unfortunate underway?

    On another note, I had my first bud break and leaf from a cutting. And I am getting ready for the hard part...

    JD

  • 16 years ago
    last modified: 11 years ago

    UPDATE: It is working. IT is a customization of Dan's Baggie Method of "cleaning, toweling, bagging, and storing" to start roots. Other than one lost battle with worms and two lost battles with mold, the process has been very successful. Success in this context means meet the short term objective: Shepherd the process that get twigs, makes roots, cups, and watches leaves grow. I say shepherd because once you have some experience and/or a plan, figs root easily. They will root, the shepherd just needs to know what not to do.

    Here's what I do for say four cuttings of a single variety:

    Before I get started, using a sharpie, I LABEL the cuttings by name and MARK which way is up with an arrow.

    CLEAN the cuttings (most of the time) in a bleach/soap mix in a single container. Make a ten percent bleach solution plus a few squirts of dish soap (anti-bacterial) in a single container. I drop in the cuttings, let them float briefly, and then I scrub them particularly the nodes and multi-headed tips. Rinse and dry (mostly). Note: I do not always clean the cuttings. I have several that I did not clean and they root just fine

    Next, I usually write the name and arrow up with a sharpie (that has water insoluable ink) before I ...

    Wet a paper TOWEL, squeeze out the water with firm hand shake pressure, and wrap the cuttings. Fold the paper towel such that the bottom node is uncovered and when possible, leave a top node or tip unwrapped.

    Place the wrapped cuttings in a BAGGIE. Note: both storage or freezer have been equally effective. And place that baggie in a controlled environment. Check it for roots. In my case, that is every 3-4 days.

    Like many of the other forum members has stated, once I get a few modest or one long or a bunch of small roots then I cup it. The cup MEDIUM is a 1:1:1 mix of Turface MVP:Perlite:Pro-MIX BX. For me, this mix provides the best moisture retention as compared to the original 50:50 combinations. Generally, I cup each cutting on top of a foundation of about 1"-2" of 'mix'.

    Thanks to the helpful, generous, and knowledge members for the fig fun I have had to this point. Still work to be done but it always nice to take a few steps...even if only baby ones.

    Some results follow.

    JD

    Atreano (Top Growth)

    Atreano (Associated Roots)

    Abebereia A

    Abebereia B

    LSU Everbearing

    Mimi's Green Honey

    MVS Black A

    MVS Black B

    Nonnie's Purple

    Sal's EL A

    Sal's EL B

    Sal's EL C

    Sal's EL D

    Stallion

    Stallion

    Voiture

Sponsored