Software
Houzz Logo Print
mr_potaohead

Earthbox/SWC construction simplified

17 years ago

Since building your own Earthbox shouldn't be a chore or be overly expensive I've come up with a couple of ways to make it easier to build and cheaper.

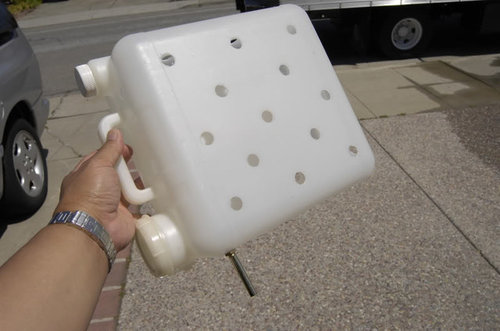
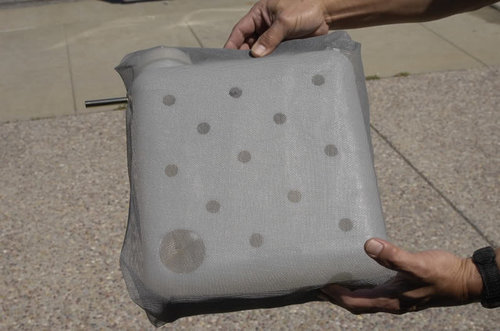
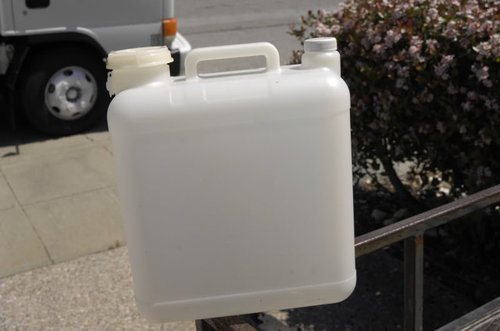
Instead of a complete chamber across the bottom of the tote, as long as you have some sort of flat container to hold the water the plant will get all the moisture it needs. So I took these plastic containers (because I had a bunch in my garage), drilled a bunch of holes in it, covered it with plastic screen and drilled a 1 1/4' hole for the filler tube.


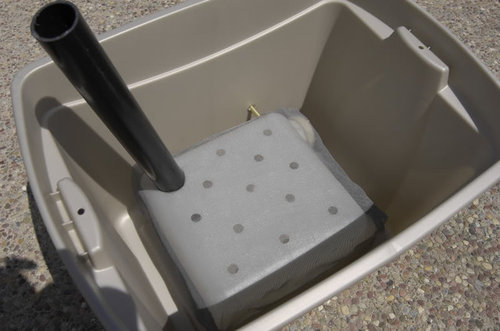
Place it in the bottom of the tote and your water chamber is finished. The first one I made had an overfill tube. But to make it even simpler I did away with the tube and just use a dipstick on all of the subsequent boxes to check the water level.

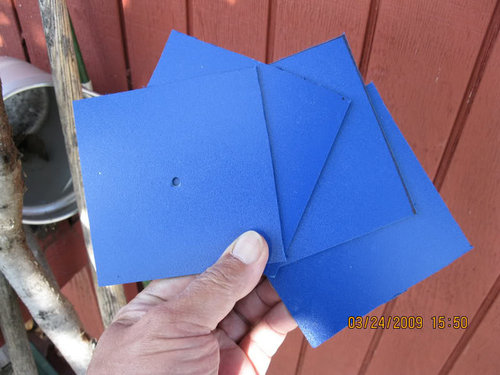
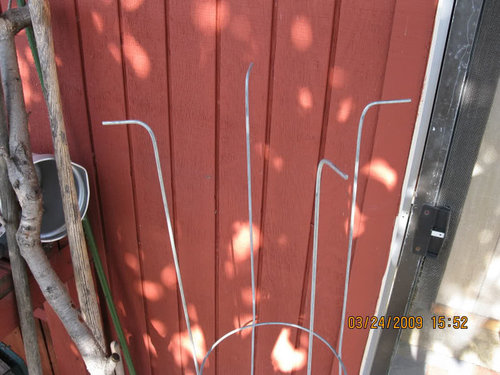
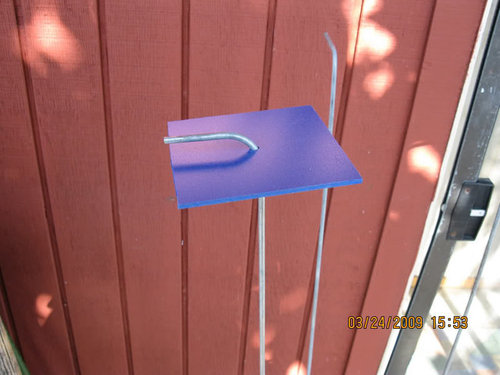
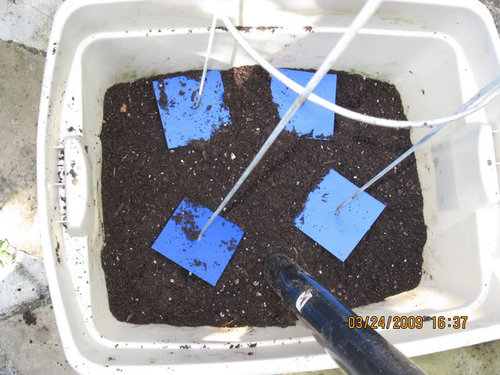
To secure the tomato cage in the tote I bought some 8" x 8" x 1/16" plastic squares from Tap Plastic and cut each one into smaller 4" squares. Drilled a 1/8" hole in the center, bent the bottom 2" of the cage leg 90 degrees and slid the square onto the leg. When placed in the bottom of the tote and wet potting mix is piled on top the squares act like an anchor without having to drill, cut screw or attach the cage to the tote.


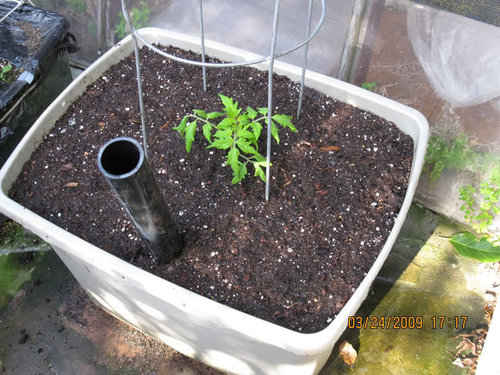
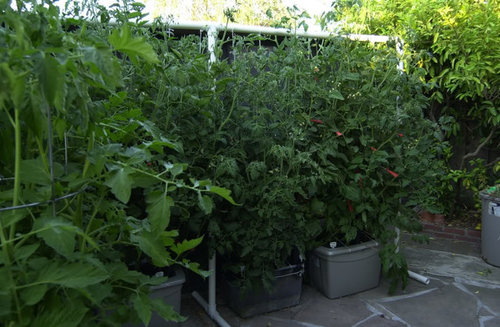
And now here is a happy Cherokee Purple waiting to be mulched.


The chamber leaches out plenty of water for the plant without having to have a large hole to create a wicking action. This photo is from last year. The first box on the right has the box water source without an overfill tube and you can see the plant, a Mortgage Lifter, is doing great. I got tired of tying up the branches almost on a daily basis, so that's why I developed the plastic anchors so I can use cages this year.


Comments (16)

  • 17 years ago

    Nice. Have you used any other materials for your aeration bench? I don't think many of us have flat jugs like that lying around. But I love to see the idea...

    How does the water wick out? It seems as though the water level would be down an inch or so into the jug, and the soil would be held away by the landscape cloth. So how does the soil wick? Obviously, from you photos it does!! (Nice BTW). Guess I don't understand something about how this works.

  • 17 years ago

    structure-

    The photo of the jug doesn't show that there are not only holes on the top, but on the bottom and sides as well. So the water is constantly trying to get out, stopped only by the potting mix held against the plastic screen. Wicking is automatic on all sides.

    You could use virtually anything for the water chamber. I was at Target the other day and saw some flat general storage boxes in the section where the totes were. All you'd have to do is silicon seal the top on and then drill the holes. In reality any container would work, even a coffee can. But something flat would be more desirable for more room for the roots.

  • 17 years ago

    Hi potatohead,
    Nothing keeps your potting mix from cascading over the sides of your (neat) water chamber at the gap inside tote wall .
    ? Is this another deliberate design modification; wicking from the margins ?

  • 17 years ago

    Mr. PH

    That is REALLY neat, saves one from having to use two bins for one self-waterer! If you used a smaller plastic storage box or even a couple of plastic shoeboxes side by side, I don't see why you'd have to stabilize them in place with a screw in the side OR glue the top to them. Drill holes in the bottom and on the sides of the smaller container(s), turn it upside down, and the weight of the soil above and in the wicking areas beside it should hold it in place unless you plan to move it by tilting it severely. You'd only need the larger hole for the fill tube.

  • 17 years ago

    gringojay-

    Yes, since the sides of the water chamber have holes any potting mix that gets down there contributes to the wicking action as well as giving the roots even more area to grow.

    anney-

    In the 4th photo above, that isn't a screw in the side to stabilize the water chamber. It's an overfill tube. It was to let me know when the chamber was full during filling. I don't bother with it anymore. I just use a dipstick to check the water levels.

  • 17 years ago

    Mr. PH

    Okay, I thought that was a long stabilizing screw! You DID say you'd done away with the overflow tube, but I didn't know that was it.

    I may adapt your simplification myself, and I think I'd drill a couple of overflow holes just above the level of the water chamber so I wouldn't have to check it with a dipstick when filling. If there were screen over the overflow holes none of the planting mix would wash out. The overflow holes would also provide aeration for the soil mix if one of the water chamber sides (with holes) were right next to it. That would allow for air flow over the surface of the water chamber and up through the holes on the top into the soil. I've thought long and hard about how to combine the aeration function and the overflow function, and that should do it.

    Right now I have nine double 5-gallon SW buckets for growing various things on the deck (other than indeterminate tomatoes). When assembling them, I ran a large perforated horizontal pipe through them at the bottom of the plant mix so air could rise through the soil. They've worked super-well, and if I was over-exuberant about filling them, these aeration pipes served as overflow holes since they were right at the bottom of the soil mix. (I took Al's recommendations about soil aeration seriously!)

  • 17 years ago

    nice research job on your changes to the earthtainer i have
    a couple of questions that is a five gallon container right
    your plants look very healthy how often do you have to fill
    the container ? how do you fertilizer, and what kind do you
    use ? thanks les matzel

  • 17 years ago

    Les-

    If you're referring to the container in the bottom that holds the water, it's 4 gallons. At this time of the year I only need to fill it once every 10 days to 2 weeks. But when the weather changes in the summer and it gets really hot, I refill them every day. For fertilizer I use 1 1/2 to 2 cups of Lily Miller Morcrop Tomato & Vegetable food, see link below, in a fertilizer strip on the side or behind the plant. I use a 5-10-10 formula because a few years back with the 10-10-10 formula my tomatoes were getting 10-12 feet tall. So with the reduced nitrogen they have less of a tendency to grow out of control.

    Here is a link that might be useful: Lilly Miller Fertilizer website

  • 17 years ago

    Mr. Potatohead, I really like simple designs, and from your photos - can see they work very well! I built 6 ET's this year, and wouldn't do it again. They take alot of time to construct! I'll be curious to see how well your cages stay erect, after the weight of the big plants get on them. Thanks for sharing!

    EG

  • 17 years ago

    hi mr. potatohead i have two more questions i would like you answer for me if you would so kind, do you have just one plant in each 31 gallon container ? do the people you
    by your lilly miller fertilizer from ship it by u.p.s. ?
    if they do can you please give me there number ? thank
    you very much les matzek. p.s. how hot does in get in the
    summer where you live ? once the heat sets in here almost every day is 95 to 103 will the 4 or 5 gallon tank be enough water thanks again les matzek

  • 17 years ago

    Les-

    This is the first year I'm planting one plant per container. The past few years it's turned into a jungle mainly because I don't prune and didn't use cages. This year I'm trying one plant per and using cages.


    Last year


    This year


    I get my Lilly Miller fertilizer from Orchard Supply. I would assume there's one near you.

    The summers here in the Bay Area can vary a great deal since we have so many "micro climates". It could be 95 where I live and at the same time 55 degrees over on the coast. I used to own a Baskin Robbins and sometimes I would leave home wearing shorts and a T shirt because the temp was 85-90. But when I would get to the store it would be fogged-in, windy and wet. And the drive there was only 15 minutes. But the average high temp around here in the summer is around 80 degrees.

    As to the water tank, it could go maybe 2-3 days before it would run down to nothing. I just topped it off every morning because I like looking at the plants.

    Hope this helps.

  • 17 years ago

    I've seen the Lilly Miller line at Walmart.

    Mr Potatohead, where in the Bay are you?

    I'm in Martinez.

  • 17 years ago

    Does anyone know where you can get the plastic screen? I can't seem to find anything like that at Wal Mart or Lowes.

    Thanks,

    Mark

  • 17 years ago

    bdobs-

    I'm in San Mateo. Have you tried the Lilly Miller fertilizer on any of your tomatoes? I've used it for about four years with really good results.

    Mark-

    I bought the plastic screen at Orchard Supply. Do they have those stores in Missouri? I've been to Columbia twice to shoot in the Bianchi Cup. Love the steaks there, delicious and cheap.

  • 17 years ago

    No Orchard Supply around here that I know of so I'll keep looking. Thanks for the reply.

  • 17 years ago

    Hi Potaohead,
    what was in the container you use for your holding container ?, and what size is the tote you use ?
    thanks, les matzek

0
Sponsored
J.Holderby - Renovations
Average rating: 5 out of 5 stars4 Reviews
Franklin County's Leading General Contractors - 2X Best of Houzz!