Software
Houzz Logo Print
vjrnts

Renovating 1922 Hex Tiles

18 years ago
Hello everyone. Long time gardenwebber here, but this is my first time in the bathroom forum. My question isn't a bathroom question, but it is about restoring an old tile floor, so I'm sure it will apply to someone's bathroom. Plus someone over at the Old House forum suggested I come here, so here I am!

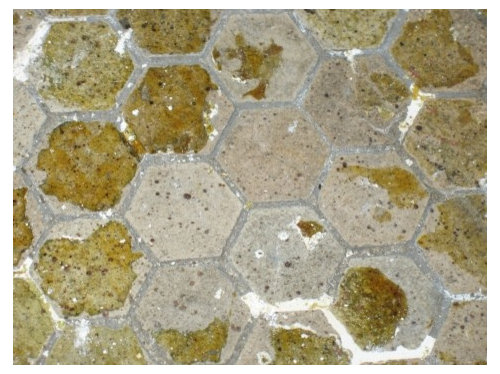
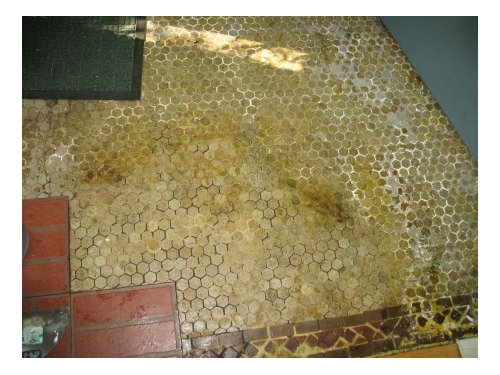
I have pulled up old vinyl tiles that were applied over the original hex tile in my 1922 home's foyer. Here are some pictures:


I've gotten quite a bit of the mastic off the tiles with a combination of Franmar's Bean-Ee-Doo and an abrasive pad, and I have another gallon of the stuff to try to get the rest off. I have two questions, one probably trivial and one that may affect whether or not we keep this floor:

1) Is there a way to make the grout look uniformly colored once I get the dirt and mastic off? There seems to be two kinds of crud here; yellowish, sticky glue and a brilliant white, hard substance that they may have used for leveling. It chips off with a scraper, and the Bean-Ee-Doo seems to have little effect on it. Can I sand this surface lightly?

2) There is a crack in the floor, running front to back. Tile on one side of the crack is about 1/8" higher than tile on the other side near the front of the foyer. They are at the same level near the back of the foyer. There is no access to the space under the foyer. (No easy access, anyway.) Is there some trick of the tiler's art that will make this uneven surface less noticeable? I have a tiny closet from which matching tiles can be harvested. Any hope?

Here is a link that might be useful: Some more pictures, including the crack of doom.

Comments (6)

  • 18 years ago

    Hi,
    It looks like you're in for a lot of hand-scraping. I would be reluctant to sand the tile. If you do, use a random-orbit sander and diamond discs (not pads, they are for polishing, not leveling) of 150/220/400 grit. Discs are a copper metal flexible, with dots of diamond applied. They cut very well. The 400 should leave you with a matte finish.
    For the grout, I'd get a narrow screwdriver and file it to the width of the grout joints, and then round the edge off so it scrapes a slightly concave contour, then there will be no sharp corner to scratch the tile, and it should follow the valley of the grout seam.
    It looks like the kind of tile that is the same color all the way through, but if it's glazed and you start to hit another color, you will probably have to live with it, buy a nice area rug, or replace the floor.
    There are some great reproduction tiles out there.
    Casey

    Here is a link that might be useful: American Restoration Tile

  • 18 years ago

    Hi Casey, thanks for your response. I remember you from the kitchen forum; we redid our kitchen last summer. I'm a stoner too! Your kitchen turned out amazing.

    I'm virtually certain that the color goes all the way through the tile.

    Scraping all those grout lines! Yowza. I think it might be necessary, but I'm going to do my best to clean them up first; they don't have to look new, just not cruddy!

  • 18 years ago

    I've done this one time, back when I was an apprentice, and if I knew then what I know now, I wouldn't have done it then, either. My sisters went to a private school in Milford, Ct., and we had gone to some school function this one evening, and afterward, there was "coffee and..." down in the school cafeteria. While we were down there, my father was talking to the principle of the school about the floor. They had vinyl asbestos tile, that had been put down over white hex tile, using that black asbestos "cutback" glue. At this point alot of the VA tiles were beginning to come loose, and the principle told my father why they'd done it in the first place. Apparently, 15 years prior to this (mid 60's), they'd installed the serving areas in the cafeteria, and when they did, they had to dig a trench thru the tile for drainage to the serving area. Unfortunately, they couldn't find any hex tile to match, nor anyone who'd be willing to take on such a small job, so they ended up covering about 2000 square feet of this hex tile that had been set in 1911 with the VA tile. WELL! My father, being the pack rat that he was, had cartons of this tile at the shop, and volunteered my services as a donation from the company. For the next three days, I was there with a respirator, first scaling up the VA tile, which came up in about 6 hours, and then soaking sawdust with DRY CLEANING FLUID, and then using the sawdust to remove that black cutback glue from the tile. THAT took better than two days to do, and believe me, even with the respirator, I had a wicked headache at the end of the day each day!! DON'T TRY THIS AT HOME, KIDDIES!!

    What I might recommend to you is to find someone who does marble floor refinishing. He'll be able to make that entire floor look like brand new, including feathering in one side to the other at that crack. I would NOT recommend laying any more tile in that area, though. The fact that one side of the crack is higher than the other indicates that there's vertical movement in that floor, and there's not a membrane around that would protect any tile bridging that crack, from cracking. Not even Ditra would help.

  • 18 years ago

    WOW! I am doubly glad that I didn't run into that black adhesive, just sticky yellow stuff that came up with the soy formula. What a job that must have been!

    And thanks for the suggestion. I'll look for someone who does marble.

  • 18 years ago

    Hi! It was me who directed you here from the Old House Forum. I can't help you with your floor because the one that I uncovered had the black adhesive (water soluble), and also because after living with it for a couple of years while our project stalled I decided to replace it. We just got tired of seeing the crack and uneven mortar bed. Its all being ripped up and replaced with similar new hex. A crack is easier to live with in the entry way.

    Hope you are able to clean it up and salvage the original tile.

  • 18 years ago

    Hi, Lauren, and thanks, I hope I can too.

    I've soaked half the area in another bath of the soy product that I'm using and then scraped away at it. It takes some elbow grease, but the mastic is dissolving and coming up. I tried acetone on a couple of tiles and it works very well, but phew! I'd rather work harder without fumes. Maybe I'll use acetone on the very last, impossible blobs.

    That half of the foyer looks better than the other half, though, so I am making progress.

    I am also waiting for a call back from a floor guy. I have two other easy tiling projects in this house, and they take precedence over hammering up the vestibule tile. You're right, in an entry it's much less dire, especially since I can put a mat right over the worst of it.