Software
Houzz Logo Print
balego_gw

Old dining set redo.. another cheap and easy project.

17 years ago

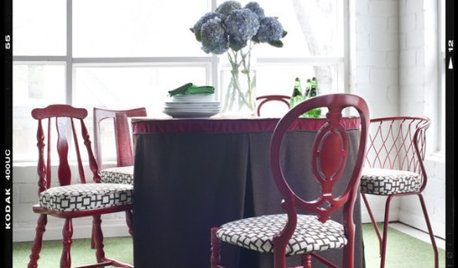
This project began because my DH complained about how uncomfortable sitting on our counter height dining chairs could be after a while. To be honest, sitting on any dining chair for a long period of time is uncomfortable, but I could see his point. I was also finding the higher chairs inconvenient at times, such as when I needed to sew something on my machine such as hemming pants- ugh), I couldn't reach the foot peddle and had no other table to sew at. So, rather than spend a lot on a new dining set, I decided to look on CL. That led us to this old set. Five chairs, and an old scratched up table. For $200. Not having much refinishing experience but going only on the praises I have read HERE in the decorating forum about Restore-a-Finish, I thought I could tackle this. While DH is trying to bargain down the price, saying it will take me a lot of hard work to strip this down, I am shaking my head and saying "no, I don't think so.. the people on the decorating forums had great success using something called restorafinish so I think I can DO this!" All the while wondering if I wasn't biting off more than I could chew.

Here is one of the chairs a couple of hours after getting it home, and minutes after Restore-a-Finish to one half of it.

{{!gwi}}

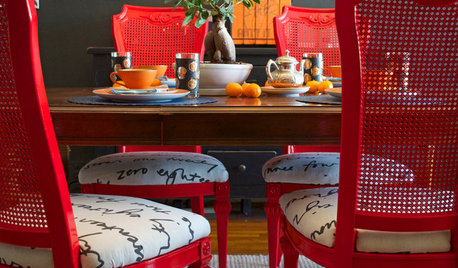
Here is the chair after reupholstering.

{{!gwi}}

The table top needed stripping. The base needed only Restore-a- Finish.

Top before...

{{!gwi}}

And after

{{!gwi}}

How to get the glass-like finish on the table top? Apply your varnish.. three or more coats. I used polyurethane for durability. Then when dry, begin sanding with a fine sandpaper (forget the grit but will post it when I look it up) and rotary palm sander, and work up to higher and higher fineness. I think I started at 1000 grit and worked up to something rediculous like 18,000 grit or higher. The sandpaper was so fine it felt like rubber.

Then buff with beeswax. Cost of redo- including all supplies and new fabric.

Comments (31)

  • 17 years ago

    oops. Should say cost of refinishing was less than $200, including fabric.

  • 17 years ago

    HOLY SMOKES...you are a wonder. I have never seen such a perfect redo of a DR set. You get the 1st prize. I have not heard of that high a grit paper. Where did you get it ? I am in awe again today at your abilities...do you want to come to AL>??? c

  • 17 years ago

    Lovely transformation!!

    Very well done! :)

    My dining table is the same shape as yours! :)

    Jan

  • 17 years ago

    Whoa .. that's fantastic! It turned out so beautiful, awesome work.

    Caroline .. you can get super fine grit sandpaper at any store that sells supplies to re-paint cars.

  • 17 years ago

    WOW!!!

    What a dining set for about $400. It turned out beautifully.

  • 17 years ago

    So for four hundred dollars and some elbow grease, you have this beautiful table. Now that's a deal! You did an awesome job by the way. It's such rewarding work, isn't it?

  • 17 years ago

    Thankyou all again for commenting!

    I got the sandpaper disks at Lee Valley Tools. We are fortunate enough to live in the same city as the original Lee Valley, so I knew that when I wanted answers to my questions about how to get the glass-like finish, that was the place to go. Two ways it can be accomplished.. with fine pumice, which is fine powder rubbed on by hand, or with the sandpaper and sander. I chose the latter way. They sell a set of sanding disks that have grit that goes this fine. Our local Home depot didn't carry such a fine paper.

    My mistakes with this set are that I chose to skimp on the chair padding. Originally there was straw under leather. I cannot imagine sitting on that for any length of time! I didn't want to spend on buying foam padding because for some reason foam is astronomical in price here! So .. he he... I had some new left over carpet underpadding. I figured it would be about the right density, not too soft. And free. Wrong. It is as hard as the straw must have been to sit on! So someday I will remove the fabric and add some nice cushy foam and hope that I have enough of the fabric turned under to cover it. Now that I have seen the video demo I posted about in my other thread about how to upholster dining chairs, I now know how I should fix it.

  • 17 years ago

    Here are the disks I used, from the Lee Valley site.

    Here is a link that might be useful: Fine sanding disks

  • 17 years ago

    Thanks for the link . I love Lee Valley and get things from them all the time...didn't think about the wood working stuff DUh...next project will get that set. c

  • 17 years ago

    It's beautiful!

  • 17 years ago

    I LOVE your dinningroom set!!!! It's really beautiful!!! Older pieces are true QUALITY!

  • 17 years ago

    Beautiful. Looks perfect. Love the fabric too.

  • 17 years ago

    Great job! What brand gloss finish did you use on it? Have you used it since finishing? When you do, would you post how well the finish holds up to heat and scratches from normal use?

  • 17 years ago

    Wow!!!

  • 17 years ago

    You did a fantastic job. It looks extremely professional-- I can't believe this was your first attempt!

  • 17 years ago

    You DR set is so beautiful! You did an excellent job. Hope DH is proud of you.

  • 17 years ago

    What a beautiful job! I wish I had something I "needed" RAF on! All these projects are coming out beautiful!

  • 17 years ago

    Beautiful! I love the mix of fabrics in your room.

  • 17 years ago

    I absolutely love the fabric you put on the chairs.

  • 17 years ago

    GORGEOUS!
    And I especially love that it was DIY on the cheap --

  • 17 years ago

    That is a beautiful set. I am glad that you brought it back to its original glory!
    Diane

  • 17 years ago

    belago, it seems we have the same interests! Wow, you did a beautiful job with that table and chairs. Just stunning!! I, too have a table top that needs refinishing. I've already RAF'd it, but it is mahogany, and has some deeper scratches in it that even the RAF wouldn't cover. I need to restain it to it's former glory, and then seal it well. The pedestal feet also need work since they've been scratched by people and dogs through years of use. I plan to use your instructions on sealing and finishing it.

    The chairs I found at auction, were shipped from England and still have their original 1864 manufacuters seal on the seat cushions, and had the original cloth printed fabric seats with horsehair type stuffing underneath. They were horribly hard and uncomfortable. I read somewhere where it devalued the piece if the original materials were removed, so all I did was put some new foam padding over the old seats, and then cover that with more fabric of my choosing. I don't know enough about furniture styles to determine what "period" they were from. Here are the chairs, which I've already recovered, and the table top as it is today. The table was made much later than the chairs, and was something we already had, but they go together well. You can see the scratches that I need to refinish on this picture of the top.


    {{!gwi}}

  • 17 years ago

    Wow, balego, that's just stunning!

  • 17 years ago

    belago, A question for you.....I'm presuming that you sanded between each coat of poly, is this so? Or did you do all the sanding with the orbital sander after all three coats of poly were applied? I'd like to do the same technique for my tabletop, but want to make sure I do it as you did. Normally I would sand between each coat of varnish, but you didn't specify, so I thought I'd check to be sure.
    Heidi

  • 17 years ago

    Thankyou for commenting, everyone. Heidi, yes, I sanded between coats of varnish, then used the finer disks after all the layers were dry. I used Varathane Diamond waterbased finish. Your dining set is lovely! And your chairs look very comfortable and it's great that you could cover right over the original seat covering.

    Marti, the poly finish holds up well and was recommended by the fellow at Lee Valley to be the strongest for everyday use.

  • 17 years ago

    Just beautiful and I LOVE the chair fabric!

  • 17 years ago

    Balego, that is one beautiful dining room set!! Amazing what elbow grease can do!! The usual problem with older sets is that the chairs have come unglued and are wobbly, but yours look quite sturdy.
    Recommending Lee Valley Tools and their products --- and this is NOT spam --- I have purchased many items from their garden shop. They are not cheap, but excellent quality and their customer service is wonderful. I always think you get what you pay for ---- and for my next woodworking project, I will certainly be in contact with them. They know what they are doing!

  • 17 years ago

    Wow this is inspiring!!

  • 17 years ago

    I fell in love with the fabric, but I originally was looking for something with blue in it but wasn't finding anything that excited me. I kept coming back to this one, even though the scale of the pattern caused me to think it would be too large for small dining seats. But then I figured 'what the heck'. I didn't try to center the pattern (that would have cost a fortune for enough yardage to do it that way). I bought 3 yards, and had enough left over to make two small accent cushions for the living room.

    no-green-thumb, yes, the chairs are very sturdy. Other than some gummy residue on the arms of the captains chair, and a little on the upper backs, they needed only a wipedown with the Restore-a-finish. The whole project took very little time, and within the week from bringing it home, it was all done and sitting in our dining room.

    Re Lee Valley, I agree! It's a fabulous place that has quality products, and a lot of things they carry you cannot find anywhere else. It is so nice to browse through the store, and I particularly love the garden product section! Their staff is very knowledgeable and take the time to answer questions. The gentleman that served us took about a half hour to tell us how to acheive the glossy finish I wanted, didn't try to sell us products we didn't need. We walked out with a package of sanding disks and a confidence that we could follow his directions and get the results with the tabletop that we hoped for.

  • 17 years ago

    Balego

    What a lovely transformation - just love when people can "see" an old piece of furniture that has serviced many - and takes time and love to bring her into many more yrs of service - now that is PC & Green - wish more people would do so - The wood alone in those older sets is far superior than any new set today.
    You have done a beautiful job - enjoy!

  • 17 years ago

    I love it! AND You've convinced me to stop being a chicken and order RAF. :)