

Tile installer wants to know: start in corner or center??
Hi peeps! :)
Ok so my tile installer sent a partner of his since he's sick. The guy seems fine so far - he's going to come back later and get started but meanwhile he asked me where I want him to start. Most of the comments on this forum lead me to believe one should always start in the center, behind the faucet, if it's a pretty typical layout in an old house (tall cabinets on either side of the sink, and windows behind the sink with a big vertical beam dividing the windows). But when he walked into my kitchen from the dining room, he assumed I'd want it started in the far corner, where he can lay out nice long pieces to wrap around the corner nicely.
My questions are:
1. Is there a way to find out beforehand (without too much of a time-consuming hassle) if centering it behind the faucet will result in corners being awkward? It's honed white marble, 2x6" pieces and they'll fit tightly together with 1/16" between them.
2. If the one corner you see when you walk in looks really great, and the other corner you don't see at first, DOESN'T look identical (as great), would it be better to just start behind the faucet and have both corners look equally so-so?
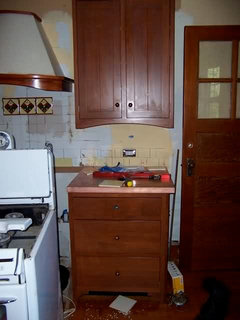
Here's what you see when you walk in (the view he had). In this picture there's a coffee grinder in the corner in question but when the installer came by there was nothing in that corner. Typically there's some small countertop appliance there (or in the past, it's been a small white TV). As you may be able to see, our upper cabinets come down quite a bit lower than most. Thank you!

Comments (21)
 15 years ago
NEITHER --
the installer needs to measure out the length, and calculate the length including grout lines.
then install so there is neither small pieces at either end.
(I'm sure one of the tile guys can say this with more professional language!)
theresse
Original Author15 years agoWhat do you mean neither? Do you mean depending on the calculation? It's gotta start somewhere! ;)
Tile guys: is there an equation that would make this process easy? Something having to do with length of wall vs. length of individual tile vs. number of tiles vs. grout space, somehow?
Thanks - and thanks peteinsonj!
Related Professionals
Palm Bay Kitchen & Bathroom Designers · Cherry Hill Kitchen & Bathroom Designers · Norfolk Kitchen & Bathroom Designers · Lewiston Kitchen & Bathroom Designers · Miami Kitchen Remodelers · Zanesville Kitchen Remodelers · Mission Viejo Kitchen Remodelers · San Luis Obispo Kitchen Remodelers · Bismarck Kitchen Remodelers · Evansville Custom Countertops · Richmond Custom Countertops · Lewiston Custom Countertops · Grand Island Custom Countertops · Napa Custom Countertops · Oxnard Custom Countertops- 15 years ago
I am not an expert (just a few DIY tile installations), but generally the tile installer should either be calculating the tile layout or dry laying out the tile first. This allows the you to know what the tile cuts and corners will be looking like (avoiding small cut tiles - aiming for cut pieces to be greater than half the size of the tile). Then once you've determined the exact placement of the tiles, you generally start with solid pieces first, to make certain the tiles are plumb and level. If the tile is wrapping around the corner on both ends of the cabinet run, you will want both corners to look nice, not just one. In terms of where to actually install the first tile, well, that would depend on the layout the installer has come up with.
Layout is very important for having your tile installation look good in the end. Is your tile installer doing this? Or is he expecting you to do this? In my opinion, the ability to plan a good layout is part of the tile installer's job and I would be concerned if your installer is saying or doing otherwise. I certainly think as a homeowner, it is wise to be involved in the layout process. In fact, I would ask your tile installer to explain his layout plan to you so that you can make certain you will be happy with the finished product.
If you would like help putting together a layout, I would recommend posting exact measurements of the area to be tiled and the tiles. You also might find more actual tile experts lurking in the bathroom forum.
 15 years ago
PS: I ditto what Prickly said -- it's a tad troubling that your installer doesn't know how to do this himself.
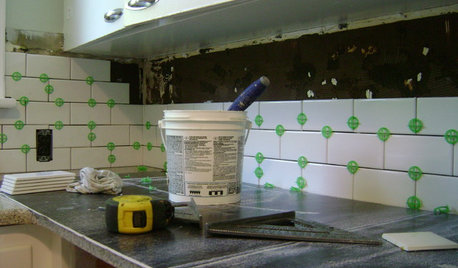
Well, DIY to the rescue! Don't be afraid to lay the tile pattern right out onto your walls with a sharpie. This is probably the easiest method of all, and after I had the general measurements set with a story stick, this is exactly what I did myself. I needed it to calculate precisely where to place my electrical outlets, which I was fitting into single subway tiles, but it's a great way to really get your layout finalized visually.
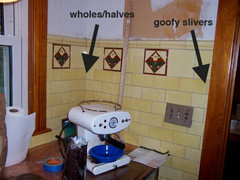
There might be compromises, like here: I wanted the corner, a focal point, to be half/whole tiles, so I had to make a smaller sliver than desirable at the edge that hits the door frame -- but I thought it was worth it. This is the kind of spacing issue you'll want to keep an eye on:
theresse
Original Author15 years agoPricklypearcactus - yes he will be dry laying it. He was going to start in the corner just cause he thought that's where the eye would first go when you walk into the room (not realizing that corner will probably have an appliance blocking it, and remember the upper cabinets come down very low compared to most people's). But when I said I might want it to start behind the faucet - because to me, that's the focal point of the room - he said that would be fine, too. I was mainly wondering if there's a better place to start in general, or if it just totally depends (and I don't mean with regard to one's personal taste - I mean logic). Thanks so much!
Circuspeanut - thanks for the stick suggestion and the link! I love the sharpie idea, too. I think this installer might (he'd better!) know what he's doing, just cause he was talking about drying laying everything right there below the wall that's to be tiled (on the countertop - at least to start). God I hope!! I just need help determining where the best location is to start from and what the consequences might be from starting in the center...stuff like that. I would like to avoid slivers at the end just cause I remember that one post where a woman on here had that happen to her and everyone replied saying "how horrible for you" or something to that effect! :-o I personally wouldn't necessarily have noticed but now that I know it's a big no-no, I don't want my installer to do it, either! Hahaha. FYI, I think your tile looks SMASHING! I am so impressed with your kitchen...
The only other thing I need to put thought into is whether I should do a white grout (with sealer) so as to keep the honed white marble (and thinner/shorter pieces than the typical 3x6) from looking too busy...or to make the grout a little darker to show off the tile shape a little. And then even if I do, what color is the next problem! I'm guessing since the tile has both gray and some tan in it, that a sand color, combining both those colors, would be ideal. IF I don't do white, that is. The other factor is that the space between the tiles will only be 1/16" so it's possible that white grout wouldn't be too hard to clean - knock on wood. Oh the many decisions.... Thanks so much for taking the time to help and for the pics too! :)
- 15 years ago
I'm reading all of these tile threads because my subway tile is coming in soon. Good luck!
Circuspeanut,
May I see photos of your finished kitchen? I love the little I see on this thread.
Thanks
- 15 years ago
at exactly the center is a center point, or center line.
On it is either a grout line or a full tile. Work outwards from there. Use both methods (starting with a grout line and starting with a full tile in the center) and you will see which one of the two methods produces tiny slivers at the walls.
Don't touch the tiles; leave a gap equal to the future grout line.
theresse
Original Author15 years agoGood luck to you too, Irishcreamgirl!
Davidro1 - Thank you. Is it fair to say that if he starts at the corner as the tile-setter assumed he would, it will prevent slivers there (and around the center line/under the faucet, since it will just be "driving by" there, so to speak) and may only risk slivers at the end (the doorway you walk through when you first walk in)?
I don't know why this is so confusing to me. Is it better to have two corners that have matching imperfections (smaller pieces) than one corner that looks good and the other not? Is it better to have the center point, between the two center windows and faucet, look really good and then have the ends be less nice but at least even with each other? Or is the best case like in the above paragraph (the corner looks great that you see). Sorry for being redundant!
Thanks so, so much!
theresse
Original Author15 years agoGood luck to you too, Irishcreamgirl!
Davidro1 - Thank you. Is it fair to say that if he starts at the corner as the tile-setter assumed he would, it will prevent slivers there (and around the center line/under the faucet, since it will just be "driving by" there, so to speak) and may only risk slivers at the end (the doorway you walk through when you first walk in)?
I don't know why this is so confusing to me. Is it better to have two corners that have matching imperfections (smaller pieces) than one corner that looks good and the other not? Is it better to have the center point, between the two center windows and faucet, look really good and then have the ends be less nice but at least even with each other? Or is the best case like in the above paragraph (the corner looks great that you see). Sorry for being redundant!
Thanks so, so much!
- 15 years ago
Theresse, the center is actually irrelevant to this kind of smaller subway layout -- you won't notice where the center falls at all, but you will definitely notice if one or both of the corners has weird slivers.
"Is it better to have two corners that have matching imperfections (smaller pieces) than one corner that looks good and the other not? "
Yes. :-)
Your homework tonight: lay out your tile dry on the countertop along the wall and see where you need to place them so that each corner has a decent sized piece before it needs to be cut to fit. That's all you have to do; the rest of the layout will derive from that. Courage!
---
Irishcreamgirl, you're very kind -- it's not quite done thus I don't have finished kitchen pix anywhere, but it looks like this now:

And I've now tiled the range hood:

- 15 years ago
Hi,
I tried and tried to type here an explanation .... the way we did our bathroom/shower/tub walls but no matter how many times I tried, reading it back, it sounded like gobble-gobble.So found a visual for you instead.
We started at large/back wall of shower/tub.
Found center.
Worked our way out and for whatever reasons, rounding the corner on both ends worked out perfectly with same-size pieces...little over a half each.Here is a link that might be useful: How to measure is at 1:25 mark
- 15 years ago
theresse, yes, it is true that you do not want to start with a full tile in one corner, and then lay them all down and say finally, golly gee too bad we ended up with a sliver over here.
one or several people have to plan this out, just a little bit.
any tilelayer knows this already.
Same as with many other things. Like planning where windows will go. Everyone knows they have to be planned for.
- 15 years ago
If he, has to ask I, would lock him out. Lol First Locate the exact center on each wall and mark that center spot.
Hold a chalk line at the center position on facing walls, as marked and snap it on the floor. The exact center will be marked at the point where the two lines cross
To check for accuracy, measure 3' in one direction and 4' in the opposite (90�) direction. When measured from true center, the distance from the 3' marking to the 4' point will be exactly 5'. If this is not the case, re-measure and re-chalk each wall to find the true center. This is essential for a quality finish.
theresse
Original Author15 years agoCircuspeanut - I'm doing my homework! :) Thank you!
Amity - those videos were really educational, thanks so much! Please see my following point to davidro1...
Davidro1 (and Amity - re. the youtube video link) - Re. starting in the center and going out, the problem there is that the center between the two end walls is off from where the center of the vertical beam is that comes down between the two main kitchen windows behind the faucet. The center of the entire countertop (and therefor backsplash) visually appears to be right down the middle of that line (though it isn't), behind the the faucet and centered directly behind the sink. So I have to work from there, out - if I start from THAT center point. And then of course what I'd have consequently on each end would be uneven.
Now what I did happen to notice is that if I start with a full piece of tile along the first row, on the far left side wall (not the back wall), up in the front and furthest from the corner, and go toward the wall then wrap around the corner, onto the back wall, the first piece on the back wall (far left) would only be about 1.5-2" wide. But if I were to continue along that back wall, toward the "center" behind the sink, a full piece lands smack center behind the faucet, really nicely (and that was with spacing as close as I imagine 1/16" to be, and giving some extra spacing in the corners like 1/8"). It also continues on and makes it to the end, beautifully (the end of that section anyway; cause there's a small bump-out from hidden pipes there).
So that leads me to this very important question: If I'm wrapping around a corner anyway, does it matter if there's a thin piece there (1 1/2 to 2") since the eye gets drawn around the corner if measured properly for that effect? Or is that just a big fat no-no? When playing with the tiles like this, I liked that the left wall would look nicer cause that wall won't be hidden (toward the front) but in the rear - in the corner - there will be an appliance hiding the corner details most likely.
What say you? I know the tiler will know a hell of a lot more than me - than most basic contractors too - so I'm not too worried but just trying to wrap my head around what choices I may have, if he puts me on the spot and asks me to decide which way I prefer.
Shar-az - ok I can tell you wrote something really smart there. It's too bad I'm an idiot!!! What do you mean by "snap it on the floor?" I was always bad at this type of math. Sigh...
Thank you so so so much everyone!!! This kitchen job's been such a nightmare that I just want this portion of it to turn out well - it would make me feel soooo much better and would compensate (to some degree) for some pretty bad luck (and awkward work) so far!
- 15 years ago
Theresse,
Oh, I'm sorry your kitchen reno hasn't gone well. You are sure helping me with all of these great questions you are asking. I am bookmarking everything.
For what its worth I knew shar-az said something really important also but for the life of me I couldn't figure it out either....and then thought....well I'll just show it to DH he will get it...lol
And I can't wait to see your finished kitchen. The little bits I do see look beautiful so hopefully it will all be worth it in the end.
I'm crossing my fingers for you on your tile installation. I know how you feel. You don't want to get this far and mess it up. I saw that other poster's kitchen (which was also beautiful) and saved it too to show to my DH because I would have never considered slivers on the end either.
- 15 years ago
Circuspeanut,
Thank you for sharing more photos of your kitchen. I love it. The tile is beautiful and the tiled hood turned out fabulous. I'm curious though, I was very intrigued by the old hood I saw in an earlier photo. I loved the wood trim that wrapped around the bottom. Was that original to the house or did you buy it and then decide you did not care for it the way it was?
And I love your splashes of color with your bakeware, pots and pans, and cooking utensils. I have colorful bakeware and utensils too and I love the pop of color they bring to my kitchen.
I hope you will share your finished kitchen with us when you are done just as I can't wait to see theresse's kitchen also.
- 15 years ago
when you don't know what some term means, you plug it into a search engine.
Looking up "Chalk" and "Line" in a dictionary won't help you. But try the two words together in a Youtube search.
"Chalk Line" with quotations.
- 15 years ago
Hi Theresse, I always enjoy following your threads and am glad your progress is still creeping along :)
I have to echo other's concern: you should NOT need to be figuring this out! In my opinion, no experienced tile installer should be asking you this. That is a real red flag to me.
If this installer comes so highly recommended, surely his "partner" can call the installer you actually hired and seek his counsel? I'm concerned that you may be paying for, but then not even getting the benefit of the well respected tile guy's experience.
I saw but don't think I had time to post to your thread about the tile guy stalling you. One thought I had was that your job could be less desirable to this guy not only because it's "small" but because you had already purchased the tile, thus he had no way to build in more mark-up/ profit for himself.
Keeping my fingers crossed for you....
- 15 years ago
If you have additional questions, try emailing Bill Vincent.
Here is a link that might be useful: Bill Vincent's Member Page
 PROlast year
You have a good understanding of where the backsplash layout should typically start. Here are answers to your questions, simplified and in layman’s terms:
1. Should You Start Your Tile Installation Behind the Faucet?Usually, tile installers do start in the center behind the faucet because it looks balanced. It gives your backsplash symmetry, especially when you have a clear focal point, like the sink and windows.
But, since your tiles are small (2x6 inches) with tight spacing (1/16 inch), this decision is important. Starting in the center means cuts at the corners might end up smaller. If these corner cuts become too narrow (slivers), they’ll look out of place.
To make sure you’re happy with the layout, ask the installer to do a dry layout first. Lay tiles out without mortar to visualize how corners look. That way, you’ll avoid surprises.
Quick Tip:• Lay out tiles temporarily on the countertop.
• Check how both corners look before installation.
• Adjust slightly left or right if corners look awkward.
Bottom line:Starting behind the faucet is best, but a slight shift can make corners look neat. Good planning now means no regrets later.
What If One Corner Looks Better than the Other?Most people focus on the corner you see immediately when you enter the kitchen. It’s okay if the corner you don’t notice as much looks slightly less perfect. Prioritize the area everyone sees first. Your installer had a good instinct here.
When you walk into the kitchen, your first impression matters most. If that corner looks great, people won’t pay as much attention to the opposite corner.
Quick Tip:• Prioritize visual appeal on the most visible corner.
• Minor imperfections in hidden areas usually don’t stand out.
Bottom line:It’s better if your most visible corner is perfect, even if the other one is slightly off. Most people won’t notice a slight difference, especially if something like a TV or appliance sits there.
Final Recommendations:1. Center Behind Faucet: Typically recommended for visual balance.
2. Dry fit the tiles first to preview results.
3. Slightly adjust if needed, but maintain balance.
4. Prioritize the most visible corner.
This approach ensures your kitchen backsplash installation looks professional, balanced, and visually pleasing.Let me know if you have any other questions!





Circus Peanut