Software
Houzz Logo Print
mustangs81

Wallpaper Removal Seriously Tedious

11 years ago

I am remodeling my small guest bathroom; everything went well (granite counter top, new cabinets, sink, decor, lighting) except the wallpaper removal...just venting!

I used sizing before putting up wallpaper years ago. However the previous owner did not in this room :( so I am having to deal with it. Day 6 and one more wall to go. While I have done this before, I read many websites to make sure I didn't miss a tip or trick. For example I used:

  • Paper tiger
  • Steamer
  • Warmed DIF Stripper Solution

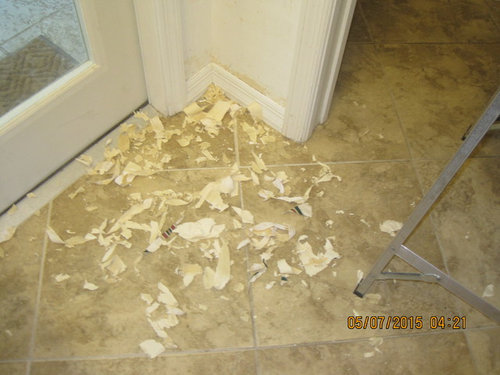
Still this is where I am...


Comments (32)

  • 11 years ago

    What a pain in the butt! You're making great progress though. Keep it up, think of the end product!

  • 11 years ago

    And people wonder why others keep outdated wallpaper. Or why wood paneling went up over old wallpaper! Ugh, I feel for you!


  • PRO
    11 years ago

    I did that in a Victorian flat in San Francisco using the same methods, and I had to do some rather large rooms. It took forever, and who knows how old the wallpaper was, but it was adhered with ancient glue. I think I have some after pictures of that project, which I did back in 1982, but perhaps not the before pictures.

    At least it is a small bathroom, but I feel your pain!

  • 11 years ago

    Thanks for letting me vent. I know you all have felt such pain on projects.
    The breakfast room was relatively easy because of the sizing. I have a large bedroom and the kitchen (with 18' ceiling) to do but regardless of price, I will hire it out.

    Lars, I can't imagine paper that old.

    Here's the thing, I really loved the whole wallpaper thing...in 1992. I know it's coming back in style but not in my house!!


  • 11 years ago
    last modified: 11 years ago

    We used downey fabric softener and water. A little messy but it did the trick too.

  • 11 years ago

    Back when I was removing all the ugly wallpaper in this house I used a gel remover from Home Depot. I don't remember what kind but I do remember that it was a little pricey but didn't care - it worked. Wallpaper will never darken my life again - EVER!


  • 11 years ago

    Those little tiny strips are maddening. I love wallpaper but will never buy a house that will require me to remove it.

  • PRO
    11 years ago

    The project I did had layers of wallpaper, and so there was wallpaper on top of wallpaper. I do like wallpaper (some of it) and have put up wallpaper myself, but I do remember that it was extremely difficult to find any that I liked, and what I liked best was extremely expensive. I was also shocked at how much horrible wallpaper there was, especially in the 1970s and 80s, but I found wallpaper from the early 1960s that I liked but never in quantities for doing an entire room. I used antique wallpaper in one place that I lived, but after a while, I found that it made me dizzy.

  • 11 years ago

    Lars, I can't imagine layers and layers :( I just had the water resistant top layer the the paper. Of course before painting I have to prep the wall.

    Belfenton, I have the gel and two other brands trying to see which worked best. I have been tempted to try the vinegar method. I also microwave it to warm it up.

  • 11 years ago

    Sssshhhh, some of us are considering wallpaper for our projects and have repressed all memories of previous miserable wallpaper removals ...


  • 11 years ago

    Here's what has worked for me.....if it's vinyl paper grab a corner and peel off the top layer, the paper backing will still be on the wall. Then use fabric softener diluted with water to saturate the wall in workable sections. Let it soak in for a few minutes and then it should scrape right off with a spatula or putty knife.

  • 11 years ago

    Wow, that photo of all the shreddies on the floor bring back baaadddd memories: 10' kitchen ceilings, wallpaper glued directly onto the drywall paper -- me, ladder, DIF, tweezers (to grab the corners), a month out of my life. OK, could've taken less time, but some nonsense about the kids being hungry, needing to eat, etc., etc., :)

    I first went at it with paper tiger and DIF, but found that too much of the drywall paper came off with each peel. Two step approach worked great (kind of along the lines of what joanie posted) -- key is to work small sections at a time so the DIF doesn't dry out: go over the waterproof surface layer with the tiger; dab/sponge/wipe on DIF (I found that forced the DIF into the holes better than a surface spritz); wait a few minutes (another key: patience! Give the DIF time to do its thing), then peel off that top layer; repeat same steps -- you'll know the DIF is working when the tiger 'holes' darken from absorbing the stuff.

  • 11 years ago

    chispa - LOL! Good luck.


  • 11 years ago
    last modified: 11 years ago

    Yup, got the tweezers and the HG is expecting 3 meals. He did take out the trash...of course I walked between him and the TV with the garbage bag several times.

    Joanie, That's what I am doing too. Grab, pull, dampen 1 square section exactly as you outlined.


    I'm going to have to do a lot of prep before painting because the paint was builder grade, thin, no base coat.

  • 11 years ago

    ...walked between him and the TV <-- priceless!

  • 11 years ago

    We used our steamer, held it in place for a bit and worked my way down, came off easy peasy. I couldn't believe the difference vs doing it without! It actually completely changed my mind from a very, never again to bring it on! Lol. Sorry it isn't working there, definitely no fun! :(

  • 11 years ago

    Now I'm afraid. I took down the vinyl wallpaper in the kitchen and one bathroom, then the backing, and still have to do another bathroom of vinyl (note to self: remember patience with the backing so you don't take off the drywall paper!). I used the hot water and vinegar method, found it much more user-friendly than DIF and fabric softener.

    But, after that I have to strip a half-bath, laundry, and family room wallpapered with regular wallpaper, not vinyl. How do I tell if it is applied directly to the wall, or if it is sized, etc? I'm thinking I would get a steamer for this one? Or hire it out? It's a lot of paper!

  • 11 years ago

    I guess you won't know until you get started with each wall, but sounds like your kitchen and bathroom project went well: maybe that's an indication of what you'll find in your other rooms. All of my wallpaper was original to the house, and I was subsequently told it's not an uncommon (!) practice for builders to slap the wallpaper directly to the wallboard w/o any prep. You'll be able to see fairly quickly if there's any other surface prep under your paper. So, at first, you won't want to go too aggressively with the tiger. I found each room/wall was a little bit different. If you have lots of time, it's doable.

    I was told by many friends to just prime and paint over the wallpaper, and not to waste my time stripping. My paper sure did seem soundly attached (no bumps or ripples, and seams were flat and beautifully done), but am I ever glad I didn't follow that advice: there were substantial swaths where the the adhesive failed (or perhaps wasn't wet in the first place?). For me, it's worth all the time spent: With each fresh coat of paint, I don't need to wonder if my wall is going to start peeling.

    Hire out? Time vs money. It was an easy choice for us. :)

  • 11 years ago

    ugh!! because of several moves, I've put up a lot of wallpaper but have only taken down a little bit of border that was on one wall! that bit made me decide that I would hire the job out if ever changing wallpaper!!

  • 11 years ago

    Steamer...I have one that I bought for the first project but the "tips and tricks" said not to use it, it was old school??!! I should have trusted my own experience with it.

    I did have a professional painter friend look it over to make suggestions on whether it was adhered enough to paint over. He said he thought it was okay but could create problems later.

    I have abandoned the tiger because of the dimples left on the dry wall.


  • 11 years ago

    Been there Cathy...I shutter thinking about it.

    What worked best for me was Filling a pump sprayer with warm water and lots of fabric softener and saturating the paper and letting it sit. Using so much water I thought I would ruin the drywall. I would pull a little paper off, spray more, peal a little more. (I kept lots of dry towels handy to dry the walls as I went.) It took DAYS to remove the paper in our living room, hall, and Family room.

    Good luck!


  • 11 years ago

    MaddieLee, Since we are neighbors you should come over and help me!! Just kidding, I wouldn't solicit friends for this tedious job. But we could do lunch again.


  • 11 years ago

    You did the right thing by removing the paper before painting, for yourself, and any future owners.


  • 11 years ago

    I just mixed up some concentrated stripper, 4 parts water-1 part concentrate. I substituted vinegar for half the water. I'll let you know how that works.


  • 11 years ago

    Fingers crossed!

  • 11 years ago
    last modified: 11 years ago

    Yes, it can be chore to remove but it will look so awesome when you are done. Just keep thinking about the end result.

    My DH and I have moved several times, and 3 of the houses had wallpaper walls and ceiling in several rooms. Who wallpapers the ceiling :), my arms throbbed for days after pulling / scraping that all off

  • 11 years ago

    Been there / done that. It's why I always make sure to use wallpaper primer before putting anything new up :)

    The fabric softener trick normally worked where previous owners did not prime first. The ones that did prime are the ones that I'd like to take out to dinner as a thank-you!


  • PRO
    11 years ago
    last modified: 11 years ago

    The only thing that has ever worked well - like super well - for me was a product called Safe and Simple covered with plastic wrap. I use the giant plastic wrap rolls movers use to wrap stuff, which you can find at Lowes or Home Depot.

    Apply the Safe and Simple per directions. Cover it with sheets of large plastic (they'll stick to the to wet wall. Let it sit for 20 minutes, do not let it dry.

    Gently scrape away paper and adhesive with a plastic putty knife. To be extra sure I get all the adhesive possible, I do one more round of Safe and Simple but do not cover it with the wrap.

    Finish by sealing in any residual adhesive with GARDZ.

    GARDZ is critical because it ensures any residual adhesive (that you can't see) is sealed so it can't affect new coats of paint. Leave adhesive unsealed, and the new paint will alligator.

    The Safe and Simple website has an interesting backstory and testing of various methods to remove wallpaper.

  • 11 years ago

    Yes - ditto the Gardz. I don't know if it's more readily available now, but when I did my kitchen, I had to have my local indy hardware store special order it for me.

  • 11 years ago

    Ceiling??!! I can't imagine having to tackle that.

    The vinegar substitute for water worked well with the concentrate.

    Done!! Now to prep the wall.

    Yes, I do have the end result in mind and I am eager to get to the fun stuff...staging. I am having some posters with my theme framed tomorrow, can't wait to hang them.

    Thanks for your continued support.

  • 11 years ago

    I've been putting off removing the bedroom wallpaper that was most likely done in the 60's because after starting I discovered cracks in every wall over every door and window corner. Love my Victorian but lathe and plaster walls are the pits.