Software
Houzz Logo Print
greenclaws

Hypertufa bonsai pots

Just been wondering if anyone here has tried making their own pots from ht? The chance of finding ready made bonsai style pots in my part of the UK is limited, some are sold at the big garden centre type stores, but they can be expensive, and choice is limited, so I'm considering having a go...at some point. Has anyone done this?

A couple of things spring to mind...they would have to be weathered for a period of time to leach out the lime from the cement I reckon. Also, would they have to be smooth on the inside, would roots adhere to a rough inner surface (not good imo)? Any thoughts out there please, and any info would be appreciated :)

Gill UK

Comments (30)

  • 10 years ago
    last modified: 10 years ago

    Yes, I recall that as we used to record the Beechgrove Garden and saw that episode you refer too. I have previously covered an old butler sink in Hypertufa to make it look like one of the old stone ones. Worked really well and is still in use as an alpine garden. Was just thinking of a good winter project, if I get time, in midst of major house decorating at the mo.

    Gill UK

  • 10 years ago

    Gill, the Hyper Tufa pots are fun to make and definitely cheaper than many of the purchased pots.

    I have made both Hyper Tufa & Papercrete pots. Hyper Tufa with peat moss/sand/cement or peat moss/perlite/cement. The Papercrete pots w mulched news papers/sand or perlite/cement.

    I made some in old low sided bowls covered in a plastic bag. If you have plastic pots that have the design on their inside as well as outside, you can make on inside the other and get the same pattern on Hyper Tufa.

    I made one right in the ground. Dug a hole the shape and size I wanted and poured the mix into hole creating the cavity inside. When I lifted it, it had the stones embossed on it's sides and I brushed it with a wire brush.

    They definitely do need to be season for quite some time and some say soak in water for a long time.

    I almost ruined one of my favorite adeniums by putting it in the pot I made and it dedicated all the fine feeder roots.. When I was in the Rhododendron Society we made some and a fella brought this "Purple" powder substance and we mixed it with water. It was supposed to counter act the lime causing a problem. Could not remember or find out what it was called later on.

    I would definitely seal any further pots with the water proof sealer you can get before potting any more up. Just in case.

    Rick

  • 10 years ago
    last modified: 10 years ago

    Gill, with this thread, I went on youtube and watch a couple of clips and it is not easy.

    https://www.youtube.com/watch?v=zwRCdTCHjNQ

    Watch this one to see if you like it. Good luck making your own pots.

    Marie

  • 10 years ago

    Oh, my Marie. That is gorgeous and I could not imagine making such a pot. Would love to be able to though.

    Rick

  • 10 years ago

    I took a handbuild ceramics class in college. Incredibly fun stuff.

  • 10 years ago

    Hi..I was looking at older posts of yours and you talk about a catalog from Rinoa. Do you have any info on a catalog for me to get one. Thank you (ps-I also grow Plumeria in AZ)

  • 10 years ago

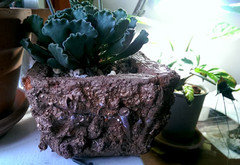
    Gill, you will absolutely love making hypertufa pots. (I personally do not like the clean-up part) You can make the inside part smooth by patting it down with just cement after the initial 48-hour curing. But you really don't have to. I've had more trouble yanking roots off of the screen I put at the bottom when it is time to repot.

    The problem with hypertufa, though, is that it is very difficult to get that slender elegant look. It will be hard to make the pot thinner than an inch unless you use fiberglass reinforcement. I've not experimented with that except once because "elegant" really doesn't fit the rest of my decor, such as they are lol

    I'm sure you are already looking at various methods and recipes. But here are a few things I learned:

    1. Resist the temptation to take curing shortcuts. Do the whole bit--48 hours under a plastic cover, two weeks to air dry out of the sun, then several more weeks (in my case, months) being rained on. Some people hose them down with water to wash out the lime in the cement. Others soak them in vinegar solution.

    2. Make the drainage hole during the shaping process; drilling one out later is more annoying

    3. Don't bother with powdered concrete colorants--the color is always horrible in the end, at least to me. So I just spray-paint the outside.

    4. Do not use for water-hungry tropicals like, say, coleus. They dry out really fast. They're perfect for adeniums though, as long as you cure them long and thoroughly enough.

    I've even had one tufa pot survive two killing winters outside, planted with semperviven. Then a tree went deciduous on it and dropped a branch. Blegh.

    Hope this helps!

    Pagan

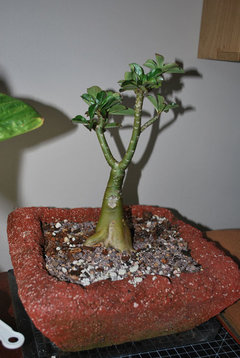
    This Rik Ni Ran has been in this pot for three years. It's only about three inches deep and about 10 inches on the sides (inner dimension). Oh, and that browning of the tips? That's what happens when some numbskull (me) sprays it with neem oil and then leaves it outside in the sun. It burns where the spray formed beads on the leaves.

  • 10 years ago
    last modified: 10 years ago

    aimp, This is a link to catalogue. If this does not work give her an email and she will send it through for you. rinoa.ch@gmail.com

    https://goo.gl/mPfB3O

    Rick

  • 10 years ago

    I was and still am very interested in this. I came across some information that you can make thinner more elegant pieces by increasing the ratio of cement in the mix, but like Pagan said, you'd probably have to reinforce it with fiberglass or even a wire mesh may work.

  • 10 years ago

    Thanks for all the replies guys and gals, sounds like a nice project...when I get the time that is,so busy doing jobs around the house while the weather is still on the 'good' side. Pagan, nice job you did with your pots:)

    Gill UK

  • 10 years ago

    Oh check this one out. I've never tried it though but I can think of many ways to adapt this method to smaller pieces that can , at least, be used as planters. It's significantly more messy.


  • 10 years ago

    They had pots mad such as this Pagan on Pinterest. Very cool. There is a product at a tool rental store here that sells a fibre product that is added to concrete to give added strength.

    I used the Federal White cement last time and it is quite something. Gives a nice white appearance rather than grey.

    Rick

  • 10 years ago
    last modified: 10 years ago

    the proper mix is important, as well. the goal is sturdy and light … i have several like pagan's and bury them in the ground and put small perennials, like hosta, in them


    used a basket from the dollar store as the form, and you can texture them with a wire brush for several days. check out the ht forum here, there are some creative and masterful art pieces out there ...

  • 10 years ago
    last modified: 10 years ago

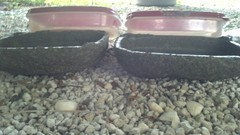
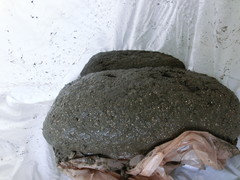
    Gill, just wanted to show you a bonsai type pot I made. I had the ingredients in the garage except sand so I replaced sand with vermiculie I had and mix 1:1:1. The form I used for shaping were the old tuberware in the background. Let me know if you want a step by step.

    Sorry for poor lighting

  • 10 years ago

    Good job Nicholas.....

    Marie

  • 10 years ago

    Nicholas, thanks for posting your picture, your pots look really good. They are relatively thin....but hopefully strong? When you have the time, if you would be so kind as to post your own particular recipe/method, that would be appreciated. I'm sure that in the depths of the shed there is a sheet of small gauge wire mesh that we didn't use up when constructing the chipmunks enclosure many years ago which could be used to strengthen them. I feel a project looming!

    Gill UK

  • 10 years ago

    Those look wonderful Nicholas. What great bowls for Bonsai and insight into other pots. Yes, please share.

    Rick

  • 10 years ago

    Just a thought. Let's keep this going. Would be wonderful winter projects for the next summer to come. What do you say?

    Rick

  • 10 years ago

    Here goes, I'll try to make this fairly detailed.

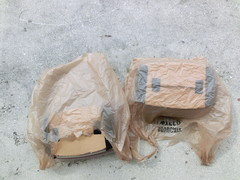
    First I wrapped the tubberware containers (can use any form you like for desired shape, depth and so on) in a plastic bag (this makes removing the finished pot easier and also saves the form for multiple uses). Some people oil down the form before putting the plastic bag in or around it but I haven't found this to be necessary yet. Might be necessary for more ridged forms like metal or wood forms though these come with their own problems.

    USE GLOVES AND A DUST MASK FROM HERE ON Then mixed the dry ingredients 1 part portland cement to 1.5 parts peat moss to 1.5 parts vermiculite in a large plastic container (this wasn't exact and may have been closer to 1:1:1 but this mixture doesn't seem to be overly temperamental).

    Next mix all the dry ingredients breaking up any large chunks until it is all blended. The point of this is to get the cement to coat all of the other ingredients. After it is mixed thoroughly... mix it more, the better this is mixed the better chances you have at success.

    Now add water slowly, your goal is to make the mixture into something that looks like cottage cheese and when you squeeze a fistful of it in your hand you should see a few drops of water drip out. Now walk away, yes just walk away for a bit. Peat moss as we all know is a pain to re-wet after it is dry so you need to allow it to soak up some of the water before moving on or your mixture will crumble after curing. After 5-10 minutes go back and add water if needed to get that desired texture again.

    I take my mask off here as it causes my glasses to fog (not sure if this is wise but I figure there isn't dust flying around once everything is wet) Now comes the fun part. Add the "mud" to the inside or outside of your form (whatever you chose) until you have your desired shape and thickness. Don't forget to poke some drainage holes, but not too many, you want it to remain structurally sound.

    When making the sides/walls of the planter a decent guide for thickness is to lay your thumb from across to rim, the planter should be at least as thick as the distance from the tip of your thumb to the first joint. (This can be changed but it's complicated, you can either use wire mesh to reinforce it or add a handful of fibers to the dry mix)

    Finally when it's all complete slip the whole thing, form and all, into another plastic bag and close it up (cement requires a lot of moister to cure properly). Leave for 24 to 48 hours, you will know it's ready when you can mark the planter easily with your nail. All forms and bags seem to be easily removed or at least I haven't had any complications .

    Now we get to the part that is a bit unclear to me some people say to mist with water and re-wrap it in a bag for a week to a month (sounds crazy to me) and some people say you can start leaching the lime from the pot at this point by submerging in water, spraying twice a day with water or leaving it outside in the elements for a few months.

    Well that's all, I wrote this while running around the house so if certain parts don't make sense let me know and I'll update. If you have any questions please feel free to ask, I'm no expert as I've just started this but would be glad to share what I've learned so far.

  • 10 years ago
    last modified: 10 years ago

    Sorry for 2 posts but I didn't want to confuse my conversation responses with the information.

    Thank you for the kind words Marie and Rick and yes Rick that sounds like a great idea, I want to really experiment with what can be made from this mixture.

    Gill, they are a bit thinner than I intended but without a freeze here I hope they'll be ok, I'll have to be gentle with them though and they will be for small succulents rather than massive Adenium roots.

    Oh and I forgot to add the cost of ingredients. I had all of these in the garage already, but if anyone is interested all of these can be bought at Home Depot for about $40 which includes 2cubic feet of vermiculite, 3 cubic feet of peat moss and a 94lbs bag of portland cement. Sand would be cheaper than vermiculite but I didn't want to have to buy anything.

  • 10 years ago

    yes, the portland cement is nasty on several fronts: on the back, and if you don't use a mask and gloves. Rather than vermiculite, i use perlite. I have attempted some pavers from ht but they tend to crack unless i dig a hole, and pour my mix in that and leave it … and re-enforce it with some wire

  • 10 years ago

    Excellent job, Nicholas. I'll pick up from where you sort of left off.

    After 48 hours in the bag, the pots can be air-dried in the shade. This
    usually takes a week in my shop, two weeks in the basement. The key to this is to let moisture to evaporate slowly. If it dries out too fast, it wont be as strong. You will know
    they are completely dry when they are very light. The reason you want the pots to dry completely is so the next step will work better.

    Once totally dry, you can then start the process of leaching out the lime from the cement. This can be done two ways.

    First method: Put the pots in a container of water just enough so they
    are submerged. They will float initially until they are thoroughly wet
    again. Leave it there for a week then pour out the water. Repeat this procedure at least two more times, more is better especially if you are planning to use this pot for acid-loving plants.

    When you get sick of this part (it usually takes 5 repetitions for me), take the pots out and give them a final rise of water. Then allow them to dry completely. Once dry, they are ready to use. I sometimes give them a final wash with a solution of one part vinegar and 5 parts water.

    Second method: If you made your pots in spring, just leave them out in the open after the initial curing process. I hose them down as often as I water my succulents in between rainfalls.

    Tips: You can make your own mould using cartons and ductape! This is how I made tufa pots that are wider at the top since I could not find such a thing to use in the kitchen. Make one, say, a shallow box, in the right dimensions you like, wrap it neatly with a plastic bag. Then make another one--maybe an inch or so smaller on the sides, then wrap that in a plastic bag. Pour the tufa mix to make the bottom, then put the smaller box on top of that, being careful to center it. Then use a spoon to fill out the sides.

    Pagan

  • 10 years ago

    Pagan thank you so much for clearing up the last bit for us, I couldn't find anything conclusive on it but it makes sense now. :)

    Bragu, thank you. I forgot about the perlite there are so many different mixtures there. I guess the perlite makes the finished product even lighter and sand could be added to increase strength, if you can confirm please. I opted out of perlite just because I use so much for the plants.

  • 10 years ago

    Nicholas...and Pagan, thanks to you both for the detailed information, it's much appreciated. I think there will be some good looking bonsai pots on show this coming spring! Cheers.

    Gill UK

  • 10 years ago

    As I have not used vermiculite in ht I cannot give a comparison b/w the two as to strength. Have just always used perlite so I can heft it around ...

  • 10 years ago

    For you visual learners, here's a picture story for the process. I actually just wanted an excuse to make more but shh don't tell anyone.

    Protect form with plastic (added cardboard to the form so the planter slopes towards drains):

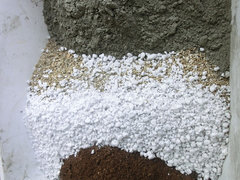
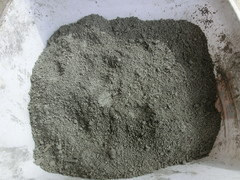
    Measure dry, here I'm trying (in parts) 11 moss, 9 vermiculite, 8 cement and 2 perlite:

    Mix, mix then mix some more, breaking large particles as you go and get everything off the bottom, unmixed portions like to hide there:

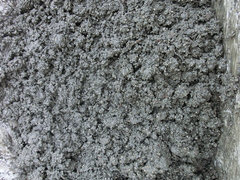
    Slowly add water to get your "cottage cheese" consistency, again unmixed portions are hiding at the bottom:

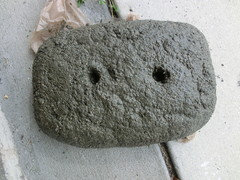
    Mash onto the form (this batch made 2 of these sorry for not getting pictures mid process but I didn't want to remove glove to take a picture and didn't want it drying out... Don't forget the drainage holes! :

    Into a larger bag to hold the moisture, close it up and let cure for a day or two:

  • 10 years ago

    Nicholas, thanks for sharing. Nice tutorial.

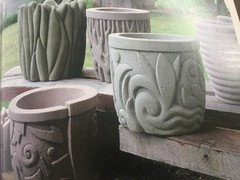
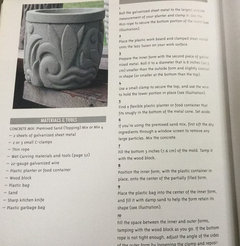
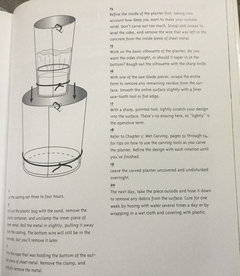
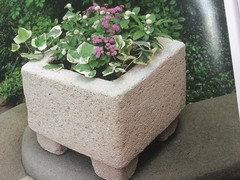
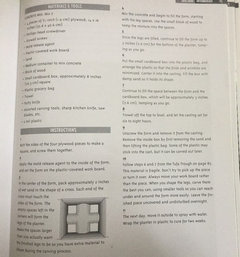
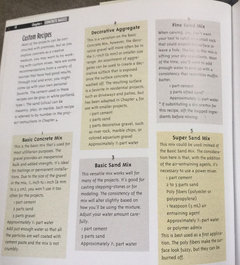
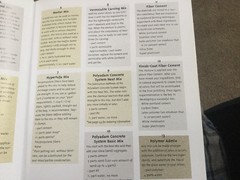
    Years ago a friend gave me a book on making Garden Ornaments. I thought I would share pages with everyone. Easier to use photo's than typing it.

    Different Recipes & Methods:

    Rick

  • 10 years ago

    Very nice Rick, I love that idea of the planter with feet, wish I was a tiny bit artistic and could sculpt the soft planter into a nice design Like those first ones.

  • 10 years ago

    Oh it's not that hard! I used a rubbermaid container, used a 1.5-inch forstner bit (I didn't have hole saws at the time) to cut out four holes at the bottom then ductaped four bottlecaps of the appropriate size to seal the holes. Pour the tufa mix as usual and when it dries---feet! Again, use a spoon to fill in those bottlecaps with the mix, to make sure it will be solid when it dries, because the plastic lining will get in the way, you have to press down the mix.

    For square pots with square feet, I had to make my own mould using shipping boxes.

    Pagan