Software
Houzz Logo Print
schubie

How do seal this mini-pebble shower floor?

10 years ago

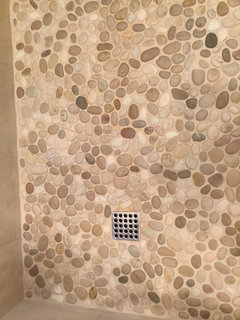
Our beautiful bathroom renovation is complete. Love it all EXCEPT the shower floor. We used a mini-pebble floor, which is probably about 50% power-grout/50% stone pebbles. The contractor sealed it with a spray. After using the shower, 24 hours later, there is still a damp ring/stain from where the grout is not drying. We dried it out for a few days, then the contractor sprayed again. Same result after using the shower. We let it dry out for a week (still showed a slight ring mark) and the contractor used an enhancer/sealer to give it the wet look. LOVED THIS. However, after the first week of daily shower use, the ring is back and it doesn't seem to ever fully dry. Does anyone have any suggestions as to what to use to seal/waterfproof the shower floor so it doesn't leave this ugly water ring? See photo. I realize grout is not water proof, and is cement based, but I thought a sealer would keep the water out. PLEASE HELP!

Comments (22)

  • 10 years ago

    There was a posting recently on just this subject. Hopefully one of the experts on this subject will jump in. From what I remember these kind of floors are a bit of a difficult thing to get done right. From what I remember, it's not about the sealing but about the grade of the floor.

  • 10 years ago

    Following. About to put in pebbles, myself.

  • PRO
    10 years ago
    What waterproofing system was used? I suspect a rubber pan liner?
  • 10 years ago

    The waterproofing method was some sort of thinset painted on mesh . . . .

  • PRO
    10 years ago

    ? Photos in process? Was the 'mesh' orange?

  • 10 years ago

    following because I can;)

  • 10 years ago
    We have the larger pebbles and epoxy grout in a renovated bathroom done a little over a year ago. Now notice the drain lip is not level or lower than the floor so water doesn't drain completely and floor is starting to collect and stain especially around the drain. It looks like our slope is ok. We were told that a pebble floor needs to slope more for good drainage. Also, in remodels a curb is necessary to get the correct slope.
  • 10 years ago

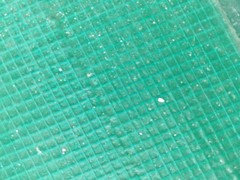
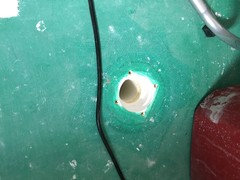
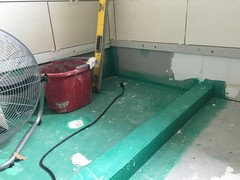
    THANK YOU for your insight. Sadly, I think it has to be A. I saw him seal the entire floor in the wet-look enhancer- and watched it dry- waited 4 days to make sure! Here are photos of the waterproofing before the grout and pebbles were placed. Now what? hammer it back up and re-do? If it is not fixed -does the grout eventually lift and we fight mold and odor - ? ugghhhh. Seems like quite a large area - big low spot?? It is definitely damp- when we use a moisture meter, it registers 17% while the other grout (not in the dark ring) registers 5% or less . . .


  • 10 years ago

    Above links by Tundra should be helpful. I recommend you determine if your contractor flood tested and determine what (if any) method was used to ensure weep holes were protected from cement plugging them. When you shower, water penetrates the grout (sealant does not completely waterproof the grout) ; the water should drain under the tile via graded shower pan to drain via weep holes which surround your drain. If grade/pitch is not to standard (I believe 1/4" per foot, not certain if pebble requires more pitch as mentioned above) or if the weep holes were not protected from becoming plugged, the water will sit in your shower pan and seek to evaporate up through the grout causing the wet appearance/dampness. Sealing the grout so many times may be causing moisture to remain trapped below your pebble floor longer. Good luck w/correcting and keep at it. Your shower selections are lovely!

  • PRO
    10 years ago
    Who is the manufacturer? They should have maintenance information.
  • PRO
    10 years ago
    last modified: 10 years ago

    @ schubie

    .....I think you know the answer, poor preslope and/or poor weep divot need to be rectified, the bigger issue is attempting any partial repair will likely damage the denshield and compromise the curb if its actually waterproof and why try to salvage work you cant trust anyways leaving you with a comprimised attempt of a repair.... The proper fix is a full redux and not by the first tiler.

    For anyone reading this, A proper tile shower pan flood test could have alerted this homeowner to the likelihood of this failure from the get go and before a single piece of tile was wasted it could have been caught and corrected.

    We are seeing this here on houzz week in and week out, Hire wisely and find Tiler who wrrtys there install to meet TCNA ANSI standards in writing so you have some recourse... Also Know what you are getting in A quote, This homeowner got a sub par mix and match of a shower attempt with The cheapest wall board/waterproofing approach there is and its unfortunate the waste here.. - best of luck @ schubie

  • 10 years ago

    This posting is a keeper, so we can refer the next shower floor dilemma to it.

  • 10 years ago

    THANKS to all of you for your insight!

  • 10 years ago

    Good luck and hope it all works out for you.

  • PRO
    10 years ago

    Sealers do not make natural stone water proof or stain proof. Sealers help prevent staining by blocking the stain from penetrating for easier clean up. Moisture can still penetrate.
    An enhancing sealer will enhance the color but will not give the stone a sheen as if it were wet. If you want the 'wet look', a lacquer or high gloss sealer will help you achieve that look.
    The discoloration on the floor could be from the thinset still curing properly. Thinset has a chemical in it that allows it to cure when tile/natural stone is installed over it. The darker area could very well be the chemical fumes (not harmful to humans) attempting to escape the floor. Sealers will not block the fumes from escaping properly. No need to add additional sealers just give it time to properly cure. Could take a couple weeks to a couple months.

  • 9 years ago
    We are getting ready to install this type of floor. Did you find a solution? Did the stain go away over time?
  • 9 years ago

    Mary, post your tile on your post and we can help you with it. pebble tile has specific things that need to be done for correct install.

  • 9 years ago

    Hi Mary. Our solution was to have the contractor hammer it up/remove it and reinstall the entire pan. Enormous hassle, but this time it seems to be done correctly. They told us they used a different type of grout this round . . . something not as porous as the previous attempt. Ask Beth (above) what your specifics are for a correct install) It has been 6 months since completed, and all seems well. No more "ring around the drain".

  • 9 years ago

    p.s. --We waited 8 months on the first round for the ring to resolve itself. It did not, AND a few pebbles eventually loosened and came out . . . . It was a failed installation all around.

  • 8 years ago

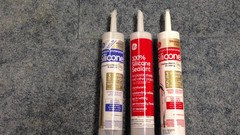
    I've sealed bathtubs, showers, and sinks many times without problem. I almost always shop at Lowes, but don't get help. This time, an associate asked if I needed help. I had him recommend a sealant. He recommended a tube of silicone, but it didn't turn out white, like the label said. It came out yellowish brown and after a few weeks it began to disintegrate. I followed the directions very carefully. I bought some new silicone, and it also did not turn out white and smooth as advertised. Please tell me what I should use to get a smooth, bright white sealant for my shower. Will this same sealant work for tubs, sinks and toilets? Thanks. Not sure why I'm having this issue, since I always had success in the past. I'm tired of wasting time and money!

  • 8 years ago
    last modified: 8 years ago

    Albert,,for the shower you need a 100% silicone. it will say 100 on it. they have it in bright white and in clear. the GE says bath on it