Software
Houzz Logo Print
lilrosa

Should I remove plaster & lathe?

10 years ago
last modified: 10 years ago

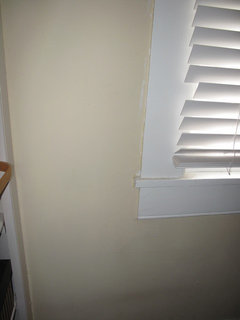
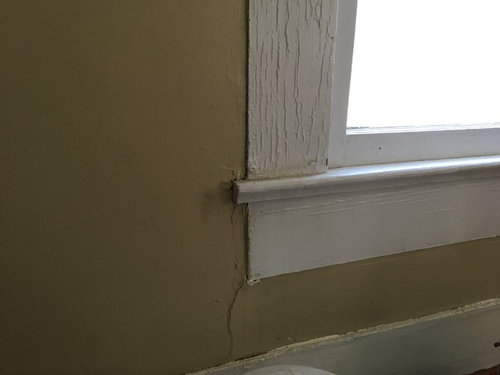
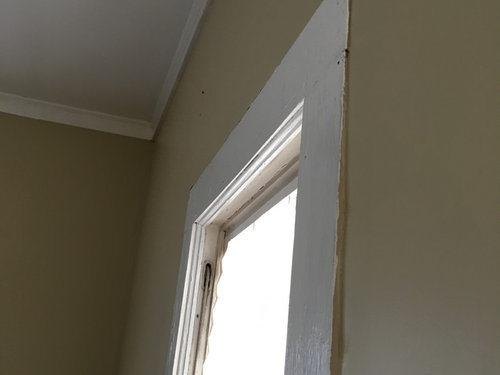
I live in a small 1920 mill house that's seen the worst of DIY home repairs. The walls in the living room appear flush with the window molding. I can only assume that the previous owners put drywall over plaster & lathe walls? Not sure how to find out for sure. It looks pretty bad, but worse than that, the drywall work is kind of a mess, too. It has obvious humps and bumps all over the place, tape is peeling, etc.

I was debating either just repairing the bad drywall job, or completely removing the wall along with the possible plaster and lathe. It seems that both will be time consuming either way. I hate the idea of adding more mud when the drywall is already flush with the molding in most areas. :/

Any advice on which course to take? (We'll probably DIY, since we're already remodeling the kitchen and spending a lot there. I feel like I can accomplish a neater job than the previous owners. I only say this because of the obvious and messy DIY work in the rest of the house. It drives me nuts and I happen to care about the details.)

Comments (25)

  • 10 years ago

    IMHO, I would tear it all out. That way you can properly insulate (if you live in a climate where insulation is needed) and have the new drywall installed properly so that it's not flush with the molding. Also, if your electrical needs upgrading, that would be the prime time to do it.

    Rosa M thanked Lisa Pinette
  • 10 years ago

    I'm usually a preservationist and would be on the side of keeping the lath and plaster. This however looks like a hot mess. A text book case of why drywalling over the existing is not a good idea. It's going to be very hard to take down the drywall without having a bad impact on the existing lath and plaster. This time I would suggest taking it all down and redoing the drywall. You could skim the drywall to give you a plaster like finish which would help minimize the "modern feel" of the drywall.

    Rosa M thanked sacto_diane
  • PRO
    10 years ago

    Your woodwork looks in pretty awful condition as well. Is this a total gut job?

  • 10 years ago

    @Anglophilia We'll probably have to strip all the alligator paint from the molding, sand a bit, fill in the holes, and repaint. I think the original molding can be restored to look better, no?

    Restoring the windows is also an eventual project since we prefer keeping them. They've been painted shut...of course. Who needs fresh air, amirite?

    We're first time home owners a bit in over our heads with this one. :'( But it was the house we could afford in this market. It's pretty small at 1100 sq ft but lots of country charm and quite cozy. The sloppy DIY work all over the place is a shame. But all the major stuff is surprisingly in working order. HVAC, gas, water pump and new-ish roof.

  • 10 years ago
    last modified: 10 years ago

    @akamainegrower Thanks for the tips. I recently watched some videos on how best to remove drywall, plaster, and lath. I was previously anxious to throw my hammer at one of the ugly walls, then quickly realized this would not be the best course of action, lol.

  • 10 years ago
    last modified: 10 years ago
    I feel your pain. We've had this work done in our 1920's foursquare and like Lisa appreciated the opportunity to upgrade the wiring and insulate. As a matter of course our contractor removes the window casings in these cases and when off they were much easier to strip and repair. But it's still really messy. You're getting good advice--good luck.

    Edit: Here's an older relevant discussion: http://ths.gardenweb.com/discussions/2472849/need-some-help-advice-on-my-old-house

  • 10 years ago

    I think that you'll have to take down the casing around the windows and the baseboards to do the drywall right. With the casing off, it's a good time to strip and prep to repaint. My tip for when you do this is to pull the nails out from the back ond to not puss them out the front. Pulling out the back will preserve the front and limit the damage to the back of the trim. I use a pair of nail trimmers to pull the nails out the back. Something like these: https://www.amazon.com//dp/B00YQ7RJQ6/


    Also with the casing off you'll be able to easily re-rope the windows and get them working again.

  • 10 years ago

    Remember--there are probably wires in the walls. If you use a reciprocating saw and demo blade, be very, very careful.

  • 10 years ago
    @sacto_diane
    Thanks for the tip. I was actually wondering about the timing of restoring the windows. Makes sense to do it when the walls are down.

    It just makes this a bigger project than I was thinking... >.
  • PRO
    10 years ago

    It's worth a try to remove the drywall separately from the plaster. It may hardly be nailed.

  • 10 years ago

    Also, be aware that there is a high probability that one or more of the old paint layers may contain lead. You do not want to be sanding such surfaces as you are likely to contaminate the house with lead dust. It would be unhealthy for you and especially for any children in the house as kids are much more susceptible to the harmful effects of lead ingestion. Here is some more info on this subject:

    Lead Paint Removal Safety

  • 10 years ago

    Are you sure that is drywall over lath and plaster? I have the same shallow inset window molding (1/4 to 1/2 inch) and it is lath and plaster. My house was built circa 1900 in a lower class neighborhood.


  • 10 years ago
    I thought I'd update as I've made an interesting discovery. I decided to demo just one wall first and see how that went.

    I think I uncovered some kind of tongue and groove wall. I haven't decided yet if that's a good or bad thing.

    I think so far the layers were: Drywall, what I think was layers and layers of wallpaper, then tongue and groove?

    This feels like treasure hunting or something. It's both scary and exciting.
  • 10 years ago

    Good luck...that looks a little scary ;-)

  • 10 years ago

    Tongue and groove walls are not uncommon right through the 1950s evidently. On both sides of the framing?

    Considering this is a modest first time project and you're living in it, I would consider repairing the drywall. If it's not a perfectly new subdivision smooth, what of it? Textured walls, highlight walls, covered walls will be fine. Insulation, of which there is likely none at all at the moment, could go on the outside if the exterior sheathing is being replaced. (Assuming it's wood.)

    I don't see anything remarkable about the simple boards surrounding the windows. Instead of spending endless hours removing and refinishing, buy new and don't limit yourself to matching what you remove.


  • 10 years ago

    Wow that is interesting - after watching a season of "fixer upper" on netflix, I sure know what SHIPLAP is now, and that sure as heck looks like it. It wafdtypically put up with the intention that it would be wall paperedbut now wuiyr ytrnrfy tyo leave it bare.

    aSSUMING the wood fits tightly to the wall, with no huge gaps for the wind and mice to get in I think it would look way cool either cleaned/sanded varnished or painted. Only you can say if its worth the effort, but I know Id have that all ripped out by now! We alll have our peeves and mine is lumpy ugly walls esp bad drywalling jobs.

    Worst case scenario - you decide to put up drywall again, but this time it would be thinner/flatter and a nicer job.

  • 10 years ago

    It's not really clear from the photo what we are looking at. There are two layers of drywall, but are the horizontal boards the inside of the exterior wall with the wall studs exposed on the interior or are the studs covered on the interior side by the horizontal boarding? What was the first layer of drywall attached to? How was the wiring and electrical outlet done? In any case, you have no plaster and no lathing to deal with, so the project is considerably less difficult and messy than first thought. I would also agree with worthy that the window trim and presumably also the baseboards and other trim is better replaced than you going through the time and effort to refinish what's there.

  • PRO
    10 years ago
    last modified: 10 years ago
    The bad news is you have (or had) termites. That is the very real danger of layering wallboard over another solid wood layer; it's just the kind of environment termites love. I saw this for myself many times while I lived in the south.

    Casey

    Rosa M thanked Sombreuil
  • 10 years ago
    last modified: 10 years ago

    @akamainegrower It's only one layer of drywall over some sort of thick multi-layered paper (approx 1/4 in thick), over some shiplap or tongue and groove wall. Not sure how electrical was done, but it's all behind that shiplap stuff.

    @sombreuil We had the house inspected for termites and it seems that we're in the clear. I'm thinking this is all old termite damage. The termite company just inspected the traps yesterday and we're a-ok.

    It's kind of funny and ironic, because when we first bought the house I had dreams of filling it with plank walls to go with the its country farm-housey charm. And now, I think that's what was there all along. Based on what we've been able to see in the attic, we also have this same tongue/groove on the ceiling.

    I still have to inspect for tightness/sealing a bit closer once I'm done tearing the rest of the drywall off. It's just lil ol' 85lb me working on it for now, so it's taking me some time.

    If we were to keep, we have some newer drywall-only walls in the living room that were a more recent addition, so we'd have to match those walls somehow to the existing tongue & groove. The plus side is our living room isn't too big.

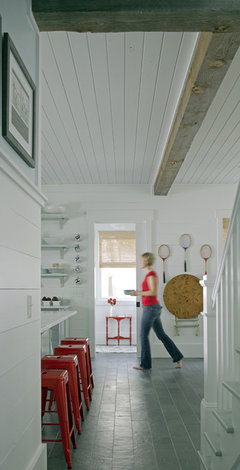
    I'd paint over the planks like this. We were thinking white:

    Hall/Kitchen/Stairs · More Info

    And worse case scenario would be to put thinner drywall back up so we don't have the weird recessed window molding. Removing the paperboard will also help.

    I'll update again once I uncover more walls. :)

  • 10 years ago

    If the interior walls really are tongue and groove, you can possibly have your plank walls with maybe even less work and expense than putting up drywall. The first step would be too scrape off any residue of paste or whatever is on the walls. Then clean thoroughly with a strong solution of TSP or similar product. After cleaning, seal the surface with a stain blocking primer. There are several brands and a good paint store should be able to recommend the best one for your purpose. Finally, paint. The amount of sanding that would be required really precludes any sort of natural finish, but such "match board" walls and ceilings were, in my experience, almost always painted anyway.

  • 10 years ago
    last modified: 10 years ago

    If you're going to rip everything down to the shiplap (if that's what it really is) and finish it, good luck on your heating/cooling bills as well as comfort as the shiplap (or whatever it is) is not an air barrier. As well, all your electrical receptacles and switches will have to be changed to surface mount.

    If shiplap walls are what you really want, I'd venture it would be cheaper to leave what's there and shiplap over the surface as in the posted pic. You'd have to build out the window trim and add extensions to the receptacle/switch boxes.

    But if your time is unlimited and not better put toremunerative labour, enjoy!

  • 10 years ago

    If you want to keep the wood, take a look at a few Fixer Upper episodes. She's in love with shiplap and you might find her ideas useful. http://www.hgtv.com/shows/fixer-upper

    Where you are could be a clue, too. From what the woman on that show says, shiplap is a very common Texas thing.

    If the wood is actually tongue and groove, doesn't that make it pretty tight, even if it does look gappy? (character?)

    And if both sides of a wall are tight with an air gap between, isn't that pretty good insulation if you're not in a harsh climate? That's what my ex said, anyway, when he was teaching thermodynamics at the college level and working with a passive solar house contractor. Wood is not a good heat conductor, as well.

  • 3 years ago

    What’s the outcome of this house?

  • 3 years ago

    @Sheila Pruitt We removed the drywall from two walls in the living room to expose the shiplap and painted over it in white. While it's charming and cute, it has impacted our cooling/heating bills significantly because there is nothing between the shiplap and siding.


    In older homes with shiplap, the airflow is good as it prevents wood rot and mold, but not good for modern AC/Heating bills. If I wanted to insulate without risk of wood rot or mold down the road, I would use Matt Risinger's insulation tips here:

    https://www.youtube.com/watch?v=jhoQ_f9ZnzQ&t=303s

    https://www.youtube.com/watch?v=VHPS5HC7VYw&t=445s


    He uses a material that adds an air gap between the siding and insulation material.


    If we had the extra funds, we would do it this way. We have left all other drywall intact for now because of this. We don't have the funds right now to fully insulate all exterior walls properly.