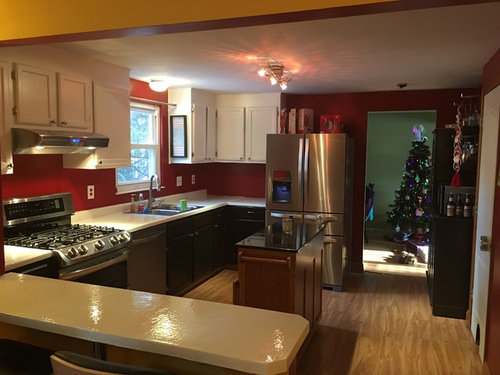
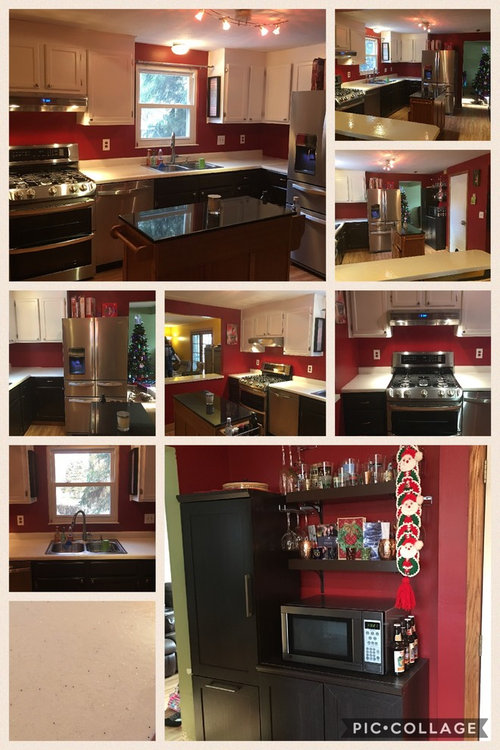
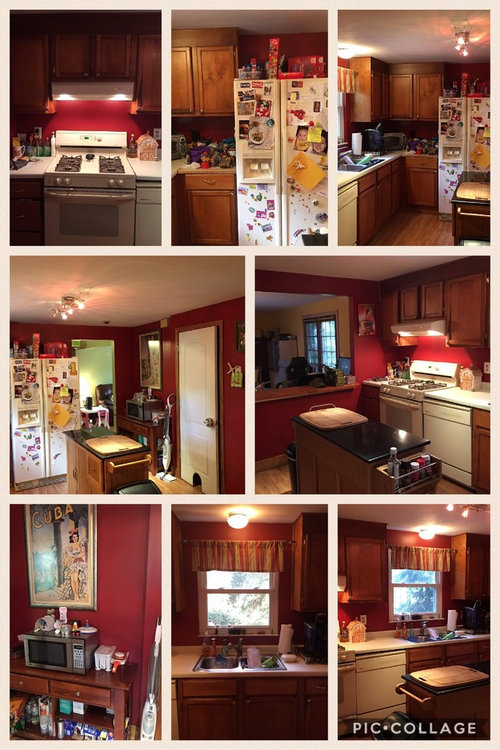
I redid our kitchen after work and weekends, it ended up taking me 2 months to do it all. Here is what I did along the way.
During all my research I found some instructions online, lots of videos. I really wanted to find a long post on what someone did, laying in bed next to your spouse at 2:00 am they don't not want to hear kitchen remodeling videos. I decided to write this to help those people who can't sleep but want to know what I did to get to the end of the project.
See my separate post on what I learned about tackling a project of this size.
Before I started anything I planned out what I was going to do. Made a lot of lists and broke them down into sections. I didn't 100% follow my lists but helped me think and plan everything out. Lists about steps for cabinets & counters, lists about touching up other paint around the house, lists about appliance research. I am a list person, but it really helped me make sure I wasn't forgetting any steps. We still had to run out to home improvement store for brushes we forgot, more polycrylic, and noticed things while working we wanted to fix or clean before moving along in the project.
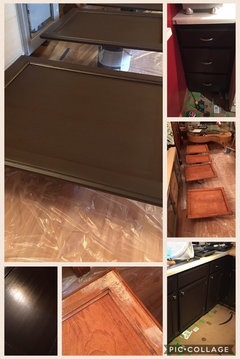
I purchased rustoleum cabinet kits in light and dark. Decided to do espresso with glaze on the bottoms and pure white with no glaze on the uppers. If I had to do it again I would not buy the kit and just buy paint and all the supplies. We ended up purchasing so many extras and not using everything in the kits.
Also we did it in sections. Upper cabinets first, then once done I did the lower cabinets. If I had to do again I would do counters before the cabinets. I accidentally hit a spot with the power sander and had to touch it up. No one else notices the spot but I see it all the time.
Cabinet steps:
1. Empty all cabinets
2. Wash inside and outside of all cabinets with dish soap and hot water. Rinse & dry.
3. Take down all cabinet doors & remove all hardware.
4. Wash cabinets with TSP solution. Rinse and dry.
5. Fill all holes and seams along edges of doors. I used pink wood putty that dried white, so I knew when dry.
6. Sand cabinets, the kit said not to sand but I feel like they would not have been as smooth if I did not sand. My personal opinion if you skip sanding the end result will not be as good.
7. Apply deglosser and scrub. This was like a second sanding. Rinse & dry. The rustoleum kit came with way to much deglosser. I have so much deglosser sitting in the garage, no idea what I will do with it all.
8. Tape everything. I used green frog painters tape and liked it better than the blue stuff.
9. Prep takes the longest and it is the most boring part of the project. Once you are actually painting you start seeing change but you don't see change during prep steps. Don't skip or cheat out on prep you will be happy later that you didn't.
10. Line your paint tray with tin foil, I used the same tray for the entire project. I know paint trays are cheap but it made for easier clean up. Plus tin foil is cheaper than paint trays, especially when you find it on clearance at Target.
11. Apply primer. I used gripper primer from Home Depot. One coat for espresso cabinets and two coats of primer for white cabinets. I used the disposable sponge brushes. Found they applied the smoothest and could throw away when done. I would wrap them up with plastic wrap between coats. They never dried out and I didn't waste as many sponge brushes.
12. Applied paint. Followed instructions on how to apply from kit. Edges, centers, main face, then raised outside edges. Thin, even coats and don't over brush. Did 4 coats of white on front of cabinets & bases and 3 on backs. Did 3 coats of espresso.
13. Apply glaze to the espresso cabinets. It wasn't a huge difference but loved the effect when done. It just made the lower cabinets a more rich dark brown. Plus removing the glaze added a slight texture look that I really liked.
14. Did not use topcoat from rustoleum kit, reviews said it yellowed over the white. After all the hard work painting didn't want to mess up my bright white with yellow topcoat. Stuck with the polycrylic for espresso cabinets, I had a system and didn't want to change it up. Applied 3 coats of satin polycrylic. Do not over brush your polycrylic with your sponge brushes. Catch that missed spot in your next coat. I did top off each coat but that is barely touching your sponge brush to the finish. It didn't over work the polycrylic. I learned if you over work it you end up with air bubbles or cloudiness. Start with the back of your cabinet doors, I used that as my test and by the time I got to the bases and fronts I knew what would and wouldn't work with my technique. But those mistakes are hidden behind the closed doors, if you look hard you can find them but only rude people come over and open your cabinet doors looking for mistakes.
15. Carefully removed painters tape while topcoat still wet. I found removing the tape while topcoat still damp gave me crisper lines than when I waited until fully dry and needed a razor to help get off.
16. Let dry 48 hours then put the new hardware on and hung cabinet doors back up.
17. Waited another 48 hours before putting stuff back in cabinets. Didn't want kids to touch them until I was sure they were dry.
The countertops were the most gut wrenching part of the project. I struggled with picking a color and a product. We couldn't afford to replace the counters because I purchased new appliances, so I needed something to apply over our current 70s laminate. The reviews were not good for the big box store DIY kits and products, so I kept searching. I finally found Armor Garage during one of my 2:00 am kitchen idea searches. They manufacture garage floor epoxy, so I figured if the product holds up to that use then they have to know how make a pretty good product for countertops. I will let you know in 6 months if still holding up to a busy family with kids, but it seems super strong right now.
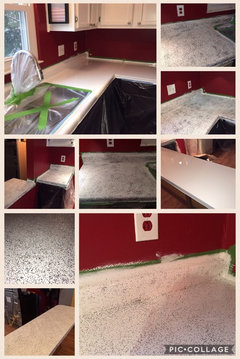
Looking at all the colors on Armor Garage website they felt too dark for what I envisioned. Finally decided on absolute white, still bummed no photos online of the absolute white and absolute black epoxy. Ordered the product online, not sure exactly what I was getting as far as color. A few things were missing from my order, but they were quick to fix things. In no way is my home dust free, so applying the absolute white in areas where no dust landed it was perfectly smooth. The epoxy self leveled really well, but I kept seeing the specks of dust. This was when I started picturing quartz and thought I could apply glitter. Glitter would hide the dust specks and would add some interest to the plain white counters. My first attempt was awful!!! (See pictures attached). I had to cover counters again with more epoxy to hide the first attempt at glitter. Very happy with second attempt. (See pictures attached).
Here are the steps for the countertops:
1. Clean counters really well with dish soap and water. I find good old Dawn dish soap cut through any grease on my surfaces before I got to later steps.
2. Fill any gouges in the counter surface with wood putty. Used my trusty pink putty again.
3. Sand the counters. I did 80 grit and then 100 grit using a power sander.
4. Clean with TSP solution and rinse & dry
5. Tape counters off. I learned to remove the tape and reapply after each epoxy coat and each top coat. It dries really hard and is difficult to cut off. Pay special attention around the sink if you don't remove the sink like we did.
6. I also put plastic sheeting on lower cabinets. Glad I did when I dripped
7. Apply the included primer
8. Mix the epoxy, I used cheap plastic disposable containers. Mix in small batches. I used 4 inch rollers from the big box store. They were the 1/8" fuzzy ones, not the hard foam ones.
9. Applied 3 coats of white epoxy. It was great at self leveling and no real issues with the edges. Very little dripping but was able to get off with razor blade between coats. Also I got better at applying as I went on, so later coats did not have any drips. I did notice dust in the smooth white finish which was when I came up with the glitter idea to hide the dust.
10. First attempt I tried sprinkling on the glitter. Trust me that did NOT work. Do NOT sprinkle glitter, it looks awful and makes your house a glittery mess. I was ready to cry at how awful it looked. My husband kept trying to be encouraging, telling me to walk away for a day or so and then see what I thought. Time didn't help, I still thought it looked awful. I ended up sanding it down some and applying 2 more coats of white epoxy to hide the awful look. After I did this my husband finally admitted it looked awful, but he was trying to save my feelings since I was working so hard. (Honey, don't save my feelings tell me it looks like crap, so we can start thinking of a fix).
11. I still liked the glitter idea, but needed a better application method. I mixed glitter into polycrylic in red disposable Solo cups and rolled it on. Lots of white glitter and clear glitter and a only a few pinches of silver and black. I ended up doing 3 thin coats of the glitter / polycrylic mixture rolled on. Then one final coat of plain polycrylic to help seal in all my glitter. Second attempt looked so much better. It won't fool anyone that it really isn't quartz but the look is more what I was going for.
12. I let all of that dry for 48 hours just to be sure.
13. Then I took the power sander to the glitter coats to smooth it out some before applying the top coat. This also helped to make sure topcoat had a good grip.
14. At this point everyone and everything in my house was covered with glitter. My family was not happy that everything had glitter including the dog.
15. I applied 2 thin coats of top coat. I used 4 inch high density foam roller, no fuzzy. It went on smoother this way. This was the smelliest step of all. The smell really bothered my husband to the point he took kids and left the house for the day, but I think I got used to the smell. It really looked like it needed more but I let it dry. I had a business trip so I didn't get back to it for another week. After looking I decided it needed more top coat.
16. Lightly sanded counters again and then applied another 2 additional thin coats. That extra topcoat really made a difference in the look. It is super glossy even after drying. They are not 100% smooth, but did self level so it doesn't show brush marks. It is pretty smooth though.
17. Let it all dry for 48 hours then applied clear caulk to all the edges to make sure it was sealed. Especially around the sink.
18. We are waiting a full week before putting stuff back on the counters. Instructions say 5 days, but after all this time an extra couple days is not going to be bad to wait.
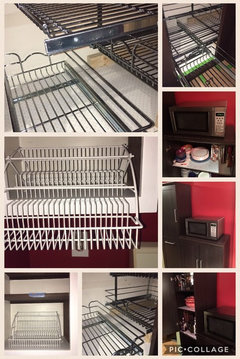
As part of the project we also added some rev-a-shelf organizers, spice rack and tall cabinet in the corner. I loved the blind corner organizers, but they cost a fortune. My husband installed a two shelf organizer on 2 inch boards in the back corner. This made it high enough that it cleared the other organizer. So now I can get at the stuff in the back corner of the cabinet. I hope the pictures attached help explain. Everyone that has seen this loved the idea and fact it cost a lot less than the fancy blind corner organizers.
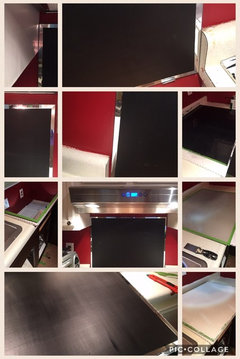
One of my great ideas that didn't end up working was the chalkboard behind the range. I still think it is a good idea, it just didn't work for us. I didn't want to sand the wall until smooth to apply the chalkboard paint, so I purchased a bathroom mirror for under $20. I taped off the edges and sprayed it with glass frosting spray paint. This gave it enough texture for the chalkboard paint to stick. Do not use primer on glass, it won't stick. Took a couple fails to finally figure out the frosting spray and then my paint stuck to the glass. I then applied my 6 coats of chalkboard paint. The edges were still mirrored and it looked exactly how I pictured. Then we went to hang it behind the stove, no matter how we tried I couldn't get flush against the rangehood and still get it in the brackets. We also learned none of our cabinets are square so none of the edges lined up. We ended up scraping the idea. It would have been great if the cabinets were square and could mount flush to the rangehood. (See attached pictures).
I wish anyone tackling this type of project luck. It was worth it in the end, but a much harder project for one of my few attempts at DIY.


 9 years ago
 9 years ago
 9 years ago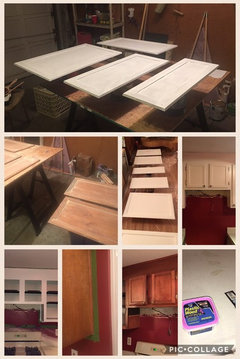


CandiceOriginal Author