Software
Houzz Logo Print
phlegmatic

Corner grout line widining as approaches ceiling. Advice Needed!

9 years ago
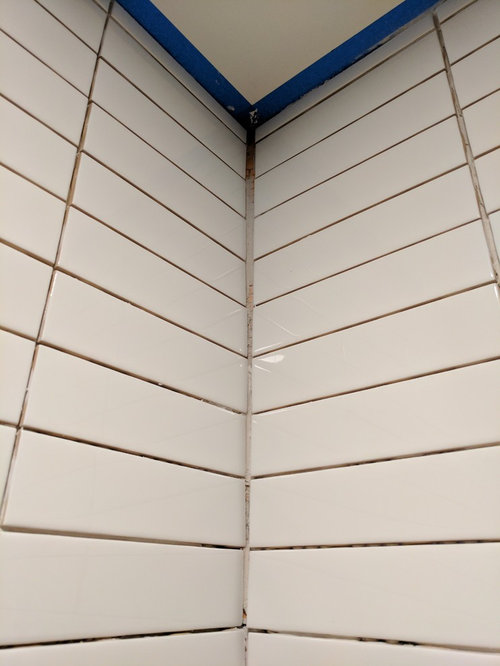
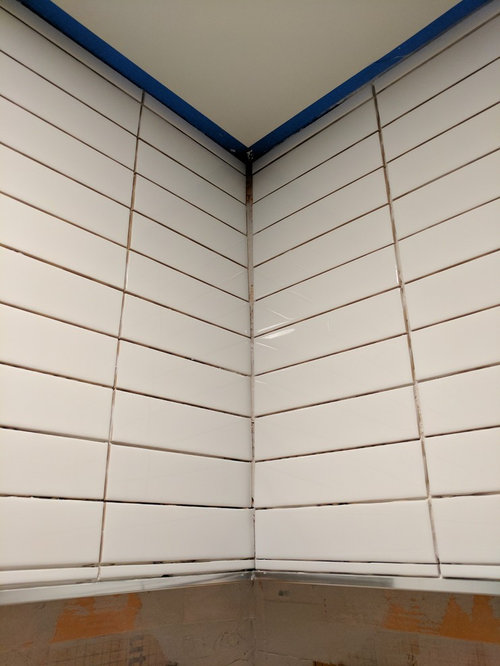
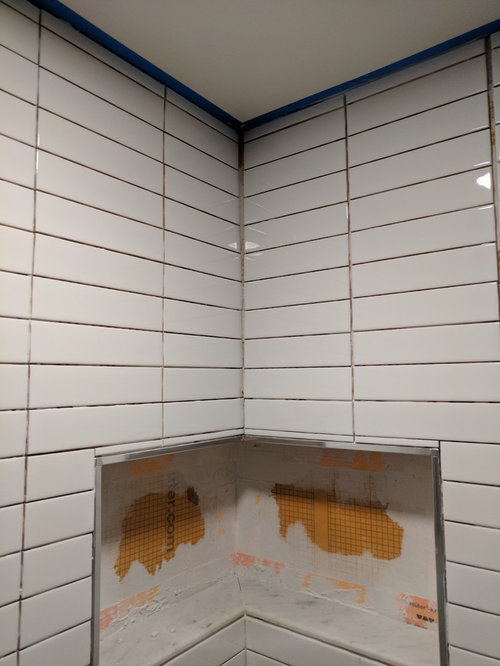
OK I'm tiling my shower and have made a few mistakes. 1st mistake I make was measuring the framing for the niche wrong for the tile height, so I have a little sliver of tile on the top. This I can live with. Not ideal, but not the end of the world.


The bigger issue is that the framing is a bit off and this gap opened up in the corner as I approached the ceiling. I have not grouted yet so I figure I might be able to still salvage somewhat. I really don't want to rip the whole shower out and redo.


So my thought is can I remove the tiles where the grout line starts to increase and build out the back with thinset to close the gap? I realize the wall will start to slope inwards up there but at least I can get that grout line back consistent.


OR


Do I just caulk the corner seam and forget about it. The grout is white anyhow so it shouldn't be too noticeable. I will still notice though.


Any advice is appreciated. I know this isn't the best tile job. please keep insults to a minimum! HA!


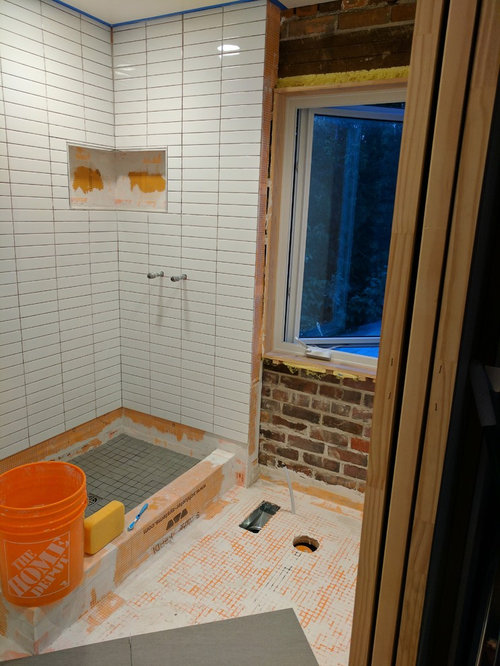
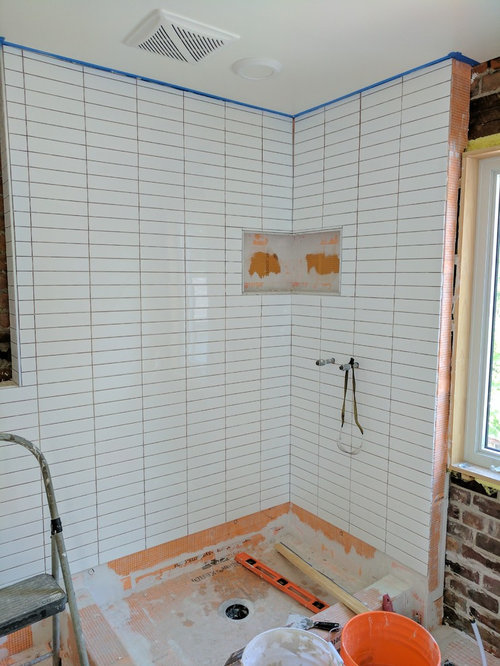
Photos attached:


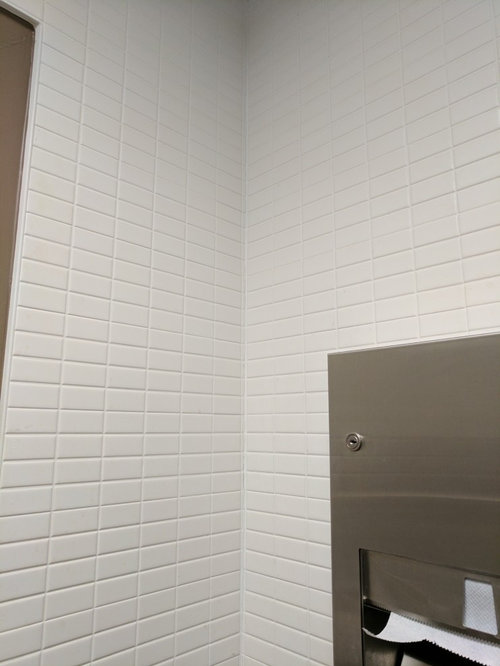
PS: I took a look at the bathroom at work and the corner is all kind of crazy with lots of small cuts and caulking. But with the white on white I never noticed in the 10 years of working in this building. See attached image below for reference. Not my work


Comments (14)

  • PRO
    9 years ago
    last modified: 9 years ago

    when you start pulling tiles and if they were set properly and have cured you may very well pull your kerdi off with it, Now you are in a pickle and must keep removing tiles until you get a chance to repair kerdi. with proper 2" overlaps. This gets very dicey in corners and changes of plane.5 tiles can lead to the whole wall.

    You are right its not the worst tile job by any means we see much worse here on Houzz. I would fix it , but thats me.

    In regards to keeping insults down, I didnt even see the tile, my first thought was building a springboard to dive over the tripping hazard /curb and into the shower! Holy jumbo curbs batman.

    when you flood tested that id suspect 15 gallons of water?

  • PRO
    9 years ago
    last modified: 9 years ago

    Did you see how Tundra slipped that "Did you flood test?" in there without actually saying it:) Your problem in the corner needed to be addressed while framing. You must have noticed it when installing the wall board. You pretty much made your decision at that point. The paper face on the Kedri board will certainly be damaged. We know where your repair will start but have no idea where it will end.

  • 9 years ago
    thanks for the replies. That's my fear also, as soon as I start taking tiles off I might damage the kerdi.

    as for the curb, it's the standard schluter shower kit curb. maybe the wide angle lens makes it look bigger?
  • PRO
    9 years ago

    Those are some pretty large grout joints. Most wall tiles have built in bumpers that allow you to butt them side by side and create a very small 1/32" or 1/16" inch grout joint. Hindsight is foresight.

  • PRO
    9 years ago
    last modified: 9 years ago

    Kerdi is a complicated waterproofing set up that is just not needed in a residential non steam bath. It actually creates more possible issues with adhesion and you would have been better off just hanging a plastic sheet behind the cement board.

    Problem you have now is if you pull some tiles you pull the Kerdi. Scuhluter is one of those products that is promoted all over the internet and the Co uses forums to promote their products. problem is DIY'ers don't have the skill set or experience to use it. Any pro using it has had to test their install methods as you have to be assured that it is adhering to the wall. I just don't get why with all the roll on waterproofing methods outside of a steam shower or a high-rise install.

    It might sound crazy to a DIY'er but I would redo the smaller wall. Yes you will disturb the Kerdi but you will also correct that gap issue. Move the tiles over to the left by cutting the lowest one the size of the gap on the top and then run a plumb line from the outer edge of the lowest tiles right side edge. This will have you cutting the tiles up to about midpoint and then you should have the correct grout line.

    I think the corner upper portion gaps are just too big. A trick to correct uneven gaps is to run two pieces of tape parallel to each other using the widest gap to space them. What this does is make the gap look uniform top to bottom. Use non silicone color matched caulk and do in two steps First as just a fill for the gap and the second as the finished bead. The bead has to be pressed down after you pull the tape or it will lift off.

    Good luck and spending time now will save you a lot of work later. Even pros have to redo jobs. Where is the shower head?

  • PRO
    9 years ago
    last modified: 9 years ago

    Not to debate but to give a different perspective. ( yes I resisted the change kicking and screaming) Cement board, poly, liner and a mud base you have a water in & water out system. Which in this day and age is going obsolete. Largely due to a lack of qualified installers. There is no advantage to having a saturated mud bed compared to topical waterproofing. Once you have accepted that the next decision is liquid or sheet membrane. I will always use sheet systems do to the fact that I know exactly what is being applied. They are basically roofing systems Liquid (roll on) systems have to many variables. Installer applied to thin or thick, didn't let dry enough, Temp, humidity, skinning. Neither the installer or the inspector know if it is the proper dry thickness. This is just one tile setters opinion and Schluter is not my system of choice although I have installed many.

    phlegmatic. Not a bad job for a DIY'r. It's a shame about the corner. I'll bet you don't make the same mistake twice:)

    phlegmatic thanked Creative Tile Eastern CT
  • PRO
    9 years ago

    Caulk that thing and forget about it. Maybe some white gloss Corian corner moulding. Pulling tile is too risky.

  • 9 years ago

    Another one for caulk. See if you can find the matching 100% silicone caulk that goes with your grout brand. Or if not, I would consider maybe getting the proper sheen (standard, satin, or sanded) that would work in the installation, just to make it blend better.

    http://colorriteinc.com/color-sil

  • 9 years ago

    Creative Tile Eastern,


    After weighing all the options and looking at a few other showers/bathrooms your suggestion is exactly the solution I've decided to move forward with. My thought is to grout the corner, grouting one side first, letting it cure, then coming back and filling the other wall to create a 90 degree corner. The resulting grout line will actually not be much bigger than the rest of the grout lines in the shower and because it's going to be white I think it will limit how noticeable it is.

    I wish I could go back in time and straighten the framing, but unfortunately I am on a very limited budget for this project and this will have to do.

    I really appreciate all the suggestions and comments that everyone has provided. I'll be sure to follow up once the work is completed to give everyone a conclusion to what I can only optimistically refer to as an experiment at this point.


    Thanks,


    Ryan

  • 9 years ago
    last modified: 9 years ago

    Grouting a corner usually gets a crack. We all know this. Use the sanded caulk that looks like the grout. If you don't leave a large bead sticking out it wont look like caulk.

    I wouldn't redo. The wall isn't perfect. Life isn't perfect. Not particularly noticeable unless you look for it. We have seen worse posted here. Honestly it is pretty darn difficult to get perfect walls unless you use LSL studs which are straight and have zero bows in them.

    I also would use liquid membrane over the kerdi, considering price and applying the kerdi (correctly) looks like a PITA in my opinion. Its like trying to use flashing on an entire wall. Needs special corner trim, etc, phooey on that.

    There was a question on where the shower head is? Was this forgotten because I don't see it either.

  • 9 years ago
    last modified: 9 years ago

    Do not use sanded grout caulk in place of real grout it is prone to mold and not designed for wet area corners read the MFG pdf on that. If I followed Creative tiles advice I would grout it all in one pass with a portland sanded and shape it . Doing it in 2 phases creates a "sort of" cold joint in the already fragile corner offering a better chance at cracking.

  • PRO
    9 years ago

    Yep. grout it all at once. thatsmuchbetter is also correct with siliconized acrylic molding fairly quickly.

  • 9 years ago

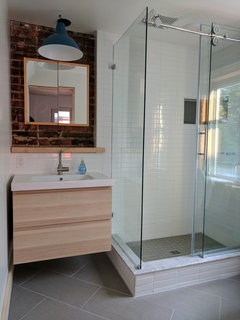
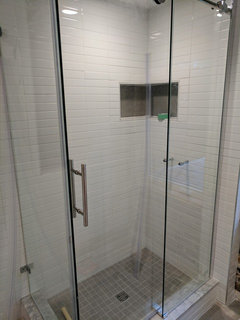
    Hey Guys,

    I just wanted to thank everyone for the advice. The bathroom is basically done. I'm just waiting on the shower mixer and hand shower hardware to arrive. But here are some pictures, in the end the gap is not noticeable at all. I ended up using white grout in the corner and a sanded caulk for the other corner seams.