Software
Houzz Logo Print
gtcircus

An inexpensive way to change leather chairs

9 years ago
I love ideas about how to repurpose things. In this instance I conditioned old red leather chairs and restained them to brown leather. Here are the photos of the before, during and after. One more chair to finish along with some touch ups. Do you have a trick to share with Houzzers?

Comments (63)

  • 9 years ago
    Wow , what a change !!, but where are the instructions to change color ?
    gtcircus thanked silviakunst
  • 9 years ago
    The instructions come on the bottle but you purchase a companion leather primer which is basically acetone. Use the acetone with a soft cloth to take the old finish off. Use a sponge to apply the new finish. You layer on the new finish, let dry and use. Not difficult at all. You can do the same thing with shoes.
  • 9 years ago

    What an awesome post. I love the before and afters, and also that you shared the products! Thank you. Do you have tips on minimizing tiny claw pricks on brown leather from a bad kitty cat? It hasn't ruined the chair, but definitely detracts from its appearance.

    gtcircus thanked WishICouldAffordThat
  • 9 years ago

    The chair looks soooo much better! Fantastic work!

    gtcircus thanked Loribeth Clark
  • 9 years ago

    Wish I had known about this process before I sold my Dad's yellow leather work chair at a yard sale for $15.

    gtcircus thanked djbittle
  • 9 years ago
    Looks great, and I like that it is usable, doesn't rub off on to clothing. Definitely a worthwhile project to do!
    gtcircus thanked Joy
  • 9 years ago

    Gorgeous! Love up cycling.

    gtcircus thanked mequarto1
  • 9 years ago
    Does the chairs have a lingering chemical odor? I'm wondering about out gassing since I am sensitive to smells like the new car odor etc.
    gtcircus thanked lyn D
  • 9 years ago

    Have you any idea if the product you used would work on distressed/natural leather? Thanks for sharing this!

    gtcircus thanked User
  • 9 years ago
    Question: What product did you use to repurpose your chairs? I have been wanting to do this, but I was afraid if I chose the wrong product it would rub off on clothing or other things. Your chairs look AMAZING!!
    gtcircus thanked rfv6712
  • 9 years ago
    Is there a similar product for to change fabric?
    gtcircus thanked ltwiggs
  • 9 years ago

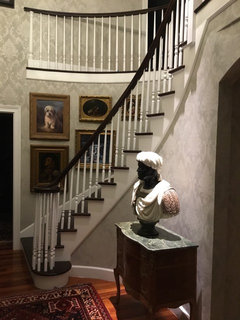
    Oooooh! The dog painting!!!!

    gtcircus thanked whynotdecorate
  • 9 years ago
    No lingering fumes. I posted what I used. Thanks, the dog painting is unsigned but attributed to Armfield.
  • 9 years ago

    VERY interesting!!!! You could also fold a beautiful wool throw and place it over the back of the chair, feeding the end through the opening, so the seat still shows.....I mean, if you need to re-finish it five minutes before your company arrives!

    gtcircus thanked clemenza2
  • 9 years ago

    The chair looks like it was always black!! Great job!

    gtcircus thanked chrisstack
  • 9 years ago

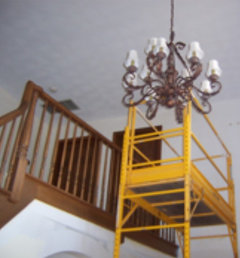
    Dang! The chair looks really good, and so does the light fixture. Thanks for sharing.

    gtcircus thanked deeners1
  • 9 years ago

    Chalk Paint by Annie Sloan does great too on leather.

    gtcircus thanked Dee Kohler
  • 9 years ago

    Looks great!

    gtcircus thanked hooked123
  • PRO
    9 years ago
    Wow, both projects came out great. Love the chair!
    gtcircus thanked User
  • 9 years ago

    Love the way both your projects turned out! Thanks so much for sharing!

    gtcircus thanked Barbara Murphy
  • 9 years ago

    Well done you. Looks great. Now for the Chesterfield setae and wing chairs! Wish me luck.

    gtcircus thanked Richard Warren
  • 9 years ago

    Love the chair. Any thoughts or experience on whether this would work on good quality pleather chairs? Some version of "vegan leather".

    gtcircus thanked sudsmom
  • 9 years ago
    last modified: 9 years ago

    Because you have to treat the leather with acetone to take off the old finish, I doubt it would work on plastic/leather. I would think the acetone would dissolve the pleather. However if you have an inconspicuous spot to test, you can always try!

  • PRO
    9 years ago

    Wow, great job!

  • 9 years ago
    How did you manage to create such a major transformation!! I have two green leather chairs I would love to transform
  • PRO
    9 years ago

    Looks great!!

  • 9 years ago

    Nice!

  • 9 years ago

    I loved it red! I really like the chandelier makeover!

  • PRO
    9 years ago

    Seriously phenomenal job! It looks amazing.

  • 9 years ago
    Thanks all, I really love red to, but after 20 years I wanted a change. I love the chairs red, they are comfortable, but as you can see, the red no longer goes with my renovated interior so that is why they are brown. In 20 years when I tire of the brown I can always restain them back. Also the rub n buff works great if you need to change the metal ceiling fan parts versus buying new fans.
  • 9 years ago

    They look great, thanks for the post. I have used a similar product for almost 30 years to do my wife boots and one old jacket over. They always wear out before the new dye does so longevity should be fine. I would recommend being careful around the wood and tack heads as the dye will change the color of them as well.

  • 9 years ago

    great job.....u have patience and a gift for shading colors...

  • PRO
    9 years ago

    great idea........... to see something different, original and creative.

  • 9 years ago

    The chandelier is stunning... Kudos as I rare see the up cycling of these as a success. The chair is phenomenal too, but the chandelier is just terrific. Inspiring truly!

  • 9 years ago
    I also see failed up-cycling, but if you are going to throw a piece out, why not try. Most issues arise from poor prep of the surface. Thanks everyone. The up cycling shall continue!
  • 9 years ago

    Obviously you are very talented because the change looks terrific. I assume you did this outside or in an extremely well ventilated room with gloves on as the chemicals must have been a bit overpowering.

  • 9 years ago

    Was talking about the chair in my last remark. Just saw the chandelier. Great job! I also love your dog painting. Would love to see some more of your projects as you are obviously creative and talented.

  • 9 years ago

    where did you buy the product from?. Amazing!

  • 9 years ago

    They look wonderful. Glad to learn about both products. Wondered if you protected wood & nail heads somehow & how much dye needed to do 1 chair? Wish I had known about dye before I got rid of old Italian leather couch I paid $39.00 for & used 6 years before white hairline cracks appeared. Replacement couch not nearly as comfortable or pretty☹️

  • 9 years ago
    The leather stain was purchased from a local cobbler, but you can get it from Amazon. The Acetone was purchased from Ace Hardware.

    The Rub'nBuff was purchased from Hobby Lobby. The black spray paint which I used to prime the chandelier was purchased from Ace Hardware.

    Yes, you must work in a well ventilated area. No I did not wear gloves for any of it. You can, but I find that the acetone really dissolves most gloves.
  • 9 years ago

    Well done, beautiful job! Would it work to go lighter? Like take a red or brown leather chair and make it white or a light tan? Darker to lighter?

  • 9 years ago
    I have never tried it. But it would be a great project to try on an old piece of leather. The trick is to do sufficient prep with the leather conditioner (acetone base). Again the chandelier can also be changed to gold instead of silver. They had a nice chandelier from Lowe's but it only came in bronze and it was under $100. The one in gold from another website was $1000 so I just changed the bronze to gold and called it day.
  • 9 years ago

    Creative trick! Thank you for posting this

  • 9 years ago

    Very good, thanks for the response. I may try dark to light on a scrap piece of leather, with, as you said a lot of prep (remover). Thanks again - very helpful.

  • 9 years ago

    That chair looks great!

  • PRO
    9 years ago

    Great Pictures! Thank you for sharing the before, between, and after pics of this, it is really helpful!

  • PRO
    8 years ago

    Looks great, great seeing the process and the after.

  • 8 years ago

    Nice job!

  • 7 years ago

    Here is an update of that entry with the new upcycled chandelier. AND the before!