Software
Houzz Logo Print
samalive4

bathroom wall tiles uneven

9 years ago

Hello,


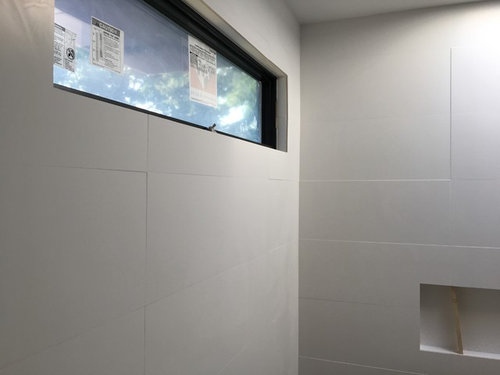
The contractor has tiled and grouted our bathroom wall. The tiles we are using are Porcelanosa 12" x 35", so they are somewhat large.


The problem is, the tiles are not looking perfectly flush. They seemed ok before grouting, but after - the unevenness seems to show more for some reason, maybe because of the shadowing. They will try to remedy with further grouting, and their excuse is the tiles are not perfectly the same width. I have a hard time believing this. The other excuse is, since the tiles are so large, it's hard to make them perfectly flush.


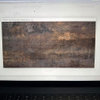
When I run my fingers between the tiles, there are definite steps. Small, but still noticeable, if you check out the pics.


Is this an acceptable amount of variance? Any ideas for alleviating the situation?


Thank you.


Comments (20)

  • 9 years ago

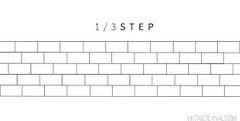
    They should be offset 1/3 for starters, never a "running bond" (all even joints). Were the walls flat? What sort spacing system was used?

  • 9 years ago
    last modified: 9 years ago

    Thank you millworkman. What does offset 1/3 mean? Sorry I am a newbie with this.

    Behind the tiles are wonderboard, that they installed before the tiles.

  • 9 years ago

    These are stacked, right? That should be ok for them to be flat. Running bond is 50% overlap like brick. 1/3 overlap is 1/3 of a tile on the higher row over the tile in the row beneath.

    S K thanked palimpsest
  • 9 years ago

    S K thanked millworkman
  • 9 years ago

    Thank you both. Yes they are stacked, for a more contemporary look. But they are not totally flush with each other. This is our first bathroom remodel, so it is very frustrating to see the work not being as accurate as it should be. Is it a hard ask, to get this to look clean and level?


  • 9 years ago

    Large tiles are difficult to work with as they are rarely flat from the firing process. But I think some of the lippage you have might be outside acceptable range. The lighting may exaggerate it.

    S K thanked palimpsest
  • 9 years ago
    last modified: 9 years ago

    palimpsest, should i ask them to take out and replace the most egregious ones? how difficult is that?

    or is there a way to grout, that might help? it's weird that i didn't notice this before grouting. the white grouting amplifies the gaps.

    reason why I am asking on this forum, instead of asking the contractor directly, is the result of my frustrations with this contractor.

  • 9 years ago

    I think the lighting is accentuating it. Are you planning any lighting changes that won't be so shadowy?

    S K thanked lisadlu16
  • 9 years ago

    The tiles are huge, which means the surface behind them has to be absolutely flat to allow them to lay flat ... which means you have to start by making sure the studs in the wall are absolutely straight and squared (planed and shimmed as needed), then that the wall material behind the tile is absolutely flat.

    And because they do warp a bit, you have to use an alignment tool like this even if the wall behind them is absolutely flat.

    http://www.homedepot.com/p/QEP-LASH-Tile-Leveling-Aligning-and-Spacer-Clips-Part-A-96-Pack-99720Q/100645280


    It's a lot of work if you insist on perfection, and your tile installer should have warned you that with your choice of tile and layout that it would be hard to give you a totally flat wall without lots of extra work for him and expense for you.

    S K thanked User
  • 9 years ago
    last modified: 9 years ago

    Even if this was a gut job and the walls are brand new, wood studs aren't perfectly flat, nor exactly same size, and thus the walls aren't, etc.... it costs a lot more money to get perfectly flat walls to end up with perfectly flat tile of that very large size. My GC said they'd use metal studs, for example, as one additional step if I was using large format tile. I'm in a very high labor cost area so ymmv.

    fwiw I used three inch by six inch subway tile partly because I knew I'd get lippage with larger format. And I still have some tile that aren't perfectly flat with the tile next to them. Ditto the two inch octagon floor tile. Sorry can't get parenthesis to work so hard to read this post!

    S K thanked amanda99999
  • 9 years ago

    lisadlu16, these photos were taken in daylight with a skylight up above. not sure what they will look like under lighting, as that has not been completed yet.

    lazy gardens/ap999 - yes I guess the contractor should have warned me about the difficulties. behind the tiles are brand new wonder board. shouldn't that be straight to begin with? they are telling me they will try grouting more to alleviate the issue. not sure if that will help.

    if I had disposable money, i would break the tiles and start over. unfortunately i may have to live with this awhile. anyone in Westchester, NY contact me and I will tell you, who to avoid working with. why is it so difficult to find a straight up contractor, who values precision and timely good work? demo finished April 1st, 4.5 months later, still not finished.


  • 9 years ago

    In general, when using large format tile, more thinset needs to be applied between the tile and the cement board to get full coverage. Unfortunately, when thinset cures, it can shrink a bit. That shrinkage can take a perfect installation with zero lippage and throw it askew overnight as the thinset cures and shrinks.

    Many installers will use a medium bed mortar instead of thinset for large format tiles due to the thicker bedding required.

    It would have helped had they used one of the tile leveling systems when setting the tiles.

    The stacked pattern will help minimize lippage. You have that.

    The high angle, raking lighting will accentuate it. You have that too.

    The smaller the grout joint, the more the lippage is accentuated. You have that as well.

    There's not much to be done about the installation after the fact. You can minimize the visual impact with a change in lighting that will get rid of the shadow lines.

    In general, for narrow grout joints, the typical lippage allowed is 1/32", about the thickness of a credit card. There are other things that can alter that number, how warped the tile is, for example. But 1/32" is the basic number.


    S K thanked MongoCT
  • 9 years ago

    Mongoct,

    Thank you for the detailed response. Good to know the acceptable amount of lippage. For the most part the work is within/slight bit over the acceptable amount. But the overall effect is not what I want.

  • 9 years ago
    last modified: 9 years ago

    I feel for you, OP. The tile work in both of my recently renovated baths is not what I expected (and I even chose tile to minimize lippage and other problems (ceramic, matching grout color, small and common size, tile guys favorite brand) - but still plenty of install issues), despite enormous cost (to me, not for my area). I dont have wisdom to help u fix it, unfortunately, but know this is common - all my friends talk about similar reno issues.

    Depending what it would cost to change the lighting, compared to cost of redoing the tile with smaller tile, if it was pricey either way I'd do the latter. I wish I had ripped out our master bath tile. Bugs me daily.

    PS no you aren't guaranteed to get perfectly straight walls with new wonder board. We are finishing 2nd of two new construction or full gut (including studs) master bath size bathrooms. All new studs, floor, walls, ceiling, insulation, durock, etc. Not one wall is perfectly plumb or straight - although most people cannot see that. I can because the 3x6 tile doesn't line up and/or isn't plumb in spots. Turns out wood studs aren't perfectly sized or straight, let alone human margin of error. Even if we had used metal studs, the gc showed why things wouldn't be perfect.

  • 9 years ago

    behind the tiles are brand new wonder board. shouldn't that be straight to begin with?

    No. It will flex a bit if the studs aren't perfectly flat.

  • 9 years ago

    When building house, I save the straightest studs for bathroom and kitchen walls. Cabinets and tile. It's not going to guarantee a flat wall months down the road, but every little bit helps.

    With large format tile, the flatter the initial surface, the better the end result. There are published standards for out-of-plane deviations across the wall surface.

    As an installer, the best way to get a truly flat and plumb surface to tile upon is to float the walls with fat mud. But that's a bit of work, and not many people float walls anymore.

    In remodels where the existing walls are wonky and the walls won't be floated, the top and bottom plates of the existing walls can be stringed plumb and in plane, and then new studs can be sistered to the old, with the new studs square, plumb, and in plane.

    After cement board is added, some folks bugger up when they thinset and tape the seams, they leave too much thinset on the walls and create speedbumps at the panel seams. Or they leave too much thinset in the corners that blow the corners out of square.

    Large format is stylish. But installers have to step up their game to do it correctly.


  • 9 years ago

    I used tile that is the opposite of this, all 2x2 in two bathrooms and 2x4 and 4x4 in another.

    But all the corners are coved so the tile has to line up exactly level with no breaks all around and minimal cuts, no slivers. (It had to be designed toward this end from the framing up.)

    As careful as we were the cement board had to be feathered out in a number of areas to get everything perfectly flat so it wouldn't start to skew. It took a lot of extra work to get everything dead flat.

  • PRO
    9 years ago

    "Behind the tiles are wonderboard, that they installed before the tiles"

    Since Wonderboard is NOT waterproof did your contractor either install poly behind it or a topical application of a liquid or sheet membrane? If not you will have grounds for a redo at the contractors expense. Any in progress photo's would help. Just a thought.

  • 7 years ago
    Good discussion. Our new master shower was tiled with 12x24 tiles, staggered. Now that all is said and done I am sick. The lippage seems to hit me in the face! Contractor said wall may have been bowed due to stud unevenness, tiles too large, and should not have been staggered, and larger tiles tend to bow here and there. Pick your poison! Why didn’t he or his crew say something! Anyway, he will do it over. On my way to select tiles again, ugh, and def smaller ones.