Software
Houzz Logo Print
frznrth

Help with a butcher block top

8 years ago

Hi

I’m needing some advice on building a butcher block top for a kitchen island. I’m planning on using some cheap maple flooring that I found. After I trim off all of the tongues and grooves I’ll be left with sticks that are about 1 3/4” wide and 3/4” thick. Because it’s flooring it will have two 3/16” grooves running down the old bottoms - not sure if these will matter or not. I’m going to turn the sticks on their sides and glue them with tightbond 3. The top will be 7 1/2’ long and 3’ 4” wide. With a 12” overhang on one end and 12” to 14” on one side. Boards will run the length.


Will there be danger of the wood sagging or splitting on the long overhang? Anything I could do to prevent this? If I need braces would one on each end be enough or would I need one in the middle too? It’s just 3 IKEA boxes put together so the braces won’t have much meat to go into to hold them up.


When I glue how many rows should I put together at once? Apply the glue with a roller? A clamp every ____ inches? How tight do I make the clamps?


Lastly I’m hoping to not have to secure the island to the floor (likely I’ll have to) - if I do it needs to be something I can undo - sometimes it’s going to have to move. Any ideas?


Thanks for your time and help.

Comments (38)

  • 8 years ago

    Do you have a planer?

  • 8 years ago

    No. I’m hoping to make due with a sander.

  • 8 years ago

    You will have no problems with those overhangs. No reinforcement needed.

    You will want to ensure that the bottoms are flat so that you get a good gluing surface. It's OK to leave the grooves, but you need to be sure that the rest of the surface is flat and will make good contact. The grooves will, of course, be visible on the ends of your counter. I've re-used a lot of flooring and have generally planed them down so that the grooves are gone.

    You will need all the clamps in the world. Well. maybe not quite, but I'd use one every six inches. I'd glue up six to eight boards at a time then glue those stacks to each other. You'll want to pay attention to alignment of the boards, you could use a biscuit or domino to keep things lined up, or a batten across the stack to prevent up/down movement. A roller is very helpful for the glue, I have a glue bottle with attached roller that is convenient for these sorts of things.

    If I were doing it I'd leave the tongues and grooves on to start, do the glue-up, then run them through the planer to take the T&G off when the glue-up reached the maximum size that fits through the planer. If you don't have a planer you're going to need to be much more careful in the glue-up, but you will still need some means for final flattening. A sander won't do it-- you can make it smooth but not flat with a sander unless you have a big drum sander and a lot of patience. It's not too hard with a hand plane and winding sticks, I'm sure there are youtube videos that describe the process. Having a long jointing plane helps.

  • 8 years ago
    last modified: 8 years ago

    Ahh - you mean the grooves will show at the two ends. I never thought about this. I guess I’ll look for a way to fill or cover them with a trim or as you suggested plain them off. Might need to kijiji a planer. That’s a lot of planing

    For the surface go over it with a big floor sander?

  • 8 years ago

    This is one of those projects that shows you the reason why some wood products are so expensive. It is do it right or do it again. And again is much more difficult/expensive than right the first time.

    When you trim off the sides, do all the pieces on one side(tongue) and then all the others (groove). That leaves every piece close to the same dimension, making final surfacing much faster. Another trick when gluing is to use cauls(boards perpendicular to the length) on the top and bottom to better align all the pieces. Just be sure to use something to isolate the cauls from the excess glue(I use waxed paper). A set every foot or so is plenty.

    Since the boards are not full length, that means gluing pieces end to end. Leave the tongues and grooves on those pieces. That will increase the holding power(butt joints are the weakest joint) and minimize creep when you glue up and clamp.

    Find the planer and plane the wood smooth. That solves the gaps showing on the ends and assures you the glue will hold the pieces together long after you care.

    For dimensional stability, alternating grain orientation from board to board would be a good idea.

    Actually, a simple hand plane or power belt sander would be the best top flattening tools.

    Finally, a matte finish on a food prep surface is a really bad choice because it will be extremely difficult to clean.

  • 8 years ago
    last modified: 8 years ago

    Thanks.

    I like the idea of leaving the tongues and grooves for the butt joints and will definitely try the wax paper between anything I don’t want to stick. I could likely use a caul at one end. The other I was planning to build long and then trim the whole thing with a skill saw. Hopefully it cuts clean enough. I’ll do a trial

    I made a small section to try an was able to smooth it with a belt sander but this left lots of dips and valleys. I heard a random orbital wouldn’t do this. Something I need to get

    Planing would get rid of the channels showing on the ends but would the grooves really keep them from glueing up as strong? They aren’t deep and if I filled them with glue? That sort of planing sounds like buying something expensive

    Wife is set on nothing shiny so matte it is I’m going to use a Rubio product

    http://rubiomonocoat.com/en?reset&country=ca

    I heard it’s good stuff and will hopefully clean up easy.

    Thanks for the tips

  • PRO
    8 years ago

    I would make this up as 12" or 15" blanks (whoever you can borrow some planer time from) and once you have the blanks planed and jointed, make up the last 3 glue joints.

    It's the only way to end up with something flat.

    My experience was in making a 12ft cherry countertop once. It was intense.

    Casey

  • 8 years ago

    A benchtop planer runs about $400, you might find it to be a reasonable investment-- plus you get to keep it for the next project!

    A good old Stanley #7 jointer plane (or if you're strong, #8) can be found for under $100 and will give you a beautiful flat, smooth top. And a workout.

  • 8 years ago

    Thanks.

    I’ll give an orbital sander a try on the sample section I put together. I also have a cheap hand planer I could try. Never thought of using it on something so big. Will have to check out how that might work. $100 for a good hand planer might be a good thing.

    If I can find someone with a big power planer the section idea is something I’d try too. Will ask around.

  • 8 years ago

    If a belt sander is cutting too deep, either the paper is too coarse or you're not moving it back and forth fast enough. A belt sander is for heavy removal of wood but you have to keep it moving.

    I was going to suggest you try and find a woodworking friend or neighbor who has a planer. A six pack or a few bucks to pay for sharpening is often all it takes.

  • 8 years ago

    Thanks. I’ll try the belt sander again in a cutting board I’m making for a trial. I watched a video of someone hand planing a big suface. He mostly was going on an angle to the boards. I had tried just with the grain before and got little valleys. Maybe it was digging out some of the softer wood? I’ll see what diagonal does.

    Sadly no friends with planes. Guess I’ll have to drink the beer by myself ;)

  • 8 years ago

    I will also add, Titebond 2 is specifically noted to be FDA approved for indirect food contact such as cutting boards where as TB3 is NOT. I would recommend using TB2 in your use case.

  • 8 years ago
    last modified: 8 years ago

    I see a lot of discussion about planers and sanders but nothing about table saw. I don't believe 1 in a hundred people can do this without a table saw. The other issue I can't see working out is end to end glue up using tongue and groove ends. I'm less worried about flat and smooth. That can be accomplished by ripping one edge straight,glue up face down on level surface then use cabinet scraper to clean/smooth top. End to end will be the most difficult step in this project. If you have or borrow a router,check out "router sled"for a fairly simple and reliable method of leveling top. IMO,grooves are of no concurn when it come's to clue up. Since this is low tech,I suggest breadboard ends which will cover groves anyhow. One clever,albeit a little difficult way of attaching breadboard is sliding dovetail glued only at center to control split from srink swell cycles. An easier but less finished looking is guleing,screwing or pegging a simple breadboard at center to control spliting.

  • 8 years ago
    last modified: 8 years ago

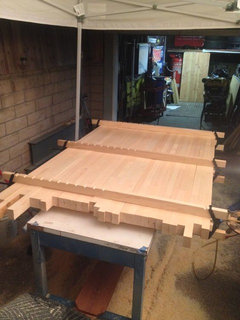
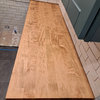
    First..I'm not a pro but a hobbyist. It's not an easy undertaking without the proper tools especially a thickness planer. Spend $300 on craigslist and buy a used one. It'll sell for $300 after you're done with your project. It'll allow you to glue up 12" wide sections at a time and plane them flat leaving you with fewer joints to align once assembled. I typically use Titebond 3 as it it waterproof. For anything that may be exposed to water with that many joints I wouldn't risk anything else. Also be precise on your cuts for each piece ensuring they are square on all dimensions or you'll have terrible gaps in your butt joints. When you sand the table down, save the sanding dust to make your own wood filler that matches perfectly. Here is a table we're building now.

  • 8 years ago

    Would have been nice if my glue was food grade but I’m not too worried. We won’t be cutting on it and it will be under what I know is a food safe finish.

    Thickness planer would be great. I can’t see anything that looks like it would work for under a grand where I am. I’ll give my belt sander a go first on a cutting board I’m making.

    Thanks for the pic of the table I’m curious about your clamps I had heard that I would need one ever 6”?? I can get close to this for most of the width but at the end I’ll be down to one every foot Will see how it goes


  • 8 years ago
    last modified: 8 years ago

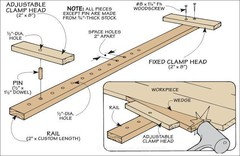
    You can also make some spare clamps out of scrap wood. Use a 2x4 that's longer than your wood to clamp by 6 to 8 inches or so. Screw a good size block to one end. Stack your workpiece wood next to the block, and when you get to the other side of the wood to clamp, screw in another block with a slight gap and at a slight angle. Then take another piece of wood shaped like a wedge (a wooden doorstop is perfect), and light tap it in between the wood workpiece and the block. Instant clamp. Repeat as necessary.

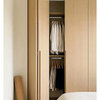
    Found this pic online. A better design if you want to re-use, but gives you the idea.

  • 8 years ago

    Thanks for the link. Closer to $600 for me through amazon Canada but still a good deal.

    The homemade clamp idea looks interesting. I wonder how much clamping force they would give.

  • 8 years ago

    Clamping force would depend on how strong your wood is. BUT, i can guarantee it would be better than not using a clamp in that space.

  • 8 years ago

    Be sure to use tape on those home made wood clamps or it'll glue itself to the table.

  • 8 years ago

    I tried to smooth a practice cutting board I made with a belt sander. Needless to say I’ll be getting a thickness planer. Any tips on joinning 3 12” sections together? Just clamp boards on top and bottom of seam to try to keep it flat? Dowels?

    Thanks

  • 8 years ago

    Bar clamps that can stretch the full width would be ideal, making sure they are flat, and on a flat surface.

  • PRO
    8 years ago

    Flooring will mnot IMO make a countertop .A butcher block is made from thick pieces of wood put together to make a nice thicj butcher block. This is not like making a cutting board. Go to Ikea get a proper butcher block for a decent price and be done , some things are just best not DIYed IMO.Look at the thickness of red dogs wood there id no comparison to what you are doing.

  • PRO
    8 years ago

    Well, strip flooring is 21/4", so after ripping off the tongues and grooves you should have 1 5/8" material, which is an OK thickness for a BB countertop, 1 3/4" is super, and the de luxe 3" thick tops are super expensive (they weigh a ton!)

    You will sooner encounter a 36" thickness sander than a planer.

  • 8 years ago

    "You will sooner encounter a 36" thickness sander than a planer."

    Arguably a better option than planer anyhow. I know I'd trade my 12.5" planer for a 36" sander any Day. Hit a nail in used material and blades must be replaced or ground then sharpened before going on.

  • 8 years ago
    last modified: 8 years ago

    Cheap unsuitable material and $1000 worth of tools and 1000 hours of trying to figure this out “saves” money???

    Worktops

  • 8 years ago

    There's truth in what you are saying Sophie,but only an ounce of real life truth. Recycled isn't necessarily unsuitable and tools are one time purchases for several projects. Surely you jest it will require 6 months to plan,geather material and construct. I own far more than $1,000 worth of tools for hobby use and don't begrudge spending a single dollar. I hope recipients of my creations never compare them with buying from Ikea. $20k of fishing,golfing or camping equipment has about the same commercial value but plenty people own it just the same.

  • 8 years ago

    Sophie also forgot to mention all the fun! My kitchen is all IKEA. Not that that is a bad thing but it will be nice to have something custom and “hand” made.

  • 8 years ago

    "all the fun!"

    You bet. Everyone started in the same place working wood as you did Garth. I was very proud the first time someone walked over and began examining and asking about one of my finished projects. It wasn't one of my first attempts by a long measure. BTW, come to think of it I hear Millman's dad whittled and held him when he was 2 years old so I guess Millman did get a head start.

  • 8 years ago
    last modified: 8 years ago

    Doing it for fun and to gain skills is one thing. It was presented as a “money saver” because all of this cheap flooring could be found. The wring materisl. The difficult material. The material that costs time and money.

    DIY shouldn’t mean questionable shortcuts. Go buy some decent stock and have at it, if it’s fun. Do it right from the beginning and it will be better and cheaper both.

  • 8 years ago
    I dont know if IKEA butchet block has improved in recent years, but I dont recommend it if there is any chance of exposure to water.

    I have a 3 x 6 ft, better used piece of maple butcherblock left by the previous owner and it is incredibly heavy. There is a local company which makes custom furniture and advertises that they will sand table tops for a reasonable price. I havent yet inquired what it will cost me but Im thinking of having the entire piece sanded if I can round up the muscle power to transport it. We have moved it around several times but not up the basement stairs. If I dont faint when I get the quote, I would like to try a commercial sanding service and seeing if it is worth the hassle

    Otherwise, I might try to see how it works to use a flooring edger to clean up the surface.
  • 8 years ago

    This is a woodworking forum, not a just buy it forum, so I dont agree with you Sophie. If people are into woodworking to save money, it takes a LONG time time recoup costs to start to save money. But as others have mentioned, its about the journey as much as it is the finished product. Half the crap you buy nowadays is just that, cheap crap made in China. I’d much rather have a nice piece with a few flaws in my house that I made, rather than a perfect looking made in China piece if crap. I can look down when I’m using it and say, “I made that.” And if I want to re-build it, I can, and use what I learned to make it better. I think the OP is using the low cost flooring because he doesnt have the tools to use otherwise. Its a great way to try new things without blowing a ton of money.

  • 8 years ago

    $150 for the flooring vs $800 for real maple. Won’t count my time though - flooring is taking hours and hours.

    In the end it will be far from perfect but definitely won’t be made in China.

  • 8 years ago
    last modified: 8 years ago

    Never thought wood police would find their way into the backyard hobby shop.Hasn't been that long they wanted to ban logging before earth is stripped naked. No old growth and no reclaimed??? We might be headed for the day of all plastic. I may sell my Rangers tickets when they begin using plastic bats. I dread telling uncle Cimus he must give up that old heirloom wood fly rod and stinky wood kreel.

  • 8 years ago

    LOL! I made my 16' 10" bb out of 2 x roughly 2" maple sticks from a reuse center. I think, looking back, they were the lam on p-lams, judging by the glue. Since poverty, not ingenuity, is the mother of invention, I used what I had.

    I didn't know nuttin then, and simply stacked them side by side, one at a time, and glued 'em. Clamped 'em and stuck them on the cabinets, where it remains to this moment. I still haven't put a finish on it, but eh, I barely cook so I don't care.

    I had/have many tools from my ex-, who was a 3rd generation GC. Thank goodness he left them when he bailed on me, because I get a lot more use out of them than... I digress. I've taught myself most of them. My investment was an electric hand planer, which is cool. Didn't know how to use my table top planer then, so it never occured to me to try rather than belt and orbital sanding. All in all, I got it smooth. :)

    Never thought about using all the left over oak flooring I have. I guess because I've seen too much flooring being put in as bar tops, which just lets liquid (read: beer and sludge) get down under it.

    I'd love to see a picture of this when you're done.

  • 8 years ago

    Bar sludge. Eww. :-)

  • 8 years ago

    Kinda along the lines of bar mat shooters, isn't it?