Software
Houzz Logo Print
lisa_porczynski

Dying hydrangea

8 years ago
last modified: 8 years ago

We planed it earlier spring with no leaves. Bud's came in beautifully, leaves turned green and got nice and thick.About 2 weeks ago the hydrangea started to bloom flowers. And since then the leaves have been turning yellow, the half bloomed flowers are starting to die and the tree is looking droopy. We have it in a flower bed with Mulch and underground sprinkling. We have been adding additional direct water @ base each day to help with the dying leaves; now turned flowers. :( My husband a week ago applied Miracle-Gro too. Any tips to save our newly planted hydrangea tree????
Also been in drought for 2 weeks & 85-95temps

Comments (23)

  • 8 years ago
    last modified: 8 years ago

    What type of hydrangea? Most likely you have let it dry out at some point. Keep watering, it may bounce back if it is not completely dead

  • 8 years ago
    last modified: 8 years ago

    Newly planted hydrangeas or worse, those planted the middle of the Summer, will suffer from heat stress by temperatures above 85F, by drying summer winds, by lack of or by limited humidity, by less water than at a plant nursery, by too much sunlight than at the plant nursery. It is called transplant shock. Since your tree was planted last Spring, it is too young and has not yet developed root systems large enough to handle summer conditions so it is stressed... but it is hopefully not going to die.

    Paniculatas are the ones which typically are sold in tree form. They can withstand the most sun exposure. But all is relative.... Take a hydrangea from a cozy day at the plant nursery or from ideal conditions at a greenhouse, then cut its roots to fit in plastic pots, then dump it outside, wait for the middle of the Summer, give it large doses of water and, whew, it will display signs of heat stress. They are not used to it and will "complain".

    Paniculatas in shrub form may show this stress in many ways... (a) by yellowing leaves, usually at the bottom of the shrub, when it is too hot or it is watered so much that the roots cannot absorb oxygen... (b) by wilting: if they cannot absorb water thru the roots as fast as they loose moisture thru the leaves then paniculatas wilt/droop either the leaves or-and the blooms... (c) by browning: if they cannot get enough water for long periods of time or if the sun dries them out, the blooms and-or leaves start to brown out. Leaves will brown out from the edges inwards.

    This year only, if the tree is suffering a lot, I would cut the blooms so the water used by blooms goes to the leaves. Alternatively, only cut the blooms that are browning and leave some of the others.

    I would not fertilize a shrub -ever- when the shrub is stressed due to environmental factors or by pests, etc. Hydrangeas normally do not require much food so let it feed off the decomposing mulch and minerals already in the soil. If you want to fertilize, do it in the S[ring with 1/2 to 1 cup of organic compost, composted manure or cottonseed meal. That is it for the whole year. Your plant's potting soil should have come with those round fertilizer pellets and should not need additional food until next year.

    Water the soil such that the top 8 inches of the soil are moist. Water the soil only when a finger inserted into the ground to a depth of 4" feels dry or almost dry.

    Given evenly moist soil (no periods of dry-wet-dry-etc soil), wilting episodes during the day should fix themselves at night. Every summer day, around 6-8am, check it for wilting. If wilted, give it water. Start with 1 to 1.5 gallons of water and tweak as needed. Water only the soil from the root ball to the drip line. Again, aim for each watering to get moisture down to 8" below the soil.

  • 8 years ago

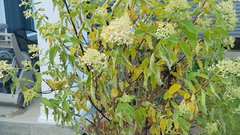
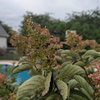
    Thank you. Here is a picture of the limelight hydrangea tree that I planted this Spring. It looked like dried up wood when we planted it.

    Finally late Spring buds came :) and turned a beautiful green and got nice,

    thick and full leaves. Once blooming started a few weeks ago it seems to be dying.

    Should I remove all the blooms? There are only two that actually Brown, others seem to slowly drying out. Leaves are dropping daily. It looks like very sad Tree in comparison to 2 weeks ago when the blooms opened and I got excited.

    Continue water more at the base?

  • 8 years ago

    I would continue watering. Last year my paniculatas did this in the middle of the summer when we went for a week on vacation and nobody watered them, I planted them earlier that spring. Atfer steady watering they bounced back and even produced new flowers in the fall. This year we have drip watering on a timer, so they do not have to suffer while we are away.

  • 8 years ago

    Thank you. We have underground sprinkling on a timer in our flower bed. So I can continue to add extra with the watering can. I wasn't sure if the blooming as taking all the nutrients, or if we were under watering it with sprinkler, or over water it with can now too. I don't want it to die nor be out money.

  • 8 years ago
    last modified: 8 years ago

    I would keep the bloom. It is not as bad as described so enjoy them. Just keep watering the correct amts using the sprinkler. Manually determine how much water is needed to get water down to 8" depth (say, 1.5 gallons). Then check the soil using the finger method. If dry, run the sprinkler long enough to give water down to 8" deep. Or calculate how much the sprinkler now gives and use the water can to get the water down to 8" deep. It takes hydrangeas 2-3 years to become established, maybe less with a vigorous specimen like Limelight. Enjoy. Keep the plant label inside so you do not loose it. Did you need to cut any circling roots on this tree when planting it? Just wondering...

  • 8 years ago

    I would seriously caution about concentrating on a specific volume of water!! It is impossible to say how much 1.5 gallons will provide as the soil conditions, weather, size of the rootball, etc, will ALL have a bearing. You want to water sufficiently and slowly enough at the root zone so that the water penetrates to the full depth. That could be as little a 1.5 gallons in an organic, moisture retentive soil but may require as much as 5 gallons (or more) in a very fast draining sandy soil.

    Rather than a sprinkler, which is almost impossible to measure accurately and also offers a lot of waste and evaporation, try using just the hose left on a low trickle. You will need to do some testing to see how long it takes the water to penetrate the soil profile adequately and I also suggest moving the hose end around the rootball a couple of times to make sure the application is thorough.

  • 8 years ago

    I had to google circling root since I'm a novice. I did not. I just took it out of the large pot into a hole I dug. The blooms were white & perky and now ivory & limp. And it looks a lil dreadful from the road. So I hope it rebounds like my yellow rose tree. New house, new landscaping via me. I think I already killed my bee balm. Only hope is that a few green specks at the base survive & grow next season.

  • 8 years ago

    I doubt you killed your bee balm... that stuff is so hardy. I pulled a piece out from my main patch, literally threw it on the ground in a new spot, and it took off and is blooming now. I bet it's just going dormant and will come back huge next year.

  • 8 years ago

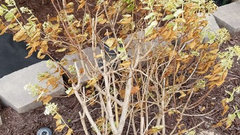
    So since our last conversation the plant looks even more dried up please see below pictures. U have to click on image so its not distorted.

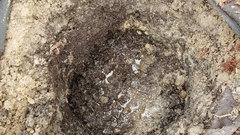
    I dug it up and there is some watery moisture at the base. The Roots look good still. What to do????

  • 8 years ago

  • 8 years ago

  • 8 years ago

    What kind of soil do you have? Could it be a drainage issue?

  • 8 years ago

    Lisa, I would dig it up and look at the roots. I will bet they are bone dry! Take the plant and put it in a bucket full of water. Leave it in the water - until there are no bubbles raising to the top of the water. Then, let it drain and shake off the old soil and replant in a large 3 - 5 gallon plastic - container with new, moistened soil. Water till it drains out of the bottom of the container, put it in the shade a leave it for two days or so. Then water till the water runs out of the bottom of the container and you will see it start to recover.

    Do this right away or you will lose the plant. I grow and propagate hundreds of hydrangeas and this will sound really drastic, but you will see it start to recover within a week or so. You can add gallons of water to a plant but if the soil is not moist, the water is shed as if it were locked in a plastic bag! When you take a plant out of a pot and plop it in the soil, you must inspect the roots and make sure the soil is not compacted. Washing the roots of soil make the transplanting more successful because the soil must be the same texture from the root ball through out the planting hole. You don't add anything to the hole and don't fertilize the plant when it is under stress. Plant roots are not like blood vessels on a human. They can be washed, trimmed and are really tough. Many times the plant is root bound - roots growing in a circle around the edge of the pot, and the roots must be gently pulled out to make sure water can get to them. If the roots are in a solid mass, the water you give it will just run down the inside of the pot and not even dampen the soil at all. It will look like the plant does not need water and you won't know unless you dig it up and inspect the roots. Don't worry about root rot - it take days and weeks for it to affect your plant and is a soil born disease and does not exist in water. Leaving the plant in the bucket of water for a day or two will not cause root rot.

    Good luck and don't be afraid to use this method - it works!


  • 8 years ago

    Man, I'm less experienced than a lot of people here, but I'd put my money on the opposite of what everyone is saying. Paniculata hydrangeas are known to get "wet feet" in which the leaves start yellowing, usually from the bottom, when the roots are TOO wet. Wet roots actually can't absorb moisture, so the leaves look similar to a thirsty plant, which leads us gardeners to overwater even more!

    When you plant, dig a hole 3x the size of the root ball, and fill the extra space with top soil. This gives better drainage and nutrients and allows the roots to grow into the ground, rather than staying tied up in a root ball, nearly the same as keeping it in a pot.

    My guess is that you have sandy clay, it acted almost like a pot with no drainage: water sat there and oversaturated, possibly rotted, the roots. You can see standing water in the bottom of the hole where you pulled out the tree.

    I'm sorry for your struggle with a beautiful tree. There is always some level of loss when planting, but maybe a slightly adjusting your approach will increase the likelihood of keeping the plant alive. Having said that, I've seen hydrangeas die to the ground and come back - I'd chop it and put it in a pot, but that's just me.

  • 8 years ago

    Thank you everyone. The bottom is clay and several inches of top soil. The roots are white & firm. Rootball feels wet. And all the roots curve in a tight spiral.

    I currently removed it from ground. Cleaned off the old dirt, put it in a large pot with drain holes. I added a fresh bag of topsoil and some water. I have it sitting in the shade.

    In Michigan we had a hot drought for 3 weeks, right when it bloomed for our 1st year transplanted. Prior it was growing strong. Hopefully a break with help it. Afterward a week or 2, I'm thinking making the ground hole bigger with more topsoil?????

  • 8 years ago
    last modified: 8 years ago

    If you have a clay soil, then you do not want to amend the planting hole (in fact, you never want to amend individual planting holes, but that is another topic :-)). All that does is create a large basin that collects water that will not drain properly. You can see that clearly in your photo. And that will lead to root rots.

    If you are dealing with clay or a poorly draining soil, dig a very wide but shallow planting hole and site the shrub so that the top of the rootball is slightly above grade. Fill in the hole with only the soil removed, broken up properly and firmed in well. Then use whatever amendments/topsoil, etc. you prefer to mound up to the top of the rootball collar.

    And you always want to loosen circling roots and spread them out. Cut them if you can't loosen by hand. I wouldn't replant now until the shrub recovers fully (if it does) and the temps are cooler....early fall.

  • 8 years ago

    GardenGal, I think I'm saying the same thing as you in your second paragraph. If not, I'm misunderstanding and could use some more clarification.

  • 8 years ago

    Yes, pretty much the same......except for adding topsoil. What comes out of the dug planting hole is what goes back in. Not new soil/topsoil or any amended soil. Save that for the mound or any topdressing or mulch. And be sure to site the plant high, so a quite shallow but widely dished planting hole when dealing with clay.

  • 8 years ago

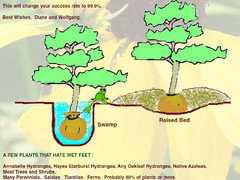
    Here is an illustration from a great mail order nursery. For some of us, a picture is worth 1000 words. I have included the link to the nursery download page and there are many one page information sheets that are very helpful for all gardeners.

    Link to download


  • 8 years ago

    Great illustration, Shirley -- thanks!! The diagram explains the situation perfectly :-) Although the mound is just a tad higher up on the rootball than I would like to see.

  • 8 years ago

    So the limelight is still dying it appears. We ended up getting a pinky winky hydrangea tree today. And tips for success? Needs to go in same spot. Add more topsoil to create a raised bed over clay hole?