

Stapelia growing questions
Just wanted to see if anyone has tried growing stapeliad types in pure pumice or perlite before?
I have done a little better with mine under grow lights, in soil/perlite mix that seems a little better than my first try. They seem to like a lot of heat but also more water.
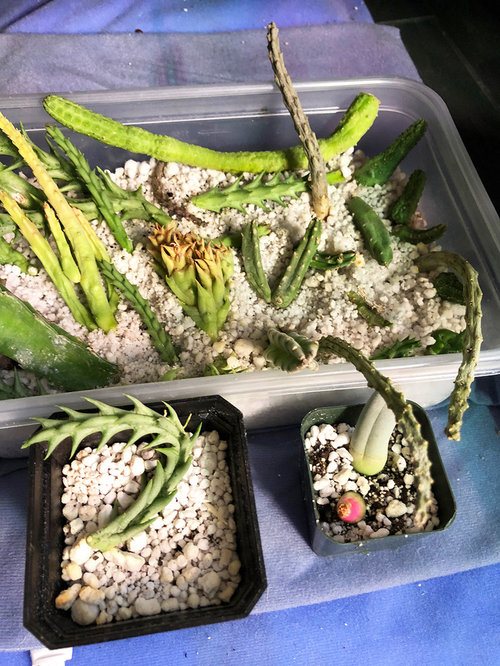
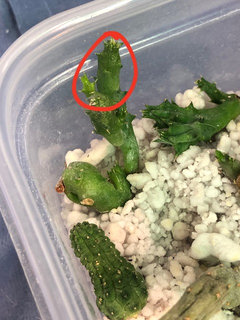
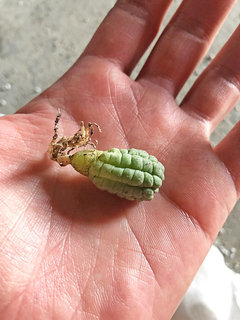
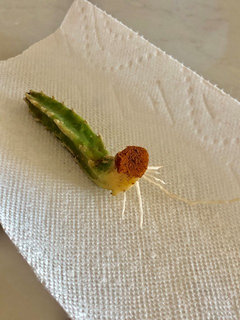
My question is because I am experimenting with rooting my cuttings in a tupperware filled with perlite, that I add water to every other day or 2. I water down the inside side's, so that it's not all over the top layer of perlite or the cuttings just fills with water at the bottom third of the container, and I keep the tupperware on a heat pad that's on high. It's lead to all of my cuttings developing big roots fast, and today I noticed a Rhytidocaulon cutting that I had dried out and put in there 2 days ago, hasn't only rooted, but is growing a flower bud.
Does anyone have any thoughts on growing my older plants this way? I am thinking of getting a large tupperware, filling it with a lot of perlite (doing this outside) and then keeping it on a large heat pad under my lights and watering the same way.
I know these seem to rot easily and I've had a ton rot on me over the last few months, but they're always in some type of soil mix. None in the perlite, even though they're cuttings, rot or have issues. I've even thrown some pieces from plants I was sure were dead into this perlite box and they're growing new green arms quickly. It hasn't seemed like I can overwater them when they're in perlite with water at the bottom heated from below.
I know I'd have to water with nutrients since they'd get none from the perlite, but I'm debating whether to try this on all of my big plants to stop all the issues with drying out/overwatering them.
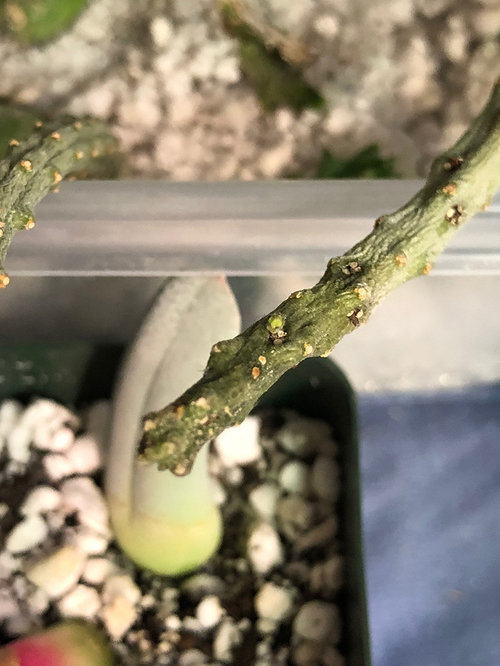
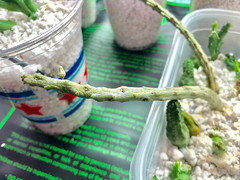
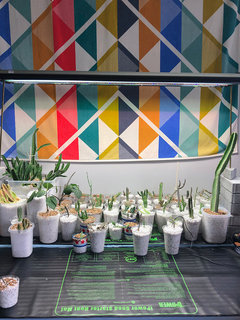
Some pictures of the box of cuttings on the heat pad, and the rhytidocaulon bud I noticed today after 2 days in the box. It's a tiny green bud that this type gets. I'm going to leave it in this container to see if it grows and opens
.
Comments (57)
 8 years agolast modified: 8 years ago
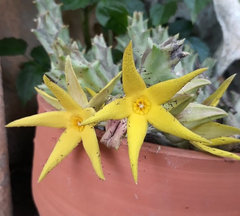
I have no use for lights so can't say anything about the subject except that if you got them to flower, you are doing something right. Light intensity is also relative to latitude and while I say that I don't give my plants much sun, this is what our morning sun makes Orbea lutea look like and that was under cooler conditions, its much redder at the moment
My preference is to use long pots, Stapeliad root systems are not shallow and they appreciate wide, deep pots. I grow all in pots of a minimum depth of 12-15cm and I do grow a couple of different kinds in one pot but this is why I use very fast-draining quartz gravel mixes and they can take regular watering that way, which they seem to appreciate. I'm not convinced that they need airy mixes, so much as fast-draining ones and to me the large particles just lets the mealies thrive but pumice seems to work well for indoor growers if their environment is pest-free.I have killed stapeliads growing outside if I left them in the rain when it was also cold, especially in autumn when it rains and becomes icy cold but otherwise, they grow happily outside in the rain in summer. The fast-draining mix is the key here and to me, they aren't finicky plants, I pretty much find a suitable spot outside and forget about them and go and admire the flowers when I smell them. The stink, especially Orbea and Stapelia, is a good reason to keep them outside. I find Huernia less offensive
Bc _zone10b thanked niksouthafricaBc _zone10b
Original Author7 years agoInteresting info Nik. That's a beautiful Orbea Lutea. I have one and it hasn't grown or changed in over a month. Just slowly gotten less plump and skinnier. ;(
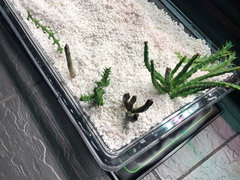
My cutting pieces are still rooting and growing new arms in my small box of perlite/water on the heating pad. I attached some pictures below. I'm trying it with a larger bin now that I put some of the duplicates I have in. I can't tell yet if they're responding well or not but it's on a heating mat with some water halfway up the perlite. One of them definitely took root or settled, I can't really budge it when I try to move it around to test the roots. Hopefully the others settle in. I'm worried about growing a bunch together in one bin like this though. I have read conflicting theories on growing multiple types in one bin. Some saying it's risky they'll spread fungal/bacteria attacks to others. Other people said that they all like to be pot bound before ever flowering. So I'm not sure they'll ever get there in a set up like mine.
Any thoughts?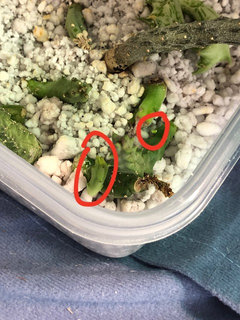
Related Professionals
Elkton Landscape Architects & Landscape Designers · Lafayette Landscape Contractors · Rochester Landscape Contractors · Kingman Tile and Stone Contractors · La Grande Tile and Stone Contractors · Bowling Green Landscape Architects & Landscape Designers · Shreveport Landscape Architects & Landscape Designers · Killeen Landscape Architects & Landscape Designers · Worcester Landscape Architects & Landscape Designers · Clarksdale Landscape Contractors · Muncie Landscape Contractors · Amherstburg Landscape Contractors · Baltimore General Contractors · Concord General Contractors · Utica General Contractors 7 years ago
I have several Stapelia cuttings which had rooted in quite well before the cold weather set in and these are in a SE window not heated. Temps there go to about 45 F (8 C) at nights and about 60 F ( 15 C) daytimes. So far they haven't been watered since cold weather hit and they are still nice and plump. Seedlings are on heat mat at about 70 F ( 21 C) nights and 78 F ( 26 C) daytime with supplimental lighting from a light about 8 inches above them. These are watered as the mix dries and appear to be okay up till now at least. Just hope I can keep them going as well through the entire Winter.
Everything in a 1/1/1 mix of potting soil/perlite/2mm crushed granite.
- 7 years ago
They can spread stem rot to each other in a communal setup but if they are happy and healthy, it doesn't happen. I first moved some of my plants into a communal pot after salvaging what I could from an unexpected cold, wet spell outside that got them all rotting. The salvaged plants survived and thrived and didn't rot any more once they were warmer and dry. Below is Heurnia volkartii flowering in a pot with a Piaranthus and an Orbea. I didn't crop the picture so that you can see the length of the pot
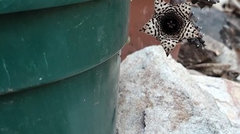
The big fat Piaranthus in the pot. These all looked like yours when I moved them. They did manage to root over winter, they were on a sunny windowsill but they have only flowered a year later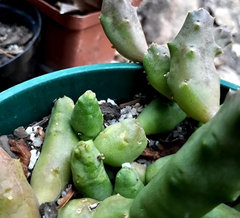
New growth is a good sign and if you want short, thick, colourful stems, give them more light and heat once they have rooted. Bottom heat is what gets them rooting. Bc _zone10b
Original Author7 years agolast modified: 7 years agoGreat info geoforce and nik. Nik, those pictures are great, your plants look so healthy. And that flower is beautiful.
I'm leaving most of mine in their plastic pots and gritty/soil mix for now....while I test out these boxes of perlite and water on heat pads.
I love how well the cuttings seem to root and grow in this box setup, but I don't know if the larger plants I'm now testing will react the same. When I unpotted a couple more today that just weren't growing or were in bad shapes, their roots had all browned. I don't have much luck with these when they're in any kind of soil mixture. Maybe the plastic pots keep them wet too long inside even with my fans blowing in the room and good warm temps.
Hopefully this semi-hydro (or whatever we're calling it) experiment works. Growing indoors is proving tricky but if all they need is damp/airy medium combined with warmth, maybe this heat pad perlite setup will work. Would be much easier to water a tray of them all once in a while and not worry about root rot because of cooler temps or soils in there.
I heard from a few different people on facebook that grow their larger stapelias hydroponically with the clay pellets. They say that they grew much better for them this way, as long as it's warm. Hoping my smaller plants have similar setup but with perlite.
edit: I started to think about this all not only after plants kept rotting, but when my Larryleachia grew so well in pure perlite and watered every other day with fertilizer. It tripled it's size in just a month or two. I know they're not all the same exact plant, but I figured it must be happy with more airy root setup and more frequent waterings.
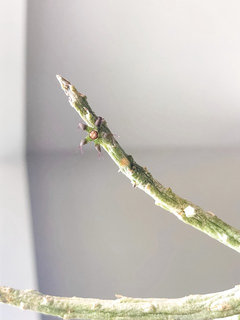
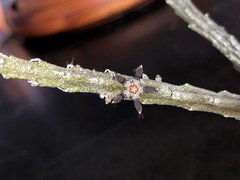
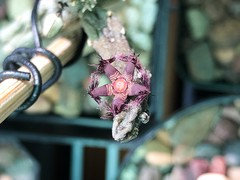
Here are some pictures of ones that have flowered for me so far...rhytidocaulon only for the most part, a flavopurpurea x schinzii (sp?) and a piaranthus. The rhytidocaulons seem to love my grow lights and won't stop flowering anytime I water them.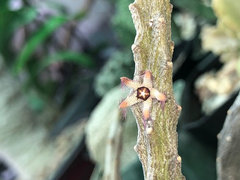
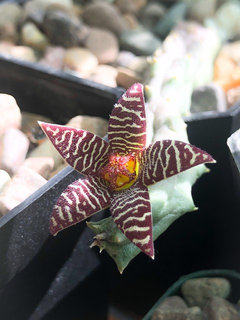
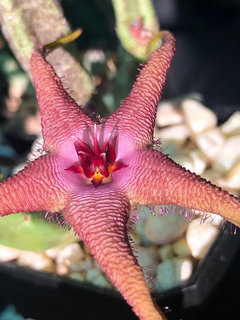
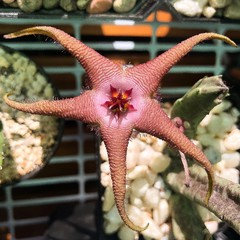
- 7 years agolast modified: 7 years ago
Those are awesome, Brendan! I love the woody look that the rhytidocaulon get and they do like it hotter and sunnier. They are among the stapeliad families that come from the Middle East and NE Africa. You can keep your Southern African stapeliads somewhat cooler and they will be happier. Our average daytime temps are 5-10 C lower than in the North.
I think that perlite will be too light for the bigger plants to stabilise in and clay balls would work better. Basically, they want slightly damp roots but dry, warm stems and good airflow. As you can see from the habitat picture I posted, the rocks do that for them. Soil remains somewhat damper and cooler around the rocks and those long roots dig their way in deeply under there.
Do be wary of overwatering and overfertilising though: you will get rampant growth which seems good but they will be thinner-skinned and more vulnerable to disease. When they suffer a bit, the skins are thick and pest- and fungus-resistant and the stems grow fat and compact.
Oddly enough, my larryleachia is finally doing better since I took it off the windowsill and it is in a relatively cool place. Note that this is L. marlothii which is darker-coloured than L. cactiformis, cactiformis doesn't go this shade of green. I top-water lightly every 4-5 days in summer and the mix drains very fast.
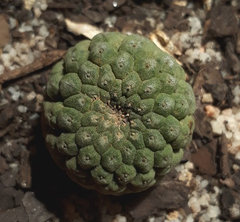
I have also had unusual success with Hoodia gordonii seeds and that is from keeping them much cooler than you would think, they are growing in my bathroom, which is light and airy but remains cooler and they don't get much direct sun at this stage. These are in 1:1:1:1 mix of perlite, vermiculite, washed silica sand and sieved c&s mix for the organic component. It drains very fast and dries out quite quickly. I water them every 3-4 days. These must be kept dry when it is cold.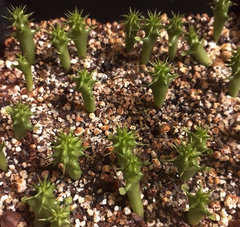
Bc _zone10b
Original Author7 years agolast modified: 7 years agoNik, awesome tips and pictures. I love those tiny Hoodias. They're really cute that size. I just picked up my first Hoodia Parviflora a few weeks ago. It's in the same compost/perlite mix as my other plants and under my grow lights. I had to raise my grow lights a couple of days ago when I noticed some of the stapelias were going deep red.
I've been trying to read up a little more on growing with hydroponic methods. I'm wondering if potting each of these in clear pots (like orchid pots but without the side holes for drainage) with the clay pellets I purchase and sitting all of them in a long tupperware on my grow table might be a better setup than multiple plants in a bin of damp perlite. That way they each have their own pot still, with drainage holes at the bottom that sits in a tupperware of water with their liquid fertilizer in it. I'm thinking keeping the long tupperware filled with the grow pots on a heat pad might help root growth more? Then I can water when I notice the bin is completely dry and not have to worry about soils clogging up my pots/roots. I tried growing a bunch of these in pure perlite over the summer but I think it was drying out too quickly and killing roots that way. Maybe if they're sitting in a bin of water with the drainage holes in their pots pulling water from below, they'll do better.
Yesterday when I unpotted a couple of random huernias to try in my new grow setup, I noticed that the soil inside was damp and pretty chilly, even though the sunroom they're in never goes below 70 degrees. Maybe this is what was leading to roots rotting and the plants looking so unhappy.
My reasoning for potting a bunch in a longer bin was because the few I have that have grown seem to grow new arms over the sides of their tiny 2 or 3 inch pots and a longer bin might help them spread out and root new arms instead of just having them hang over the sides of tiny pots.
Do you think clay pellets are too large for small stapelias in 2-3 inch pots? Mine are all this size accept for 2-3 larger stapelias in 6-8 inch pots that are in the soil/perlite mix (and haven't shown signs of growth ever ;(
If the clay balls are better than perlite though I can try those since I have a giant bag in my basement somewhere.
Do you have any photos of your Larryleaicha's flowers? It looks great, mine has never flowered but I am pretty sure it's a cactiforme. It's grown tall and fat compared to the tiny pinky size it was when I got it a couple of months ago.- 7 years ago
Nik... How old are your Hoodia seedlings? They look marvelously happy and so very crisp and spikey.
- 7 years ago
Geoforce, they are just under 4 months old.
Brendan, I haven't tried clay balls because gritty mixes work fine in my climate but I would give it a try, since soil mixes haven't worked well for you. Try it with plants you have extras of first. Soil is often much chillier than you think.
My Larryleachia hasn't flowered yet, it's a young, seed-grown plant but marlothii flowers are deeper red than cactiformis. You can use Google to see the difference
Bc _zone10b
Original Author7 years agolast modified: 7 years agoNik, good to know about the soil. I noticed that when unpotting some of these that didn't look so great. Even though it never goes below 70 in the room they're in, the soil was very chilly.
Your Larry is a nice color. I've been confused trying to figure out the flower difference between marlothii and cactiformis. Sometimes the marlothii seems to have really light color flowers like the whitish yellow one photographed by Martin Heigan and some more deeper reds. I love them all though, just always curious to see new flowers on these plants.
The ones I put in the plastic container with perlite and water on a heat pad have rooted, and the flavopurpurea I buried a little bit deeper to put perlite under the new arms it had grown has started rooting from underneath those new arms. I found that to be a bit tricky to do in the tiny plastic pots they've all been in because I was told to keep them raised above soil level to avoid rot, and to keep the pots as small as possible for the root system.
I don't know how this damp perlite on a heat pad method will work in the long run, but for now I am happy to see some good results. I think I am going to go with individual "Solo" plastic cups of perlite for each plant. I thought a communal bin would be good to put them all in, but I am a bit nervous that some may have fungal stuff going on and I'm worried it will spread.
Below is one of my two Huernia Zebrina's with a weird skin color developing. It used to be a darker green and a little "healthier" looking in my limited opinion. Now it has a lot of yellow/white spots and a grainy pattern on the older parts. The newer growth has a strange blue-ish tiny. I had two in different pots and they both developed this skin change. They also have their tips turning yellow. A lot of mine seem to have the tips turning whitish tones, not sure if that means there's too much light/heat or if they naturally develop that.
I unpotted them and have them in their own cup of perlite on the heating pad now, hoping they will grow new healthier roots. I didn't notice any mealies when I unpotted (I used insecticide on all of these about a week ago). I was seeing a lot of webbing on them all and suspected mites. So maybe that's what was causing the skin change.
Anyways, these plants are all still very new to me. I figure it can't hurt to try new growing methods. I was reading a lot on a garden forum about a woman who grows all of her pseudolithos and succulents semi-hydro, with the hydroton in cups and holes cut an inch from the bottom. She fills them with water until there is a small reservoir just below the holes at the bottom and waits to water until that's gone.
I'm hoping this method I am trying with the heat pad and perlite has similar positive effects. Most of mine have such small root systems that when I tried to pot a couple in the hydroton clay pellets yesterday, they would hardly even stand up. I'm going to stick with perlite for now and see if I can get some healthy roots going first.
The pic at the end is of half of my setup at the moment. They're under 2 T5 6500k lights about 18" above them, and there's also a red/blue/white LED bulb in that setup that I'm going take out since adding that one bulb seems to have really burned a few of them and you explained they don't like full sun.
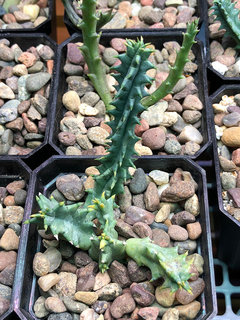
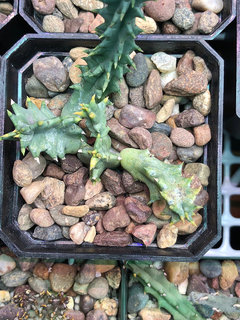
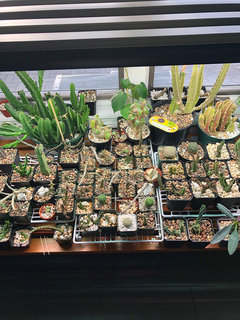
Bc _zone10b
Original Author7 years agoNik, I repotted my Larryleachia this morning because he hadn't shown any growth in a few weeks, after growing well all summer. Turns out he was much bigger than I thought and I think needed a new pot. The one plant that's done well for me. Pure pumice, water every other day with fertilizer... 2 pictures when I got him on July 31 and now-
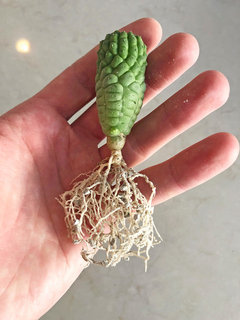
- 7 years ago
Larry looks good. Rather concentrate on it getting rounder rather than taller so more light and less water. Do I see an offset forming? They go dormant in winter and you should let them rest and not water them.
What you are seeing on your huernias is the leaves hardening and many huernias do have "teeth" so I wouldn't be too concerned about that. Some of them show scarring from the red spider and that isn't a train smash. I don't know what is up with the blue but it may be something to do with the lights.
Seems like you are finding your way and so long as you aren't rigid about how you try and grow them, you'll figure out what works for you
Bc _zone10b
Original Author7 years agoThanks Nik
I'll keep it a little higher up on my grow table so it gets a little more light. It seems to have two little offsets or growths coming out of the very bottom, where the body meets the stem. I'm not even sure what they are but I kept them about the perlite level when repotting yesterday.
Thanks for the info on huernias too. It seems a lot of my stapelias with the "teeth" on their stems have turned the teeth from green to yellow/white. Wasn't sure if that was due to the spider mites or light. Hopefully they make it. I'm slowly repotting all of them since I finally got a larger heat pad in the mail to keep the whole setup on.
I put my Flavopurpurea that was in the communal pot the last three days into it's own cup this morning. I noticed it had grown a bunch of new white roots and only in a few days in this damp perlite/heat pad setup. Keeping my fingers crossed that this semi-hydro test works out and my plants like it and grow better.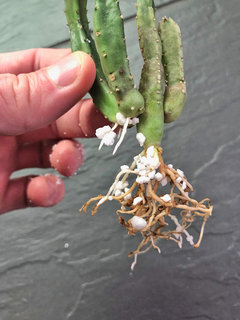
- 7 years agolast modified: 7 years ago
That looks very healthy! Heat pads are quite miraculous when you want root growth. Hopefully you are turning the corner with them, Stapeliads can be very frustrating until you get them figured out
Bc _zone10b
Original Author7 years agoThanks Nik and for all the tips.
This heat pad pad seems to be helping them settle and grow better while getting water. Can you think of any drawbacks to using the mat? I am thinking of trying this method out on some of my larger stapeliads now that I’ve found large Tupperwares to hold them. Just want to make sure there isn’t a bad thing with heat pads.
I measured the inside of the soil for the ones on the heat pad in damp perlite today and it’s between 88-94. Hopefully that’s a good constant for them to grow healthy with the water in their containers.- 7 years ago
I have never tried what you are doing so I couldn't say but I know people who swear by heat pads in winter and for struggling plants. Do remember that plants might need and want dormant periods in order to flower, etc so once you have established good roots, and the weather is warmer you can try the South African stapeliads without it. They grow outside all year round at my place and temps are between 3-5C overnight and around 12-15C during the day in winter. Your psuedolithos, edithcoleas and other middle eastern plants need to be warmer
Bc _zone10b thanked niksouthafrica Bc _zone10b
Original Author7 years agoGreat thanks Nik. I'll try to update once more of these have some time in this new setup. Yesterday I put a flavopurpurea that has been trying to flower for weeks in this setup. Curious if the more steady warm water flow will help with flowers not aborting.
I'm excited to try a few outside during the summer. Last summer I was just learning about these plants and purchasing them for the first time that I was worried I'd kill them outdoors with all of our rain.- 7 years ago
If it raIns a lot, rather grow them outdoors under a roof. You will get rot in summer if it os cool and rainy for days on end. They don't mind rain if it is a short, sharp shower and the weather becomes hot and dry again soon thereafter.
Another thing about stapeliads, you need to find their happy place and leave them there. Many will abort their flowers if they are moved
Bc _zone10b thanked niksouthafrica Bc _zone10b
Original Author7 years agoYeah I learned that the hard way....I moved a few of my Orbeas when I first got them and they got giant buds on them (dummeri I think they're called) to look at them closer. Next day buds had shriveled and dropped. Stapeliads might be the most finicky plants I've ever owned, but I really do like their weird skin patterns/colors and the flowers of course.
Good to hear about the summer roof cover from rain. I sadly don't have much shade here (which some plants seem to love outside in the summer) but just tons of sun and sometimes lots of rain. Maybe I'll build some kind of small covered pergola next summer for a plant table and try some of these outside- 7 years agolast modified: 7 years ago
I actually find them quite forgiving. For me, succulent euphorbia and mesembs can be much more finicky than local stapeliads. Anything that chooses to rot just because you brought it home and gave it water too soon is a diva IMO.
Stapeliads: I bring them home, put them in a suitably warm, airy, semi-shaded spot in gritty mix, keep dry in winter and we are good to go. Even my Larryleachia, which I got in the mail from someone whose growing conditions are very different to mine just looked unhappy but didn't rot. I moved it and we growing. Hoodia gordonii is doing great in my bathroom of all places and the seeds were already 4 months old when I sowed them, thanks to not 1 but 2 postal strikes, which left the seeds in the tender clutches of the Post Office for 11 weeks - and they have a reputation for not germinating unless fresh
Bc _zone10b
Original Author7 years agolast modified: 7 years agoSounds good. They seem to like more perlite/pumice mix here than soil. Probably because they're in plastic and indoors, so they stay damp a little longer. Glad to hear the hoodia is doing great without too much work. I only have one but I'm hoping it grow well. It has a nice spiral effect to it's thorns/skin.
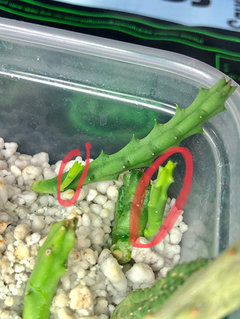
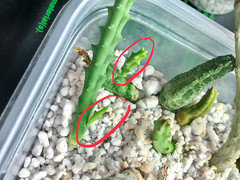
Nik I was wondering if you think the damp/warm perlite mix might cause any kind of incorrect growing on these cuttings? I don't even know if a cutting can grow something new that isn't the same shape as the usual plant, but I noticed two different types of cuttings today had great new growth on them, but they seemed to look very similar looking growths to each other, even though the plant types are different. The growth doesn't look as plump or identical to it's main stem. Is that normal? The larger growth for instance was off a very plump/round stem someone had sent me as a gift (so I don't know the type). But the new growth seems to have the "teeth" like some of my huernias.
I'm going to leave them where they are and see what happens, but thought I'd ask. Most of my other cuttings in the past have just grown roots before I'd try to pot them in soil, not actual new arms, so I'm not sure what to expect here.
Last pic is one of my rarer type Rhytidocaulon's that rotted at the base when I first got it so I never got to see the flower. After cutting it and letting it dry at the bottom it's been sitting in this damp warm perlite and grown a bud over the last couple of weeks. Hoping it opens so I can see the coloring-
- 7 years ago
Hi Brendan. Houzz keeps sending notifications but then I can't see your comments and this one is finally visible. Your new growth is a little bit etiolated and they are growing fast because of the water, as you suspect. Rather water a bit less. You actually want to keep stapeliads dry over winter and let them rest although I realise that you are trying to let them recover after a bad summer.
I hope your Rhytidicaulon flowers, do post pictures if it doesBc _zone10b thanked niksouthafrica Bc _zone10b
Original Author7 years agoSounds good on the growth Nik. I wasn’t sure if it was abnormal or what.
Here is the Rhytido flower finally opened. It’s been in the box of perlite/water on the heat pad for a couple weeks now. It’s gotten much thicker and is growing at the tip so it seems to be happy.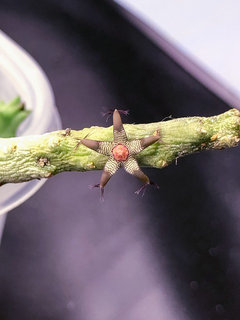
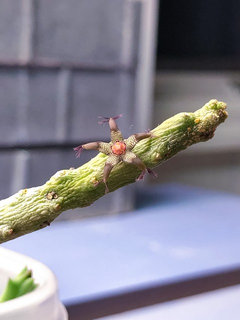
Bc _zone10b
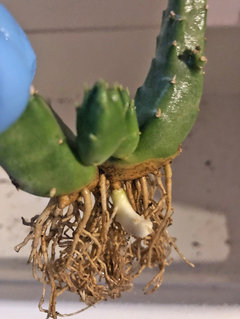
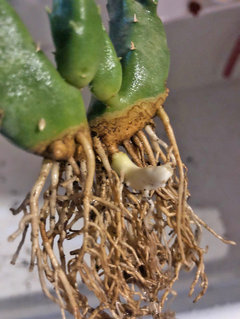
Original Author7 years agolast modified: 7 years agoThis morning I was unpotting some more stapelias and noticed a giant white growth on this one. Do you think it might be a giant root? I noticed there were one or two normal size looking roots coming out of the growth.
This particular plant had longer roots than any others I've repotted into this semi-hydro system so I put it in a taller container so the water reservoir at the bottom is further from it's long roots. Hopefully it continues growing-
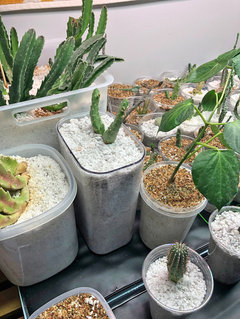
- 7 years ago
It's not a giant root, it's a new stem. It will green up once it becomes exposed to the light
Bc _zone10b thanked niksouthafrica Bc _zone10b
Original Author7 years agoOh wow interesting, maybe I should repot it a little then so that it is above soil level?
Bc _zone10b
Original Author7 years agoOk great Geo, I guess I will leave it potted like it is in the third picture. Hopefully it makes it way up from the perlite once it's ready to be above ground.
- 7 years ago
Brendan, don't keep disturbing the roots, it will sort itself out
Geoforce, I am at over 1 mile altitude, 1,753m to be exact. Those are our winter temperatures and plants will grow a little although they will be prone to rot if watered much. If those are your summer temps, then you are unlikely to get flowers from them. They need heat to flower, in the 25-35C or more for South African StapeliadsBc _zone10b thanked niksouthafrica Bc _zone10b
Original Author7 years agoNik and Geo,
Was also wondering if you've ever seen this before with the tips of your stapelias? This is a flavopurpurea that seemed to burn a tip off a week or so ago when I added an extra lightbulb to my grow stand (left stem in pic)
That was in my old setup which had two AgroBrite T5 High Output 4ft bulbs and the third bulb which I added:https://www.amazon.com/gp/product/B071XXXZPK/ref=oh_aui_detailpage_o06_s00?ie=UTF8&psc=1
An LED type tube.
In this new setup with semi-hydro, I've moved the whole light stand much higher on these but am still worried their tips might burn. It's about twice as high now above all of them, I'd say about 18-24 inches from the tips of any plants below it. Some are closer since they're taller and I'm watching their coloration.
Not sure if that stem will recover but hopefully the plant grows.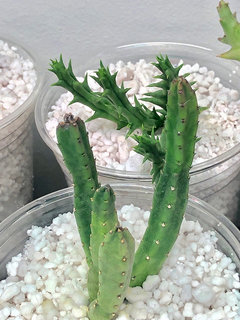
- 7 years agolast modified: 7 years ago
Nik,,, No, these are my winter indoor temps on a windowsill. We are only about 50-60m altitude here and very near both Delaware and Chesapeake bay. Winter temps outside are -18-5C nights -5-12C days. Summers are about 10-15C nights and 20-30C days. Rarely over 35C anytime but most summer days will go over 20-25C. They call them heat-waves here if temp stays over 90F (32C) 3 days in a row. We had 17 days over 32C last Summer.
A friend regularly blooms S. gigantea and she is who first gave me a start of it and got me interested in them but I've only had any since May and haven't bloomed any yet..
- 7 years ago
That should be doable, geoforce. I just hope that you aren't too humid with those temperatures
Brendan, as I said, I know nothing about growing with lights so I can't help you thereBc _zone10b thanked niksouthafrica Bc _zone10b
Original Author7 years agoHey everyone, I was wondering if you ever saw a stapeliad with weird yellowing/red on it's stems?
I got this Hirsuta hybrid maybe a month or 2 now, and it came in pretty rough shape sadly (first three photos). The grower grew it outdoors in pretty peat heavy mix. I did my best to clean it's roots and had it in a 50/50 perlite mixture near a window and lights, but it seemed to continue to yellow.
About a week and a half ago when I was moving my plants into a pure perlite/water mixture pots, I unpotted it and discovered it was covered with root mealie bugs. I washed it with rubbing alcohol, cleaned it's roots, cutting the rotted ones and trying to leave only healthier looking roots (next set of photos)
The last photos are of it in it's new pot, hopefully with mealy-free and cleaner roots in pure perlite. I still notice the strange coloring and want to make sure it's not diseased. If it can spread to my other plants then maybe it's best to get rid of it.
I'm hoping it may just take time to adjust to a new pot and put on new growth? It's tips all seemed to be somewhat dried or damaged. I can't really tell what's going on. Any ideas would be appreciated: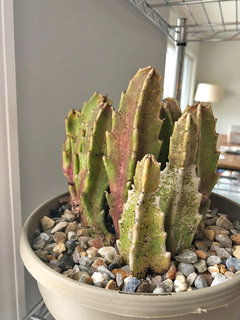
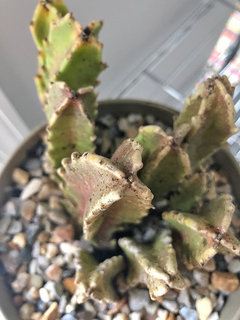
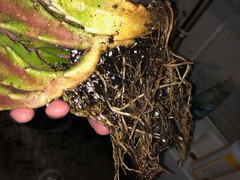
After cleaning: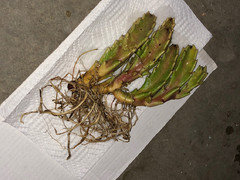
new pot same colors still happening and no new growth yet: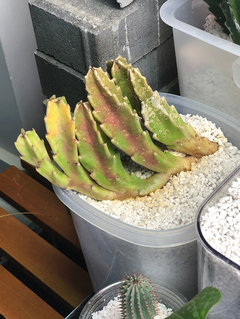
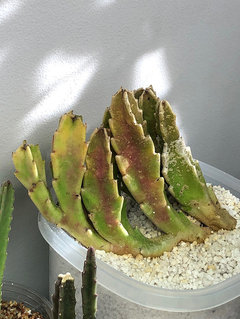
- 7 years ago
Brendan... Hope your hirsuta turns out ok. I really fell for the fuzzy look of them as I see in onLine photos, and got some seed going which are about 2 months along now and starting to square up now, (photo in the "Growing from Seed" thread down below). So far I've been able to avoid the root mealies. I tend to have periodic attacks of small black aphids in a lot of my indoor plants, but that seems my only major indoor insect pest to date.
Bc _zone10b thanked geoforce Bc _zone10b
Original Author7 years agoThanks Geo,
Your seedlings are awesome looking. How difficult have you found growing them? I have no idea how to grow seeds (or full grown plants for the most part hah) but I like experimenting and have been wanting to give it a shot.
The hirsutas seem really special, I love their flowers. Hoepfully this one pulls through even if it has to start completely new growth. It's the last plant I bought. After I got it and realized how weird it looked I decided no more buying plants online until I feel confident growing the ones I have and recuperating the not-so-healthy ones like this. Buying online is tricky and I'm mostly done well with getting what I expect, but I needed a break and this rough looking stapelia gave me a reason to stop.
I have problems with pests, because I collect too many plants and they're all indoors for me. I get them from all over and should probably be more cautious when I see things online or in nurseries I visit, but I have a hard time saying no if it's something I really like. This has lead to aphids, mites, and mealies. I've found that Bayer 3-in-1 granules helped stop all mealies when I put it in the plants soils (I think I forgot to do that on this hirsuta, of course ;(
I also use a liquid form called Bonide(sp) complete insect control that I mix with water and spray on plants when I see aphids or mite webs. You have to do this outside since it's a spray...but I've found it to really help get rid of them. Hopefully one of those can help you with any future problem. With stapelias I'd say add the granules regardless if you see mealies or not. They seem to appear out of thin air and once they attack, the plant basically collapses because they go for the base just above where the roots attach I've found it's better safe than sorry. Hope this helps-- 7 years ago
So far, the seeds have been remarkedly easy. I planted them in a fairly well drained mix, watered a bit, and placed on a windowsill in a plastic bag. Germination about 50% in less than 10 days. Removed the bag and water them ever so often. I've placed the pot on a heat mat now that weather is much colder, but that's about it.
I also use Bonide systemic on my plants but generally use the granules scratched into the top of the mix. - 7 years ago
Brendan, the weird colours on the Hirsuta will be from stress because of the mealies. Give it time and use a systemic. You have correctly understood that sources are important for controlling pests. Time to get your own collection clean and quarantine all new plants in future
Bc _zone10b thanked niksouthafrica Bc _zone10b
Original Author7 years agoGeo, great to know the seeds were fairly easy for you. I will have to look online on where to buy stapelia seeds and give it a try.
Nik, thanks, I wasn't sure about the coloration. I have read a lot of conflicting things online about yellowing being for a "diseased" stapelia that should be thrown out so it doesn't spread to other plants, or yellow being from too much or too little water or light. So I wasn't sure what the problem was exactly but hopefully it recovers and shows some new growth in time. It seemed to have a decent amount of healthy looking roots after cleaning it all off, so I was hopeful that it would recover.
I'll let it be for now and see how it does.- 7 years ago
Houzz seems to have eaten my comment. If it doesn't show up, let me know and I'll repeat it
- 7 years ago
I see one comment is missing. Yellow is a sign of stem death and disease but that is because the mealies have been sucking the life out of it. The two end stems won't recover but the rest should. If the entire plant was yellow, yes, it would be bin time
Bc _zone10b
Original Author7 years agoOk great to know Nik, thank you. Would you recommend snapping those end stems off or just leaving them on to die?
- 7 years ago
Leave it. It isn't rotting and the rest of the plant will withdraw nutrients stored in the stems
Bc _zone10b thanked niksouthafrica Bc _zone10b
Original Author7 years agoI actually unpotted it about an hour ago and the whole base had black roots and black spots all over the main stem in soil. I think I should have cleaned it better when I first repotted it. I left too many brown stems I think ;(
slowly learning.
I was able to hopefully save a save a couple of arms. I just cut off any parts that had the blacking area around any roots even if they looked healthy(pic 1) the main part was even worse looking with deep purple black spots
and tried to save any piece with whitish roots (pic 2)
I put some cinnamon on the end I cut on these healthy pieces like in pic 2. I read that cinnamon was good anti bacterial home remedy for cuttings, but maybe I should have let the cut air dry.
Not sure if I should let the whole thing dry in a cooler room for a few days, will that hurt the healthy white roots that are there now? Or pot it in perlite and keep the cut part with cinnamon above the top soil line?
Bummed out our to lose most of the plant. But I don’t think it was very healthy when I got it, sadly. Hopefully these pictures help others to know what to look out for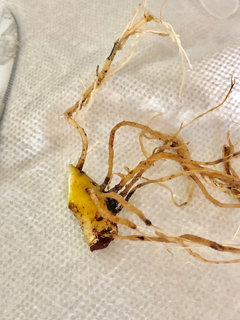
- 7 years agolast modified: 7 years ago
Ugh. Leave it all to air dry. You probably should have left it all to air dry after the first cleaning. When succulents have been disturbed it's always better to let them dry out for a few days before potting and watering. It will grow new roots
Bc _zone10b thanked niksouthafrica Bc _zone10b
Original Author7 years agoThanks Nik. I kind of knew this plant would be difficult when I got it in the mail.
Good to know that letting it air dry might help t. I’ll leave the four or five arms that didn’t have too much black rot on them to air dry and try again with it in a week or so. Thanks again for your help
Bc _zone10b
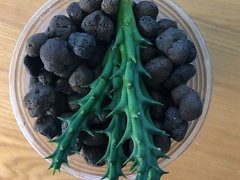
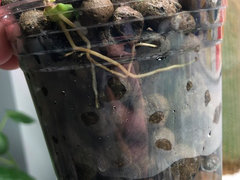
Original Author7 years agolast modified: 7 years agoHas anyone tried Hydroton clay pebbles for Stapelia types? I noticed the small gravel I was using as top dressing in my perlite cups was staying too wet. I took the top dressing off and the perlite does a better job of keeping the top dry and bottom half of cup moost, but still noticing some dampness on the top layer of perlite in some cups.
I have a lot of Hydroton in my basement so I potted up a Huernia in it this morning. The top layer stays drier than perlite it seems, and keeps the water reservoir at the bottom. Just worried they won’t shoot out new roots in these larger pebbles (compared to perlite) I’m going to watch this one to see if it grows new roots.The reason I decides perlite before was because I wanted new arms that grew from these to lay on something that would cause new root growth on the underside. Perlite does that but if it’s damp at the top layer, it seems to lead to rot on some of mine (even on heat mats)
- 7 years ago
I haven't tried anything like that but the main possible problem I could think of is that mealies will have a field day in there due to the large particle size. How often are you watering? I thought that you were bottom-watering?
Bc _zone10b
Original Author7 years agolast modified: 7 years agoUnfortunately I have to pour a small amount of water from the top, because the cups don’t have drainage holes. When I watered yesterday I tried to stay at the edge of each cup to avoid any stems or leaves. I also think the first time around, when I had gravel on the top to retain moisture, I watered too much this way. The gravel stayed wet and a couple of plants rotted on the underside that touched the gravel.
I watered a lot less with the new perlite cups and hopefully the heat pad doesn’t evaporate it too quickly. I just did a 2-3 pours from a tiny shot glass type cup I have, I didn't even really create a water reservoir at the bottom this time, I just let the water touch the bottom but figured the water was being taken up by the perlite in the middle of the cup so I tried not to overwater.
I’ll keep an eye out for mealies too with that cup of clay pebbles. I was more worried they would be too large for the small roots to grow in but hopefully I see some new growth. But I like that I can see clear water line at the bottom with the Hydroton clay pebbles, and that the top layer that the Huernia is sitting on seems really dry compared to the top of perlite.
I’m also wondering if something like rubber surfacing pebbles might work to prevent water at the top surface, but also provide soil like granules for stems to grow and root into.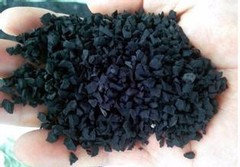



geoforce