Software
Houzz Logo Print
webuser_546951756

Paint is terrible, help please!

7 years ago
last modified: 7 years ago
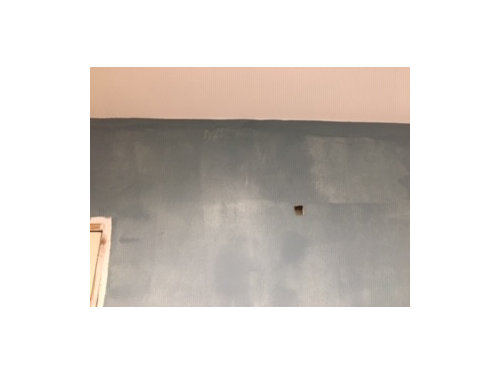
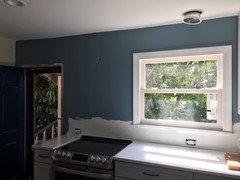
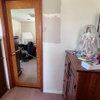
I painted my kitchen wall for the first time ever so please bear with me - I tried to cut the edge with a shur edge paint tool and then paint the rest of the wall with a foam roller and the picture is what I got! It looks terrible! Any advice is greatly appreciated, I need the 2nd coat to look better :(

I sanded, cleaned, and primed the wall before painting. The paint I'm using is Sherwin Williams emerald interior


Comments (27)

  • 7 years ago

    Photo?

    Missus S thanked darbuka
  • 7 years ago

    That's so weird.. i thought the photo uploaded. it should be up now. Thanks!

  • 7 years ago

    Wrong tools for the job!

    Go back to Sherwin Williams and have them show you a good quality brush for cutting in and a good roller and roller frame/handle. Wash them well after using and they will last for years and many more projects.

    Missus S thanked chispa
  • 7 years ago

    It's a bit difficult to tell - but it looks like it needs another coat of paint?

    Missus S thanked Marissa Brown
  • 7 years ago

    Sorry, you said it needed a 2nd coat - are you talking about the lines? I've had trouble with a sure line - done much better with an angled brush and lots of patience lol

    Missus S thanked Marissa Brown
  • 7 years ago

    Cut in brush. Frog tape.

    Missus S thanked jdesign_gw
  • 7 years ago

    Relax. It will look much better with a second coat.

    Missus S thanked terezosa / terriks
  • PRO
    7 years ago

    What color is it suppose to be? It doesn’t look like you are applying it properly. Do a second coat and don’t let edges dry. Use strokes that criss cross in addition to up and down. It will keep final look more uniform. Get a 2” angle brush to do your edges. Purdy is good brand. Check info on brush to make sure it is right for your paint. Good luck.

    Missus S thanked Flo Mangan
  • 7 years ago

    I'm an avid DIY'er myself. I've tried various methods and tools over the years and find that I need to tape the ceiling and adjoining walls and baseboard in order to get the straight line I want.

    Missus S thanked maree85
  • 7 years ago
    last modified: 7 years ago

    I was taught to make ”M” and “W” shapes with the roller, in addition to going up and down. That way the edges of your stokes all end up cross crossing each other, and you won’t see the lines later. Confirm with SW that you have the right kind of roller, and then try that with your second coat.

    Missus S thanked AJCN
  • 7 years ago

    What AJCN says. You have areas where the paint is thicker than others. One way to prevent this is making an M or W and then basically spreading the paint evenly by going over that with parallel lines. You should be overlapping each section as you do this. I would guess that you can find a YouTube video illustrating the method.

    Missus S thanked mainenell
  • 7 years ago
    last modified: 7 years ago

    Here's the video of how to paint it. video

    Missus S thanked Yayagal
  • 7 years ago

    Just my 2 cents...

    When I have a lot of stuff to cut around, I sometimes use the shur line to get paint on the wall near where I need to cut in. I don't use the wheels and move it about a quarter inch off the line I am cutting. After that you are just moving the paint up to the cut line which saves a lot of time.

    Wedge brushes are better than simple angle brushes for cutting. I have been using the Whizz brush from Lowes and am impressed with it and I normally hate products like that.

    Foam rollers are my favorite thing to whack people over the head with and my least favorite thing to paint with. Personally, I would use a 1/2" nap, but that is just me.

    Again, just my opinions.

    Missus S thanked bry911
  • 7 years ago
    last modified: 7 years ago

    "Here's the video of how to paint it."

    That is a lot of room prep for a little bit of paint.

    ETA: As a complete amateur, who has to paint rental property once or twice a year, here are my (off the top of my head) tips for amateurs.

    Clean walls, caulk where needed, patch holes, etc.

    Ceilings first, then walls then baseboards, I am trying to make my crisp line the lower one. This can be a bit of problem if you have crown because I would technically be painting ceiling, then crown, then walls, then baseboards and door trim (probably with the same paint I did crowns with). That adds a cycle to cleaning, but if you are not a pro it is much easier to cut that way.

    I use canvas drop cloths and run them up the baseboards while I am painting walls and ceilings. I will only do any masking when I am painting the baseboards. If there is carpet then your baseboard and shoe will match and you can just use a half dozen cardboard paint shields and not really mask at all. If you have hardwood or tile floors I would probably tape.

    I use the reservoir method for cutting in (video below), I believe it is the easiest for amateurs, I use a wedge and angle brush, and I use 1/2" nap. I understand that the smaller the nap the smoother your surface is going to look, but if you are not great with roller then the higher nap is beneficial.


    Missus S thanked bry911
  • 7 years ago

    Regarding prep: Like anything, prep is 80% -90% of the job.

    Cooking from scratch: 80% -90% is planning, shopping, cleaning, chopping, trimming, marinating or brining, pausing to go pick up the kids, setting table, cleaning and starting the grill, etc, etc, etc. That can take hours to days. The actual cooking takes about 5-10%, then 5-10% for cleaning.

    School: 80% -90% is showing up for class, taking notes, reading, studying, etc. Taking the test is the 10% part.

    Painting is the same. If you don’t prep properly it won’t look good. Most big paint jobs, I just can’t prep well enough because I don’t have the right equipment (extension ladder, scaffolding) or skills (large areas that need drywall repairs, willingness to use oil paint),so I have hired pros for those jobs. But for a normal room with no soaring ceilings, I can handle that myself.

    Missus S thanked AJCN
  • 7 years ago
    last modified: 7 years ago

    I have found Sherwin Williams paint always requires two coats to look good, regardless of which formula you're using; Emerald, Duration, etc. and regardless of which sheen you use.


    I'm off to look up this "Whizz" brush because I hate cutting in paint.

    Missus S thanked zmith
  • 7 years ago

    Regarding prep: Like anything, prep is 80% -90% of the job.

    Let me rephrase that is a silly amount of bad and unneeded prep. However, let's use your analogy a bit, while studying for an exam is a good use of your time, attempting to read every book published on a subject is a poor use of your time. For a bit of play on a couple of old adages, "it takes hard work and effort to get anywhere, but my dog puts hard work and effort into chasing his tail."

    Read the comment section of the video posted...

    In this video there were so many things that are just mistakes.

    • Taping everything, is a bit much, painting a vertical straight line at intersecting walls is not that hard.
    • Taping a textured ceiling is completely worthless and will not look good.
    • Taping carpet, and this is especially good when she uses the too small tool that pulls the tape from the wall and gets wet with paint. It is almost a perfect transfer mechanism.
    • Didn't take the outlet covers off.
    • Left the tape on far too long.
    • Take a hair dryer to the uncured paint to get the tape off the wall without scoring the edge.
  • 7 years ago

    Thanks everyone for your comments! The angle brush applied better along the edges but i definitely struggled more with keeping a straight line.


    I was wrong earlier when I said I used a foam roller - I was using a nap roller but I definitely didn't have enough paint on the roller, which was causing some of the discoloration.


    I went back with the 2nd coat with more paint, making W shapes and it turned out much better. Not perfect, but I'm pretty happy with it, considering this was my first time ever painting a wall. (Bottom part was intentionally left undone because we'll be covering it with glass tiles)


    Thanks for all the helpful input!


  • 7 years ago

    That’s awesome, looks much better! Painting is just one of those things you have to do a few times to get the hang of :) As an experienced amateur painter, I still talk to the guys at the Benjamin Moore store every time I do a project, they are so helpful and make sure I have the right supplies for the project. I find their paints, and primers(other than Aura, I hate that stuff!) really easy to work with. And I love the edger tool, I don’t use the wheels and I touch up with a brush as I go so you can’t tell I used an edger.

    Missus S thanked Momofthree Ma
  • PRO
    7 years ago

    Perfect! You got it! And yes, it does take a little practice and you were doing a dark color which is the hardest, but it looks really nice now and congrats! Now you are an expert! lol

  • 7 years ago

    Great job!

  • 7 years ago

    Looks great! Love the color you chose!

  • PRO
    7 years ago

    What color is it? It is really pretty.

  • 7 years ago

    Great job! Everyone always says “it’s only paint.” But it’s not only paint if it’s your first time trying it. It’s prep, then paint, then disappointment, then back to the paint store, more prep, re-paint, etc, etc. Your paint job looks great.


    Missus S thanked AJCN
  • 7 years ago

    Thanks zsmith and Flo Managan! The color is SW Whirlpool :)

  • 7 years ago

    Nice job, and I love the paint color you choose! What color is the paint?