Software
Houzz Logo Print
hzdeleted_47106605

Tub hardie backer spacing problem

6 years ago


Comments (22)

  • 6 years ago
    last modified: 6 years ago

    I have bought half inch thick 3 X 5 hardie backer boards for this project and I will either use RedGard or a a different kind of vapor barrier (haven’t decided yet). I’m probably going to use 4 X 4 white tiles for the wall.

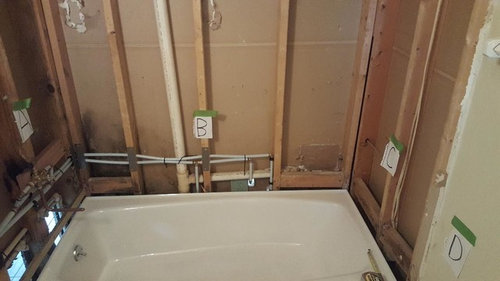
    My issue is the tub lip in the areas labeled A and B in the photo is about 1/8 of an inch from the studs, but the lip in area C is 3/4 inch from the studs.

    I’ve read about using furring strips and sister studs, but my concern is that if I build the studs out in Area C so that the hardie backer hangs above or over the tub lip, that the hardie backer (and consequently the tile) on that side will be built too far out from the drywall in the area labeled “D” in the photo. That it will project out too far and not be even with the drywall on the rest of the wall.

    What is the best way to do this so that it looks right? Thanks.

    The tub was installed by a plumber, I don’t want to move/remove it unless I absolutely have to.

  • 6 years ago

    Thanks! I know the studs need some work. I've already used a four foot level on them and I can see some problems that need to be fixed. And I'm not sure what to do about those metal plates the plumber put over some areas (you can see one of them below the "B" tag). I don't know if I should remove them and chisel down the area beneath them so that that it's level and then put them back in?

  • 6 years ago

    Chiseling out to accommodate those nailing plates would be a start. Then get yourself some cardboard drywall shims and staple them where needed. They're about 1/16" thick and you can use more than one, or they can be peeled down the center to make them thinner. This is what they look like: Drywall shims

    User thanked kudzu9
  • 6 years ago

    Thanks again kudzu! Very helpful.

    I guess shims are the way to go rather than "sistering studs"?

  • 6 years ago

    Trust me: "sistering studs" will only add a new set of problems.

  • 6 years ago

    Depending on how out of level it is, sistering might be needed. Wet shimming the backer board could work if it’s not too bad. Foam board like Kerdiboard will be lighter easier to handle and deal with than cement board.

  • 6 years ago

    I already bought hardie backer.

  • 6 years ago

    The metal plates have to be there to protect the electrical wires from accidentally being drilled into once you start hanging drywall or cement board. If you remove them to fir out studs put them back in the same place

    User thanked Brittney E
  • PRO
    6 years ago

    Personally I would tear the rest of the drywall out and start from the frame and build out the entire wall if it needs it. The more prep you put into having a frame job the easier it will be to finish correctly. With all the studs exposed you should be able to plane from corner to corner and make sure you have a smooth transition from the drywall to hardy board. Your looking at maybe $200 in drywall and studs (if it’s a 5’x8’ bathroom).

    User thanked Green Hammer Construction Consulting
  • 6 years ago
    last modified: 6 years ago

    Green,

    Thanks...that's what I was thinking of doing but I wasn't sure. But it sounds like it may be.


    The drywall in that bathroom is damaged anyway from abuse over the years and I already have the new sheets to replace although I haven't done any of it.


    Do you just attach extra studs to build the main wall out further, or use furring strips?

  • PRO
    6 years ago

    I would personally use another stud and nail to the side of an existing stud. You will have to rip one down for your corners to fur it out but it’s by far easier and more time efficient.

    User thanked Green Hammer Construction Consulting
  • 6 years ago

    Thanks. So you just nail it parallel the existing stud, but pushed out as far as you need it too protrude to be flush with the hardi backer?

  • 6 years ago

    John-

    I'm going to give you a reality check on the idea of fixing things by simply sistering new studs to existing studs. This will help part of the problem, if you have existing studs that are way off, but the idea that the new studs will all be totally straight, won't shift at all when you're nailing, and will end up precisely in the same plane is a pipedream. Bottomline: there is no substitute for shimming. I've had showers retiled twice in the last couple of years, and my tile guy was insistent on shimming the walls so that they were all perfectly vertical from top to bottom, and limiting deviation in surface flatness to less than 1/64". You don't get to tolerances like that by simply nailing in some more studs.

    User thanked kudzu9
  • 6 years ago
    last modified: 6 years ago

    Thanks Kudzu. I think Green Hammer was talking about sistering studs only on the area of that main wall of the bathroom that is being redone (to push it out to be flush with the new hardibacker) -- area "D" on the photo -- not on the area that's going to be tiled over.

  • PRO
    6 years ago

    Correct John,
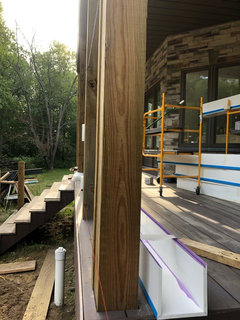
    The entire wall (D &C) would need to be furred out. I don’t have an exact picture to illustrate what I mean but attached is a simple example on a deck post.
    You will need 2 string lines to make this work. First parallel one just above the tub lip. With a straight edge plumb up from your first string. Now measuring back to a reference point (the corner stud is a good choice) this is the distance at that point your going to have to place the second string. Do this for both corners on that wall. Now with the 2 strings plumb to each other and parallel off the tub edge it is time sister the studs. Make sure you are using straight studs, if they have a crown cut it straight or else all the work so far is for not. Using a full length stud make sure you are touching both stings but not bowing the string and nail it to the existing stud. When you are done you will have a wall that is plumb and planning with the back of your tub. This process shouldn’t t take more than an hour to do.

    And to Kudzu,
    I am always willing to learn new ways to make projects more efficient. If you have any info or resources as to how your tile installer performed this 1/64” deviation I’d be happy to read up on it.

    User thanked Green Hammer Construction Consulting
  • PRO
    6 years ago

    IMO you are in over your head get a pro it will be worth every penny. Watch and learn.

  • 6 years ago
    last modified: 6 years ago

    @Patricia Colwell,

    Thanks for your input, but I am not in over my head on this project.

    Green,

    Thanks for the photo! I am also going to watch some videos about shimming and stud sistering.

  • 6 years ago
    last modified: 6 years ago

    Green Hammer-

    Fortunately, my three shower walls were at 90 degrees to one another, and close to plumb from top to bottom. He used an 8' level along each stud and diagonally across studs looking for any daylight. Wherever he saw a gap, he stapled drywall shims, sometimes splitting them down the center to get the right thickness. Some studs had shims at several height locations. Once he was satisfied that each wall was dead flat, he screwed down the backer board with an impact driver, making sure no screwheads were above the wall surface. When he was done, he checked each wall with the level again to make sure all the screws were fully seated and all the backer board was tight to the walls. It took a bit of time, but it made the tiling process go very smoothly since there were no deviations or irregularities to be dealt with in the wall surface.

  • PRO
    6 years ago


    Watch Sal DiBlasi wet shim. It’s a much easier process. Guru of guru’s. Watch his whole channel!


    https://youtu.be/e2yYse0cd_E

  • 6 years ago
    last modified: 6 years ago

    Wet shimming is an interesting approach, but I still prefer normal, solid shimming that can be checked before the backer board is set. If you're not experienced with wet shimming, it's easy to end up with a with a panel that might be flat, but not plumb or in plane with the others. Then it's a mess to try to remove or fix it. Maybe it works great if you are experienced, but I'm old-fashioned on this. Just my two cents...feel free to ignore my view.

  • 6 years ago

    ...