

Very limited kitchen layout options
I have been wrestling with kitchen layout and I need some advice.
Because of size and walkway/thoroughfare limitations, there are just SO FEW ways we can rework our kitchen to get some added storage and counter space. So many people flippantly tell me to add an island - and GUYS - it will not fit.
Our kitchen backs to a narrow hallway that must be maintained. It has a wall of GORGEOUS Windows we want to modify but preserve, it acts as a walkway between a den/office space, and its just pretty small.
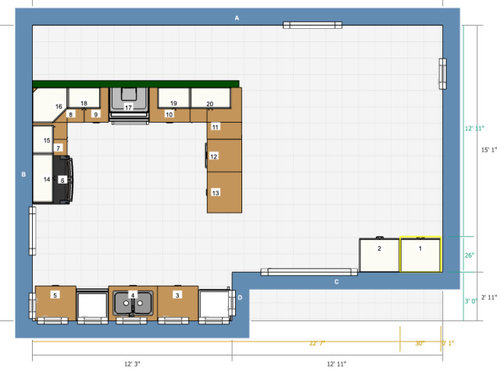
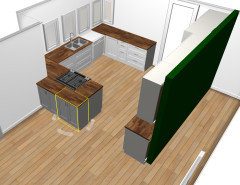
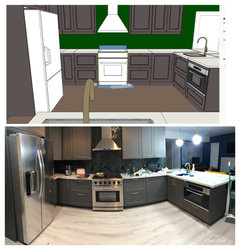
I will attach a screen capture from the IKEA kitchen planner software. This is my proposed design. I can post a couple before pics too. (Trying but they won’t post for some reason.)
Heres my question: My sink, in this proposed new design will be 9 feet away from the stove. The kitchen is very compact and efficient now - just about 2-3 steps from fridge to stove and stove to sink.
Unfortunately compact also equals no counters! We are proposing that we raise the window height, add cabinets the nook (which I typically refer to as “the atrium”), and relocate the sink and dishwasher to the atrium. (Since My before pic won’t upload: The sink and dishwasher are currently on the peninsula and the atrium is just an open area of floor, housing a small table and chairs. No cabinets.)
Please share your wisdom. Will I regret the 9’ distance from stove to sink? Or will I adapt to it?
Would a small vegetable sink w/ disposal in the location of the current sink be necessary/valuable so water is closer to the stove?
Comments (82)
 PRO7 years agolast modified: 7 years ago
Or with a base cabinet on the right side of RF.
Emily L
Original Author7 years agolast modified: 7 years agoI feel like we probably could rework the kitchen that way, but that it would also impact some other layout issues. It would make the entry way open into the kitchen, and would close off the two rear slider doors from kitchen, which serves as a really nice wide access point to our large deck right now. It's kind of the thing that makes this house wonderful in a lot of ways - that wide facing open wall of windows and doors at the rear.
This shows the location of the load bearing beam. That entry way wall is beneath that beam, so unlikely it could be taken down, which, at minimum, would leave a post in between the living and dining rooms.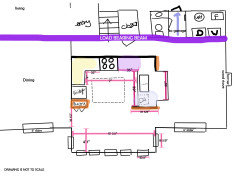
Related Professionals
Sault Ste. Marie Interior Designers & Decorators · Forrest City Architects & Building Designers · Natchitoches Architects & Building Designers · Orange County Architects & Building Designers · Denver Architects & Building Designers · Twin Falls Architects & Building Designers · Ocala Kitchen & Bathroom Designers · Vincennes Kitchen & Bathroom Designers · Cherry Hill Kitchen & Bathroom Designers · Athens Kitchen & Bathroom Designers · Brattleboro Kitchen & Bathroom Designers · Platteville Kitchen & Bathroom Designers · Chillicothe Kitchen Remodelers · Elizabeth City Custom Countertops · Richmond Custom Countertops 7 years ago
With your comment about needing to rebuild the window wall anyway, I could see integrating it into the kitchen. I do love your inspiration photo. How big is your current kitchen sink? If you put a prep sink in that same area, it would likely take up less counterspace, giving you more prep area between range and sink. On your Ikea plan, are you planning to add any depth to the peninsula counter top on the right side? If you added some overhang (with or without cabinets underneath for extra storage), you'd have even more space to spread out when prepping.
Something like this (not having it to scale makes it a bit tricky)..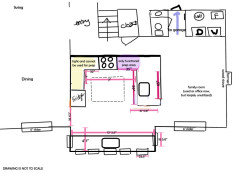
Can you/will you raise the ceiling over the current kitchen? Is that a florescent light in the center, or a skylight? It looks like you have the same 7' dropped ceilings I just ripped out.Emily L
Original Author7 years agolast modified: 7 years agoWe do plan to remove the drop ceiling. It used to be a large fluorescent light. The previous owner removed that and put crown molding inside to make it a lighted tray ceiling.
And yes we do plan to extend the counter as you have drawn.
The current sink is 28” and divided in the center. And a lovely stained (formerly cream) ceramic job too.
 7 years ago
..and say you were to encroach into the dining..keep it either one wall (no work triangle I know, but I did live like that and I found it quite convenient-but it was an eat-in space..dining table was in the kitchen)..or L-shape..meaning your penincula stays..will your big dining table fit comfortably still, with chairs and all, or prolonging cabinets/counters there will make the room too narrow?
 7 years ago
The only way to a successful remodel, especially for a kitchen, is to plan, plan, plan and then plan more.
You need to have graph paper and put all your measurements down on paper. An inch here and an inch there makes a huge difference.
What is your budget? What do you want the finished product to look like??
I think you don't know what you don't know and that is a recipe for disaster.
Please read the following Houzz pages to help you find your voice.
https://www.houzz.com/discussions/5500754/new-to-kitchens-read-me-first#n=533
http://starcraftcustombuilders.com/kitchen.design.rules.htm#.Wq1aeWrwaM8
https://www.gardenweb.com/discussions/3638270/faq-kitchen-work-zones-what-are-they
https://www.gardenweb.com/discussions/3638376/faq-how-do-i-plan-for-storage
https://www.gardenweb.com/discussions/2699918/looking-for-layout-help-memorize-this-first
https://www.houzz.com/discussions/5332686/10-tests-for-you-and-your-contractors-first-meeting#n=25
Emily L
Original Author7 years agolast modified: 7 years agoMy response of “it is what it is” wasn’t meant to indicate an overall lack of preparation on my part. I’m planning and planning and planning some more. Just trying to think through a problem and thought the group might help a little.
The mix of pros/invested group members and newbies with questions makes it's own culture here. I know that designers are used to working with deep specificity - as they must, and you're all annoyed with homeowners who have questions ahead of getting into that level of specificity. I'm sure this place is clogged with idiots who tear out rooms without measuring anything at times, and you're all used to dealing with said idiots - but that's not me. No worries there.
I know how I want it to look and have extensive plans beyond what is indicated by my question. I am working with professionals and no one will lift a sledgehammer until the plans are on graph paper. I don’t expect the Houzz community to design my kitchen - the conversation is fun - but it goes beyond what I expect the collective group to accomplish.
But thanks for the links.- PRO7 years ago
Emily, you are doing good. I just do not like that walking way is not open to kitchen. If you keep it open, then both Kitchen and walking way will gain with space.
Emily L
Original Author7 years agoYeah, it is a ridiculously narrow hallway as it is (exactly wide enough for the hall closet door to open).
None of it is ideal. I just want to have a sense of what will work best for me prior to getting a contractor in here. And even with all this planning, I know that changes will still come. That's the funny thing about a design, it only lives on paper. Things are just different once you start demolishing the old and building the new.- 7 years ago
"...it is a ridiculously narrow hallway as it is (exactly wide enough for the hall closet door to open)"
So the hallway behind the range wall is not 40" wide like it appears in your first layout?
Emily L
Original Author7 years agoThe max width is 40” but the front of the closet (not shown) juts into the space.
- 7 years agolast modified: 7 years ago
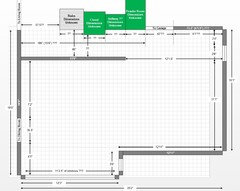
OK, this is what I came up with for dimensions. Are they correct? What about the ones with only question marks?
Scale is 1 square = 6" x 6"
Emily L
Original Author7 years agoWhat software did you use to make this? Is it something I could figure out at home?
I can try and put something similar together. There are flaws in my drawing. The closet and powder room are adjacent. No hallway between them. Didn’t fix it before because I didn’t think it was relevant to my plan necessarily. I can fix it.
- 7 years ago
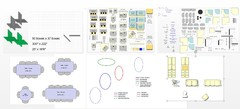
Lol! Microsoft PowerPoint!
I downloaded graph paper from the web and pasted it into a presentation.
I set the scale at 1 square = 6" x 6"
Then, I created "templates" for various common things like sinks, ranges, cooktops, refrigerators, etc. The one think I cannot do with PPT is 3D elevations.
If you'd like me to email you my template, email me at EverCurious2009 at gmail dot com
- 7 years ago
The hallway items only become important if the wall b/w the Kitchen and the hallway is taken down. I'm just trying to draw it up so all options can be considered.
- 7 years ago
In my (decidedly non-professional) opinion, it is not the 9-foot distance from stove to sink that would be difficult for me to adjust to, it is the fact that it is across a walkway. If it is a walkway that is not used too much, it might not be a problem. I would have to envision taking a big pot of pasta over to the sink to drain it. If I were doing this, I would almost certainly have a prep. sink somewhere on the peninsula in addition to the clean up sink across the aisle. Though it takes up precious space on the peninsula, you are gaining a good amount of counter space across the way.
Having said all that about crossing walkways... Have you given any thought to moving the (non-load bearing?) stove wall closer to the atrium wall and making this into a galley kitchen? The fridge would move onto the stove wall and the sink and dishwasher could be in the atrium as you have shown (perhaps with deeper countertops?). You could then extend the stove wall into the current den/office space, incorporating some or most of that space into the kitchen, but still leaving room to walk from the end of the hallway to the sliding door out to the patio. You could consider a bank of shallow pantry/storage cabinets along the wall where the former wood stove was. Extending the stove wall would make the hallway behind it longer, but it would be wider, so more functional and could likely include storage also. This idea does not really leave any seating space in the kitchen, so if that is important, it might not work. - 7 years ago
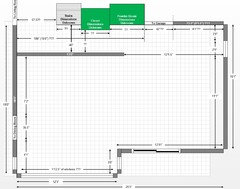
Just realized I forgot to put the left window and right 6' slider in the layout. I also took out the "hallway" that you said doesn't really exist. I suspect there are walls b/w each of the stairs, closet, Powder Room, and Garage doorway as well, but I have no idea how wide they are, so I didn't include them.
- 7 years ago
You could make the sink wall even longer if you move the peninsula to start at the top of the corner instead of in the bump out.
The inspiration photo of the sink is awesome!!!
It would be doable, but you would have a walk way thru part of your work area.
 7 years agolast modified: 7 years ago
I like your plan--with a prep sink, and as long as the range can be vented to the exterior. With the addition of the prep sink on the peninsula, you'll have separate zones; you can be prepping and cooking, while a helper is prepping on the other run, or loading/unloading the DW, or gathering dishes to set the table--without entering your work zones. There would be no walkway through your work zone.
Since that alcove/bump-out appears to be deeper than a standard base cabinet, you might consider making the counters on that side deeper, or having custom deeper drawer bases, for more storage capacity.
Emily L
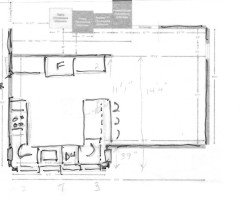
Original Author7 years agoOk! I have done it. A measured scale drawing. It should be mostly accurate...I hope.
Ignore the top edge, I have omitted details regarding doors to the powder room, garage and laundry, as well as details in the entry way, and the front door. I have also (hopefully obviously) omitted most of the side of the house where the living and dining rooms are.
Once again this is a 1,792 sq ft 80's modern home, with 3 bedrooms 2 1/2 baths. All the bedrooms are upstairs.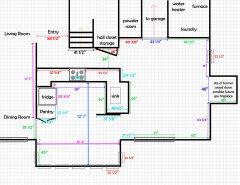
- 7 years ago
thank you for posting the drawing..now I know that my former question I wouldn't ask it at all since dining and living are the same space..back to the drawing board as they say..I might be too preoccupied with thinking of how-not-to affect-your windows and skylights wall..
Emily L
Original Author7 years agoThey’re kind of the same space. They are separated by the ceiling. The living room has a very high vaulted ceiling and the dining room has 8’ ceilings. But they do not have a wall separating them.
- 7 years ago
I still like moving the sink to the window wall and making the windows above the sink.
 PRO7 years ago
Late to this thread, but while skimming the comments the idea of reversing the U and the opposite wall occurred to me, as per Karenseb's sketch above. This seems to solve most or all of your problems and preserves the sink under the windows. The wall at the top becomes a storage wall anchored by the fridge and could include a reach-in pantry with a counter between it and the fridge on the end. The door/opening to the dining room on the left would have to be moved.
Emily L
Original Author7 years agoI believe we can move the door to the dining room. I’m wondering about the change in traffic flow. We have two sliders in the rear, both just off the kitchen. Right now we get a real indoor/outdoor flow happening in those locations. Wondering if we would lose it if relocate kitchen access away from the two sliders.
Emily L
Original Author7 years agoHere's a quick rework.
I have a question or two.
The location where I have placed the stove...will it be difficult to plumb the gas there due to it's proximity to an outside wall? I know so little about this, so if that's a lame question say so.
If it will be tough to do, where is the better place to put the stove?
The original plan I have (the IKEA floorplan I posted early on) I have a sort of dishwashing zone around the sink and a cooking zone around the stove. With this plan the dishwashing zone and cooking zone are very close to one another and I'm not sure if there's a better way to place it all.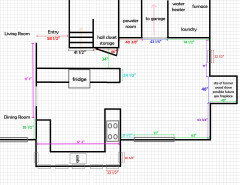
Emily L
Original Author7 years agoRough mockup from IKEA's Kitchen Planner. I moved the slider so I could make room for more countertop behind the stove.
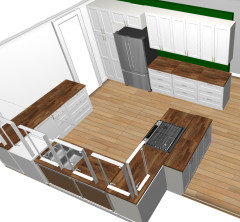
- PRO7 years ago
The change in traffic flow will be improved since the kitchen will function far better. You'd only be moving the opening to the dining room about 3 or 4 feet.
- 7 years ago
I'd want a backsplash above the cooktop, so I'd put it on the dining room wall. With that much space around the refrigerator, you could also consider a cooktop/wall oven rather than a range, if that interests you. Moving the gas line will largely depend on where it is currently and where it has to go: is it run through the floor or the ceiling? Are you on a crawl space? Basement? Concrete slab? Another thing you need to think about is how to vent the cooktop.
Emily L
Original Author7 years agoGas comes through the floor. We are on a crawl space. If I move cooktop to the dining room wall a hood can be installed there. So that would probably be better.
 7 years ago
Emily, just curious if you’ve calculated counter space in your original plan vs this new plan? Is it about the same?
Emily L
Original Author7 years agoThe most counter space is in the original redesign.
The “reverse u” design has about double the current kitchen.
The first design has about 3x the original kitchen. A little less when I add the extra sink.
 7 years ago
I love your windows and would save them. With respect to your current layout, is there any reason you couldn't move the stove a bit further to the left to expand your run of usable prep space to the right?
- 7 years ago
I have 3 ideas so far. (It's taken a while b/c of work!)
They are three very different ideas. Personally, I prefer #1, but you may differ. I tried drawing up something similar to your latest without the range on a peninsula, but I didn't like how it had a lot of wasted counterspace where it's not useful. (I'm not a fan of ranges in islands and peninsulas b/c of the venting needs and other issues.)
Here they are...
Layout #1:
- Is a shallow "U" with a row of cabinets/fixtures below.
- The "U" shape protects the Prep Zone and, especially, the Cooking Zone from traffic through, around, and in the Kitchen. The center of the "U" is 10' wide there's plenty of room to move around in. Since the peninsula extends only about 4' past the upper row of cabs/counters, o one will be "trapped" in the "U" or feel like they have a long way to go around. In my opinion, that's the secret of a successful peninsula-style Kitchen -- legs not too long and a wide base. [I have a similar setup (a little smaller than yours) and I absolutely love it! I have plenty of room to prep & cook while my DH has plenty of room for cleaning up -- all of which often happen at the same time! I even had sixteen 16 12-year old girls cooking in my kitchen (earning their Cooking badge for Girl Scouts). My new kitchen really proved itself...as well as justified my focus on "zones" as we had 5 stations of 3-4 girls each + "extra" activities...and it all fit in a medium-sized kitchen!]
- The window area gives you a lot of depth, so I made the sink cabinets and counters deeper than standard:
- Counters are 30" deep
- Cabinets are installed approx 1.5" out from the wall
- Cabinets are 27" deep. If you cannot get 27" deep cabinets, simply pull them out from the wall an additional 3" for a total of 4.5" (3" + 1.5" from above) [If you live in a climate with cold winters, consider putting some extra insulation in that space.]
- The Dining Room door stays where it is now.
- Wall stays as it is now
- Utilizes all the space
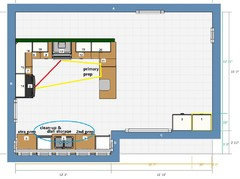
- The Prep and Cooking Zones are separated from the Cleanup Zone for better working conditions. It allows a couple of people to be working in the Prep/Cooking Zones while someone else is cleaning up along the bottom wall. If you have several people working in the Kitchen (e.g., family gatherings where several are in the Kitchen), Prepping can also take place along the bottom wall. In effect, you have 4 potential Pep Zones with direct water access as well as another 1 or 2 without water access (to the left of the range).
- The Cleanup Zone and Dish Storage are along the bottom wall -- next to the Dining Room doorway. It will be easy to (1) unload the DW into the cabinets and (2) set the table in the Dining Room without getting in the way of those prepping and cooking in the upper "U".
- The refrigerator an MW Drawer are on the outer edges so someone can access/use them without getting in the way of those working in the Kitchen.
- There's a 5-foot row of 15"D pantry cabinets along the bottom wall on the right.
- Aisles are all wide enough for easy access and use of the Kitchen. There shouldn't be any bottlenecks.
- There are 2 places with seating in the Kitchen.
- Both have 3 seats at the peninsula.
- The first option has a bistro-style table and chair in front of the only window on the far right wall. It could be a comfy chair and table instead.
- In the second option, there are two comfy chairs in front of the fireplace, assuming you go ahead and convert it back to a fireplace. There's just enough room to pass between the chairs and the peninsula when someone is sitting at the counter.
.
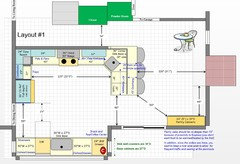
.
Layout #1 Work Zones:
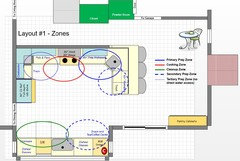
.
Layout #1 with Fireplace Seating option:
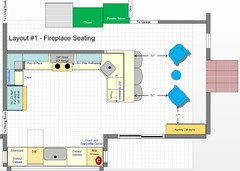
- 7 years agolast modified: 7 years ago
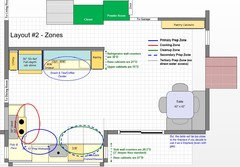
Layout #2 is an "L" plus a row of tall and a Snack Center.
- The three primary work zones are all in the "L". The Cleanup Zone is on one side of the sink and the Prep and Cooking Zones are on the other side. I don't think it gives you as much workspace overall as Layout #1, but at least it allows two or more people to work in the Kitchen at the same time.
- The top wall has a Utility cabinet (for broom, mop, etc.), a standard-depth refrigerator, a Snack Center, and an 18" pullout Pantry cabinet. (Pullout, not doors/drawers.)
- The counters are 30" deep to make the standard-depth refrigerator look counter-depth. The base cabinets are 27" deep and pulled out from the wall 1.5". The upper cabinets are 15"D.
- The MW is in this space. I put in a MW drawer (I'm biased, I really like mine!) but you can optionally put a standard MW on a shelf under the upper cabinets or on the counter.
- If you have a toaster oven, coffeemaker, tea kettle, etc., they can also be on this counter.
- Optionally, you could have a sink -- there's plenty of space!
- The Dining Room doorway is moved up.
- For seating, there's a banquette-style setup on the far right. If you get the fireplace going again, the table and right bench may be too close.
- There are 66" (5'6") of 12" deep pantry cabinets in the upper right corner, next to the Garage entrance. The window keeps you from going much deeper than 12", but that's a good depth for pantry shelves anyway. You could go to 13", which would give you 12" deep shelves when accounting for the back wall of the cabinet...but no deeper.
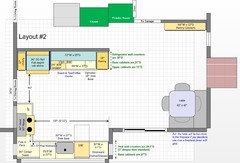
.Layout #2 Work Zones:
- 7 years agolast modified: 7 years ago
Layout #3 is probably the most expensive to do and will limit access to the Dining Room, but I thought I'd post it for you. It's an "L" with an island plus table seating.
- The top wall is removed. This also expands the walkway b/w the stairs/closet and the Kitchen to 48" from 34".
- The Dining Room doorway is eliminated
- The Living Room doorway is enlarged -- but only if it will fit the architecture of the Dining and Living Rooms
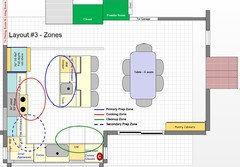
- Like Layout #1, this layout also has plenty of workspace and completely separates the Prep & Cooking Zones from the Cleanup Zone.
- The island contains the Prep Zone as well as the trash pullout and MW drawer (optionally, the MW can be on the counter elsewhere, e.g., in the corner b/w the sink and range)
- The Cleanup Zone is along the window wall on the right side of the sink (away from the range)
- There's a secondary Prep Zone b/w the sink and range with plenty of workspace. It's really another primary Prep Zone as many people prefer to prep right next to the range rather than across on an island. This layout provides both for your, depending on your mood. (I think it would be nice around Christmas baking cookies on the island while a fire is going and Christmas music is playing! I can see it now...! Same with Layout #1, BTW.)
- All counters are 30" deep (see previous layouts with explanation).
- Refrigerator is standard-depth and on the periphery so snackers and others won't get in your way.
- There isn't quite as much dish storage next to the sink & DW, but if you also use the upper to the left of the range, you'll probably have enough. However, that will draw someone setting the table into the work area...but if you're prepping on the island, it won't be too bad (try to make them go around the outside of the island, though, so they don't get in your way).
- The island seats 3, with the middle seat having a deeper overhang -- for someone with long legs!
- There are either 6" filler pullouts (as shown with a 1.5" panel for support on the outside) or 6" cabinets on either end of the island. Two or three cutting boards would fit in one. Or, a spice pullout or other. (See this link for ideas: Rev-A-Shelf Base Filler Pullouts ranging from 3" to 9" in width: https://www.rev-a-shelf.com/rev-pages/product-listing.aspx?CategoryFilterID=47&SubcategoryFilterID=53 )
- A 39" wide table fits nicely. While I would prefer 42", those extra 3" make a difference in the aisle b/w the pantry and the table.
- The aisles around the table are sufficient for the traffic:
- The Garage entrance (48")
- Between the island and table (60"). Note: 48" is too tight. I have that and when someone is sitting in one place, it's a bit tight. When someone is sitting at both places, someone has to to move to let someone else pass by.
- The slider (48"). This will probably be even more important if the Dining Room door is closed up b/c now that will be the only way to get to the back from this side of the house.
- The Fireplace -- you don't want to be too close in case there's a fire in the fireplace.
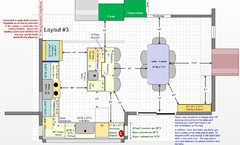
.Layout #3 Work Zones:
Emily L
Original Author7 years agoOh my goodness!! I am incredibly impressed at your effort here. I really appreciate it.
I’m going to study these and see what will work best.
I have started to lean away from the idea of reversing the U of cabinets because of added construction costs and the limited width placing the U in the atrium. It cuts way back on counter space.
- 7 years agolast modified: 7 years ago
Just a note about Layout #1...while it's my favorite, it won't work if you don't have a prep sink on that side of the Kitchen.
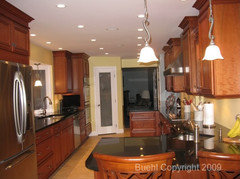
Here's my Kitchen to give you an idea of how it works. Like Layout #1, my Kitchen would not work if I didn't have a prep sink.
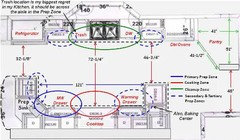
I only have room for two seats on my peninsula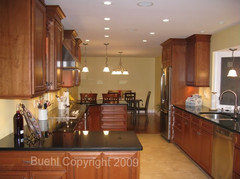
- 7 years ago
I hope you will post what you decide to do. I'm super curious. I definitely prefer #1 over #2 but I LOVE #3. The layout seems more efficient, easier to work in and cozy. I would be annoyed every time I was loading the dishwasher and someone came in from the dining room and squeezed by. I totally agree with Buehl's recommendation regarding the added distance behind the sink to the windows for a splash zone. This is an ongoing problem in my kitchen with no easy fix.
Emily L
Original Author7 years agoYes! We will share. I believe we have decided on #1...but want to look at some things too.
- 7 years ago
I had the kitchen in your first plan and with a large rolling kitchen Island I not only had extra counter top area but it also had two cabinets and a few drawer that were used for my favorite cookbooks and bake ware. It also came in handy for get-to-together as an additional buffet area. What ever you choose enjoy your large beautiful kitchen, now that I am back to a smaller one I really miss the extra room and even the steps!
Emily L
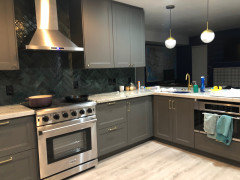
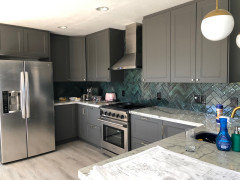
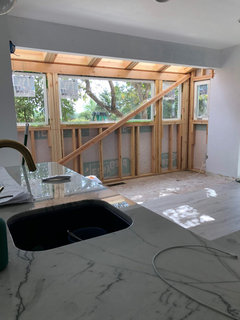
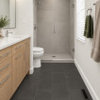
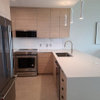
Original Author6 years agoHi! This is an old thread but I’m back with a photo of our almost completed kitchen. This project took EXCEEDINGLY longer than we envisioned but we are almost done.
I want to thank everyone who helped me. You really made things come together. Especially Buehl who made floorplans for me - without me even asking!! (Such a kindness!) - and those designs allowed me to communicate better with the architect who ultimately drew our plans.
Here are some pics:




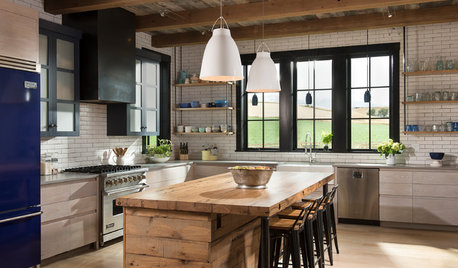
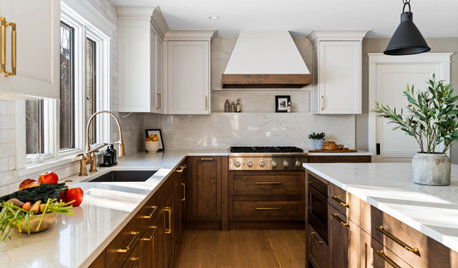
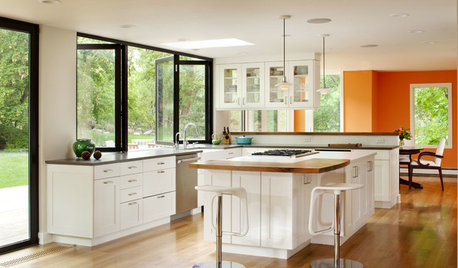
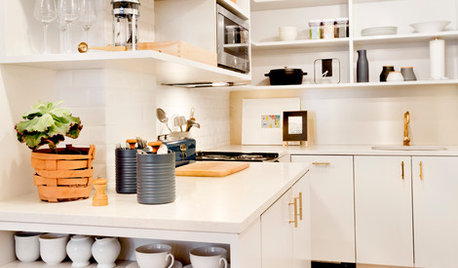

Emily LOriginal Author