Software
Houzz Logo Print
sherry_bunch

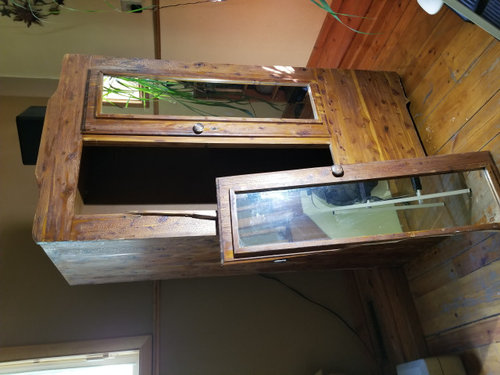
Should old wardrobe be refinished or just rejuvenated?

6 years ago


Comments (33)

  • 6 years ago

    Thanks Fori,

    The finish seems pretty stable. No flakes, but a few areas where it's looking a bit thin, dry. Any ideas on how to revive and protect those areas?

  • 6 years ago

    Also, is the bubbling just the nature of the aged finish, or is this caused by moisture or heat or....?

  • 6 years ago

    Never mind about the last two questions. I found a website that explains it in language that even I can understand. lol Thanks for your help. :)

  • 6 years ago

    Mind sharing the website you found?

    Sherry Bunch thanked party_music50
  • 6 years ago

    If, if the wardrobe has a natural varnish, pre polyurethane finish it may be what I guess is called re-amalgamated. I found a article that explains what to use. I've done it but couldn't remember what I used.

    It basically slightly dissolves the natural varnish finish just a bit, then it dries and is smoother. If you use a light hand it won't go down to the wood or stain.

    I've done it twice. Once just using cotton rag from old white t-shirts on a old storage cabinet that belonged to grandfather. But one one spot I was a little too aggressive and took off too much, but first time so a learning curve. The second time on a great grandmother black walnut table. Very heavy alligatoring (looks like cracks in finish, looks like alligator skin) it was worse on the legs, and used rags and brush. It was so heavily crackled it took at least three times on the legs.

    FYI, not sure if totally correct on this, but pretty close: Natural varnish was made by dissolving sap from trees in turpentine and used as a clear finish

    Sherry Bunch thanked Izzy Mn
  • 6 years ago

    Here is the article

    Here is the article

    https://home.howstuffworks.com/home-improvement/home-diy/projects/how-to-restore-wooden-furniture-finish1.htm

    ....I used wrong terminology. It's not natural varnish. The correct term is shellac.

    Sherry Bunch thanked Izzy Mn
  • 6 years ago

    I've tried reamalgamating shellac. I've always failed. :)


    If you mostly like the way it looks, you can probably seal it up and protect it with shellac. Test somewhere you can't see.


    Don't do anything to the finish if it's valuable.....


    Sherry Bunch thanked Fori
  • 6 years ago

    I have had very good luck reamalgamating a finish or 2 that had checkered or clouded. For a shellac finish use denatured alcohol....sold in the paint store as shellac thinner.....for a varnish finish use a mixture of alcohol and shellac thinner...acetone. 2/3 alcohol to 1/3 acetone. I just brushed it on with a paint brush and when the finish melted, smoothed it out. But the surface must be flat to work....turn that wardrobe on it's back and only work on the horizontal surface.


    Sherry Bunch thanked lindac92
  • 6 years ago

    This is the website that I found. https://www.wisconsinhistory.org/Records/Article/CS4249. I'm pretty sure that the finish is shellac, but if not I shouldn't harm it any by using denatured alcohol if it is actually varnish. Going by the website, I could use Dawn dish soap to clean it and although I don't really want to refinish the whole thing, I do need to repair some scratches plus where the doors are damaged and need repaired so that is where the denatured alcohol comes in. Then just repair the shellac in those spots using amber shellac and then a clear shellac for protection of the whole cabinet. I think I'll probably end up putting more money and effort into it than the piece is worth, but it's a first time refinishing project for me so it should be fun. Besides that, it's cedar, so I can't really go wrong with trying. :)


    I'll check out your link Izzy Mn. Thanks for all the help to all of you. :)

  • 6 years ago

    Agreed....but forget the dawn dish soap...it will leave a residue that will affect the shellac or varnish. If it's dirty dust it and wipe with mineral spirits

    Sherry Bunch thanked lindac92
  • 6 years ago

    Thanks lindac92. Saw this the other day, but didn't have a chance to get back on here to answer it. I'm using the mineral spirits instead. I did have to sacrifice a little of the finish on the back edges due to a lot of paint on the shellac that wouldn't come off with any less than the use of the denatured alcohol. There were two different colors of paint on the poor thing. A yellow that I was pretty much able to get off using olive oil to soften it, and then a white that was speckled all over it and a lot on the back edges. I used a tiny little pick to get the speckles off, but where it was thick on the back edges I was more afraid of damaging the wood than the finish, so had to use the denatured alcohol to remove the paint. :( Whoever couldn't be bothered to throw something over it or move it out of the way before painting, or at least clean the paint off before it dried, needs to be shot.


    One last question though. I'm trying to leave the finish, as much as possible, the way it is, crackling and all. If I apply more shellac over it as a protectant, won't that cause at least a slight realgamation? I guess what I'm asking is will the new shellac cause the old shellac to soften and smooth out?


    Also, I've found out that the wardrobe is not an antique. It was made in the early 1980's and would technically be called "vintage". I'm learning all kinds of new terms. LOL

  • 6 years ago

    Yes....adding new shellac would smooth out the old....melt it a bit and smooth it out.

    Sherry Bunch thanked lindac92
  • 6 years ago
    last modified: 6 years ago

    If it's a 1980's piece it almost certainly is coated in either oil or water base polyurethane. I doubt any modern furniture uses shellac anymore, maybe in rare cases, can't say never. A 1980's polyurethane finish will not do any re-amalgamating. Now looking at it with that in mind the rough part of the finish it probably from bleeding of sap in the wood, probably pine. The only thing for pine like that may be to totally strip, sand, seal the pine, stain or paint. Or sand, prime with oil base primer and paint. Older pine may be done bleeding out sap at this point, but may still stain through.

    I was kind of having second thoughts about the shellac thing because it seems it's not alligatored all over, just in sections, with the wood grain. For some reason that happens from time to time on this site I could type anything but a few words of gibberish.

    Sherry Bunch thanked Izzy Mn
  • 6 years ago

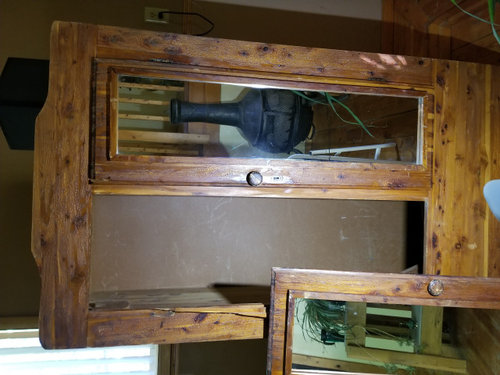
    Fresh cedar will also release sap but most makers will kiln dry it first. I do agree about it not being shellac. I did wonder if someone had used heat in an attempt to remove the existing finish as some of the bubbling in the second picture appears that it might have some charring. One way to tell cedar from pine is to find a place where it will not show and scratch the actual wood. You may have to scratch though the finish to reach the wood. If it is cedar and you want the odor you would have to rough the inside after a couple of years.

    Sherry Bunch thanked User
  • 6 years ago

    Looks like a hand made piece to me....in which case it mgiht be shellac. Easy way to tell....get some denatured alcohol and wipe it on a spot....if the finish dissolves it's shellac. But it it's not shellac it may be lacquer, like Deft which was an easy and popular finish in the 80's.....and it will dissolve in lacquer thinner.
    A trick I learned in qualitative chemistry many years back, one way to ID a substance is to find what it will dissolve in.

    Sherry Bunch thanked lindac92
  • 6 years ago

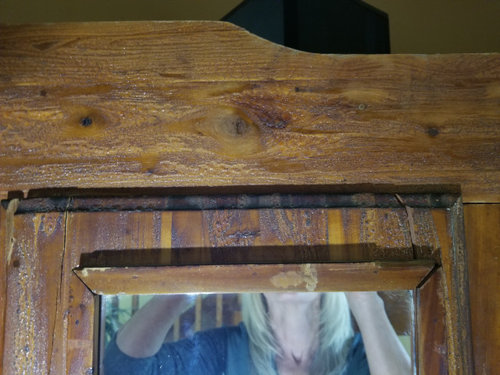
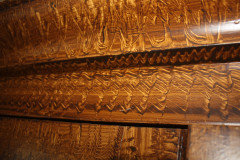
    Does anyone remember the knotty pine paneling that was popular several decades ago? It went out of fashion as quickly as it came in LOL. That's what it looks like to me. As was previously noted if it were cedar you would want the interior unfinished, that's not the case here. Am I the only one who sees a glaring split on the left side. That's a major issue which needs to be addressed first. Regarding the finish, look at pic #2, what exactly is worthy of restoration? I do have one recommendation for the OP depending on how much time you want to put into it. Consider a faux grain project. Search online for the kit. It would really add some class to that wardrobe and help to hide the repair. Here is an example of false graining.

    Sherry Bunch thanked sam_md
  • PRO
    6 years ago

    You might want to hold off on what to do about finishing till after you are done with repairs.

    Sherry Bunch thanked beesneeds
  • 6 years ago

    The wood is definitely cedar. The inside is unfinished as you would expect and the cedar colors and pattern are easily seen. I pretty much agree on the fact that it was probably hand made, although it was built very nicely and no evidence of uneven cuts. As I said previously, I can't find any tags or labels like you would expect if it was factory made.


    I also have to say that it is a shellac finish. I had to use the denatured alcohol to remove a very heavy splatter of white paint from the back edge on one side and it also removed the finish down to the bare wood. It is possible that someone had attempted to remove the finish with heat. The top of the door that is still attached is very dark like maybe someone was getting frustrated and turned up the heat in that area. I had originally thought that it had probably been left sitting in someones attic or garage for several years and that the heat had caused the bubbling, but as Izzy_mn said, it's not consistent. The bottom front is completely smooth where the top is almost solid bubbles and the sides also have some smooth areas.


    That second picture with the cracks is actually the door and top front of the wardrobe. Both doors are in horrible shape and are going to take a lot of work to repair them without it being too noticeable. There are no cracks or splits in the left side. You may just be seeing where some sunlight was shining through my vertical blinds and hitting a light area of the wood. Most of the cabinet is in pretty good shape other than the doors and some gouging at the right side bottom of the cabinet along with some chips off the bottom on that same side. I'll probably just leave the chipped area alone and try to fill in the gouge with a little extra shellac as best as I can. And I will definitely do the repairs to the doors before trying to refinish it. Fortunately, I have a hubby that is very good with building pretty much anything with wood, so he's going to help me with the doors. This is the first item that either of us has tried to refinish though, so it's definitely a learning experience. lol


    I can tell that some of you think that I'm crazy to just repair the finish rather than strip it and start fresh, but I actually like the bubbled look of it. It makes it look more rustic than just something someone bought out of a furniture store. I will probably reduce some of it, especially on the front where it is darkened, but I hope to retain as least some of it. If I fail with that, I'll have to strip it.


    Sorry sam_md, but I have to say that I really don't like the looks of the faux graining. The cedar has a really nice look all on it's own.


    Thanks again everyone. :)

  • 6 years ago

    One last comment. I guess I'm a bit prejudiced. If it was pine, I probably wouldn't hesitate to strip it down and refinish it completely, or even not even bother with it and hand it off to someone else to deal with. The fact that it is cedar puts it in a whole new ballpark for me. Everything my hubby makes is pine. Have gotten really bored with it. Lol

  • 6 years ago

    Hi Sherry,

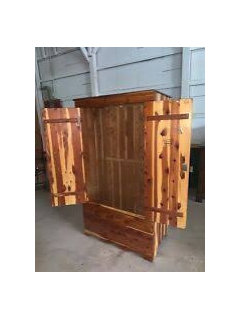
    I should have been more clear. I am posting from eastern US. When we use the word cedar we are talking about the aromatic wood that Lane chests are made of. The fragrance of the wood repels moths so woolens are kept in such chests and the interior is unfinished. The inside of your 3d pic shows a painted interior. The following image is of a true cedar wardrobe It is fragrant and makes the clothes smell of cedar.


  • 6 years ago
    last modified: 6 years ago

    sam are you looking at the back? That appears to be the cheap fiberboard that is sometimes used. I too have my doubts about it being cedar as no mention of the characteristic odor was mentioned. The inside wall that you can partially see in picture three appears to either have some type of coating on it which would diminish the idea that it is cedar or it has turned color which is not something that cedar will do for years and years. I have one of those deathtrap Lane chests and although the scent needs refreshing by lightly sanding it still looks like cedar.

    Edited to add I too see a triangular area that appears to be a problem in the pictures right above the door that is resting against the frame.

  • 6 years ago

    I have a hand built little table from the 80s or 90s that has a wood with a similar appearance. It looks sort of like knotty pine and sort of not. Helpful, huh? It was imported from Asia, which is also pretty vague. Anyway, it could be one of those. Which is fine!


    It has a good look. I'm not usually a fan of "rustic", but I like this one, and I like it looking like it's been around the block a few times. :)


    The early 19th century had some absolutely amazing faux wood grained furniture and household moulding to make lesser woods look fancy, but I like the "humble" wood on this piece.

    Sherry Bunch thanked Fori
  • 6 years ago
    last modified: 6 years ago

    Sam: The back is fiberboard. The inside walls are not finished but it is very dirty. I haven't mentioned the odor because right now it's too coated with crud to smell it. The whole thing smells pretty musty. After I clean it a bit better I'll sand it to get the smell back. I'll try to get you a better picture of it soon. Probably some close-ups of the finished sides and the unfinished inside. Not enough light to get a good picture tonight.

    Maifleur: The triangular area you mentioned in the picture above the door that's loose is actually part of that door where it had broken off the side of it in the hinge area.


    Edited to add: Also, I talked to my husband about the possibility of the bubbling being caused by sap from fresh cut wood and he pointed out to me that if it hadn't been dried, that as it started drying on it's own it would have shrunk and left gaps between the boards. Since it doesn't have any gaps, I guess that leaves it as someone trying to remove the finish using heat. The only other cause I've read about is from prolonged direct sun exposure, but if it was that, it would have been on just whatever sides were facing the sun, not on both sides and the front.

  • 6 years ago

    Here are the pics that I said I'd post. I tried to post them yesterday and again just now, but although I clicked the submit button it never appeared on the site. I'll try reducing the size and see if that is the issue.

    The wood is definitely cedar. I was wrong that the inside was unfinished. It actually had shellac on the inside too. I don't really understand why someone would want to cover the inside like that, but maybe they just liked the looks of the wood more than the smell. I used some heavy grit sandpaper to remove the finish and the cedar smell is starting to come through. It will probably still need sanded another time or two to remove all of the finish, but I've got a good start on it.

    I don't remember who it was that first mentioned all of the knots which isn't too usual with furniture grade cedar, but if it was hand made, I guess there's no way of telling where they got the wood. I hadn't noticed at first how rough looking the clothes rod holder were, but they definitely look home made.

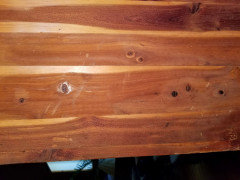
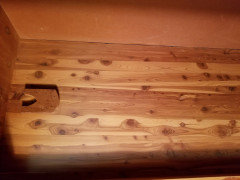
    The first pic is of the inside of the cabinet and the second one is a closer pic of the outside side.


  • 6 years ago

    Well looks like the inside pic still didn't post. Will reduce it more and try again.


  • 6 years ago

    Finally! LOL

  • 6 years ago

    Nice looking but I am still curious. Do the knots on the inside line up with the knots on the outside? The boards on the inside seem to be slightly smaller.

    Any woodworkers care to comment as to if this is red or white cedar? Across from FIL's house were something that was called in that area "white" cedar and it was a special use tree.

    Sherry Bunch thanked User
  • 6 years ago

    Huh, never really thought about the knots not lining up. lol I'll check on it tomorrow when I have some daylight.

  • 6 years ago

    Some of the knots don't go all the way through to the other side or are barely noticeable, but the ones that do go all the way through do line up.

  • 6 years ago

    Good and not so good. Good because It means there is only one layer of boards. Bad that some of the knots are the type as they age and dry out will simply fall out or turn soft in place. The knot that is at the top of the first picture is of this type.

  • 6 years ago

    It's a little bit rustic! If a knot pops out you just pop that sucker back in!


    It's pretty for cedar, you know. Probably because of the knots!

  • 6 years ago

    Yeah, that's what wood glue is for. lol I guess if they fall out and can't be put back in for whatever reason, that'll just add to the rustic look. Hoping to get started on it again next weekend. Got to many other things going on right now to devote much time to it.