Software
Houzz Logo Print
mass36

Ikea Sektion cabinets for bathroom???

6 years ago
last modified: 6 years ago

We are remodeling our kids bathroom and thought about using the IKEA Sektion cabinets. We recently remodeled our kitchen with those and I LOVE the organization of it all!! So I was thinking I could do the same for the kids bathroom. Only thing is those cabinets are 24" deep. I was wondering if they could be cut back to 22"(much more standard depth, I think, and depth of old vanity we're trying to replace) BUT still use the IKEA drawers.....any thoughts???

Comments (10)

  • PRO
    6 years ago
    last modified: 6 years ago

    I love the Godmorgon cabinets for bathrooms they have awesome storage and you can get them without the top and sink and do your own.You really can’t jerry rig the Ikea cabinets since the drawer slides are made to work in the standard cabinets. The Godmorgon are 20” deep and all drawers and lots of organizers for the drawers . I actually like the tops and sinks from Ikea they work well and save you money. too

    mass36 thanked Patricia Colwell Consulting
  • 6 years ago

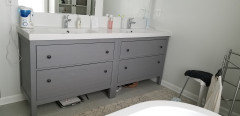
    We used Sektion cabinets in our hall/kids bath and I really like them! Honestly, we do not really need all the space in the drawers/cabinets so maybe it was a bit overkill but it's what I really wanted. We installed at full size/height. We also have Hemnes vanities in our master and, like Patricia says above, the actual vanities are really nice and may be better scaled to your space.


    Hemnes in master. Contractor installed them flush to each other. I wasn't there to make the final decision due to a death in the family. I think I pictured them slightly separated but I think he made the right call due to some space issues.


    mass36 thanked m_gabriel
  • 5 years ago

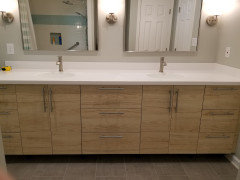
    Great vanity! What sink did you use on the kitchen cabinet vanities?


  • 5 years ago

    The sink is integrated with the Corian countertop.


  • 5 years ago

    Thanks!!

  • 4 years ago
    last modified: 4 years ago

    I know i'm answering an old thread and the OP certainly doesn't need this info anymore, but there's a lack of solid information about this IKEA hack on the internet. Hopefully this helps someone. I just went through the trouble of doing this, and while it is doable, it's unlikely I'll do it again. I certainly won't install them the way IKEA calls for in their manual. This obviously isn't a step-by-step, but I wanted to share the trickier parts of my installation.

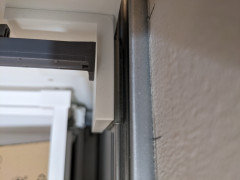
    When using the Maximera drawers with the Sektion base cabinets, you can cut the depth down to 22". Any more than that and you'll likely run into problems. When you cut the depth down, you are introducing potential clearance issues with the drawers and the Sektion L-brackets that mount the cabinet to the wall. I have less than a 1/16" clearance between the white plastic bracket cover on the Sektion and soft close mechanism on the Maximara drawer glides (pictured). I also opted to drill the holes for those metal brackets lower down the cabinet to ensure the drawers wouldn't interfere. Where you choose to mount those brackets will depend on which size of top drawer you use (if you are using a bank of drawers). If you change the location of the brackets, you'll likely need to cut the cabinet back a bit lower on each side to allow for that.

    While cutting down the depth of the cabinets was definitely doable, I had bigger issues with the general way in which the cabinets install. If I had it to do over again I would build a plywood base to set the cabinets on instead of using the metal hanging rail and the plastic adjustable legs. Those legs are truly awful. They are flimsy in just about every way imaginable and I spent a good amount of time fighting them. Additionally, once I had everything in, I honestly didn't have a lot of confidence in the strength of those legs, so I ended up cutting some 4" plywood pieces and used shims underneath them so they would provide additional support underneath the cabinets. Building a base, shimming it level, and screwing it to the wall would have saved a significant amount of time and made for a sturdier installation. If I had built a base, I would have no issue skipping the metal hanging rail and simply using heavy duty hollow wall anchors to attach the cabinets to the wall.

    I also ran into issues because the hanging rail and plastic spacers which attach to the back of the cabinets at the bottom assume a plumb and flat wall across the whole span. This was not the case with my house. Removing those white spacers and using wood shims was the way to go. This isn't an issue that's created when you cut the depth down. It would apply to all installations unless you have a perfect wall.

    Also, buy the Sektion reinforced top rail and use those instead of the flimsy ones they package with the cabinets. They should be standard.

    So, those are my big lessons learned. I'm satisfied with the outcome, but I'm not sure it was worth the trouble. Let me know if you have questions. I'll try to help.

    Pic of clearances. This could be increased a touch by skipping the white plastic cover.


  • 4 years ago

    @cej22 Thanks for this. I'm considering doing this for a bathroom remodel and your comments are very helpful. If you want to post photos of your finished result I'd love to see it. thanks.

  • 4 years ago

    Easiest way to set base cabinets along a wall is to use a 2x4 base ledger, leveled, on the wall to carry the back side of the cabinets and use leveling legs on the front. Cabinet screws & shims where needed into studs thru the top rail along the back of the cabinets to secure. Using this method, the back run is level and you need to adjust only the easy accessible front legs.

  • 4 years ago

    That method wouldn't work with Ikea cabinets since they don't have a top rail. And their self-leveling legs are awful to use. Better to just build a base and level that.