Software
Houzz Logo Print
psyohe

Installing new shower and valve

6 years ago
last modified: 6 years ago

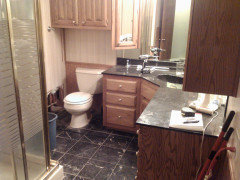
The hall bathroom's ugly yellowed fiberglass shower stall does not leak, but it needs to be larger. We are guessing the previous owners installed it in the 1970s.

My GC removed the trim around the knob, and said all we would need to buy is the Delta trim kit. That part was not that old.

My question is, since we are going to either tile the walls or use solid surface panels, shouldn't we install a new valve? It is probably 50 years old.

Thanks for any advice.

Comments (35)

  • 6 years ago
    last modified: 6 years ago

    Everything should be gutted to the studs. Everything behind the walls or below the floor should be replaced.

    Peke thanked User
  • 6 years ago

    Not necessarily. Once you have everything open, it would be easy to do. But I would replace the cartridge.

    Peke thanked weedmeister
  • 6 years ago
    last modified: 6 years ago

    Ok. Thanks. I don't understand the terminology though. Is the valve the entire thing, and is the cartridge inside the valve?


    Edit: The shower WAS leaking, but not where we could see!

  • 6 years ago

    I would rather pay more now and do it right.

  • PRO
    6 years ago

    Replace it all. Anything 50 years old.

    Peke thanked User
  • 6 years ago

    That is what I thought. I am guessing at the age because I know this part of the cabin was built in 1966, and because of the wall papered drywall and fake paneled drywall. Surely, that was in the 70s.


    Replacing it all!

  • 6 years ago

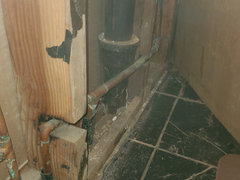
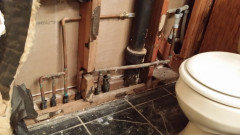
    What do I do about copper pipes that are in concrete? These look bad, but I know nothing about plumbing. (Except I know the cut outs need metal on the openings.)


  • PRO
    6 years ago

    Copper pipes in alkaline concrete have a finite life. Mine lasted only 20 years with acidic well water on one side and alkaline concrete on the other before the pinhole leaks required replacement. Ask your neighbors and your plumber about their experiences needing to repipe due to pinhole leaks. It’s usually a well known local

    syndrome.


    All of out supply lines were redone from the attic down, instead of from the slab up. If it were done today, PEX would make it a lot easier. Plastic drain lines aren’t any issue. Cast iron can be. Again, talk to a local experienced plumber. It’s a project that I would definitely tackle for at least the bathroom while the walls are open. I wouldn’t wait until there was a problem.

    Peke thanked User
  • 6 years ago

    Thanks, Cook's Kitchen, Neighbors aren't around much because this is a lake area. Many only visit in the summer. We are always calling someone to tell them their dock is floating away. LOL


    I talk to one of them that lives here year round. He said they have not had a problem, but my house is the oldest out here.Their house is about 15-20 years old.


    Do they run some kind of pipe inside the copper pipe? I can't imagine how it is fixed in concrete.


    All of the new kitchen pipes are PEX. That hall bathroom has the original plumbing from 1966. The rest of the plumbing was installed in the 80s or 90s. This house went from 850 sf to 1100 sf to 1800 sf to 2100 sf to 2700 to what it is today (info from tax records). I should be thankful that the old kitchen is gone, and all I need to deal with is the 1966 bathroom pipes.


    Experienced plumbers are rare here. Most are apprentices without licenses. I wonder what the oil and gas fracking is doing to our concrete slabs. Earthquakes used to never happen. They do now...4.0. It was bad enough being in Tornado Alley without adding earthquakes to the mix.


  • 6 years ago
    last modified: 6 years ago

    Really???? I finally have good news? They did something right in this house?


    The sleeves must be the black rubber looking things around the copper pipes.

    Joseph, thanks. You teach me something new every day!

  • 6 years ago

    In the picture in the previous post above, we had to replace some of the copper pipes with PEX when they burst 6-7 years ago.


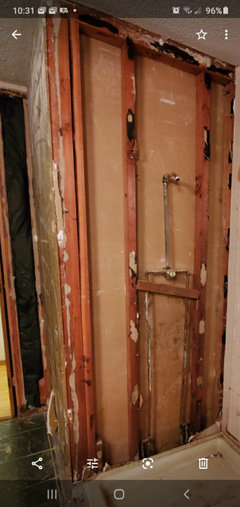
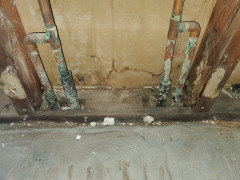
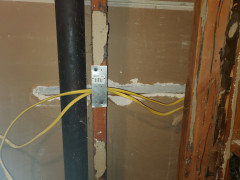
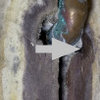
    In the picture below, inside the shower wall, does it look like we need to do anything to the copper pipes themselves? We are putting a new valve in. The piece of horizontal wood doesn't do much. The whole pipe bounces when you touch it.


    Since they are coming up from the concrete, I am guessing the pipes can't be moved back about 12-18" so we can put a tub in? Or maybe too expensive to do? There is a 39" deep closet behind that shower wall, so we could move the wall back to put a tub instead of a shower.

  • 6 years ago

    Moving the supply lines in concrete would be 'problematic', ie $$$$.

    It looks like the pipe from the valve to the shower head is galvanized steel? Replace it.

    You will reset the depth of the new valve in the wall based on whatever the finished wall will be, tile, fiberglass, etc You will need something to hold it in place, more than that stick that is there now. Same for the shower head.

    Peke thanked weedmeister
  • 6 years ago

    Weedmeister, you are right. I didn't even notice the galvanized pipe.

    I did think the pipes had to be attached instead of just hanging out, but I don't know much about plumbing. Good to know. Thanks.


    So moving the pipes is $$$$, but moving the drain is not so expensive? I still need to remove the pan to see what the rest of the pipes look like, and the concrete floor.

  • 6 years ago

    With the pipes completely exposed this is a straightforward job for a plumber or experienced handyman. If it was mine I would probably solder a fitting on the pipe sticking up out of the slab and transition to PEX near the slab. Then install and plumb the shower valve at the proper depth in the wall (depth depends on tile thickness, etc.), and run PEX up to the fitting for the shower head.

    New shower valves are pressure or temperature balancing, which reduces the scald risk if someone flushes a toilet at the wrong time. They can also be adjusted to limit the max temp at the shower head, which is useful if you have kids or older adults who might set the controls too high.

    Figure out ahead of time how you plan to waterproof the shower walls. I prefer to use Kerdi board with the proper fasteners, taping, etc., but I have friends who prefer cement board and waterproof membrane (its a little cheaper). Just make sure the walls are completely waterproof, and installed according to the recommendations of the shower pan manufacturer.

    Then decide whether you want to use tile or some type of solid surface. In my basement bathroom I used a Dreamline pan, doors, and fiberglass enclosure, and I think it looks very good. Its not high end, but it does not look cheap. My other bathrooms have tile, and its a lot more attractive, but it also required a skilled tile installer. In contrast, installing a solid surface enclosure over your waterproof walls is much faster and requires much less skill than tiling a shower.

    Bruce

    Peke thanked Bruce in Northern Virginia
  • 6 years ago
    last modified: 6 years ago

    Bruce, " transition to PEX near the slab "

    Solder right by the black sleeves coming out of the concrete and use PEX all the way up? Sounds good. There are 4 copper pipes coming out of the concrete. 2 are an inch apart and connected like an upside down u (hot?) and separated maybe 10" then 2 more an inch apart in the upside down u shape (cold). Can't get a picture yet.


  • 6 years ago

    Yes, the big box stores and and any plumbing supply will sell the fitting that solders on to the copper stub sticking up out of the black sleeve. https://www.homedepot.com/p/SharkBite-1-2-in-PEX-Barb-x-Male-Copper-Sweat-Brass-Adapter-Fitting-UC607LFA/202270574

    The wierd routing of four pipes for only one shower is probably the plumber's way of creating a junction in the two supply pipes (hot/cold) so that he could extend it to another fixture. One pipe on each side is probably the supply, and the other pipe goes back into the slab to feed a sink or other fixture. A lot of plumbing is rather inelegant, but very functional.

    Bruce


    Peke thanked Bruce in Northern Virginia
  • 6 years ago

    Thank you, Bruce.


    Do you know if there is a way to trace where the other pipe goes?


    We have a wooden box built around a water pipe in a closet. We would love to get rid of it because it takes up a lot of space. That bathroom was built in 1966 along with that closet that is about 17 ft away and across a hallway.


    If we can't get rid of the pipes, we can at least make the box smaller.


  • 6 years ago

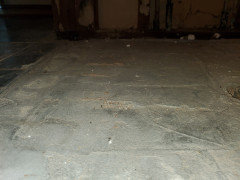
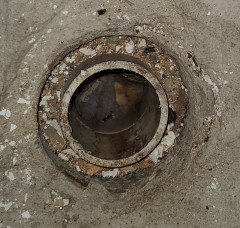
    Sower pan removed.


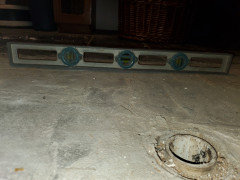
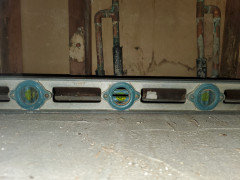
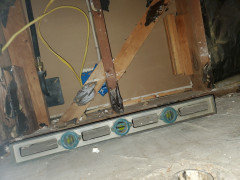
    The concrete is not smooth at all. I don't think the concrete is level enough for a solid surface pan. I know I could use a Kohler cast iron pan but I would rather use a solid surface base.


  • 6 years ago


  • 6 years ago

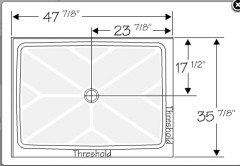
    A Kohler cast iron base is over 5" tall so I guess I am buying a solid surface pan. I have found only one with a dual threshold and a low profile, The Onyx Collection. It is 47 7/8" x 35 7/8" x 1 1/2".


    The concrete is 36 1/2" from stud to edge of tile on one side. Then, the other side (36 1/2") is going to need tile removed to 47 5/8", plus the depth of drywall and wall surface (tile?.) I am not sure I can save the tile, and I need a little of the old tile.


    I know I need to add the depth of the shower drywall (?) material and whatever wall surface I will use so I can decide how much tile to remove. So, I need to figure out the depth of the waterproof drywall next.


    From stud by the valve to center of drain is 18 3/4", and side wall to center of drain is the same. It looks like the pipe is 2" diameter. With the Onyx base, the drain would need to be 17 1/2" on the valve side and 23 7/8" on the side wall side.


    So, the Onyx base would not work, unless I move the drain in the concrete.


    Any suggestions? I need to find and order a shower base.


  • PRO
    6 years ago

    Yes, get the solid surface base you want custom made at Grifform.

    Peke thanked Joseph Corlett, LLC
  • 6 years ago

    I can't afford the Grifform's base.

  • 6 years ago

    If you are redoing the shower, everything should be replaced.

    Peke thanked strategery
  • 6 years ago

    My husband says it is like an archaeological dig in this house. Under two layers of paneling, we found an electric wall heater. We also found a metal plate near the doorway. Our GC has no idea of its purpose. Too bad no gold or money has been found!

  • 6 years ago

    They make self-leveling concrete for flatenning the floor for a shower base. It's like thin pancake batter, no agregate. Mix is and pore it on the floor, let it set.

    If the floor issn't too thick, busting the concrete in order to move the drain is not that bad. An electric jackhammer would make short work of it. Then a new trap and vertical pipe. Box around the pipe so you have some movement space to put in the new pan, then fill with concrete when you have the pan fitted.

    Peke thanked weedmeister
  • 6 years ago

    Thanks. Yes, we will have to move it a few inches. They did not put a box around the pipe in 1966. GC will have that fun job! He thought setting the Onyx shower base would be incredibly easy.

  • PRO
    6 years ago

    Peke:


    I don't think you've figured the cost savings in labor in material that a "more expensive" custom base that doesn't require breaking concrete allows.

    Peke thanked Joseph Corlett, LLC
  • 6 years ago

    That's true. I will have my contractor work it up with a Grifform pan and not breaking up concrete and work it up with the Onyx and breaking concrete, moving plumbing, and filling back in with more concrete. I will have to see if Grifforn gets set in wet or dry like the Onyx. I just have not decided whether or not to use the Onyx panels.

  • 6 years ago

    Joseph,

    I am trying to measure for the Grifform custom shower base, and I have some questions for you.


    When looking at "Care and Maintenance" on Grifform's website, it lists Grifform, Corian, and HiMacs so I guess they are three different products. When I click on Grifforms, it explains about Corian.

    Are Grifform custom bases made from Corian? Solid surface all the way through?


    Slab-floor Preparation:

    1. The sub floor must be level and flat within 1/8”. If it is not, mix Self Leveling Mortar and screed the floor level. The Self Leveling Mortar must be thoroughly dry before proceeding with the installation. So, this base does not install in thinset. It installs like the Onyx Collection base. We plan on leveling the concrete to meet the level of the marble floor. (Or the level of the new tile if we tile over the marble.) Does this sound good?


    2. Shower must have 1/8” clearance to any adjacent wall materials to allow for expansion.

    Does this mean 1/8" clearance to the wall studs on two sides? If I understood correctly, no backerboard is installed until the shower base is installed. Backerboard means cement board? There is no waterproof membrane added under the base? The base itself is waterproof.


    3. The concrete slab should have a block out to allow the plumber to cut and fit the drain-line to the shower pan at the time of installation.

    A block out? I don't think I have this. My drain looks like concrete up to the PVC.


    4. If the hole in the slab is greater than six inches from the center of the drain line, fill the hole with concrete level with the existing slab floor.

    If we need to chip out concrete to make a block out (#3), if we make it smaller than 6" , then we don't need to fill the hole in? Or is it 6" from all sides since it says 6" from the center of the drain line.


    Installation instructions:

    4. Be sure the hole in the concrete around the drain is large enough not to interfere with the plumbing. If the plumbing does not adequately clear, excessive pressure could be placed on the drain and cracking may occur.

    I have no idea what this means. I thought it said to fill in with concrete.


    Measuring:

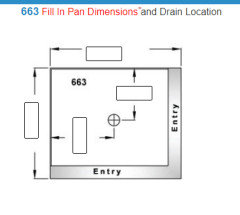
    I think I need the custom base that has two lips (flanges?) and two flat sides. Like the one below, except 48" x 36".


    #663 has the two lips for walls on the left side and back side, but it says the front side and right sides are entry. I don't want two entries, but I do want the right side to have a glass panel. Is this the one I want?


    Where do I start measuring from?

    Drywall is gone. Do I start measuring from the wall studs to the center of the drain hole?


    When ordering the base, I don't need to subtract anything for cement board or waterproof barrier or anything else?


    If I install tile on two of the walls, do I need to install anything under the concrete board?

    Waterproof membrane? Anything on top of the concrete board. I assume the seams get sealed before tiling.


    Does the cement board go all the way to the ceiling?

    Or just up to where I am stopping the tile? Can we texture the wall from top of tile to ceiling if we don't take the tile to the ceiling?


    Will any brand of shower door and glass panel work with the Grifform base?

    The Onyx Collection sells a glass door, so I don't know if just any glass door will fit.


    Geez, I am sorry I have so many questions after reading Grifform's manuals. I can't trust contractors here. I must know what they SHOULD be doing so I can ensure the job is done right.


    Thanks for your help, if you have time.


  • 6 years ago

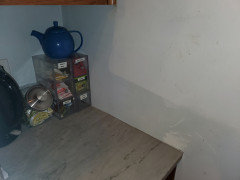
    Another example of screw up with my quartzite countertop. Instead of taking off the 30.5" countertop and cutting off a little bit, they cut a hole in my drywall. We discovered it after removing the bathroom drywall. We could see daylight through to the kitchen. They did not tell us they had done this.


    We still need to texture the side wall that the sheetrock/texture contractor skipped. (He got half of it done, somehow he forgot the rest.)


    Any ideas on how to fix this? We are planning on tiling the backsplash, but not the side wall where the drywall was cut out. Will silicone caulk be good enough? There shouldn't be a lot of water there unless my husband breaks a full pot of coffee there.


    Thanks.

  • PRO
    6 years ago

    Peke:


    Does Grifform have any detail drawings? That would answer a lot of your questions. I'll try to get to them in the morning.

    Peke thanked Joseph Corlett, LLC
  • 6 years ago

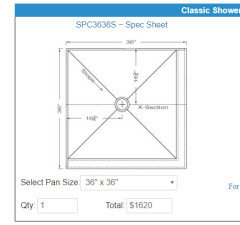
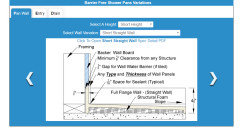
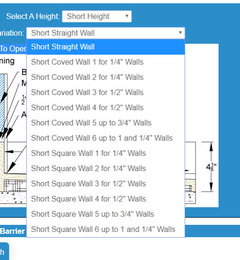
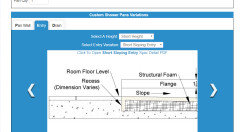
    They have too many choices for me.


    Here is what I found:


    I have no idea about these choices....


    If I cut out some of the tile, and added another layer of tile, the base would be sort of recessed...


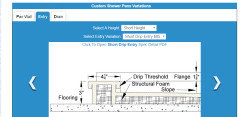
    Short sloping entry...


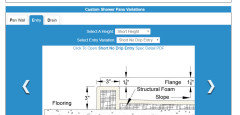
    Short Drip entry


    Short no Drip entry...


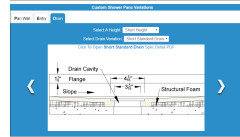
    Short standard drain


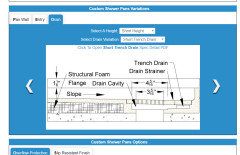
    Short trench drain


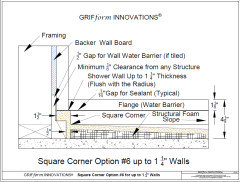
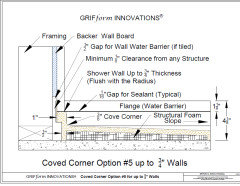
    It looks like the square corner options have 90° corners and the coved corners are more curved which would probably be easier to clean than the square corners. I know there are more differences, but I don't understand why I would choose one over another. I guess the 1/2", 1/4", 3/4" walls choices depends on how thick the cement board will be. It also looks like some of the side walls of the base would show before the tile starts.


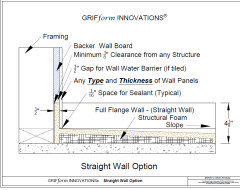
    The picture below is a straight wall option. It looks like the tile would go all the way down to the base, and the sides of the base would not show.


    Good grief, they don't make it easy for a homeowner.

  • PRO
    6 years ago

    Peke:

    I've designed, built, and installed solid surface shower bases. With 40 years experience, my hands are full on those jobs. Every single detail must be thought out and there can't be any mistakes. That said, I think you may be in over your head on this one.

    Peke thanked Joseph Corlett, LLC
  • 6 years ago

    Well, that is probably true! 😀


    However, if I don't understand it, then I can't order it. I have no intention of installing anything myself. I have learned since I moved here, that if I don't understand the process, then I can't watch what the contractor is doing. I have had way too many problems.


    Thanks, Joseph.