Software
Houzz Logo Print
bridget_mattox

pruning jade question.

6 years ago
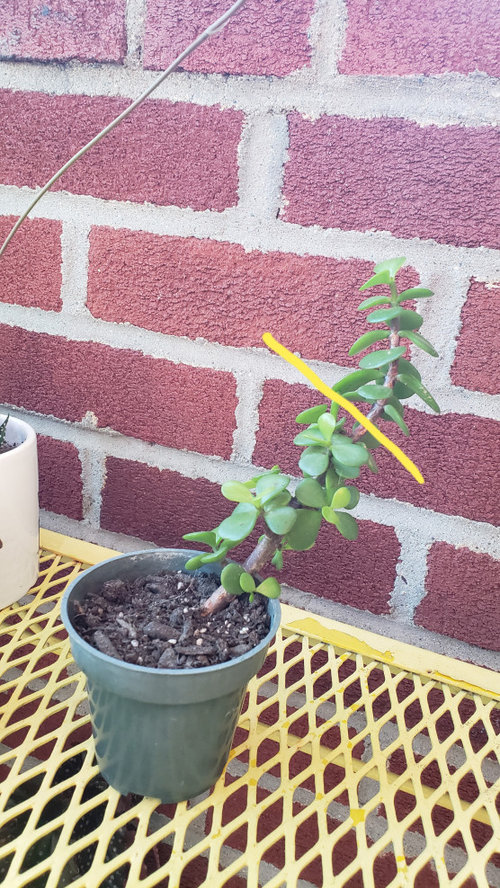
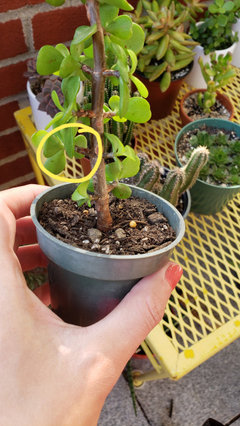
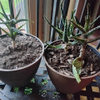
I rooted this clipping from a restaurant plant and it has been doing well for over a year. It's getting rather tall and when the wind blows too hard it falls over so I'm gonna prune it. My question is if I cut it at the yellow line two steams will grow from there right? (All the branches from the yellow line down have clusters of leaves and the yellow line up just single leave. That's why im taking of cutting it there.) I plan on rotting what I take off and placing it back in with the momma plant. Just trying to decide if I want two steams from that point or lower.

Comments (11)

  • 6 years ago
    last modified: 6 years ago

    I don't know the answer, but 'til someone comes along who does, I'll tell you it's called a Portulacaria afra aka Elephant Bush & it's a succulent.

  • 6 years ago

    Great. I'll research it and see what I can find. I thought it was Jade.

  • 6 years ago

    Hi, Bridget. Any pruning cuts you make now should be focused on what you want the trunk line to look like. If you must prune now, your plant will eventually be more interesting if you make your pruning cut lower, to just above the secondary branch growing upward from the second pair of nodes. To be clearer, moving distally from the soil line, one branch of the second pair of branches is growing close to vertically. That branch will make a better (new) leader because it means the long stretch of straight growth that makes up the existing trunk wouldn't generally be considered eye appealing. After the new leader grows several inches, you can cut that back again to change the trunk direction. This will give you a more sinuous trunk as opposed to a ho hum trunk that's stick-straight. If you do decide to put my suggestion to use, leave a bit of a stub that protrudes beyond the new leader. It will dry up and drop off (with a little help) and leave a much cleaner break than had you pruned tight to the node.

    I have a couple of portulacarias I've been growing on for a bit for potential bonsai. I brought them out of the basement grow area a week ago and they're starting to grow in earnest. I was going to prune them for a trunk line. If you have interest, I'll do that and post images. They're older than your plant, but it should give you and others a better sense of how easy it is to grow interesting trunks on Portulacaria.

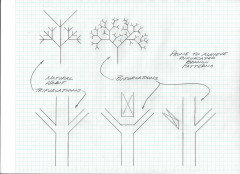
    Also, as your plant grows, try to eliminate as many trifurcations as possible. Portulacarias (and jades) tend to develop heavy branches near the top of the plant, which sort of jars the eye and looks incongruous to what we're accustomed to seeing in tree-form plants.

    A generalization of how to pinch/prune plants with leaves that grow in opposite pairs:

    Al


  • 6 years ago

    Hi. Al. thanks for all the info. I don't need to prune it but I thought since it was leaning whacking off the top would be the easiest way to stop it from blowing over. I have never tried to prune anything to make it actually look a certain way. I have pinched back a couple wandering jews and swedish ivy but only to help make them bushier. If you would take some pictures of your pruning what would be great. Excited to see what this turns into down the road especially since I pitched it off a planter at a restaurant.

  • 6 years ago

    Just getting ready to make dinner; been the cook since we tied the knot. I'll be sure to prune them tomorrow and show before/after images.

    Learning how to manipulate plants elevates the plane on which we interact with them, provides a whole new dimension to explore, and offers added opportunity top get more from our growing experience.

    Al

  • 6 years ago

    First off, congratulations on getting married! I'm getting married next year! Thouse look so awesome. They also look extremely complicated. How did you get the trunks so thick? I should prune towards the bottom, see picture, to get two branches from there? Then depending on how I was it to look prune the new growth to be the main branch.

  • 6 years ago

    First off, congratulations on getting married! I'm getting married next year! Lol - thanks the congrats for the nuptials, but that occurred 42 years ago. ;-) I'll be sure to tell DW of your best wishes. How did you get the trunks so thick? Thickening a trunk is a product of time, good health, regular root work, good nutrition, and leaving as much foliage on the plant for as long as possible. Every leaf is a food factory. Plants make their own food by of photosynthesis. The more food they make, the more files of cells they lay down in neat little rows that make of the leaves and branches (multiplicative growth) and increase the thickness of stems and branches (additive growth). While waiting for the thickening to occur, you can still be working on what you want the trunkline to look like. I should prune towards the bottom, see picture, to get two branches from there? Then depending on how I was it to look prune the new growth to be the main branch. Is the tree in the image immediately above different from the image in your OP? I'm thinking it must be, because the first image shows the trunk leaving the soil well off center, and the most regent image is pretty well centered.

    I'd probably grow that tree as a formal upright - which has a straight trunk - like the image of the plant above in the black pot against a black background. It's the easiest, and can be achieved by way of some (easy) directional pruning. To get started, it doesn't take a lot of effort or pruning. Let me know if you want to take a crack at it.

    Al


  • 6 years ago

    OH!!! HAHA. Sounds like you've been doing A LOT of cooking then!

    It is the same picture I just tried to straighten it by angling it a little different in the soil. I like the way the one in the black pot looks and since it is the easiest it might be a good starting for me. What is the first step?

  • 6 years ago
    last modified: 6 years ago

    All you need to do for now is choose your first 3 branches. Generally, the lowest 2 branches will be different heights, one moving left, 1 right, both moving slightly toward you like they are offering a hug. So, start by turning the plant so the top is bowing slightly toward you in greeting. That will be the frontal view. Start moving your eye upward from the soil line to the 3rd or 4th pair of branches. Select one that's moving left or right and slightly toward you as the first branch, then remove the branch on the opposite side of the node. That's it. Then, move up a node and create a branch growing away from you by removing the front half of the pair of branches. Move up another node and remove one of the pair of branches so it grows opposite the direction from the first branch. So from the bottom, you'll have left branch, back branch, right branch (or R,L,B) at successive nodes. All other branches should remain on the tree for now, no matter their location. They provide the tree's food and hasten growth/development. As you move up the tree (visually) the next branches should be selected to fill the largest spatial void when the tree is viewed from above to ensure branches overlap minimally and don't shade any branch that might otherwise be positioned immediately below it. Too, as the tree gets taller, branches at the top should be closer together. This will occur naturally because the internode length will decrease as the number of growing points (apices) increases. If the base of the branch was a dot, and you connected the dots, it should look roughly like a spiral.

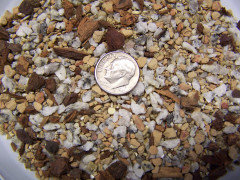
    Fertilize often. I really like Dyna-Gro's Foliage-Pro 9-3-6, and use it for all my trees. It would be best to grow the tree outdoors in summer, and it would really appreciate a mix that doesn't hold lots of water. Contrary to some commonly offered advice, the plant's soil shouldn't be allowed to dry completely. All my trees and succulents are in this medium:


    Al

  • 6 years ago

    Just an update. I haven't been brave enough to remove anything...I keep looking at it thinking where do I want the branches but end up doing nothing. Maybe I'll attach a picture of where I think the branches should go and get your thoughts.

Sponsored
Peabody Landscape Group
Average rating: 3.5 out of 5 stars8 Reviews
Columbus' Reliable Landscape Design & Contracting