Software
Houzz Logo Print
nikkisp11

HELP! New trim keeps falling off!

6 years ago
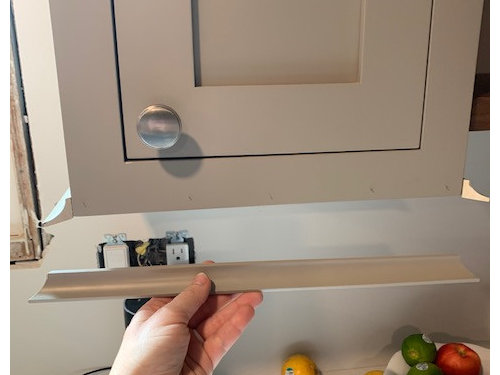
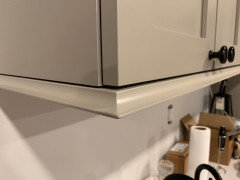
I just had my cabinets installed in September, and since then multiple pieces of the lower trim have fallen off with very minimal pressure. Opening the cabinet I am bound to touch it with that part of my arm, and they’re wobbling. The cabinet company came back and glued some on and retacked them, but at this point, I want them all removed and fastened another way. This is only 2 months later! I am hoping someone has some options that I can give to them, because I am literally about to lose my mind. The molding doesn‘t fasten underneath there is nothing giving it support, so any minimal downward pressure they fall off onto the counter. I’m a small person, and I am babying these cabinets, so my forearm touching them while opening the door, should not dislodge the trim!!!!! They’re all separate pieces, and the pieces still attached are also loose. They will probably fall off if I sneeze. They’ve been tacked on and brush touched so many times and I cannot keep doing this with them. I was in tears, so I am hoping someone has some advice for me. I seriously regret paying what I did for custom cabinets. The install has been a nightmare. I have to pay someone to fix the damage to the new ceiling and walls, and they nailed right thru the side of the one cabinet that I didn’t even mention because I didn’t want to seem like a nag. But I have had enough, and I am about to lose my sh*t!

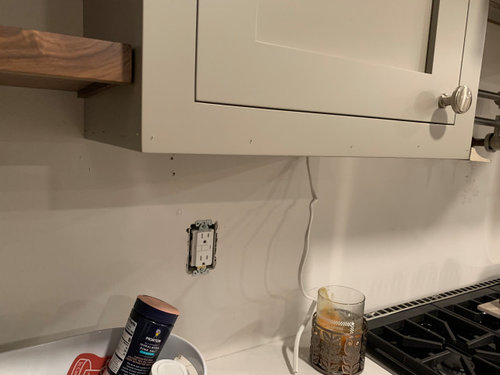
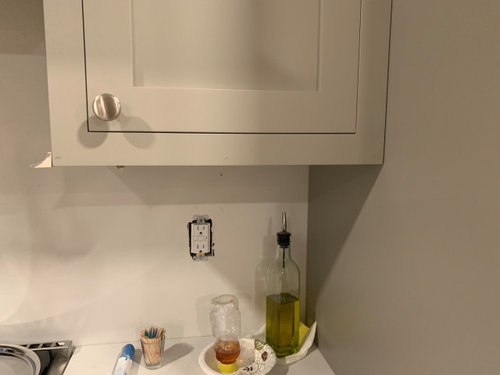
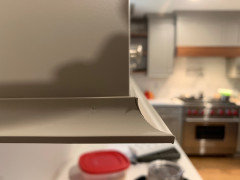
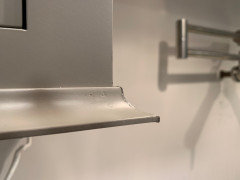
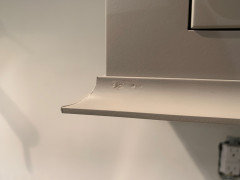
Please see attached pics - the top

is from today, the bottom ones are from the last time it happened.

Thanks in advance for any tips/advice/options you can offer!


Comments (23)

  • 6 years ago

    Were the cabinets and labor totally free? No? You paid a fair and reasonable price? Then expecting the cabinets to function in a reasonable manner isn’t nagging. Expecting the company that did the work to deliver a finished usable product isn’t nagging. Conveying these expectations to the service provider isn’t nagging but you have to relay those expectations to them.

  • 6 years ago

    Why does that trim flare out? Shouldn't it be flat?

    Maybe if you glue it as well as nail it, the trim will hold. I would sand the cabinet surface and the trim surface a bit before gluing.

    Beverly | 2018 · More Info


    Palm Beach Residence · More Info


  • 6 years ago

    I’m not an expert so take my comment with a grain of salt but i can’t help but wonder if they’ve installed the trim in the wrong orientation. Flaring out like that just is going to get it bumped all the time... and one of the purposes of that trim in my kitchen is to hide the bottom of the cabinet so that, for example, you can install under cabinet lighting. Your trim is totally flush with the edge of the cabinet, and installed on the face. Mine is installed on the bottom of the cabinet hanging downward, instead of outward.

  • 6 years ago

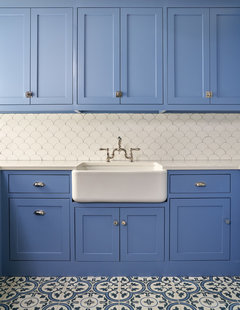
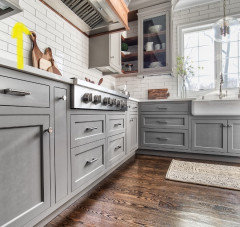
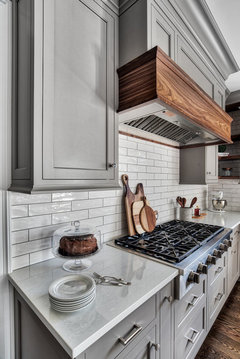
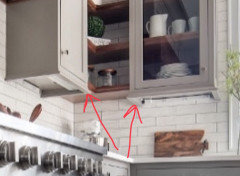
    I modeled them after this kitchen (pics below) I saw from a company called the brothers stonington, but as you can see their trim seems to have some build up under the cabinet, which suggests to me that the trim they use has almost like a notch out of it and forms an “L” shape. Again, this is the model kitchen, not my own.

  • 6 years ago

    Pretty! Hopefully with the silicone tip Joseph mentioned you’ll be good to go :)

  • 6 years ago

    Have the company fix it until it is right. Don’t let them off the hook

  • 6 years ago

    Joe- would they be able to construct that in their shop then attach it so the mitres look nice? The reason I ask is because the mitres look like junk even after they “fixed” them, so I kind of just gave up. The wet bar cabs are not inset, and they had to do that with the light rail because the mitres were horrible.
    The first three pics are the main kitchen mitres and trim and the second is the wet bar area they did in house.
    Thanks everyone for their help!

  • 6 years ago
  • 6 years ago

    Ksc36, thank you, this is exactly what I imagined it should look like, notched out like an “L”. I didn’t see my style tho. :(

  • PRO
    6 years ago

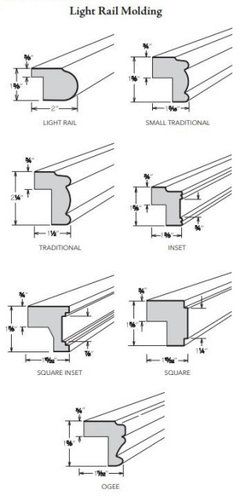
    Whose bright idea was to use cove molding and face-nail-it. They should have used light rail molding, which comes in many styles, intended specifically for that and installs under the cabinet.

    That said, the miters are off, they don't know how to cut miters, the cuts should be crisp and aligned.

  • 6 years ago

    Your best bet would be to contact the brothers stonington and find out what brand those cabinets are in your inspiration picture. Maybe they can order it for you. Or your could find a custom millwork supplier in your area and see if they can make it for you, or do what Joe said...

  • 6 years ago

    Thank you everyone. I think I will contact the brothers stonington and see where I can get that light rail. I just can’t live with it like this and always wondering if they are going to fall off at any moment. I thought I was being anal about the mitres, but it seems like other people think they don’t look great either.

  • 6 years ago

    I’m sorry I have nothing useful to add here but I follow the Brothers Stonington on IG and every single kitchen they do is stunning! GOOD LUCK with your kitchen!

  • 6 years ago

    nikki, that pic showing the mitered edges and nail holes is horrific, lazy, cheap work. I'd be ashamed to present that level of work to a customer. filling in nail holes takes a little time. you have to fill it w/proper wood filler, let it dry, sand smooth, prime and paint. from the looks of yours, they skipped all but the last step.

  • 6 years ago

    Beth-Thank you for the honesty. That’s what I was thinking as well, but I didn’t articulate it as well as you did.

  • PRO
    6 years ago

    Were these cabinets painted onsite? Or this is a manufacturer painted cabinet?


    If this is a manufacturer painted cabinet and molding came from the manufacturer with matching paint you don't fill and sand the filler off and paint afterward.

    First of all, you have to use a No-Mar Tip attachment on the nail gun to prevent surface damage when you nail any cabinet trim and you have to use the right gauge brads to fasten the molding to leave tiny nail holes which barely seen.

    If the filler is used, the manufacturer provides a touch-up kit with color matching marker, filler, etc, and there are ways of using them that you will never know there was a nail hole a chip, etc. the touchup is seamless.

    This molding is shot, you need a new molding, by the time you take it off, re-cut/adjust miters, clean it up, etc being installed at eye level you will see everything and it will not be a pretty picture.

    Frankly speaking, someone screwed up, new molding needs to be ordered and re-installed and hopefully by someone else who knows what they doing.

    Good luck

  • 6 years ago

    GN Builders- They were painted at the shop. I had the cabinets made. The trim was put on on site(as you can tell). My thought was also that the molding will need to be replaced as they have been tacked multiple times at this point.
    Thanks everyone for the advice!! I appreciate it so much!

  • 6 years ago

    I'm sorry this happened and I hope you find a good solution. Those flared pieces will need to be dusted and cleaned, so you'll want them to be sturdy and hold up to at least a bit of pressure.

  • PRO
    6 years ago

    This is embarrassing for the custom shop that made and installed these. Your inspiration photo clearly shows a light rail Moulding that is 3” or so wide , not cove pinned on from the front.

  • 6 years ago

    Thank you everyone for the feedback. I really appreciate it and I absolutely see everything you guys are indicating. Also, I didn’t think about cleaning them and the potential for them to come off during that process as well! Thanks again!

  • PRO
    6 years ago
    last modified: 6 years ago

    @HALLETT & Co. Couldn't agree with you more, just by cutting that corner and not ordering the right light rail molding the job looks hacked up.

    You cannot glue that molding because it will always be hit and if sustain any damage which is inevitable in this situation, the entire piece will have to be replaced and good luck with that when molding is glued and OP said it, she hits it all the time.

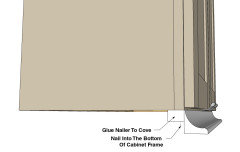
    This why light rails always come with a nail backer like in the picture so it can be fastened to the bottom of the cabinet instead of nailing to the face frame.


    The least they could have done since they didn't get the light rail and this is being done in the shop is attach a nail strip to the molding and nail to the bottom of the cabinet frame, this way it's not only easier and faster to install there will be no nail holes in the molding, no filler needed and it would look beautiful something like this


  • 6 years ago

    Thanks everyone! They another guy to fix some, hopefully they can address the rest. Fingers crossed!