Software
Houzz Logo Print
webuser_77494458

Help repairing sprinkler valve/manifold

5 years ago
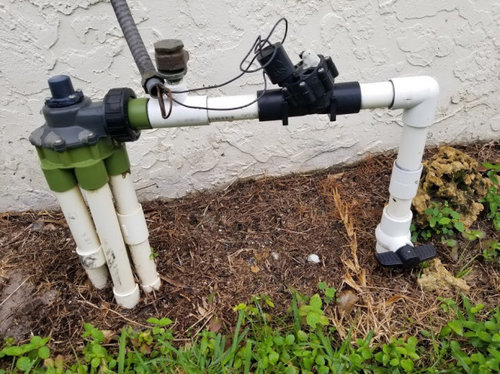
My in-ground sprinkler system valve/manifold is all cracked and shoots water out when it's on, so I'd like to try and replace it myself. As you can see in the picture I tried using epoxy putty to seal the gaps but the water just shoots right through it. The gray/green piece on the left and the black piece in the middle are the pieces I'm trying to replace. Question is, I don't know exactly what these pieces are called and when I look for replacement pieces at Home Depot, there are so many different varieties so I'm not sure exactly what I need. I've made repairs to the lines in other places of the system so I have extra PVC pipe and PVC cement, so I'm confident in making the connections, I just don't know which of those manifolds/valve pieces I need. Can anyone help? TIA


Comments (13)

  • 5 years ago
    last modified: 5 years ago

    The item on the right is a zone valve. Typically these all actuate with 24 volts AC. There's nothing really special with this, many other brands and style valves could replace this.


    The item on the left is a manifold with one inlet and multiple outlets, and it probably is an indexing valve. Indexing valves allow one zone alone to be watered at a time (which minimizes water draw and pressure requirements from the water utility) and then switched to the next zone by the timer/controller shutting off the zone valve and then re-energizing the valve. A mechanism within the indexing valve senses this pressure drop and return and advances the water flow to the next zone. The timer/controller is preset with the number of zones connected and just cycles water through to each zone as needed. We really need a manufacturer's name from this manifold it to be able to track down the actual part. None of the box stores will have this part.


    I don't know from the picture what the middle item is (adjacent to the flex conduit).


    For my irrigation system, I rarely use the box stores, I will in emergencies. There are many more options with irrigation supply people on-line than what is offered nearby and one can quickly shop for reasonable pricing.

  • 5 years ago

    Thanks for the response, that's very helpful. Your description of the indexing valve is exactly how the system works.


    I checked the manifold, it says Fimco Hydro-Indexing Flow Valve, Pat. No. 4034775-4109670-4353386, but don't see any specific model number. I unscrewed it and disconnected it from the bottom green part, but couldn't get the black connection to the right unscrewed by hand, I suppose I'd need a wrench which I don't have one big enough.

  • 5 years ago

    The Fimco web site is pretty complete, you should be able to get all the parts you need for the indexing valve. Looks like you can shop everything online from them. Also, the site says that the older valves were green on the bottom, now they are black. This page on their site tells you how to identify the model valve you have:

    https://www.fimcomfg.com/identify-indexing-valve/


    As far as replacing the zone valve, I've used this site several times, they seem to have better pricing on my stuff than other sites:

    https://www.dripdepot.com/category/lawn-irrigation-valves

  • 5 years ago

    Awesome thanks for that info. One more question- do you know if the valve solenoid is interchangeable? In other words, if I get a new valve, can I re-use the solenoid that is currently connected to the valve I have? I'd rather not re-wire the wires if I don't have to.

    Thanks

  • 5 years ago

    If you buy the same model valve, your old solenoid should work on the new valve. That's why I gave you a web site with so many manufacturer's, so you could find your specific valve. If you do need to rewire a valve, it is not hard and doesn't require an electrician. They are powered by 24 volts A/C, so there is no + and - polarity to worry about, no shock hazard, just turn the controller off, strip some insulation back on each wire, twist the strands together and twist an orange wire nut from the box store on them.

  • 5 years ago

    Ben-

    Please quit trying to save a couple of bucks by salvaging the old solenoid. The wiring is a no-brainer, and then you won't have to worry about redoing something soon when that part gives out. I'd simply cut out the old, messed up valve entirely and glue in a new one. And that black union on the left doesn't need a wrench; you just need a pair of slip joint pliers. And if you don't have a pair, you need to spend a couple of bucks on this basic part of your tool kit: https://www.amazon.com/CRAFTSMAN-Pliers-10-Inch-2-Piece-CMHT82547/dp/B07QN1PYYM/ref=sr_1_2?dchild=1&keywords=slip+joint+pliers&qid=1607547463&sr=8-2

  • 5 years ago
    last modified: 5 years ago

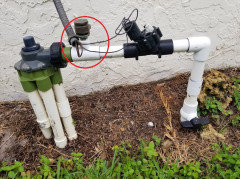
    Hi again. So I purchased the two replacement parts and am ready to start replacing them. Just one more question. Does anyone know what this piece is in the red circle? In order to replace the old manifold, it looks like I'll need to make the cut on the right side of this T-coupling, which means I'll lose this metal piece. Do I need to get a replacement or can I just have a straight piece of PVC extending from the valve to the manifold?

    Thanks


  • 5 years ago

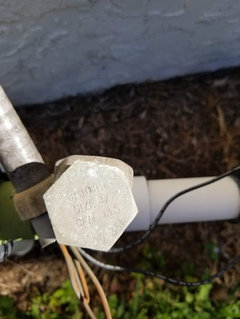
    If you search 'Watts 36A' as seen on the top, it is a Watts vacuum relief valve. Its purpose is to prevent the water supply on the right from ever sucking water from the yard sprinklers back into the water system; these valves are usually a code requirement to prevent cross-contamination of the water supply. If you have to cut it out, just save the piece with the Watts vale, unscrew it from the old fitting, and then reinstall a similar tee with a threaded bushing in your new plumbing and screw the vacuum relief valve back in.

  • 5 years ago

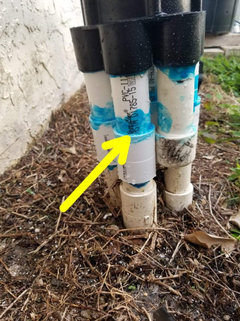
    So I replaced the index valve, let it dry, turned it on, and one of the outlets sprung a leak. I had difficulty with these 5 outlet pipes since there was limited working space and they weren't straight at all, so I had to twist and maneuver when gluing them, which is why I think it didn't bond perfectly. This also caused the glue to get pretty messy, hence why there's a lot of excess above the coupling.


    Anyways, is there any kind of quick fix to stop the leak at the coupling or do I need to take out the whole pipe and redo it? The arrow is pointing to the leak.


  • 5 years ago
    last modified: 5 years ago

    Yeah, it can be a real pain to get them all lined-up to go together smoothly. You'll need to take it apart and re-prep and re-glue it.

  • 4 years ago

    Hello, my system got the same your system but my timer was broken. Is it possible that I can install the digital timer for this system?


Sponsored
River Mill Construction
Average rating: 5 out of 5 stars2 Reviews
Delaware County's Customer Focused General Contractor