Software
Houzz Logo Print
jaycie14

Accidentally topped my FLF. What now?

5 years ago
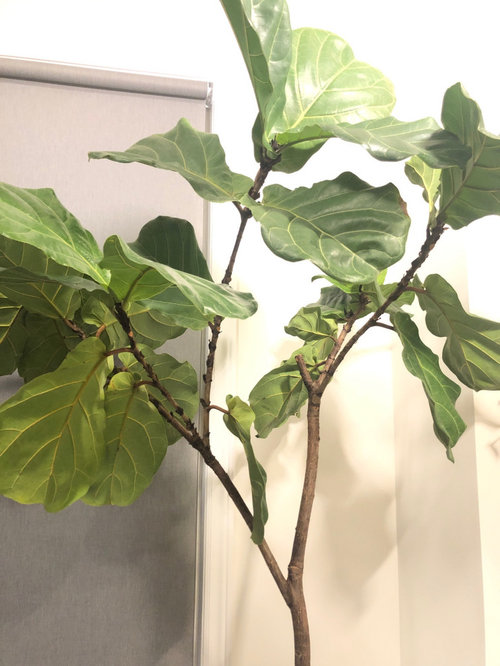
I decided to prune my FLF without enough research late last summer, and have just realized I’ve topped it. I pruned the branch expecting it to back bud but I guess I went too far. What happens now?

I’m definitely going to further prune the rest of the branches this summer to get things back in bounds into the lollipop shape but not sure if I should leave what’s now the tallest branch alone, or if there’s anything else I should be doing.

Thanks.

Comments (11)

  • 5 years ago

    I think you are OK. I would have taken that branch growing inwards. It is unlikely to grow any new buds now. The two branches growing to the right of the stub will dominate and grow. Any branch left behind that is above the cut will always dominate for ficus. If you want a ficus to bud back and branch you should leave one viable leaf axil with a bud (may be hidden or not obvious) with the leaf.

    How does the whole plant look like. What is that you like to achieve?

  • 5 years ago

    So I can still back bud a leading branch as long as I keep it longer than the rest?

    Currently spends a bit wide. Would love for the middle to be fuller first and then build up to the ideal shape like in the IG photo.

  • 5 years ago

    Ficus will respond to pruning far better in Summer. Right now with low light conditions it is far from ideal conditions. I have many kinds of Ficuses (no FLF) that take out around May and get them accustomed to the outside. By mid-to-late June they are ready for severe pruning. If you want good branching structure then you prune most of the branches to one or two leaves. Making sure that the leading bud is pointing outwards. This bud will grow out first and if you are lucky the bud below it will also start growing. After that you will use pinching method. Let each branch grow 2-3 leaves and then pinch the leading bud. That will induce more branching.

    Your plant does not look too bad to me. The one in the stock photo was grown in a greenhouse and then situated in the location for a photo-op. It will start being lanky if it is left in that spot.

    You may want to spend some time studying this post by our resident expert on Ficus:

    https://www.gardenweb.com/discussions/1476078/ficus-trees-in-containers-iv

    It is a long post and lots of details on handling a ficus tree properly.

  • 5 years ago

    Thanks! How do I make sure a leading bud points outwards?

  • 5 years ago

    Bud is hidden in the leaf axil. So if the topmost leaf left after pruning points outwards then the next branch will grow outwards. I believe there are pictures illustrating these things in the link I posted. If you are still not sure I will try to dig out some.

  • 5 years ago

    I see now, thank you!

  • 5 years ago


    If you look at a ficus branch like you're sighting down a rifle barrel, you'll notice the consecutive leaf locations roughly in a spiral, attached to the branch so each leaf is approx 90* to the last leaf, then repeat. IOW - you might have the first leaf growing up, the next right, the next down, and the next left; then, the pattern repeats but not necessarily in the same order. In the image below, we see the top leaf is attached at the back of the branch, the next leaf just below the pruning cut faces right, and the lower leaf faces left.

    The pruning cut shown will produce a higher order branch to serve as a new branch leader, which will grow to the right if not acted upon by phototropism, the tendency to grow toward the brightest light source. If it would be advantageous to the way you want the tree to look that the new leader grew to the left instead f the right, the pruning cut should be just above the lower leaf. Pruning above the top leaf would produce a branch growing away from the viewer, and the unseen leaf below the lowest leaf shown in the image would almost certainly be growing toward the viewer. Choosing where you prune a branch to ensure the new leader will at least try to grow in the direction you prefer is called 'directional pruning'. There are several additional leaf arrangements. See short video if interested:


    Al

  • 5 years ago

    Thanks, Al. I’m also planning on repotting before pruning in June. Can I do everything at once or should I repot first, let it recover, and then prune?

  • 5 years ago

    Where do you live?

    Al

  • 5 years ago

    Ontario, Canada.

  • 5 years ago

    Lol - that sort of narrows it down to a south to north distance of about 1,700 km, but I'll assume you're somewhere in the deep south of Ontario. Correct me if wrong, please.


    I would move the tree outdoors as soon as nights are reliably above 13*C, or better, start moving the tree in and out of doors asap, but still as required to protect it from temps below 13*. Then, a couple of weeks before the summer solstice, prune the tree. We can decide on how hard based on how it responds to all the good treatment it gets between now and then. After it starts to back-bud, which will follow the pruning, do a full repot, which includes root-pruning and new fast-draining and well aerated grow medium. Then, allow it to grow unfettered by additional pruning (pinching is ok) until around the 2022 solstice. If it's really healthy, you can prune somewhere between as hard as you wish or just enough to remove all the lanky growth that will occur between fall '21 and mid-spring 21. IOW, you'll be pruning back to the previous year's tight growth. That is how to maximize ramification (branch and leaf density) so your tree stays and looks full and compact.

    Between now and then, you should be sure water is provides on an 'as needed' basis, and care it taken to avoid over-watering. Using a "tell" to "tell" you when it's time to water works great. Avoid advice to water when the top inch or two of the soil becomes dry. That advice is a recipe for over-watering as almost commercially bagged media that's readily available to the public can easily have 4-6" of 100% saturated soil at the pot's bottom when the top 2" feel dry when you insert your digital moisture sensor (your finger). Don't forget to fertilize regularly, even in the winter. That a plant might not appear to be growing, doesn't mean it stops using nutrients to keep its systems orderly. More in the short piece I wrote about using a "tell":

    Using a 'tell'

    Over-watering saps vitality and is one of the most common plant assassins, so learning to avoid it is worth the small effort. Plants make and store their own energy source – photosynthate - (sugar/glucose). Functioning roots need energy to drive their metabolic processes, and in order to get it, they use oxygen to burn (oxidize) their food. From this, we can see that terrestrial plants need plenty of air (oxygen) in the soil to drive root function. Many off-the-shelf soils hold too much water and not enough air to support the kind of root health most growers would like to see; and, a healthy root system is a prerequisite to a healthy plant.

    Watering in small sips leads to avoid over-watering leads to a residual build-up of dissolved solids (salts) in the soil from tapwater and fertilizer solutions, which limits a plant's ability to absorb water – so watering in sips simply moves us to the other horn of a dilemma. It creates another problem that requires resolution. Better, would be to simply adopt a soil that drains well enough to allow watering to beyond the saturation point, so we're flushing the soil of accumulating dissolved solids whenever we water; this, w/o the plant being forced to pay a tax in the form of reduced vitality, due to prolong periods of soil saturation. Sometimes, though, that's not a course we can immediately steer, which makes controlling how often we water a very important factor.

    In many cases, we can judge whether or not a planting needs watering by hefting the pot. This is especially true if the pot is made from light material, like plastic, but doesn't work (as) well when the pot is made from heavier material, like clay, or when the size/weight of the pot precludes grabbing it with one hand to judge its weight and gauge the need for water.

    Fingers stuck an inch or two into the soil work ok for shallow pots, but not for deep pots. Deep pots might have 3 or more inches of soil that feels totally dry, while the lower several inches of the soil is 100% saturated. Obviously, the lack of oxygen in the root zone situation can wreak havoc with root health and cause the loss of a very notable measure of your plant's potential. Inexpensive watering meters don't even measure moisture levels, they measure electrical conductivity. Clean the tip and insert it into a cup of distilled water and witness the fact it reads 'DRY'.

    One of the most reliable methods of checking a planting's need for water is using a 'tell'. You can use a bamboo skewer in a pinch, but a wooden dowel rod of about 5/16” (75-85mm) would work better. They usually come 48” (120cm) long and can usually be cut in half and serve as a pair. Sharpen all 4 ends in a pencil sharpener and slightly blunt the tip so it's about the diameter of the head on a straight pin. Push the wooden tell deep into the soil. Don't worry, it won't harm the root system. If the plant is quite root-bound, you might need to try several places until you find one where you can push it all the way to the pot's bottom. Leave it a few seconds, then withdraw it and inspect the tip for moisture. For most plantings, withhold water until the tell comes out dry or nearly so. If you see signs of wilting, adjust the interval between waterings so drought stress isn't a recurring issue.


    Al

Sponsored
CHC & Family Developments
Average rating: 5 out of 5 stars5 Reviews
Industry Leading General Contractors in Franklin County, Ohio