Software
Houzz Logo Print
webuser_250784160

Water popping "time limit"

5 years ago

Is there a "time limit" as far the latest time you should apply stain to floors after water popping? For example, can you water pop them and if you had to wait a few days before stain, is that ok?


No on will walk on them in the meantime and no cartons or floor coverings will be put on them.

Comments (68)

  • 5 years ago

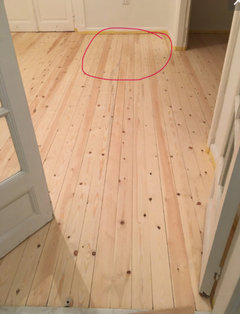
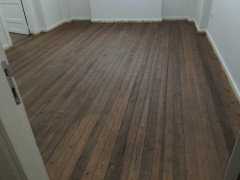
    I knew I was going to see the chatter marks and I felt the sanding job had not been done well, even though we tried to do one last sanding by hand in the end, I knew the problems would still show up. I wanted to get it done anyway knowing it's not gonna be perfect. BUT, I'm wondering if this is beyond that, ok not perfect, but maybe this is so so bad....that I should literally paint my floors white and be one this whole thing.


  • PRO
    5 years ago

    The color looks good from the standing position. At this point, I would just finish the staining and apply a satin finish. The satin finish will help hide the imperfection. I would not paint the floors.

    C A thanked G & S Floor Service
  • 5 years ago

    ok great. I have two more rooms to do tomorrow. I got a satin finish, but oil based. I do'nt mind an amber look to the floors, I like it on stained wood but not on raw wood, so it's fine with me to go "orange". But I didn't know my stain was gonna come out this dark. You think the oil based poly on dark floors is gonna give me a bit of an orange zebra?


  • PRO
    5 years ago
    last modified: 5 years ago

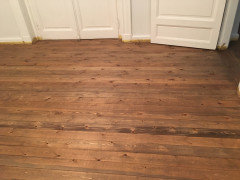
    The stripes existed, before the stain was applied. You can see here in your photo.

    Once you move in, it won't be that noticeable.


    C A thanked G & S Floor Service
  • 5 years ago

    I agree completely with G & S Floor Service as well. It looks good and a hell of a lot better than it would painted. Move in and enjoy it!

  • 5 years ago

    Thank you all! I feel a lot better about it. And definitely it looks a lot better after the stain dried. I’m glad to get your feedback.


  • 5 years ago

    will this look better after the poly? right now to me I'm mixed feelings. sometimes I'm ok with it, sometimes not. the color looks like "burned wood" I don't know if that has to do with the flatness of a stained wood that has no poly on it....I'm thinking I need to add tint to the poly just to have a sort of glaze over this and make things feel a bit more uniform?


  • 5 years ago

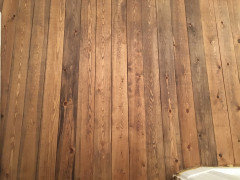
    actually i think it's really bad once I open the window and let the light in. Not sure this is livable. I do like darker orange colored wood, but this is off. It's really orangey in spots and dark almost black in others. I think with the finish it's gonna look more "halloween" like.


  • PRO
    5 years ago

    The gray haze is throwing you off., which is normal. That goes away once, poly is applied. You are doing good, keep going.

    C A thanked G & S Floor Service
  • 5 years ago

    Good to know! I hope it looks a lot better with the finish

  • 5 years ago

    this room looks the worst. but I just finished it. is it because it has to dry still? looks terrible.


  • 5 years ago

    You've done a great job with a difficult wood. I don't think many pro's would have done a better job. You are in league with the 'good guys'.


    The last pic looks different because (I'm guessing here) of the ?artificial lighting? You have a few pics that look IDENTICAL to this photo (and you can see the quality of light is different). And then you have a few photos of natural lighting (ie. the video) where it looks brown.


    To me, there is no difference between the last photo and the first ones with the brighter looking stain. It is just part of the process. Trust the process.

    C A thanked SJ McCarthy
  • 5 years ago

    That's a big compliment, thanks. I do'nt feel I did a good job haha. I never wanted to go at this DIY, but here I am. I'm kind of not sure if the color is coming across in the photos well. In this video it shows it. Sometimes my phone camera dulls the color, but when the orange flares up, that's the right color (again to be clear, I like a warm orange brown, but not halloween or burned orange colors). I liked it so much on the sample. I do'nt understand why on my floors it turned into a nastier orange shade than my samples and with lots of black here and there on boards.


    Is it best to poly it and let it be? will that really adjust the issues? Or can I tint poly and somehow help it be better?


  • PRO
    5 years ago

    Looks good , poly it

    C A thanked G & S Floor Service
  • 5 years ago

    Hi all. I started the poly process. I did one coat today. Is it normal it looks kind of patchy and feels rough in some parts? It's strange. Is that cause of the water popping? Will it be better after I sand and get to the second and the third coats?

  • PRO
    5 years ago

    It is normal for the first coat to look horrendous: rough and uneven. It's worst for soft wood. It improves after the first coat.

    C A thanked G & S Floor Service
  • 5 years ago

    As G&S has stated. Things get prettier as you go.

    C A thanked SJ McCarthy
  • 5 years ago
    last modified: 5 years ago

    Do i still need to sand after this first coat? it looks so rough, i cant imagine why it would need sanding. i feel like the next coat would stick to the roughness. but it has dried more than 12 hours.

  • PRO
    5 years ago
    last modified: 5 years ago

    Yes, you need to sand for a smoother look and feel. If, you do not care for a smooth look and feel, then skip the sanding and apply the poly if the manufacturer allows it.

  • 5 years ago

    It’s ok to use normal 220 sandpaper for that? Or does it have to be a special one for screening (we don’t have those where I am)

  • PRO
    5 years ago

    Any 220 grit abrasive will work.

  • 5 years ago

    Some spots stayed white after sanding and cleaning. and sanding the top coat rehighlighted the chatter marks. i guess to be expected?


  • PRO
    5 years ago

    Those are high spots. It's normal to see, when flooring is not flat. Are you abrading the low spots? How are you abrading surface - tool?

  • 5 years ago

    a worker did it with sandpaper 220 grit attached to a sanding block. the whole floor was white. so i guess he sanded everyhing. but after i vacuumed, i noticed some areas were still white after i cleaned

  • PRO
    5 years ago

    Sanding block is probably too hard. pad it up with a soft pad: red, white or maroon pad. make sure there are no missed spots. white dust is s good sign, means your poly coat is dried enough for sanding.

  • 5 years ago

    Dont think we have pads here. can he just sand with the sandpaper in hand as is?


    should i have it sanded again before the next coat? or you think its fine? the whole floor seems to be smoothed out to me after he sanded. but now im worried about him having done it with the sanding block. i dont want an adhesion problem

  • PRO
    5 years ago
    last modified: 5 years ago

    Get a foam mop, spray adhesive and 220 grit sandpaper sheets. cut the sheets to fit the mop head. use a the spray adhesive to attach the paper to it. you now have a soft sanding pole.


    becareful not to sand through the high spots. you do not want to remove any color.

  • 5 years ago

    is it imperative that I sand it again? Even though he used a sanding block, the whole floor seems smooth now. Will I have a problem if I do'nt sand it again after he worked with the block?

  • PRO
    5 years ago

    Walk around touch up any spots that did not get abraded.

  • 5 years ago

    Its throughout the whole floors—those chatter waves. seems overwhelming to find the spots, can only see them well too when the light is less. so we would just have to abrade the while thing again and i worry about the high parts getting oversanded then.


    will i have problems with the next coat sticking if i dont revise this sanding we did? we can sand better after the next coat/before the third coat.

  • PRO
    5 years ago

    You risk adhesion issues

  • 5 years ago

    Thanks. He did not sand too hard this first round. so I will have him sand the whole thing again but without the block. I hope we don't risk removing too much from the high areas.

  • 5 years ago

    He did say he got it all, it's the just the high areas got sanded a bit more than the low parts when it comes to chatter marks. We also hand sanded the floors with blocks as the final sanding of the raw wood before I water popped---we did the same, just sanding blocks.

  • 5 years ago

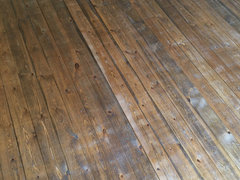
    Minwax customer support is useless. I email them questions about my issues and they write one line answers and never really address the real question. They say the chatter marks that got highlight from sanding the poly will show through the next coat....but I already have chatter marks on my floors and I know I will see them forever, at this point I'm not trying to fix that. I just want to know if I'm going to have an adhesion problem because we handed sanded the poly a week ago and waited too long before the second coat and I need to know if I need to sand it again with the paper in my hand rather than on a block to try and scratch the low parts of the chatter? I'm lost.

    That's the floor AFTER sanding the first coat poly and AFTER cleaning with vacuum. I see some white spots still

  • PRO
    5 years ago

    The finish will seal up after a few days. You cannot abrade the floor a week ahead of time. You need to redo it.

  • 5 years ago

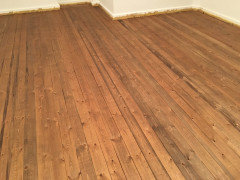
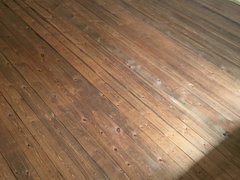
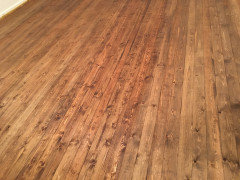
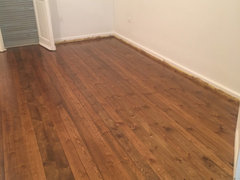
    I just wanted to leave this photo here on this post for any other DIYers searching the internet. In the end, the ugly reddish aura that happened after staining the floors is gone after the 3 coats of poly. I got the warm orange brown of the Early American stain that I wanted and it was enriched by water popping. So do'nt be afraid if you stain your floors a warm color like Early American/English Chestnut and before the poly it looks strangely reddish or burned orange in a bad way. It gets better after the finishing. (ignore the bad painter's tape on the base boards)


  • 5 years ago

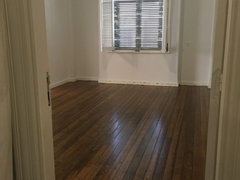
    Another photo, but the lighting is more low in this room. Really shows the brownish color.


  • 5 years ago

    Looks good. Well done even more so considering all your constraints.

    C A thanked millworkman
  • PRO
    5 years ago

    Look great, great job!

    C A thanked G & S Floor Service
  • 5 years ago

    Thank you all for your help! I'm a professional singer, not at all into anything construction or DIY and will never do it again. You all helped me so much. If you look closely in person you will see my mistakes on the floors HAHA, but overall I'm satisfied. It's going to be a vacation airbnb rental in Cairo, Egypt, if you ever want to come stay, drop a message and I will send a discount. :-)

  • 5 years ago

    The second photo REALLY shows off the 'tobacco leaf brown' that you were hoping for! I'm SO GLAD you were able to get what you were looking for!


    You've done some amazing work in an area of the world that can be frustrating to live/work in. I think you should be VERY proud of yourself. You've learned a lot about yourself and your abilities. Way to go!


    I would like to give a BIG shout out to @G & S Floor Service for all his advice. I'm super impressed with everyone's input. I guess it really does take a village to refinish a floor!


    Congratulations!

    Stephanie

    C A thanked SJ McCarthy
  • 5 years ago

    Yes! im quite happy with it and you all were so helpful. and special shout out to @G & S Floor Service for all the generous input! :-)

  • 5 years ago

    Also I wanted to add that I ditched the synthetic pad applicator. I never found a short nap roller where I live. So I did all of this with a brush in hand, every coat on 1109 square feet! Never again, haha haha. And I now really respect the professionals that do this work.

  • 5 years ago

    I hope this is my last question about my floors, but I wanted to ask something.


    Now that it's done and I've opened my windows again, the sunlight is showing me my issues. Two of the four rooms look great (except some issues on the boards where I was exiting).


    The other two, I definitely did'nt do well with my brushing overall and left lap marks. I do'nt care about perfect aesthetics at this point, I can't care about that as I'm not a professional. But are those laps detrimental to my floors?


    Cause it some spots where I notice the topcoat being thin, those parts feel a bit rough.


    Because there is no furntiure moved in yet, this is the last chance were I to adjust anything. Is it advised we sand this last topcoat and I put ANOTHER coat on? (that would be coat number 4 in those two rooms) Or aside from the funny look of the lap lines, are my floors protected enough and can I let it go?

  • PRO
    5 years ago

    Spot fix by abrading and recoat.

  • 5 years ago

    @G & S Floor Service I do'nt have to recoat the whole floor? Just the certain planks that are worse than the others? Or not the whole plank of the wood--just the little spots I see that are wrong?

  • PRO
    5 years ago

    Just the problem areas. Feather in the finish, do not lay a blob.

  • 5 years ago

    The trouble is there are many of those spots all through the floors in two of the rooms. It seems I would have to recoat the whole thing, but I hate the idea of now 4 coats of poly on top.


    Is it bad if I just leave it as is? The low spots could also be cause my first coat I didn't do as good a job at getting everything properly covered. After that, I got more of a hang of it, but it seems if it already started a bit patchy, it will continue to be patchy, right?


    Is it protected enough even with those spots? I'm looking forward to walking on them and aging them anyway.


  • PRO
    5 years ago

    You have three coats, youre protected. furnitures will cover up most of the flaws. if if, it bothers you, go ahead and recoat.

  • 5 years ago

    Ok. its not the prettiest but as long it is protected, im good with it. the patchy spots are rough to the touch but it is not bare wood. its the previous sanded coat showing through (although i only sanded the first coat on these rooms as second and third did not have more than 12 hours drying time, so i recoated per manufacturer's instructions) i just dont want anyyhing to damage those rough spots.