Software
Houzz Logo Print
teddie2

Tiling Pros I need your help!

5 years ago

Hoping the pros coul[d help with the question above.

How to best to lay out 8 by 24 tiles on a 31 inch wall??

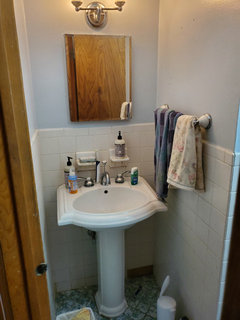
This is a photo of the space.. before.. This was all ripped out. There will be another pedestal sink (which was not planned but another story) and so now I need to tile behind (another story) and it has been suggested I use the tiles in my shower for continuity. Should I go horizontal and center the first tile then have a 3 inch piece on each side? Should I stagger them like you would a subway tile? Should I do them vertically ? Any help on how you would approach this wall appreciated. I do plan to do the whole wall behind the sink and not the sides.

Comments (20)

  • 5 years ago


  • 5 years ago

    The best way is to hire the experienced pro.

  • 5 years ago

    For a smaller space I’d go with a classic subway and do something cool for the floor. Maybe even plain white herringbone patterned floor.

    teddie2 thanked HU-187528210
  • 5 years ago

    I have an experienced tile installer hes just not a designer.. So much depends on what would look best. I have the tiles already as left over from my shower which has already been installed floor is already in basketweave very pretty.which matches my shower tiles.. all design pros said put the shower tiles on this wall.. so.. My question is how to pattern the 8 by 24 tiles on this 30 inch wall.. what would look best.. Thanks

  • PRO
    5 years ago

    What about placing them vertically?

    teddie2 thanked Lehigh River Kitchens
  • 5 years ago

    I would go with the same layout from the shower.

    teddie2 thanked Rachel Lee
  • 5 years ago

    That would be stacked. One center tile and have 3 inch slivers on either side?

  • 5 years ago

    I coukd place them vertically yes it would give a very long look and more It's a narrow alcove and more grout lines. I guess what I am asking is what would look best there. I have a hard time with imaging.

  • 5 years ago
    last modified: 5 years ago

    Not really. But maybe I can have my guy cut them down but to what size? They would still be 8 but maybe 8 by 8 make them square? Or 8 by 16?

  • 5 years ago

    Actually just read it's good to use large tiles in a small space

    https://www.roccia.com/inspiration/large-format-tiles-for-small-spaces/

  • 5 years ago

    What if I have my installer cut them down to 20 and 10 or all 10 that would be three across evenly if laid horizontal.

  • 5 years ago

    If you already used these tiles in your shower, what pattern did you use there? That pattern might want to be your starting point, especially if the two spaces are visually related.


    If you don't want to replicate the shower pattern, you and your installer should be aware of possible installation limitations regarding offset. Some manufacturers recommend a maximum 25% or 33% offset with large format due to lippage issues. With a 24" tile that would be 6" or 8". That limitation is simply to minimize potential lippage. I've had people acknowledge the lippage and request 50% offsets, because they liked the look.


    Also be aware that too many tile cuts may result in cut tile edges being abutted to factory edges within the field. Depends on the type of tile and the profile of the factory edge, but sometimes those tiles edges at the grout joints can be normalized, some times they simply stand out as looking a bit odd. They may distract from, rather than enhance, the layout. Your installer should be able to give you guidance based on the tile's factory edges and what he has in his tool box to make things match.


    All things being equal, I'd prefer to avoid the 3/24/3 layout. If it's something you truly want, go for it. But as an installer I'd try to move you away from it.


    If you can accept a 6" offset, the following pattern gives you (theoretically) zero waste and you'll have factory edges meeting in the field. The cut edges will be buried in the corners.


    6/24

    12/18

    18/12

    24/6

    6/24

    12/18

    18/12

    24/6


    Regardless, good luck with your installation.

    teddie2 thanked MongoCT
  • 5 years ago

    That was extremely helpful thank you!

  • 5 years ago
    last modified: 5 years ago

    To add: You could have your installer cut them down to 10s and go 10/10/10. Just make sure the 10" wide by 8" tall tiles don't look to square to you...out of proportion with the space. Too blocky. Don't read that as me saying they ARE too blocky.

    Someone else recommended drawing the pattern out on graph paper. It's a great idea. If your wall is 3' wide by 8' tall, take an 8-1/2" x 11" piece of paper and rotate it landscape. Draw out three 3" wide x 8" tall rectangles. Not draw in your tile patterns to scale, 1" of paper equals 1' of tile.

    When comparing one to another, you can take in a holistic look and view the entire page at once. But when looking critically, cover the "others" so you are only looking at one pattern at a time. One pattern will stand out to you. You can then discuss that pattern with your installer regarding tile waste, cut edges, etc. How well he can execute that pattern with the tile on hand.

    With it being a sink wall, a portion of the lower part of the wall will be covered by a sink. The upper likely by a mirror and a couple of sconces. Take that into consideration. You can even make small paper cutouts to represent the shapes of the sink and mirror and place them over your drawn out patterns.

    Cutting tiles? FWIW (and that's not much), years ago when Kerdi was somewhat new, I posted a Kerdi Shower tutorial. The shower was 5' by 8'. There is not a single uncut tile in that shower. So sometimes you simply do what you have to do with the tile on hand to get a pattern or layout that pleases the homeowner. Fibonacci and the golden rectangle can be your friend. Or your enemy!

    Again, good luck!

  • 5 years ago

    Lol!

    Just to be clear that list earlier is you suggestion as to a possible layout top to bottom?

  • 5 years ago
    last modified: 5 years ago

    Yes. Use the cutoff from the first course to start the second course. I do have to admit I saw your 10/10/10 and thought you were filling a 30" space. If it's actually 31", it may not work. You could still massage the layout for minimal waste. With the following you'd have a 3" waste piece every three courses.

    10/21

    17/14

    24/7

    10/21

    17/14

    24/7

    Yes, start at the bottom with a 24/7 and work up the wall.

    Nothing is hard and fast. Just offering options. Depends on what pleases your eye.

    Best, Mongo

  • 5 years ago

    Sounds like a good idea will draw it out as scottie mom suggested

    Thanks again!

  • 5 years ago

    I’m so glad you’re getting Mongo’s help with this! It would be labor intensive, but you could also use paper cut into corresponding sizes and try taping them in place to see what pleases you Good luck!

    teddie2 thanked olychick
  • 5 years ago

    Olychick Thank you I thought the very same thing! I uses to be good at paper dolls lol

    I can move them around to see the best design. It

    Will take some work but be worthwhile

    Mongo was very helpful! My contractor os good technically and does have some good ideas but he really is not a design guy.