Software
Houzz Logo Print
aboyer

Shower floor tile

4 years ago
last modified: 4 years ago
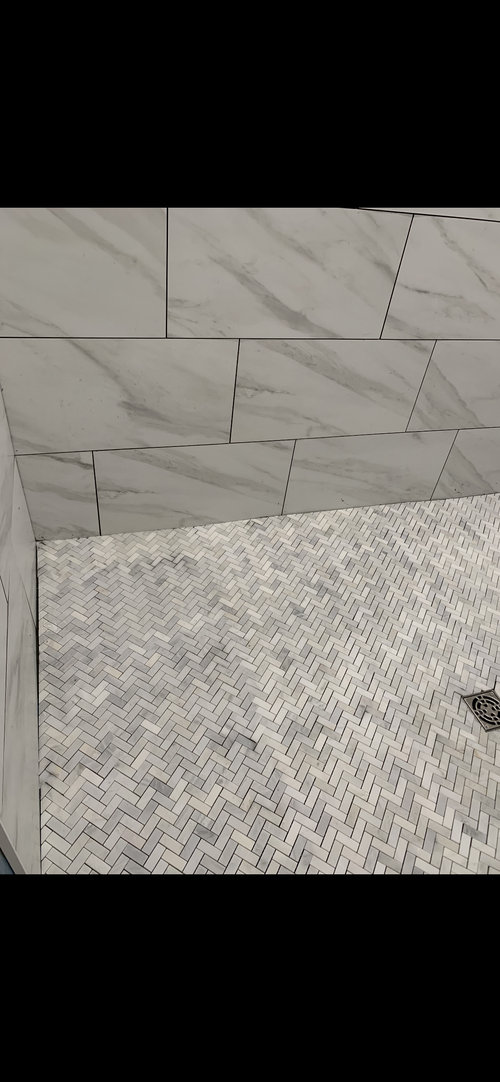
Is this tile floor acceptable? I see large gaps and uneven floor!


Comments (15)

  • PRO
    4 years ago

    The mosaic looks ok (on a phone) but that gap looks huge.

  • 4 years ago

    Maybe it is the tile or the picture but it looks to me that the floor is wavy with a dip in the corner to the left. If so, water is going to pool there and not get to the drain. And since you've got marble tile then it will be permanently discoloured and wet. Not a look you will be happy with.

    Do you have a level? Or does anyone working there have one? The entire shower floor should be sloped slightly towards the middle drain. If it isn't, you're going to have problems.

    I love the herringbone floor by the way but I agree that gap on the left side between floor and wall tile is a big gap. It is going to take a lot of caulking to fill that and if that corner is a low spot, you can almost count on mildew starting there too.


    Good luck. I hope things work out but ask questions and stand firm if things aren't looking or feeling right.


  • PRO
    4 years ago
    last modified: 4 years ago
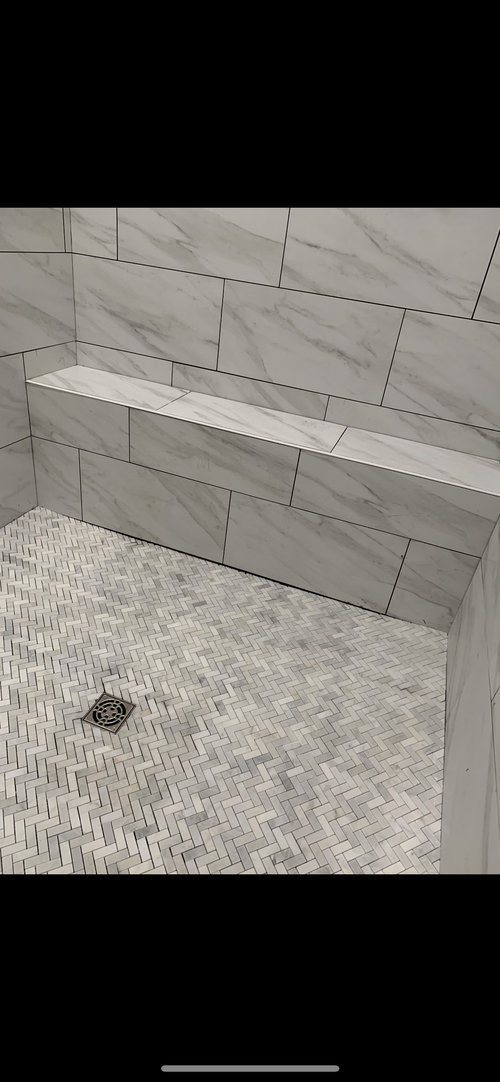
    We usually start with wall tile 2nd row, after wall tile is done, we do the floor tile next and the 1st-row of wall tile last so the wall tile is on top of the floor.

    The way they did your tiles most likely you will have issues down the line, in addition, they should have prepped the walls, etc before tile installation.

  • PRO
    4 years ago

    The layout is off as well, there is certainly different levels of skill in this game almost always reflected in pricepoint and wait times. If there is a builder involved or A GC that hired the sub/tiler you can push on them..... if youve hired this Handyman yourself id just hope you had plumbing inspections, a flood test and have a written long term wrrty.

  • 4 years ago

    Thank you for the feedback. Can you tell me more about the issue with the layout layout? I do have a GC. How do I prove that this is subpar?

  • 4 years ago
    last modified: 4 years ago

    The gap between the bottom row of tiles on the bench and the floor tile makes me worry that there is a swale in the shower floor. Also in the first picture it looks like the left hand side of the floor is pitched away from the drain. If the floor is pitched correctly to the drain then the small mosaic tiles should lay flat. Is the floor a pre-made foam one or a mud one? Put a level on the floor and see if it pitches to the drain in all places

  • PRO
    4 years ago

    Use a level or straightedge to see if the floor is flat in rays radiating out from the center drain. Should be level around the perimeter.

  • PRO
    4 years ago

    Like @Jeff Meeks said, you'll want to check that everything is pitched correctly. The darker coloration on the tile in the low spots says to me otherwise...

  • PRO
    4 years ago

    I do shower tile as GN stated and for sure that gap on the left will give you no end of greif down the road . Did the GC do the tile or did they have an actual tile setter ?I would aslo be curious to know eaxctly what they did for watrproofing.

  • 4 years ago

    Tile guy did the install. The tile will need to go for sure. I just need to be sure that i I understand enough to stand my ground.

  • 4 years ago

    The tile might just be the superficial problem. The shower floor needs to be correctly constructed ie flat around the perimeter, everywhere pitched towards the drain and properly waterproofed.

  • PRO
    4 years ago

    Judging by the square drain grate odds are a preformed foam tray was cut down to size revealing the concave dip in the center. Unacceptable from a Tile Setters point of view. Don't care if the product manufacturer states just cut it to fit. The perimeter should be level as stated by others previously.

  • 4 years ago

    Agreed the tile is definitely the least of my worries! It was a mud bed that was built not pre constructed.

  • 4 years ago
    last modified: 4 years ago

    agree to what was said above.

    the wall tile should go on top of the floor tile so that you won't see jagged cuts or uneven edges. looks like he did the floor last? or cut it too short.


    Let me also touch on tile layout. math was not his thing??

    Arrow- Sliver-cut tiles in the corners are my pet peeve. It means he couldn't be bothered to do a dry layout and determine where to start so that you don't get tiny tile cuts.


    The other thing is in the circles. Here it's a 1/4 offset, while everywhere else it looks like a 1/3rd. see the lines in relation to the tiles on the seat? see how close they are? everywhere else it's a 1/3 distance.

    Right above the bench, the super thin cut tiles, the one on the left is short than the one on the right. You have full tiles above those, and it just doesn't look right. again, poor layout.

    I would have tried for a full tile to be even w/the bench so you don't have the small cut piece where the arrow is.


    He cut the 2nd row of tiles below the bench seat anyway, so why didn't he do that w/the first row and allow full tiles all above and around the bench? Poor layout and lazy design.


    Actually, your seat should be a solid piece of marble or quartz. I would never do tile on a seat bench.

    Can you stand back and take a full-frame picture showing the entire shower?


    do you know how the bench was designed? if something is going to get water damage, it's usually the bench. any pictures? how it was waterproofed?

    let me also say, no grout in these joints where there is a change of plane. It should be 100% silicone caulk in your grout color


    example of the places where caulk should go, and not grout. vertical corners, around the bench (which should be slanted downward, btw) and the area between floor and wall.

    make sure you ask about this and demand it done correctly.

    Amanda B thanked Beth H. :
  • PRO
    4 years ago

    Seeing it was a mud bed there is no excuse.